
Introduction
The growth and development of the adult dentition is a sequential process that can be a cause for increased self-consciousness in some children. Children are well aware of when they exfoliate their first baby tooth, and are often critical of their appearance and that of their peers during the time they exhibit mixed dentition. Unfortunately, occasional developmental anomalies or traumatic injuries to individual teeth can disrupt the overall aesthetic of a developing smile.
It is well documented that the maxillary central incisors serve as the focal point and esthetic cornerstones for a beautiful smile. Predictable, conservative, and natural restoration of a deformed or damaged tooth is a challenge for any aesthetic minded practicing dentist. Many factors contribute to the appropriate design and material choice for the restoration of an anterior tooth. The dental age, occlusion, habits, and esthetic desires of the patient are three paramount considerations any dentist must take into account when selecting restorative materials and methods. 1,2 Lab fabricated restorations and chairside direct restorations have different advantages and disadvantages that should be considered in treatment planning. 1,2
When treating a young patient in mixed dentition, future flexibility and planning for the changes of maturation should dictate treatment options. Direct resin is one of the most common materials used in restoring damaged anterior teeth. It provides the dentist with the ability to restore the tooth immediately, in the most conservative fashion possible, and can be modified in the future as the patient matures. Fabricating a conservative direct resin restoration during developing dentition can allow for more varied future treatment options once the hard and soft tissues have reached maturity. Restorative resin can be matched with the natural tooth for shade determination and then can be used to restore the tooth to a very natural appearance. Resin can also be layered in such a way that the physical differences in the resin layers can match the physical differences in the layers of natural tooth structure providing a natural result. 3,4,5 The dentist can evaluate changes to shape and contour as he or she is rebuilding the tooth and make any subtle changes needed to provide a pleasing result. 2
Case Study
History–Medical and Dental
A 10-year-old female presented with her parents for a restorative consultation for her right central incisor. She was in excellent overall health, exhibiting normal growth and development, except for her maxillary right central incisor (#8) (Fig. 1). She and her parents expressed a chief complaint with the appearance of the incisor that had a visibly deformed crown (Fig. 2). Her parents indicated that she has been seeing a pediatric dentist for dental prophylaxis twice a month, and has seen an orthodontist for an early consultation.
Radiographic evaluation revealed that the extent of the deformed central incisor was not limited to the crown of the tooth, but involved the root structure, as well (Fig. 3). Pulp vitality tests using an electric pulp tester and ice were performed and the nerve of #8 responded within normal limits. Occlusion was also evaluated to rule out any possible traumatic interferences. 1
Clinical examination revealed a Class I molar relationship with a slight deep bite. Asymmetric gingival display between teeth #8 and #9 was noted. The patient exhibited no symptoms of any temporomandibular disorder and appeared asymptomatic during a TMJ evaluation. Future orthodontic options to expand the arches, address tooth positioning, and level the occlusal plane were discussed; and the patient’s parents indicated that the orthodontist advised that future treatment would likely be indicated.
The patient’s parents also indicated that she was very self-conscious about the appearance of her maxillary right front tooth. They stated that she tried to hide her smile, and had experienced some degree of being “picked on” by her peers at school. Her parents confided that they were worried that the appearance of her small central incisor might be affecting her social development.
Fig. 1
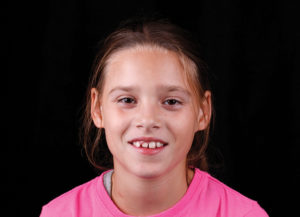
Fig. 2

Fig. 3

Treatment Plan
Following discussion of restorative options for tooth #8, the patient’s parents elected to pursue gingival recontouring and treatment with direct composite resin. Her parents were impressed by the idea of having his tooth restored in a single visit. They were very interested in having the most conservative treatment option due to the fact that she had not reached developmental maturity, and changes with growth would dictate additional restorative treatment in the future. Proper care for the resin restoration on tooth #8 was discussed, and the importance of optimal maintenance including regular cleanings and examinations was stressed.
Alginate impressions of both arches were made with occlusal records and stone study models were mounted in a semi-adjustable articulator (Fig. 4). Tooth #8 was waxed to full contour on the study model to provide a symmetrical appearance with #9 (Fig. 5). A putty polyvinyl siloxane (Genie PVS Putty, Fast Set; Sultan Dental Products) stent was then formed to fabricate a lingual and incisal matrix for the restoration of #8. 3,6
Fig. 4

Fig. 5

Description of Treatment
A small size Optragate (Ivoclar Vivadent) was placed in the patient’s mouth for comfort and isolation while elevating the patient’s upper lip (Fig. 6). The Optragate, saliva ejector, and HVE provided adequate isolation from moisture and contamination during the restorative procedure.
The lingual and incisal matrix was tried in the patient’s mouth for fit (Fig. 7). A shade map for the resin restoration was designed using color corrected lighting and multiple tabs of the restorative composite were cured and compared to tooth #8 to verify color choices. Selected tint and composite shades were loaded into a covered composite resin keeper to provide for organized access during restoration.
Fig. 6

Fig. 7

Due to the conservative nature of this procedure, only topical anesthetic was used for this treatment. A periodontal probe was used to sound for crestal bone around #8, and to establish the design for the gingival margin (Figs. 8 & 9). An 810nm + 980nm dual-wavelength diode laser (Gemini; Ultradent) was used to remove tissue and shape the gingival margin of #8 (Figs. 10 & 11).
The surface of the tooth to be restored was cleaned with an abrasive chlorhexidine paste (Consepsis Scrub; Ultradent), rinsed, and a 35% phosphoric acid gel (Ultra-Etch; Ultradent) was then applied to the facial, incisal, and lingual areas of #8 to serve as the restorative interface and agitated for a duration of 20 seconds (Fig. 12). The acid etchant was then removed by rinsing with copious amounts of water and excess moisture was removed with a short blast of air. Direct lighting was removed while a single-component, total etch adhesive (ExciTE F; Ivoclar Vivadent) was applied to the etched tooth structure (Fig. 13). The adhesive primer was evaporated while the bonding agent was thinned with oil free air, and then cured for 20 seconds (Fig. 14). The incisal matrix was seated in place filled with a thin layer of nanofilled milky-white, semi-translucent resin (WE Filtek Supreme Ultra; 3M) in the area of the defect to be restored (Fig. 15). The WE layer was adapted to the etched edge of the defect on #8 with a gold tipped composite instrument and cured for 20 seconds (Fig. 16). This layer serves to provide for a wear resistant lingual and incisal area as well as a halo effect to enhance the incisal appearance of #8 and mirror #9. 3,6
Fig. 8

Fig. 9

Fig. 10

Fig. 11

Fig. 12

Fig. 13

Fig. 14

Fig. 15

Fig. 16

The matrix was removed and an artificial dentin layer with anatomic internal lobes was formed using an A2D nanofilled composite (Filtek Supreme Ultra; 3M) and cured for 20 seconds. 3,6 A thin A1B (Filtek Supreme Ultra; 3M) body layer was added short of full contour and cured for 20 seconds to continue to build appropriate opacity to the artificial tooth structure (Fig. 17). A thin, gold coated composite instrument (ICPL; Cosmedent) was used with a very careful and delicate touch to adapt an A1E (Filtek Supreme Ultra; 3M) body enamel layer to full contour around the gingival margin to avoid irritating the laser-modified gingival tissue (Fig. 18). An artist’s brush (#3 brush; Cosmedent) was used to accentuate the lobes and the mesial and distal interproximal areas. 3,6 A 20 second cure was performed. The A1E layer was left just short of full contour from the gingival margin. This layer was used to provide the basic contour of the tooth prior to application of the tints to add effects within the enamel. 3,6 A small amount of honey yellow tint (Creative Color; Cosmedent) was applied to the gingival 1/3 of the tooth and cured for 20 seconds. A white tint was delicately applied to the facial of the tooth in striations with an artist’s brush (#1 brush; Cosmedent) to mimic the characterization of #9 (Fig. 19). Following a 20 second cure a 0.5mm layer of clear enamel nanofilled composite (CT Filtek Supreme Ultra; 3M) was used to cover the entire length of the preparation and establish full contour of the restored tooth 3,6 (Fig. 20). This layer was smoothed and shaped with an artist’s brush to provide an even surface and minimize the incorporation of any air pockets. 3 A final cure was applied for 60 seconds.
The incisal edge was leveled with #9 and gross contoured using a coarse abrasive disc (Mini FlexiDisc; Cosmedent) (Fig. 21). The labial and lingual surfaces were then gross contoured a using a coarse grit flame diamond (Brasseler), a medium grit disc (Mini FlexiDisc; Cosmedent), and diamond finishing burs (Brasseler) 3,6 (Figs. 22 & 23). Interproximal areas were contoured with finishing strips (Epitex; GC America). 3,6 Labial texture was accentuated with a coarse flame diamond (Brasseler) using a light touch while moving back and forth in a mesial to distal direction (Fig. 24). Final polish was performed with fine and superfine abrasive discs (Mini FlexiDisc; Cosmedent) and a rotary polishing brush (FlexiBrush; Cosmedent) 4,5 (Figs. 25 & 26). The Optragate isolation was removed and proper occlusion was verified in centric occlusion and excursive motions.
Fig. 17

Fig. 18

Fig. 19

Fig. 20

Fig. 21

Fig. 22

Fig. 23

Fig. 24

Fig. 25

Fig. 26

The patient’s teeth were inspected for any excess restorative material. The occlusion was checked again and smooth interproximal areas were verified with unwaxed floss. Post-operative home care instructions were given and the patient was scheduled for a follow-up appointment in two weeks for a final check for function and esthetic evaluation.
During the final check appointment, the patient was less reserved in the way she interacted with the office staff and myself (Figs. 27 & 28). She reported that her “new tooth
felt great” and she was very happy with the appearance (Figs. 29 & 30).
Fig. 27

Fig. 28

Fig. 29

Fig. 30

Conclusion
Direct resin restorations are an excellent choice for restoring teeth during transitional dentition. Proper planning and meticulous attention to execution can provide patients with an esthetic result that is conservative, functional, and natural in appearance. OH
Oral Health welcomes this original article.
References
1. Rufenacht CR. Fundamentals of Esthetics. Quintessence Books: Chicago, IL; 1992.
2. Terry DA. Natural Aesthetics With Composite Resin. Montage Media Corporation: Mahwah, NJ; 2004.
3. Fahl Jr N. Mastering Composites [Lecture]. Presented at the Hinman Dental Meeting; Atlanta, GA, March 24, 2006.
4. Mopper KW. The Art and Science of Freehand Bonding. Cosmedent: Chicago, IL; 2003.
5. Mopper KW. Renamel Restorative System Manual. Cosmedent: Chicago, IL; 1994.
6. Baratieri LN; Araujo Jr EM; Monteiro Jr S. Composite Restorations in Anterior Teeth: Fundamentals and Possibilities. Quintessence Books: Chicago, IL; 2005.
About the Author
 Dr. W. Johnston Rowe, Jr. (“John”) maintains a private practice dedicated to excellence in general, cosmetic, and complex restorative dentistry located in Jonesboro, Arkansas. He is an Accredited Member of the American Academy of Cosmetic Dentistry(AACD) and currently serves as the AACD’s Accreditation Chairman and as a member of the American Board of Cosmetic Dentistry. He also serves as an Accreditation Examiner for the AACD. Dr. Rowe has been awarded Fellowships in the International College of Dentists and the Pierre Fauchard Academy. He is a graduate of the University of Tennessee College of Dentistry, and is a formally trained artist having graduated from Washington and Lee University with a Bachelor of Arts degree in Studio Art. Dr. Rowe enjoys sharing his passion for cosmetic dentistry materials and techniques, lecturing nationally and internationally, and can be contacted through his office at info@rowesmiles.com or 870.932.4126.
RELATED ARTICLE: Overcoming Deficiencies to Create an Aesthetic Smile: A Case Study


