
Introduction
Each year I have the honor of performing a smile makeover for the winner of the Mrs. North Carolina America and Mrs. South Carolina America beauty pageants. Each of these women go on to participate in the Mrs. America Pageant and each would like for her smile to be the best it can be for the national competition. The treatments have involved simple tooth whitening, minor tooth alignment, composite bonding, needed restorative procedures with esthetic materials, direct composite resin veneers, porcelain veneers, esthetic crowns and full mouth rehabilitation. My recommendation has always been to choose the least invasive procedure or procedures to achieve the desired result.
The Patient
Figure 1 shows Merideth Kirk, Mrs. South Carolina America 2014. As you can see, she has a beautiful smile. The close up of her smile in Figure 2 illustrates well-aligned teeth with a slight crossbite at teeth #6 and #27. Note that both maxillary canines are slightly rotated. In the retracted view in Figure 3, it is obvious that there are white decalcification areas on incisal edges of the maxillary anterior teeth. An excellent all ceramic crown was in place on tooth #7.
Clinical and radiographic examination illustrated that Merideth had superb dental health with no caries or periodontal disease. The occlusal view in Figure 4 shows the slight rotations resulting from orthodontic relapse in the maxillary arch and the occlusal view of the mandibular arch shows a bonded lingual wire retainer from canine to canine.
Merideth was interested in eliminating the white decalcifications and achieving a wider and whiter appearance of her maxillary teeth. I was very hesitant to prepare her natural teeth. She was not interested in orthodontic treatment since she would be making numerous appearances and her professional photo shoot was scheduled soon. Direct composite resin veneer placement was one conservative option that was considered. The fact that there was ceramic on tooth #7 complicated that option. While looking through my portfolio of smile makeover cases, Merideth liked the appearance of porcelain veneers. I suggested that we might be able to achieve her goals with no preparation porcelain laminates for her maxillary ten most anterior teeth. The ceramic crown on tooth #7 could be re-veneered rather than replaced. The advantage was that we could try the ceramic laminates in before placing them and decide then whether we would bond them to place or not.
Fig. 2
The patient’s smile before treatment.

Fig. 3
Retracted facial view before treatment.

Fig. 4
Maxillary incisal view before treatment.

The Process
Upper and lower full arch impressions were taken with a vinyl polysiloxane (VPS) impression material (Bonasil, DMP Dental) and an occlusal registration was made using a PVS bite registration material (Bona Bite Air, DMP Dental). The impressions were sent to the dental laboratory and they were asked to fabricate thin laminate veneers for her maxillary teeth from maxillary second premolar to second premolar. The material chosen was lithium disilicate (eMax, Ivoclar) for its excellent strength and esthetics.
The thin laminate veneers are shown in Figure 6 photographed on a mirror surface. The veneers were tried in using a drop of water as the try-in medium. In Figure 7, the veneers are shown tried in on Merideth’s right side. She immediately could see that she was going to like the appearance. The teeth looked more aligned, a little more full, lighter in color and completely eliminated the white decalcification. The decision was made to proceed with adhesive placement.
No anesthetic was needed. The natural glaze on the surface enamel and the ceramic glaze on the facial surface of the crown were lightly abraded with 50 micron aluminum oxide particles from a MicroEtcher IIA by Danville Materials (Fig. 8). The two central incisors were isolated using tofflemire matrix strips cut into small sections. Enamel etching gel (Bisco) was applied (Fig. 9) and allowed to remain for ten seconds (Fig. 10). The etching gel was rinsed for ten seconds with water from an air/water syringe (Fig. 11) and air-dried. The etched and dried enamel surface can be seen in Figure 12.
Fig. 6
Thin veneers ready to place.

Fig. 7
Right side tried in.

Fig. 8
Micro Etcher II to abrade surface glaze.
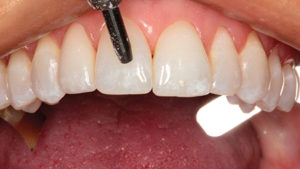
Fig. 9
Enamel etch applied to enamel surface.

Fig. 10
Enamel etch remains in place for ten seconds.

Fig. 11
Enamel etch rinsed and surface dried.

Fig. 12
Etched enamel surface

A universal bonding agent (All Bond Universal, Bisco) was applied liberally to the etched enamel surfaces (Fig. 13). Oil free air from an air/water syringe was used to thin the bonding agent and evaporate the chemical carrier (Fig. 14). The bonding agent was light cured for ten seconds using an LED curing light (Fig. 15).
Figure 16 shows application of a self-adhesive light cured resin luting agent (Fusion ZR Veneer Cement, Taub Products) to the internal pre-etched surfaces of one of the ceramic laminates. Each laminate was carefully placed on its tooth using cotton pliers and lightly seated with a placement instrument (Veneer Stabilizer, Brasseler, USA) as shown in Figure 17. The marginal excess luting agent was “tack” cured for two seconds with the LED curing light (Fig. 18). A number 12 surgical blade was used to remove the marginal excess, which easily peeled away (Fig. 19). Floss was worked into the interproximal areas to remove excess luting resin there (Fig. 20). Final light curing was accomplished by placing the LED curing light on the facial and lingual surfaces for twenty seconds each (Fig. 21).
Fig. 13
Bonding agent applied.

Fig. 14
Bonding agent blown thin.

Fig. 15
Bonding agent light cured.

Fig. 16
Luting agent applied to etched internal porcelain surface.

Fig. 17
Veneers placed and positioned.

Fig. 18
Luting agent “tack” cured.

Fig. 19
Excess marginal luting agent removed.

Fig. 20
Floss removes excess interproximal luting agent.

Fig. 21
Final light cure.

The Re-Veneer Process
The veneer for the ceramic crown on tooth #7 was placed next. In order to assure seating, an interproximal separator (ContactEZ Interproximal Solutions) was used to free any excess resin interproximally (Fig. 22). Interproximal strips were placed as before and light cured flowable resin barrier was placed over the marginal tissue to protect it from the etching gel. A ceramic etching gel (Porcelain Etch, Bisco) was applied to the surface to be re-veneered and left in place for sixty seconds (Fig. 23). The etching gel was thoroughly rinsed and the ceramic surface was dried. The self-adhesive luting resin was applied to the internal surface of the pre-etched laminate veneer as before, placed on the etched crown surface and seated with placement instrument (Fig. 24). After the veneer was “tack” cured and resin barrier removed, the clean up process was identical to those above.
The first three laminates in place can be seen in Figure 25. The other seven laminates were then placed in the same fashion.
The Final Result
The final result is shown in the retracted view in Figure 26. In the incisal view in Figure 27, the new arch form can be visualized. Merideth’s new smile In Figure 28 shows the improvements she desired. Her post op portrait in Figure 29, shows that her smile is indeed radiant.
Fig. 22
Interproximal separator removes excess cured resin.

Fig. 23
Porcelain etch for ceramic surface.

Fig. 24
Porcelain veneer placed.

Fig. 25
Three veneers in place.

Fig. 26
Retracted view of final result.

Fig. 27
Incisal view of final result.

Fig. 28
The patient’s new smile.

Conclusion
In this article, I illustrated a smile makeover using no preparation porcelain veneers to enhance the smile of a beauty pageant winner who was on her way to compete for a national title. In addition, I showed a re-veneer process for a previously placed ceramic crown. Our desire to use non-invasive procedures with precise cosmetic results led us to this process. A slightly fuller smile with a lighter color devoid of her previous incisal white spots was the result. Most importantly, the patient was very happy with the results. OH
Oral Health welcomes this original article.
About the Author
 Dr. Ross W. Nash maintains a general practice in Huntersville, North Carolina. A polymer engineer before entering dental school, he began focusing his practice on esthetic and cosmetic dentistry early in his career and began writing and lecturing about these subjects in the early 1980s. Dr. Nash lectures internationally on subjects in esthetic dentistry and has authored chapters in two dental textbooks. He is cofounder of the Nash Institute for Dental Learning and is a consultant for numerous dental materials manufacturers. Dr. Nash is a Accredited Fellow in the American Academy of Cosmetic Dentistry. He can be reached at rosswnashdds@gmail.com.
RELATED ARTICLE: Treatment of Tetracycline Discoloured Teeth with Full Ceramic Restorations


