
Introduction
For some of our patients, esthetics is not a chief concern as lip posture accommodation has enabled them to hide their smile. A precipitating event, such as an accident resulting in dental trauma or critical comment from a stranger or spouse, often motivates a patient to seek esthetic dental treatment to address their esthetic deficits. Whenever numerous esthetic issues are present, if not all issues are addressed, a tertiary or quaternary esthetic issues may become the new primary esthetic deficiency. Severe tetracycline staining and moderate crowding of this gentleman’s dentition were the two central issues that had not been a concern for this patient for years (Fig. 1). At full smile, a third of the crown length of the maxillary incisors was visible, concealing the tetracycline staining and crowding (Figs. 2-7). However, following a bicycle accident that caused Ellis Class II fractures to teeth #10 and 11, and vertical and oblique fracture lines on the facial surfaces of #7, 8, and 9, this gentleman desired an esthetic and functional improvement to his smile.
Fig. 1
Full-face view of patient at maximum smile demonstrating lip posturing.

Fig. 2
Frontal view of patient’s smile.

Fig. 3
Right lateral view of the patient’s smile.

Fig. 4
Left lateral view of patient’s smile.

Case Report
Diagnosis and Treatment Planning
Upon examination, the deficits included dark staining, variations in midline orientation and axial inclination of the teeth, the presence of numerous exostoses, irregular occlusal plane with irregular incisal embrasures and incisal edge position, Curve of Spee disharmony, asymmetrical mandibular gingival zeniths, and a lip line that did not match the smile line (Figs. 5-7). Following the trauma to teeth #10 and 11, Renamel® hybrid composite resin (Cosmedent Inc.) was used to restore to approximate pre-trauma tooth form (Figs. 5 & 7). A comprehensive TMJ examination is always completed during the diagnostic phase. A stable Piper Stage I TMJ diagnosis was confirmed for both left and right TMJs after negative muscle palpation, negative history of symptomatic joints, negative TMJ Doppler auscultation, no tension nor tenderness to CR load testing, and normal range of motion testing was completed. 1,2 Six structural elements including disc alignment, disk shape, ligament anatomy, masticatory musculature, joint space, and condylar bone anatomy were assessed as normal.1,2 After evaluating the patient’s mounted casts in centric relation position on the SAMIII® articulator (Great Lakes Orthodontics), stabilizing the occlusal scheme by correcting the dip in the occlusal plane and reestablishing centric holding cusps and anterior guidance were necessary functional objectives. A diagnostic wax up was completed to address these functional components as well as the esthetic objectives of the severe discoloration, variation in midline canting, uneven occlusal plane, incisal edge position and incisal embrasures, axial inclination, and moderate crowding (Fig. 8). The diagnostic wax up was used to demonstrate to the patient the proposed treatment outcome. It also served as the guide for temporary fabrication and enabled Sil-Tech® putty (Ivoclar Vivadent) tooth preparation matrices to be made with the desired midline, tooth form, incisal edge position, and occlusal plane. Correcting the asymmetrical mandibular gingival zeniths was not a treatment objective, as this would not provide the patient with a significant benefit by performing this additional procedure.
Fig. 5
Frontal view of patient’s smile showing damaged teeth and repair work with Renamel hybrid composite resin (Cosmedent Inc.).

Fig. 6
Right lateral view demonstrating multiple esthetic deficits.

Fig. 7
Left lateral view showing multiple esthetic deficits.

Fig. 8
Patient’s diagnostic wax up with all esthetic and functional considerations corrected and mounted on SAMIII articulator (Great Lakes Orthodontics).

One of the most significant challenges in all ceramic dentistry is reproducing the natural dentition and balancing opacity and translucency without the influence of a dark dentin stump shade showing through. 3 The stump shade is the most essential information that the clinician needs to pass on to the ceramist as it has a significant impact on the final outcome of the restoration. 3 Ideally any required masking should be completed within the substructure rather than the build-up, therefore, in order to block out the generalized dark dentin staining and achieve the established esthetic goals, 24 Noritake CZR, Noritake Cerabien™ porcelain placed on a zirconia framework, full crowns were fabricated (Kuraray Norataki Dental Inc.) with a target shade of NWo. 3
Clinical Protocol
One of the first steps in establishing an esthetic reconstruction is to define the proper plane of occlusion. 4 Without a proper plane of occlusion the remaining features that establish proper form and function are adversely affected. Embrasures will not be perpendicular to the proper plane of occlusion and all tooth dimensions will be nonconforming. 5 In order to confirm the correct occlusal plane with the facebow transfer, a stick bite technique was utilized to accommodate for the fact that this patient had a discrepancy between the levels of his external auditory meatuses. If you take a proper facebow transfer with one external auditory meatus lower than the other, the mounted cast will be lower on the side with the higher external meatus. By utilizing a stick bite, we are able to correct this error. Futar® (Kettenbach GmbH & Co.) bite registration material is placed on the mandibular incisal edges and then a 4.5 inch plastic stick applicator brush is inserted into the unset material and appropriately aligned and held until the material sets. This should be done with the patient standing and oriented so as to capture the horizontal plane as it relates to the patient’s face. This occlusal plane is the most esthetic and in balance with more of his facial structures. To relate this to the laboratory technician, we place the stick bite on the model and elevate the articulator until the stick bite is parallel to the floor or horizon. Any device that can be attached to the base of the articulator and allow you to tilt the entire articulator until the stick bite is parallel to the horizon will accomplish this goal. 5 The sequence of treatment began with preparing and restoring the mandibular teeth first in order to establish the proper Curve of Spee and incisal edge position. A conservative 1.5 mm incisal and 0.8mm axial reduction was desired. To achieve accurate reductions a 0.5mm depth cutting diamond #900-7136 (Henry Schein Inc.) followed by a 0.3mm depth cutting diamond #900-7135 (Henry Schein Inc.) was used for reducing the facial surface of the anterior teeth. A permanent marker can be used to identify each depth cut to ensure that the desired amount of tooth structure is removed. Although not shown with the mandibular arch this reduction protocol can be seen in preparation of the maxillary arch (Figs. 19-22).
Fig. 19
Frontal view of mandibular restorations in place.

Fig. 20
0.5mm reduction cuts are marked for accuracy with a permanent marker. When the marks are eliminated we are at a desired reduction.

Fig. 21
Facial reduction of 0.5mm.

Fig. 22
0.3mm reduction cuts are marked and then reduced for a 0.8mm total facial reduction.

A round-ended diamond #112-5161 (Henry Schein Inc.) with a 0.75mm diameter was sunk twice its diameter to obtain a precise 1.5mm incisal reduction. All external line angles are rounded and smoothed with a diamond #8878K-31 (Brasseler USA) (Figs. 9-11). The mandibular anterior sextant is prepared first and a centric relation bite registration is taken with DeLar Wax (DeLar Corp.) (Fig. 12). By taking the anterior bite registration first, then preparing one posterior quadrant at a time, accurate tooth reduction is ensured and vertical dimension is maintained. The result of this bite registration method is a three-pieced centric record with an exact recording of the preserved vertical dimension (Fig. 13).
Fig. 9
Frontal view of teeth Nos. 22 to 27 prepared.

Fig. 10
Right lateral view of prepared teeth showing dark dentin staining.

Fig. 11
Left lateral view of prepared teeth.

Fig. 12
Frontal view of DeLar wax (DeLar Corp.) centric relation bite registration.

Fig. 13
Frontal view of prepared mandibular teeth with three separate DeLar wax (DeLar Corp.) centric relation bite registrations in place mounted on SAMIII articulator (Great Lakes Orthodontics).

Provisionalization of the mandibular arch was completed using a Sil-Tech® putty (Ivoclar Vivadent) matrix of the diagnostic wax up and utilizing Alike™ resin (GC America) and Kerr Corp.’s Kolor + Plus® kit to add ochre and opaque characterization (Figs. 14 & 15). LuxaGlaze® (DMG America) was painted over the provisionals to create a life-like enamel appearance. During the temporization phase of treatment the patient was provided with 0.12% Chlorhexidine Gluconate (Henry Schein Inc.) to rinse and brush with to ensure gingival health. The opacity of the final restorations’ zirconia coping and Noritake Cerabien™ porcelain (Kuraray Norataki Dental Inc.) accomplished the objective of blocking out the discolored dentin and produced a more uniform tooth shade (Figs. 16-19).
Fig. 14
Frontal view of mandibular provisionalization with Alike resin (GC America).

Fig. 15
Frontal view of characterization of mandibular provisionals using Kerr Corp.’s Kolor + Plus kit and LuxaGlaze (DMG America).

Fig. 16
Occlusal view of mandibular Noritake CZR restorations (Kuraray Norataki Dental Inc.).
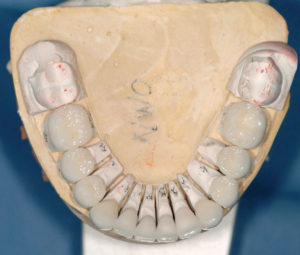
Fig. 17
Intagilo surfaces of restorations.
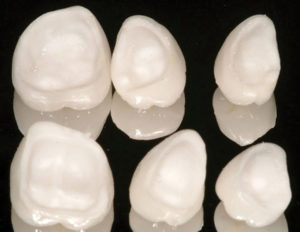
Fig. 18
Occlusal view of try-in of Noritake CZR restorations blocking out of the discolored dentin.

Fig. 19
Frontal view of mandibular restorations in place.
In order to bond the restorations in place, the preparations were etched with Etch-Rite™ 38% phosphoric acid gel (Pulpdent®) for 20 seconds, washed thoroughly and dried, followed by placing several coats of Dentin Desensitizer (Pulpdent®). Next, several coats of OptiBond FL® (Kerr Corp.) primer followed by one coat of adhesive was placed. These coats are slightly air dispersed then light cured for 20 seconds. The restorations are cemented with Calibra® Esthetic Resin Cement (Dentsply Caulk). Proper finishing of restorations is essential for success. Three burs were used to initiate the finishing process. First a red-striped 30 grit diamond (Brasseler USA) was used around all margins, followed by a yellow-striped 15 grit diamond (Brasseler USA), and then a white-striped 30 bladed finishing bur (Brasseler USA). Next, Shofu polishing points were used starting with the no stripe point, then the yellow-striped, and lastly the white-striped polishing point (Shofu Dental Corp.) The interproximal finishing began by utilizing a Ceri-Saw™ (DenMat) to initially clear out excess cement in the interproximal areas, then a red-striped Gateway™ Flexi diamond strip (Brasseler USA) was used to smooth each interproximal surface. The last and most critical interproximal polishing was achieved with a series of Epitec Strips (GC America). After the blue, green, gray, and then tan strips were used, flossing between the teeth was extremely smooth and the polishing sequence was complete. The morning after delivery of the mandibular arch, the maxillary arch was prepared following the same protocol sequence and provisionalization (Figs. 20-22). The bonding procedure of the final maxillary restorations was completed in the same manner as the mandibular restorations.
Fig. 23
Completed case in place.

Fig. 24
Frontal view showing patient’s impoved smile.

Fig. 25
Full-face of completed case.

Conclusion
When treating patients with numerous esthetic deficits, it is essential to address all deficiencies regardless of whether they are a primary concern for the patient or not. Making improvements with the major esthetic issues and not correcting the secondary issues can limit the overall success of the case and patient satisfaction. Placing the facial margins of teeth #7 to 10 more apical to aid in concealing the discolored dentin could have made an esthetic improvement, however this was contraindicated due to the patient’s low lip line and risk of jeopardizing the functional integrity of the prepared tooth structure by excessive dentin removal (Fig. 23). An esthetically and functionally harmonious smile was attained and as a result the patient’s lip posture accommodation to hide his previous smile disappeared (Figs. 23-25). All involved with the case were pleased with the outcome. OH
Dr. Tyler Wynne received his doctor of dental surgery degree (2014) from the University of North Carolina School of Dentistry. He practices general dentistry in Faison, NC and is adjunct
faculty at the University of North Carolina School of Dentistry. He can be reached at wtwynne@gmail.com.
Oral Health welcomes this original article.
Disclosure: Tyler Wynne, DDS, has no financial interest in any of the companies mentioned in this article and received no compensation for writing this article.
Acknowledgement: Laboratory fabrication by John Wilson of Wilson Dental Arts – Raleigh, NC.
References:
1. Dawson, Peter. Functional Occlusion from TMJ to Smile Design. Elsevier Health Sciences, 3rd ed.2007.
2. Dawson PE, Piper MA: Temporomandibular disorders and orofacial pain. Seminar Manual. St. Petersburg Center for Advanced Dental Study, 1993.
3. Hatai, Yugo. Extreme masking: achieving predictable outcomes in challenging situations with lithium disilicate bonded restorations. Int J Esthet Dent 9 (2014): 206-222.
4. Ahmad I. Geometric considerations in anterior dental aesthetics: Restorative principles. Pract Periodontics Aesthetic Dent. 1998;10(7):813-822.
5. Wynne T, Wynne, WPD. A multifactorial approach to restorative dentistry. Inside Dentistry. 2015; 11(6) 72-78.
RELATED ARTICLE: Diagnosis and Treatment Planning of Mandibular Crowding in the Mixed Dentition


