
Abstract
In 1987 dentistry changed profoundly when Fusayama introduced the world to “total etch, total bond” and the beginning of current cosmetic dentistry was born. By 1991 John Kanca began his uphill battle to gain acceptance of this ground-breaking technique throughout the profession in North America. As time passed and patient demands emerged, it was discovered that thin shells of porcelain could be bonded to enamel, and to a lesser extent dentin, almost instantly correcting unattractive, crooked, pitted and stained teeth.
It was not long before porcelain veneers became in high demand by patients and the treatment of choice by dentists. However, quite often-excessive amounts of tooth structure were required to be removed to achieve the desired result. However, like many trends there can often be an opposite “swing of the pendulum” and recently patients have begun to demand a more conservative approach to aesthetic services wherever possible. To predictably fill the void of conservative aesthetic dentistry, Dr. David Clark created a matrix and polishing system referred to as “Bioclear” to address unsightly spacing between teeth, pitted and stained surfaces, and black triangles that are the result of recession, adult orthodontics and periodontics.
Introduction
This healthy 36-year-old male, patient of record, expressed that he did not like the appearance of his teeth and smile. When questioned further, he advised that he did not like the fact that his teeth looked small and were angled in on the corners of his lips giving the look of disappearing appearance (Figs. 1a, 1b, 2a, 2b, 2c). In addition, the patient desired to have his smile enhanced as conservatively as possible. Since these teeth were not restored, there was an overwhelming desire to comply with his wishes. To begin the process, a comprehensive examination, complete set of X-rays, photographs and mounted study models were obtained. After reviewing the photograph (Fig. 2b) it was evident that there was a canting of the maxilla suggesting that an orthodontic component would play a role in creating the final outcome. Consequently, the patient was referred to Dr. Bruno Vendittelli for assessment and recommendations. After his assessment and a joint consultation the following recommendations were set forth:
1) Attend Dr. Vendettelli for orthodontic treatment to address the maxillary cant, lingually verted rotations and the discrepancies of the maxillary anterior gingival contours (Zeniths).
2) Once complete, bonded restorations (without tooth reduction or preparation) using the Bioclear Matrix System to close spaces that would be created by widening the maxillary arch would occur.
3) Placement of a lingual retention wire from 12-22 and fabrication of a maxillary night guard.
Fig. 1a

Fig. 1b

Fig. 2a

Fig. 2b

Fig. 2c

Orthodontic Treatment
This patient presented for an initial evaluation. Upon completion of a comprehensive examination and review of all records including extra-oral and intra-oral photographs, lateral cephalogram, panoramic radiograph and full-mouth-series, the following challenges were identified:
1. Class I occlusion with a deep bite
2. Undersized teeth 12 and 22 with the anterior teeth being generally small and conical in shape
3. Tooth 24 was in buccal crossbite
4. Crowding of both arches
5. Occlusal canting (down on left), particularly in the maxillary incisors
The patient was offered orthodontic treatment consisting of maxillary and mandibular fixed appliances with the possible use of a temporary anchorage device (mini-implant) in the 23 area to help in cant correction. The estimated treatment length was to be 18-24 months.
Treatment was initiated with maxillary fixed appliances. After six months of levelling and aligning, mandibular fixed appliances were placed. The mandibular arch was levelled to aid in the deep bite correction. At this time, it was determined that a temporary anchorage device was not necessary. As an alternative, the patient was prescribed right Class II elastics to optimize the occlusion and to aid in midline control and cant levelling. After one year of treatment, a set of progress records consisting of photos and models was acquired (Fig. 3a, 3b, 3c, 3d, 3e, 3f). Upon meeting with Dr. Soll and reviewing these records, it was determined that the following detailed movements would aid in the restorative plan:
1. Abut the 13 and 23 to the 14 and 24 (i.e. close all space between these teeth)
2. Further align the gingival margins (zeniths) of 12,11,21,22 as best possible
3. Distribute the remnant space equally between teeth 13 and 23.
Fig. 3a

Fig. 3b

Fig. 3c

Fig. 3d

Fig. 3e

Fig. 3f

Orthodontic treatment continued for another 10 months and the above goals were achieved along with optimization of the occlusion. Upon completion of the orthodontic treatment, the fixed appliances were removed and a lower fixed retainer was placed (Fig. 4a, 4b, 4c, 4d, 4e, 4f). Given that the upper teeth were to be restored, a removable retainer was prescribed for two months of full-time wear followed by two months of nighttime wear. Once three months of post-orthodontic settling occurred, the patient was ready for the restorative phase of his treatment.
Fig. 4a

Fig. 4b

Fig. 4c

Fig. 4d
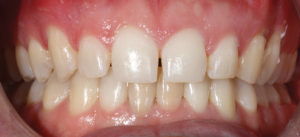
Fig. 4e

Fig. 4f

Restorative Treatment
Upon completion of the orthodontic treatment and a sufficient amount of time was allowed for settling and retention, the restorative phase to address the open spaces began (Fig. 5a, 5b, 5c). In keeping with a conservative approach and not wanting to destroy existing tooth structure, the following treatment plan was presented and accepted.
Fig. 5a

Fig. 5b

Fig. 5c

1) Zoom in-office whitening to bring the dentition to its’ brightest natural colour. (Note that it is an accepted principle to whiten the dentition prior to any restorative work so that the restorative work can be matched to the new brighter/whiter dentition)
2) Closing newly formed gaps with the Bioclear System using composite.
3) Lingual wire retention and fabrication of a Brux-Ez Night Guard to provide additional retention and prevent damage to the new restorations.
To initiate the Bioclear phase of treatment, it is imperative that the surfaces to be treated are meticulously cleaned and free of debris and microfilm. To accomplish this, the teeth are treated with a high pressure cleaning instrument that emits Aluminum Silicate and water from a unit known as a Bioblaster (Bioclear–Tecoma, Wahington) (Fig. 6). The benefit of the Bioblaster is to ensure that the treated surfaces are free of the pellicle film layer so as to allow for maximum retention and prevent premature staining of the completed restorations. Once done and rinsed with copious amounts of water and dried, the appropriate Bioclear matrices are selected for the result that is to be achieved. In this specific case DC 201 (mesial) and DC202 (distal) were selected. As the interdental bone is higher than the buccal/lingual bone, the matrices are trimmed to accommodate this anatomy (Fig 7). The matrices were positioned and examined to ensure that complete closure of the open space would occur (Fig. 8). The entire buccal, interproximal, distal-lingual, and mesial lingual surfaces were etched with 32% phosphoric acid and after 20 seconds washed with copious amounts of water (Fig. 9a, 9b, 9c). The tooth was then scrubbed with Scotchbond Universal (3M Corporation–Minneapolis Minnesota) for 20 seconds, and not cured (Fig. 10). To ensure that the composite, Filtek Supreme Ultra (3M Corporation–Minneapolis Minnesota) flowed evenly, it is warmed to 125 degrees F by a specially designed warming unit for this process (Bioclear Warming Unit–Tecoma Washington) (Fig 11). The flowable composite is applied to the MB, ML and DB, DL line angles and subsequently the composite is applied to buccal surface ensuring that the entire surface is covered and sandwiching the flowable to ensure all areas are absent of voids (Fig 12a, 12b). The matrices are used to smooth out the composite as well as shape it with the aid of a plastic instrument (Fig 13). Once complete the composite is cured 40 seconds on the buccal and lingual (Fig 14).
Fig. 6

Fig. 7

Fig. 8

Fig. 9a

Fig. 9b

Fig. 9c

Fig. 10

Fig. 11

Fig. 12a

Fig. 12b

Fig. 13

Fig. 14

The process is repeated on the subsequent teeth in the treatment plan. Once all teeth have been treated and you are satisfied with the initial shape, the matrices are separated from the composite both on the buccal and lingual, then using a haemostat the matrices are removed using a rolling motion (Fig.15a, 15b). Once all the matrices have been successfully removed, the restorations are ready for shaping and finishing.
The restorations are first shaped with Red Stripe fine diamonds (Brassler–Savannah, Georgia) (Fig. 16). A short shank-cutting tip for trimming the gingival margin and long tip for the body of the restoration is used. To create the lingual contour a football shaped bur is used. The buccal surfaces are viewed from the right and left sides and incisal to ensure the proper contour and shape. Once the over all contour has been achieved and the occlusion is balanced, the final polishing sequence can occur and is referred to as “The Rock Star Polish” by Dr. Clark. The protocol is a 3-step sequence and occurs as follows:
1) Using a pointed Brownie Polisher (Brasseler – Savannah\ Georgia) in a high speed hand piece at a reduced torque, the buccal and lingual surfaces are smoothed and shaped adding subtle surface textures (Fig. 17).
2) Using the Bioclear Polishing Paste (Bioclear – Tacoma, Washington) in a rubber prophy cup the buccal and lingual surfaces are polished to a high gloss (Fig. 18a, 18b).
3) To complete the process, all composite surfaces are shaped using a finishing cup (Cosmedent–Chicago Illinois) with my assistant providing a slow drip of water to enhance the gloss (Fig. 19).
Fig. 15a

Fig. 15b

Fig. 16

Fig.17

Fig. 18a

Fig. 18b

Fig. 19

Fig. 20

Fig. 21

Once complete, the patient was thrilled with the outcome (Fig 20). With thorough pre planning and execution we were able to deliver to the patient the result that he had envisioned, a wider smile and more prominent teeth (Fig 21). The Bioclear system/protocol when properly incorporated into treatment planning can effectively provide a sensible conservative solution. OH
Oral Health welcomes this original article.
About the Authors
 Dr. Jordan Soll is a Toronto based general practioner with special interest in appearance related procedures. He is principal of Aesthetics in Dentistry, Co chairman of the editorial board of Oral Health Journal, and the dental expert for City Line with Tracy Moore.
 Dr. Bruno L. Vendittelli is a Toronto- based orthodontist whose practice is Forest Hill Orthodontics. He is a Staff Orthodontist at the Hospital for Sick Children and an Associate at the University of Toronto, Faculty of Dentistry.


