
A patient presented for orthodontic care with a chief complaint to straighten her front teeth, eliminate her overjet, and balance her lip eversion. Her dental history included annual dental cleanings and root canal therapy on #9. Due to the skeletal class 2 retrognathic profile, the severity of her mandibular asymmetry, the vertical discrepancies in the maxillary dental arch, and her desire for some facial soft tissue changes, a combination of various disciplines within dentistry were discussed. The patient chose to pursue orthognathic surgery in combination with orthodontics, periodontics, endodontics, and restorative dentistry. The patient visited with an oral surgeon prior to starting treatment.
Figure 1 shows the patient’s smile as she presented at our initial meeting. In Figure 2, you can see the occlusal view of the maxillary arch. After an endodontist evaluation of the previously traumatized anterior teeth, #9 was retreated and #10 was endodontically treated as well. Figure 3 highlights #9’s apical fracture during the retreatment which was managed with an apicoecotomy allowing the preservation of the proximal 1/3 of the root, thus the ridge height and bone density for this eventual implant site. The patient also established a plan for three to six-month checkups with a periodontist to remain in place throughout treatment.
Fig. 1

Fig. 2
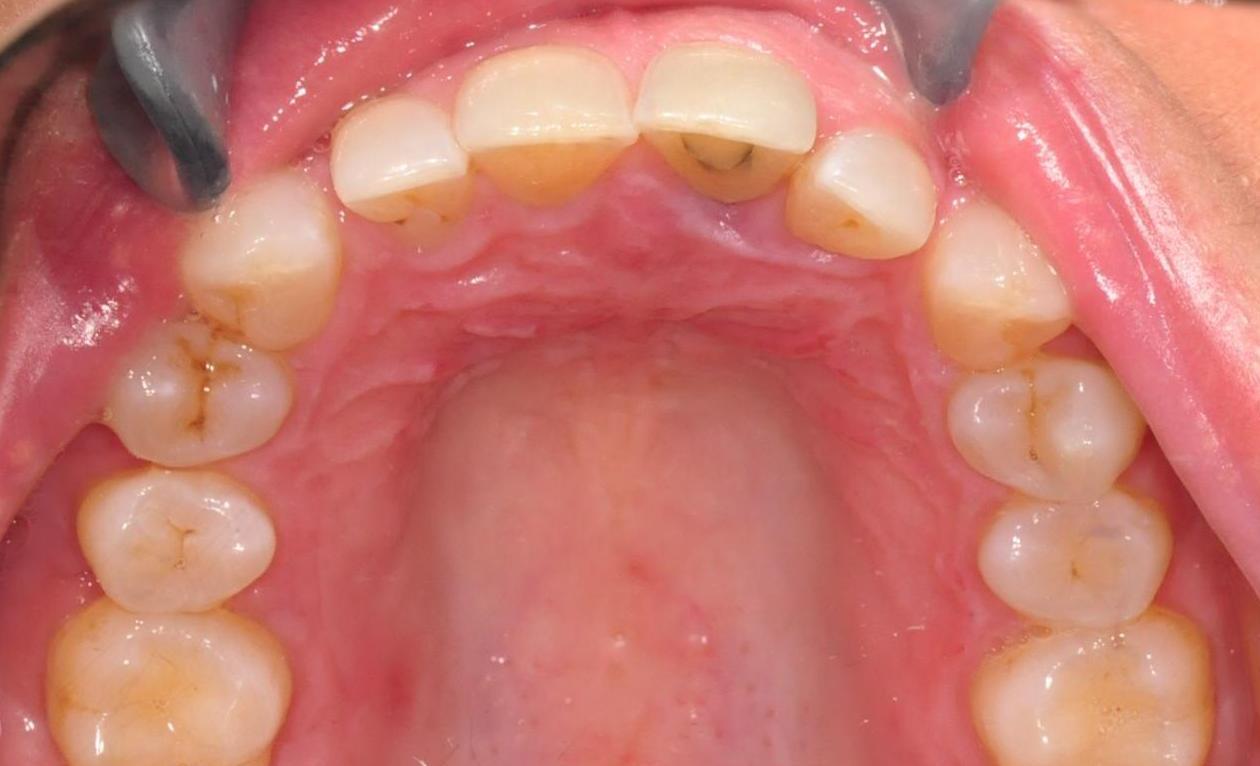
Fig. 3

Orthodontic Treatment
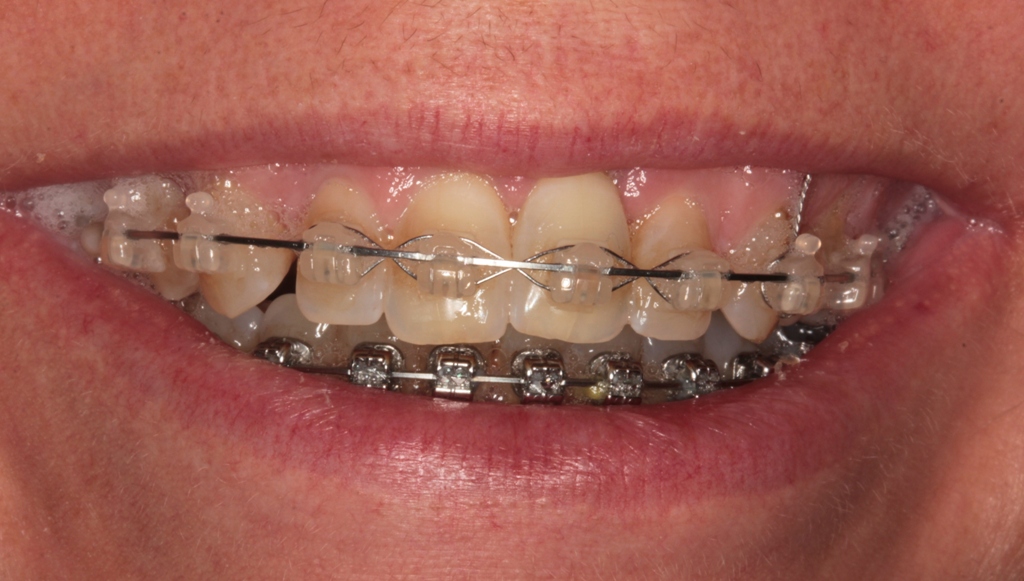
Figure 3 shows the initial bonding using Ormco Damon D2 and Damon Clear2 brackets along with the immediately placement of an ORMCO VectroTAS 6mm TAD in the anterior region. The TAD allowed for vertical control of the front teeth, as well as control of the yaw, pitch, and roll of the patient’s smile within the face. In Figure 4, you can see the occlusal view of the maxillary arch with the brackets in place.
Fig. 4

At the two-year mark of treatment, the patient was ready for restorative treatment. The final tooth positions can be seen in the retracted facial view in Figure 5 with the brackets still in place and with patient smiling Figure 6. The patient was referred to a periodontist (Dr. Paul Gibbs, Davidson, N.C.) for the extraction of #9 and immediate placement of a Straumann bone level RC size 4.1 mm x 10 mm with a healing abutment RC 5 mm X 4 mm in the #9 space.
Fig. 5

Fig. 6
The patient was referred to a restorative dentist at this time to confirm the adequacy of the #9 interdental space. Residual space was also left distal to #7 and #10 to allow for establishing golden proportions for the upper anteriors using veneers.
Orthognathic surgery was completed 22 months into treatment. Braces were removed six months later. Following a full occlusal adjustment, upper and lower permanent retainers as well as removable thermoplastic indexes upper and lower were generated.
Restorative Treatment
Figure 7 shows the patient’s smile after her orthodontic and implant treatment. The retracted facial view can be seen in Figure 8. Our treatment plan involved one implant supported crown for the missing left maxillary incisor and ceramic veneers for the other central incisor and both lateral incisors. Later we would place porcelain veneers on the maxillary canines and premolars. We chose 1M1 on the Vita 3D shade guide as the shade (Fig. 9).
Fig. 7
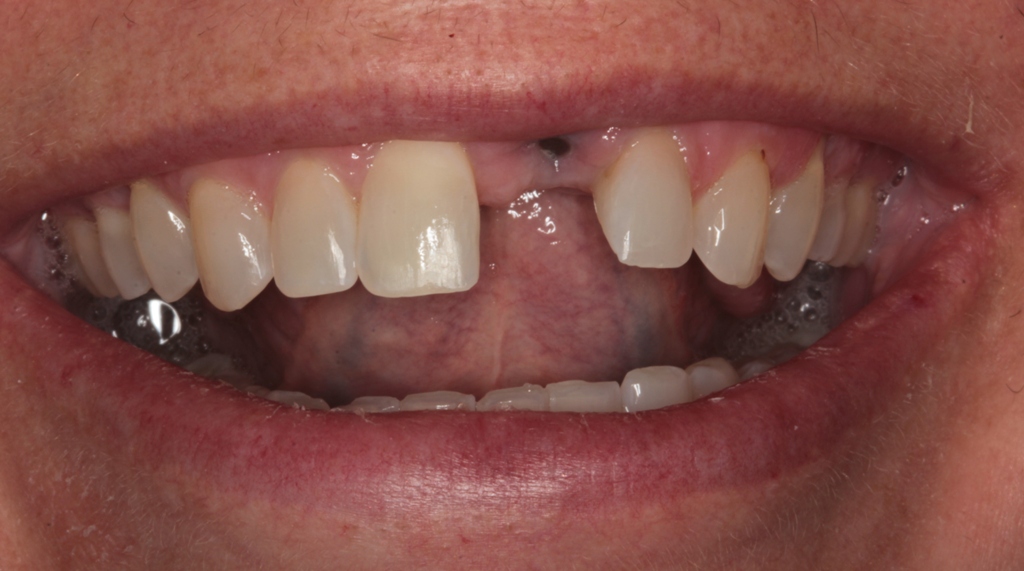
Fig. 8

Fig. 9

Maxillary and mandibular preoperative Impressions were taken using an alginate substitute material (Kettenbach). A centric relation occlusal registration was made (Kettenbach). Finally, a facebow record was made (Denar).
The maxillary lateral incisors and right central incisor were prepared for eMax veneers with 0.5 mm of facial reduction, 1.5 mm of incisal reduction. Chamfer margins were placed at the height of the tissue and elbow preparations were taken to proximal contacts. All corners were rounded (Fig. 6). An impression abutment was placed for the implant. The preparations and implant impression abutment can be seen ready for the final impression in Figure 10.
Fig. 10

Final impressions were taken using Panasil Extra Light body (Kettenbach) around the margins and heavy body Panasil Putty in the tray. Provision restorations were made by using a putty stint made over a model of the preoperative teeth with a composite tooth placed where the missing central was. A bisacrylic provisional material was injected into the stint, placed on the prepared teeth and allowed to set. Excess bisacrylic material was removed with a small carbide finishing bur and the temporary restorations were left mechanically locked over the prepared teeth.
Laboratory
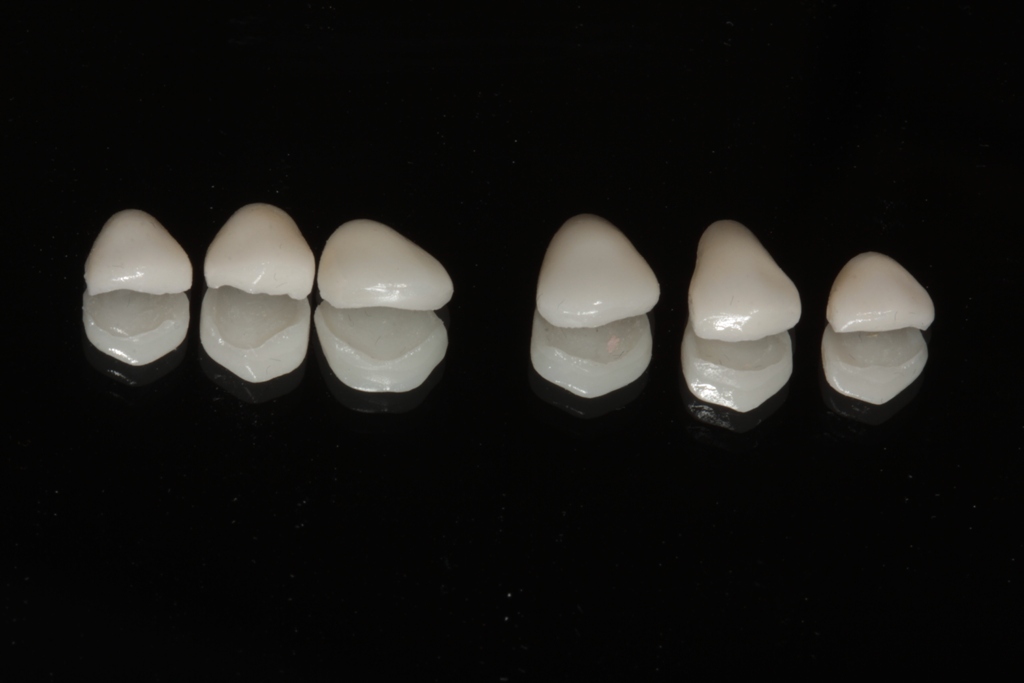
At the dental laboratory, the impressions were poured up and mounted for fabrication of the final restorations. A zirconia oxide abutment was fabricated for the implant supported crown. A eMax (Ivoclar) crown and three eMax veneers were fabricated. In Figure 11, you can see the four eMax restorations photographed on a mirror surface. Figure 12 shows the implant abutment and crown before placement.
Fig. 11
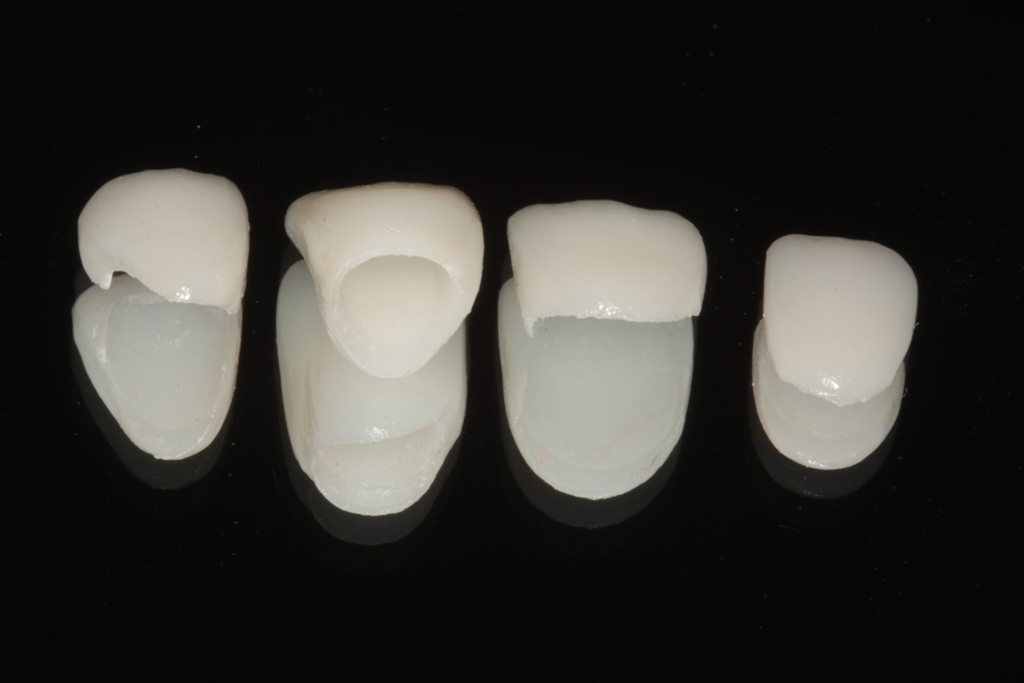
Fig. 12

Delivery
The prepared teeth and implant abutment in place can be seen in Figure 13. The implant abutment was placed first. After the torque of the implant screw was accomplished, the screw was covered with a soft light cured resin and the eMax crown was cemented to place. The internal etched surfaces of the eMax veneers were treated with silane primer (Silane Primer, Bisco), which was allowed to dwell for twenty seconds and air dried with an air/water syringe. A self-curing luting composite (Choice 2, Bisco) was added to the intaglio surfaces of the veneers and placed on the prepared teeth. Excess composite was removed with an explored and the luting agent was light cured with a curing light (SPEC 3, Coltene). Excess cured luting agent was removed with a small carbide finishing bur and the margins were polished using an Enhance cup by Dentsply. The four restorations are shown after placement in Figure 14.
Fig. 13

Fig. 14

More Veneers
A few months later, the patient was ready for ceramic veneers for the maxillary canines and premolars to “finish” her smile. After very minimal preparation, final impressions were taken and sent to the dental laboratory where eMax veneers were fabricated for teeth numbers 4,5,6,11,12 and 13. They are shown photographed on a mirror surface in Figure 15. The veneers were bonded to place as before.
Fig. 15
The Final Result
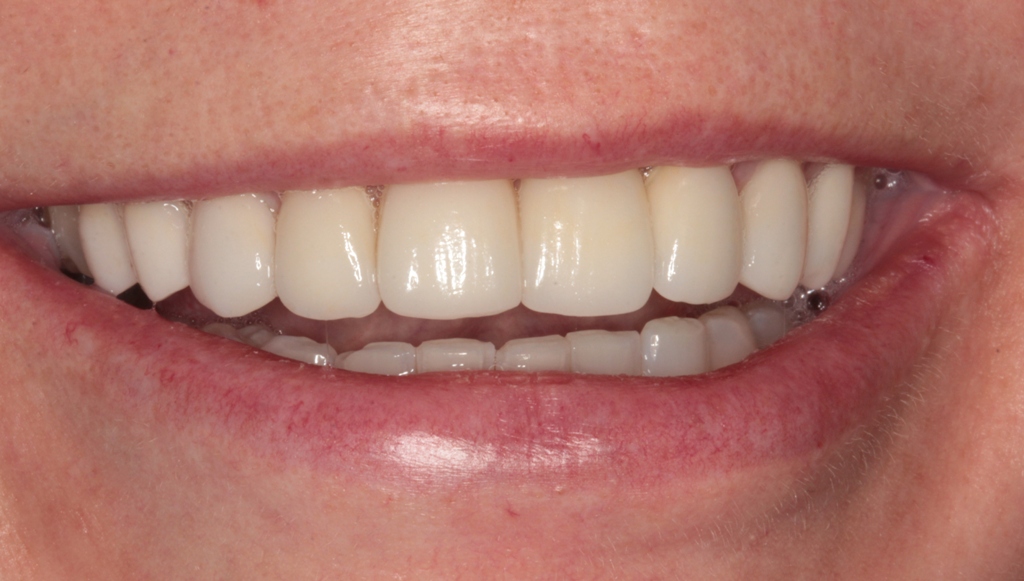
The final result can be seen from the retracted facial view in Figure 16. A view in occlusion is shown in Figure 17. The patients new smile can be seen in Figure 18.
Fig. 16

Fig. 17

Fig. 18
Conclusion
Planning the vertical position of a smile in a face prior to the bonding is critical for all successful treatment plans. The use of TADs to control the vertical by the orthodontists maximizes the outcome for all disciplines involved in interdisciplinary care. Continual communication throughout treatment enabled us to create a stable, esthetic, and functional result pleasing to all involved, especially, the patient. By using a multidisciplinary approach with orthodontics, implant placement and ceramic restorations, we were able to provide this patient with the smile she desired.
Oral Health welcomes this original article.
About the Authors
 Dr. Ross W. Nash, is a graduate of the University of North Carolina School of Dentistry and practices general and cosmetic dentistry in Huntersville, North Carolina. He is cofounder and Director of the Nash Institute for Dental Learning in Huntersville, N.C. He can be contacted on line at rosswnashdds@aol.com. As a graduate of the Roth Williams Center for Functional Occlusion in 2000.
 Dr. Marc Allen was engineered to manage some of the most challenging adult orthodontics. The University of North Carolina and The University of Texas along with the Spear Center for Dentistry all prepared him to strive for excellence during the past 20 years of private practice in Charlotte and Huntersville, North Carolina.


