
Introduction
The American Academy of Cosmetic Dentistry (AACD) launched “The Smile Story Contest” in April 2014. The purpose of the contest was to raise awareness of the benefits of cosmetic dentistry. Entrants submitted their smile story explaining why they deserved a new smile, along with their photo. The contestants were chosen by the public through a voting process. The top 20 met with participating AACD dentists for treatment consultations and to take an AACD photograph series. Then a panel of dental professionals selected the five finalists.
One of the five finalists was Renata, who was edentulous due to a rare genetic disorder, Ehlers Danlos Syndrome. Her wish was to be able to smile again, eat normally again, live her life and realize her dreams. She believed her wish was not attainable as she had no teeth to smile with or eat with and little confidence to move forward in her life. I was asked by the AACD to present a treatment plan for Renata that could be completed within a six-month time frame.
FIGURE 1. Full face photo before the treatment.

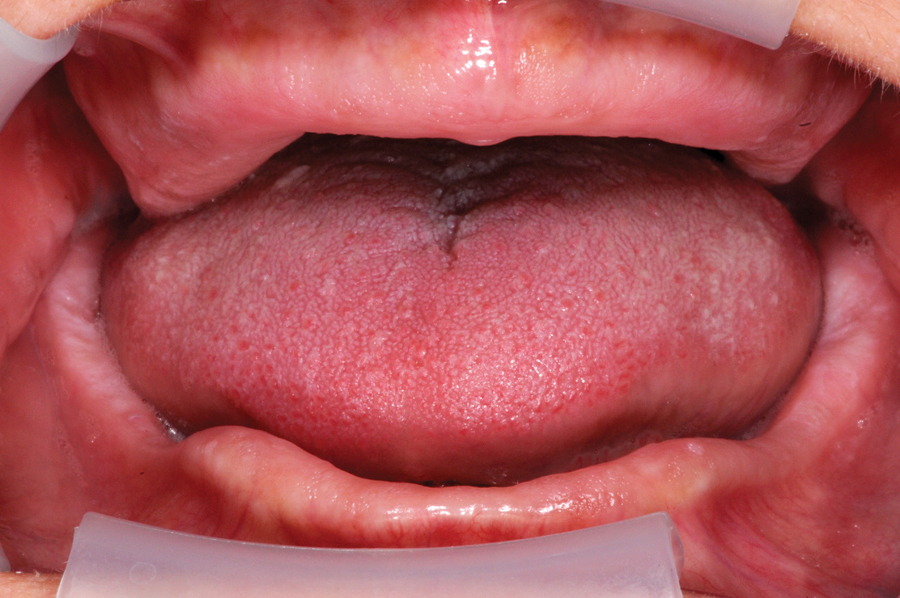
FIGURE 2. Retracted smile photo before treatment.
Patient Interview
Patient interviews are imperative in comprehensive cosmetic cases. Information is gathered from the patient to determine their needs and expectations. This interview process can be a separate appointment or coincide with a patient exam and record collection.
In the interview, we discussed the effects that Ehlers Danlos Syndrome (EDS) had in her life. Ehlers Danlos Syndrome is a group of inherited connective tissue disorders caused by a defect in the synthesis of collagen. The collagen helps connective tissues to resist deformation. Depending on the individual mutation the severity of the syndrome can vary from mild to life-threatening, affecting skin, muscles, ligaments, to blood vessels and visceral organs.
In Renata’s case, this condition made her skin very fragile. This can become a problem as damaged skin often does not heal well. The condition made her prone to severe periodontal disease that resulted in the early loss of her dentition. The fragility of her oral mucosa as a result of EDS made denture wear impossible.
FIGURE 3. Maxillary final plan.

FIGURE 4. Mandibular final plan.
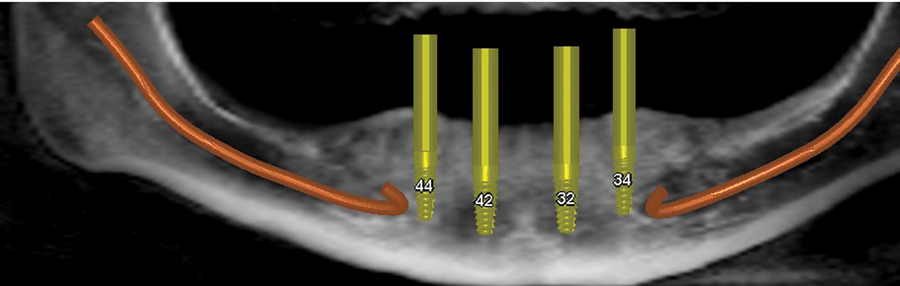
FIGURE 5. Operating room post anesthesia induction.
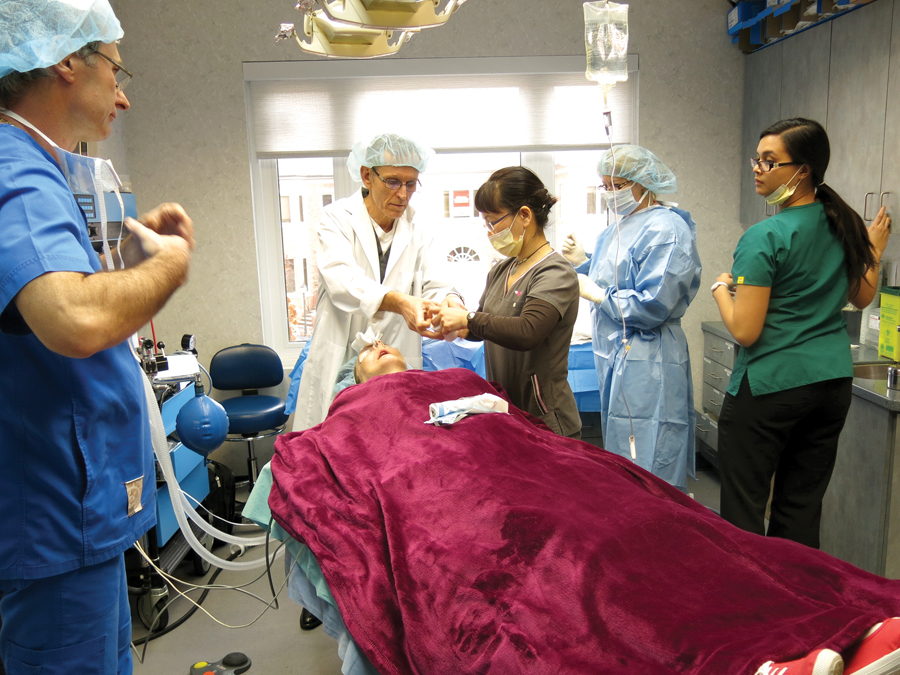
FIGURE 6. Surgical exposure of maxillary ridge.
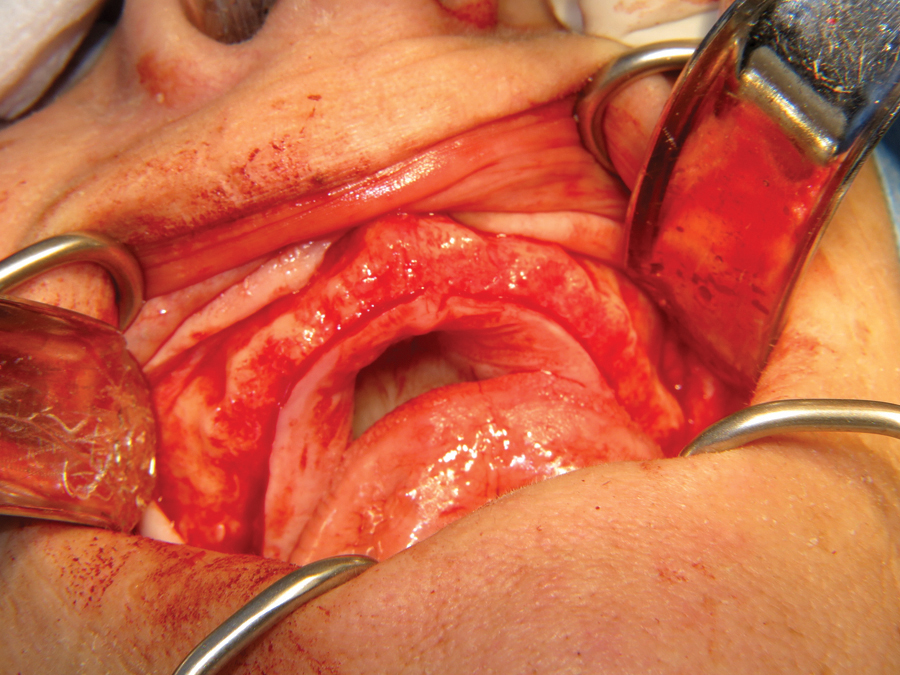
FIGURE 7. Right sinus osteotomy.
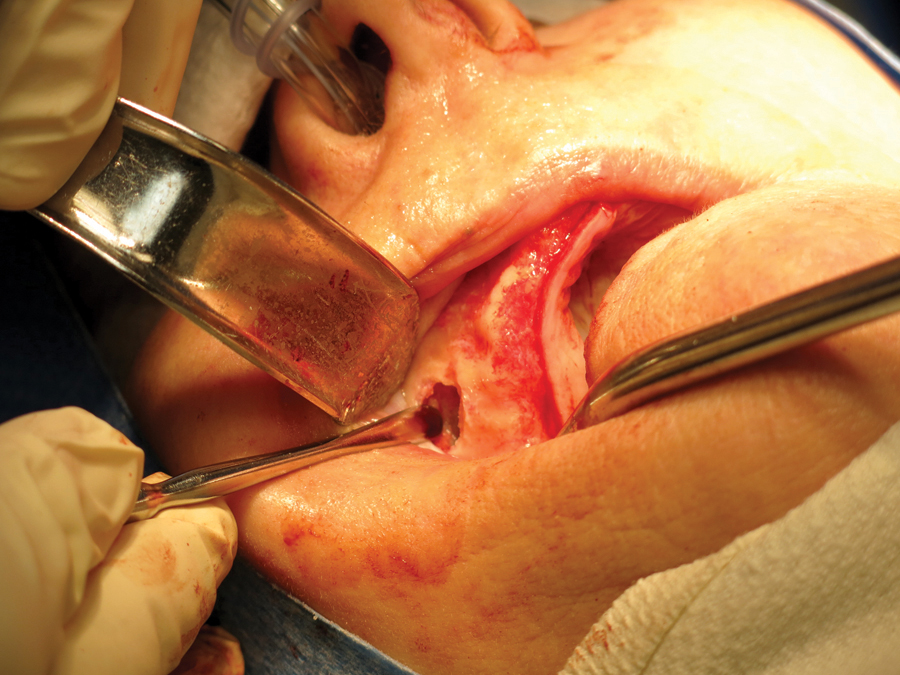
FIGURE 8. Maxillary implant osteotomies and guide pins.
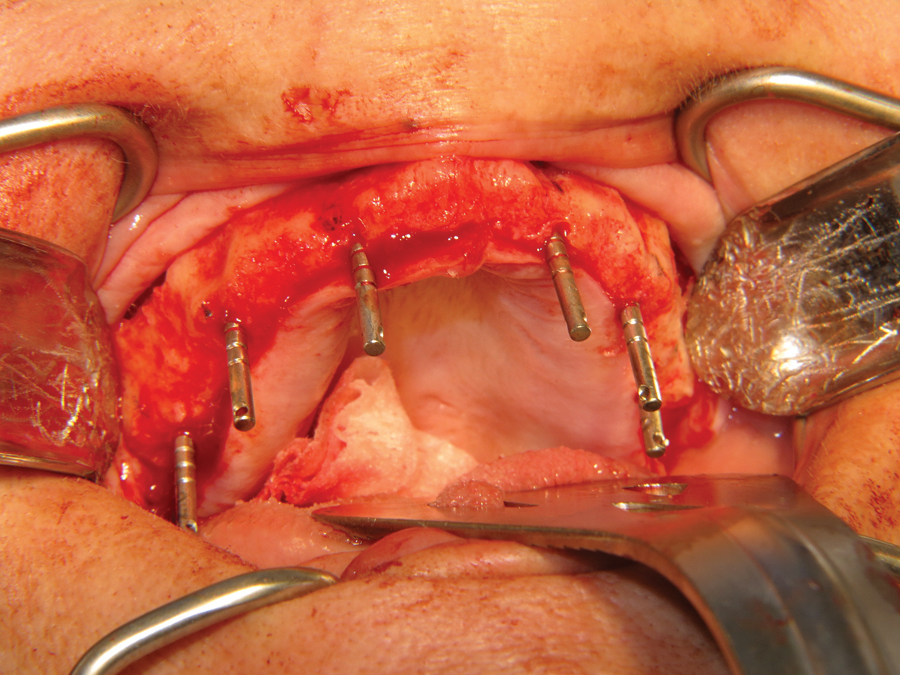
FIGURE 9. Left sinus osteotomy and membrane lift with simultaneous implant osteotomy.
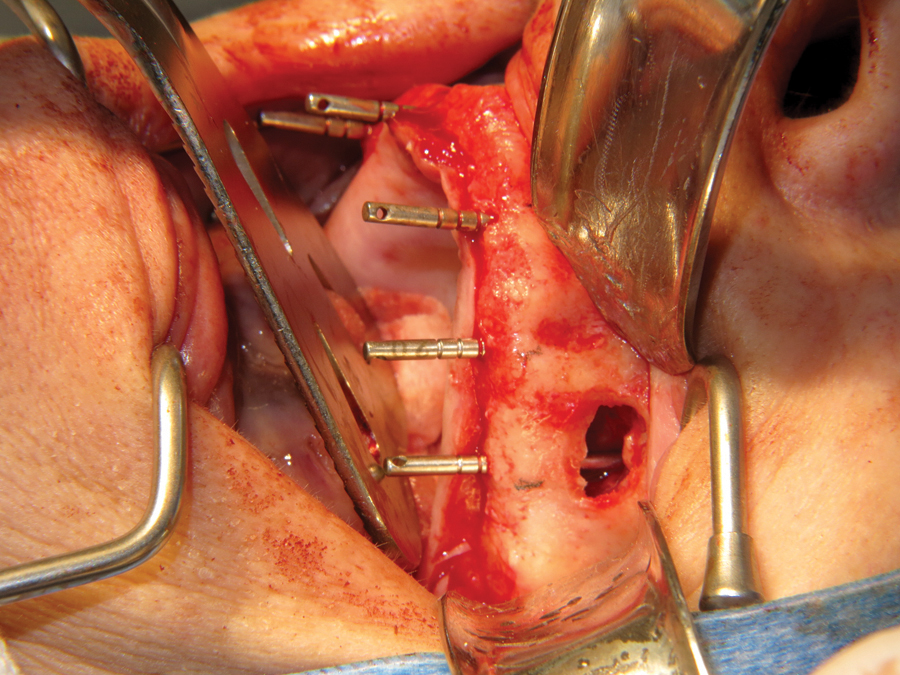
FIGURE 10. Bio oss bone grafting material placed in left sinus floor.
Patient Exam and Diagnostic Records Collection
Diagnostic information was gathered by performing a comprehensive clinical exam, taking necessary radiographs, taking impressions for study models and possibly mock-ups, and by taking a series of digital photographs. More information from the patient can also be learned. In this case, we learned our patient has a very sensitive gag reflex.
This affects the modality of treatment as well as the design ideas of the upper prosthesis. The patient was also a cigarette smoker. This had to be addressed as tobacco use negatively affects post surgery success and longterm outcomes.
Renata conveyed her suffering psychologically with self-image and social stigmas, and the detriments to her health with malnutrition from not having any teeth for over eight years. She brought photos of herself from the past and expressed how she does not have to have a “movie-star” smile, she would be happy with her own smile and the ability to eat more than just soft foods.
When asked why she wanted the smile makeover Renata said her reasons were twofold. First, she said she had a desire for crunch. She missed eating salads, carrots, grabbing a handful of cashews or eating bacon. Having no teeth meant her diet consisted of carbohydrates like mashed potatoes and foods that were pureed beyond recognition. Simple pleasures like dining in a restaurant were not a possibility. Having a high starch diet with no ability to eat fresh greens also left Renata anemic. She hoped having a new smile would allow her to eat her way back to health with a complete and balanced diet full of vegetables and fruit.
The second thing Renata hoped to gain from her smile makeover was self esteem. She said she had become a recluse because of her appearance and did not go out anymore. Going for a movie or out with friends she said was no longer an option because of her appearance. She recalled a few times she had ventured out in public only to be met with stares and whispers. She repeatedly underscored that her appearance was shameful and people treated her differently as a result of it. She said she missed the social interaction and looked forward to a day when she could go out with her friends or with her daughter to a restaurant. Renata also expressed hope that a smile would lead her to be gainfully employed once again. She recalled many job interviews that were unsuccessful because potential employers could not get past her having no teeth.
FIGURE 11. Six implants placed with healing collars.
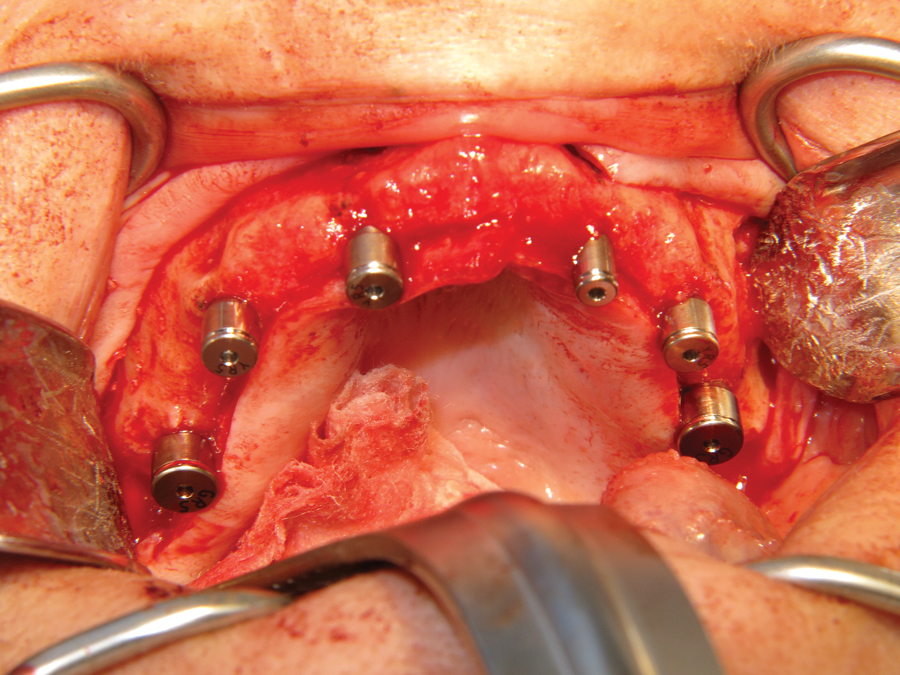
FIGURE 12. Left sinus floor bone graft and simultaneous implant placement.
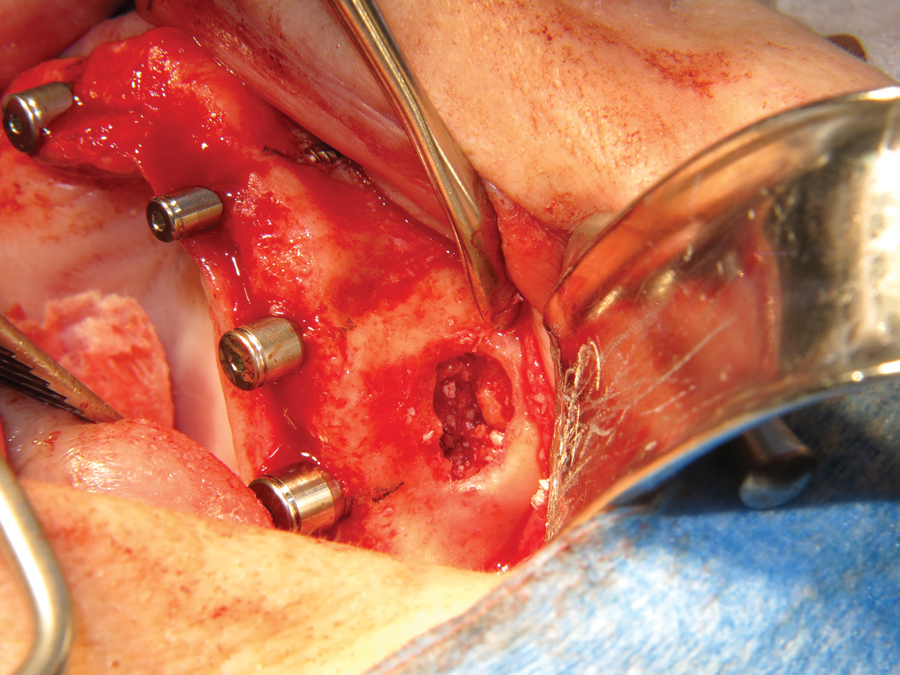
FIGURE 13. Additional Bio oss bone graft material to complete sinus floor grafting.

FIGURE 14. Five pins in mandibular implant osteotomy site–occlusal view.

FIGURE 15. Mandibular implant osteotomy site -side view.
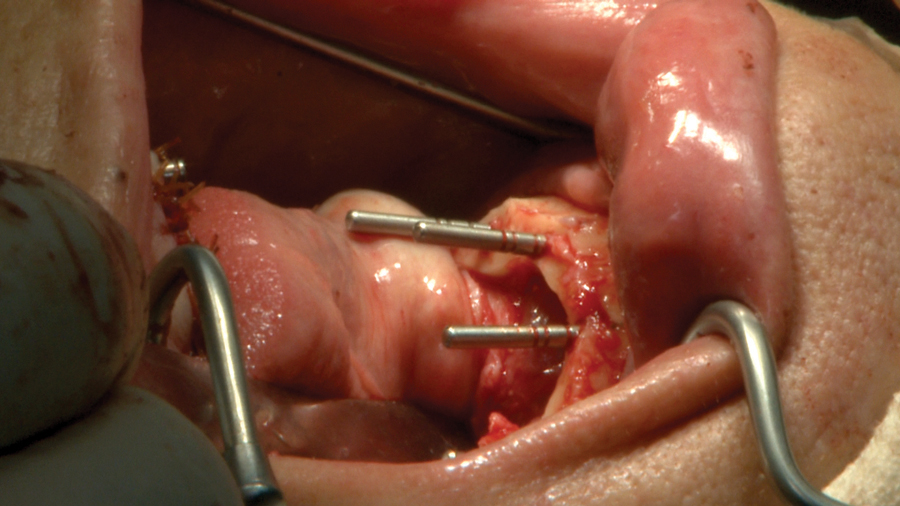
FIGURE 16. Implants in mandible with stock abutments.
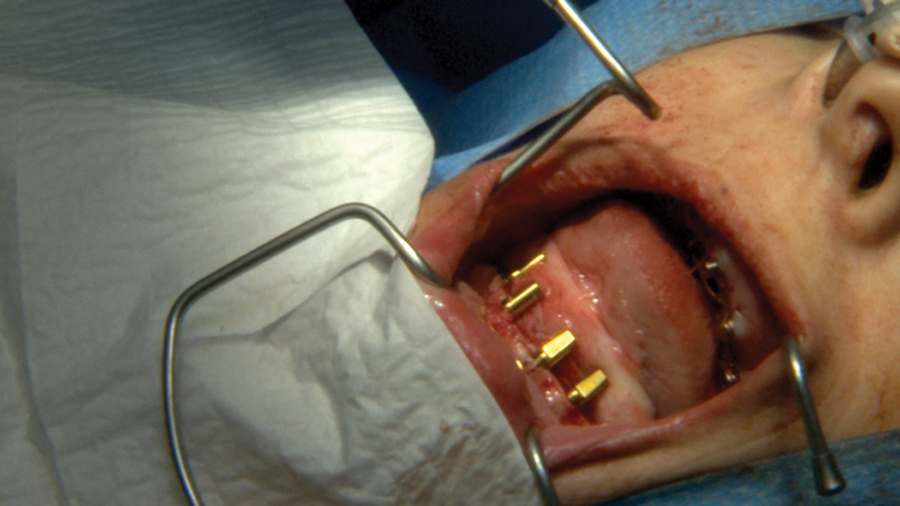
FIGURE 17. Implants in mandible with healing collars.

FIGURE 18. Bone graft being placed in the mandible.

FIGURE 19. Surgical team including oral and maxillofacial surgeon, anaesthetist and registered nurses.

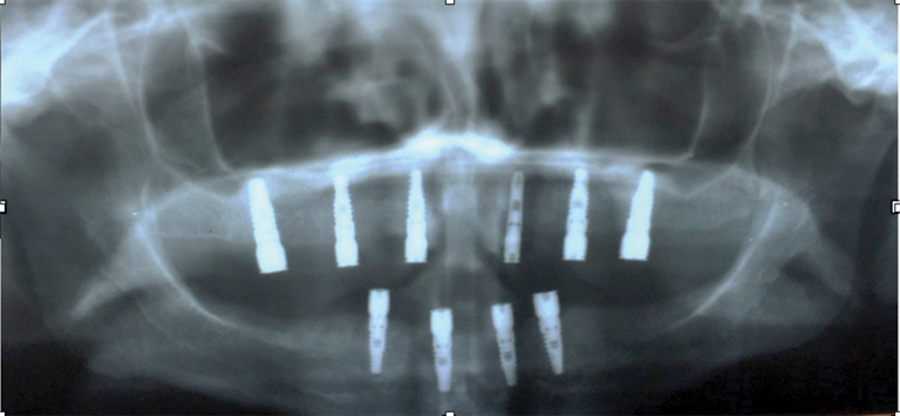
FIGURE 20. Post-operative panoramic radiograph.
Development of a Treatment Plan
Knowing that the patient was unable to wear a denture due to EDS concerns, implant treatment was the most optimal treatment course for Renata. Knowing that Renata would need bilateral sinus lifts, placement of ten implants under sedation and the characteristics of EDS that could cause complications with the surgery, I decided to enlist the expertise of my colleague of 32 years, Dr. David Psutka, Oral and Maxillofacial Surgeon, to perform the sinus lifts and implant surgery.
Dr. Psutka, having practiced for over 32 years, had experience with this rare genetic disorder. Dr. Psutka raised surgical concerns, which included potential for severe intraoperative and postoperative bleeding due to the vascular friability. There was also a potential for compromised and delayed wound healing.
Dr. Psutka would do a preoperative exam which included a pre surgical history and physical examination as well as hematological testing, including complete blood count and electrolyte measurements. A chest X-ray and ECG was also acquired and since all was within normal limits he could deduce that surgery could be performed.
The patient was sent for further diagnostic information gathering to Canaray Oral Radiologists for a CAT scan by Dr. Milan Madhavji, Oral and Maxillofacial Radiologist. Dr. Milan Madhavji has reported approximately 39,541 CBCT scans with Canary and 15,683 CBCT scans in other facilities. Discussions with Dr. Psutka and Dr. Madhavji and further communications with the patient, concluded in the decision to place four implants on the mandible with no additional bone grafting and six implants in the maxillary with bilateral sinus lifts. Dr. Madhavji would construct the surgical guides. Dr. Zbigniew Wajtasik, Anesthesiologist, would administer the general anesthesia for the three-hour surgery with 90 minutes of recovery time.
The expertise of AACD Accredited laboratory technician Trevor Laingchild of Yorkville-Burlington Dental Studios was secured for the restorative phase of treatment. In consulting with Trevor Laingchild, it was determined that a full upper and lower fixed appliance would best suit the patient’s needs.
The implants were generously donated by BiohorizonsTM Implants. The teeth were donated by Ivoclar- VivadentTM (Antaris & Postaris teeth).
FIGURE 21. Removing healing collars for final impression.

FIGURE 22. Upper impression copings in place.
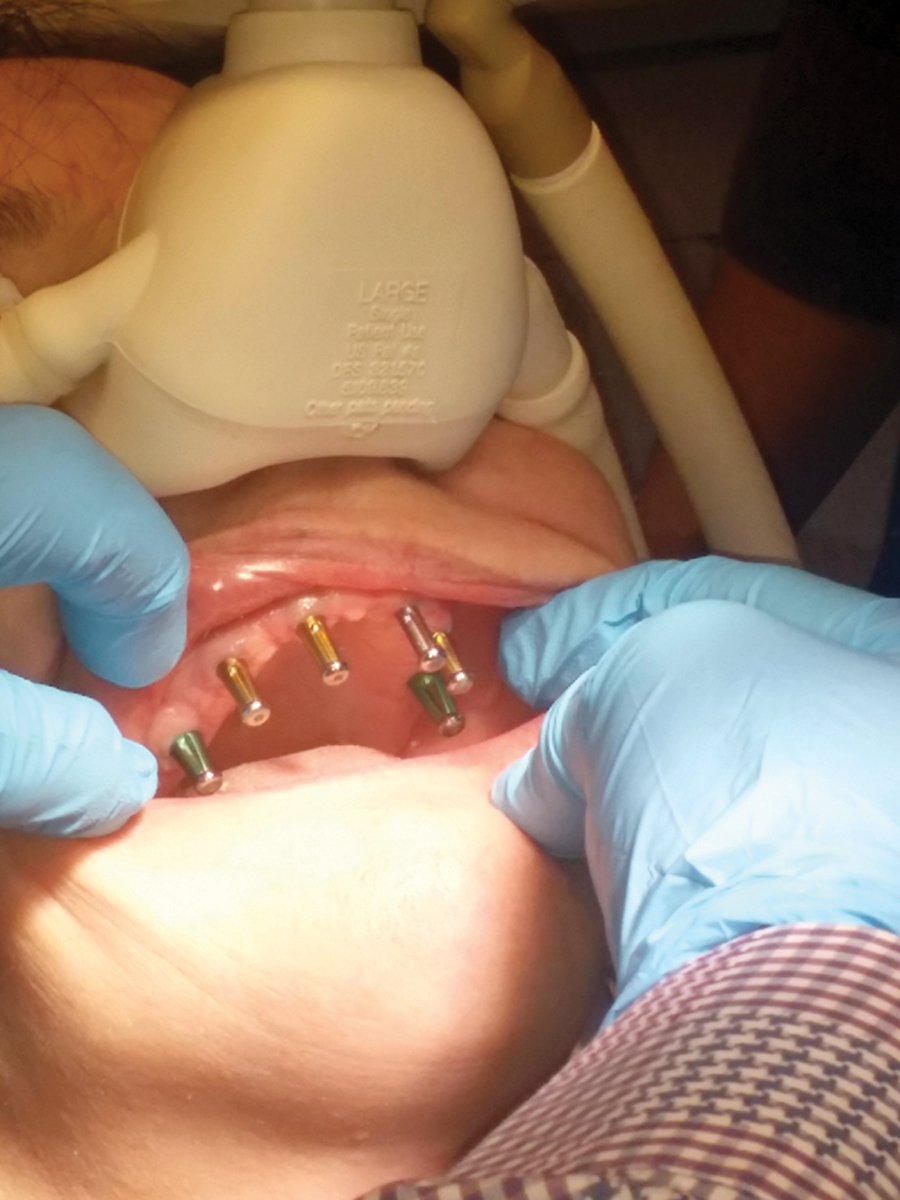
FIGURE 23. Lower final impression being taken under IV sedation.

FIGURE 24. Lower final impression.
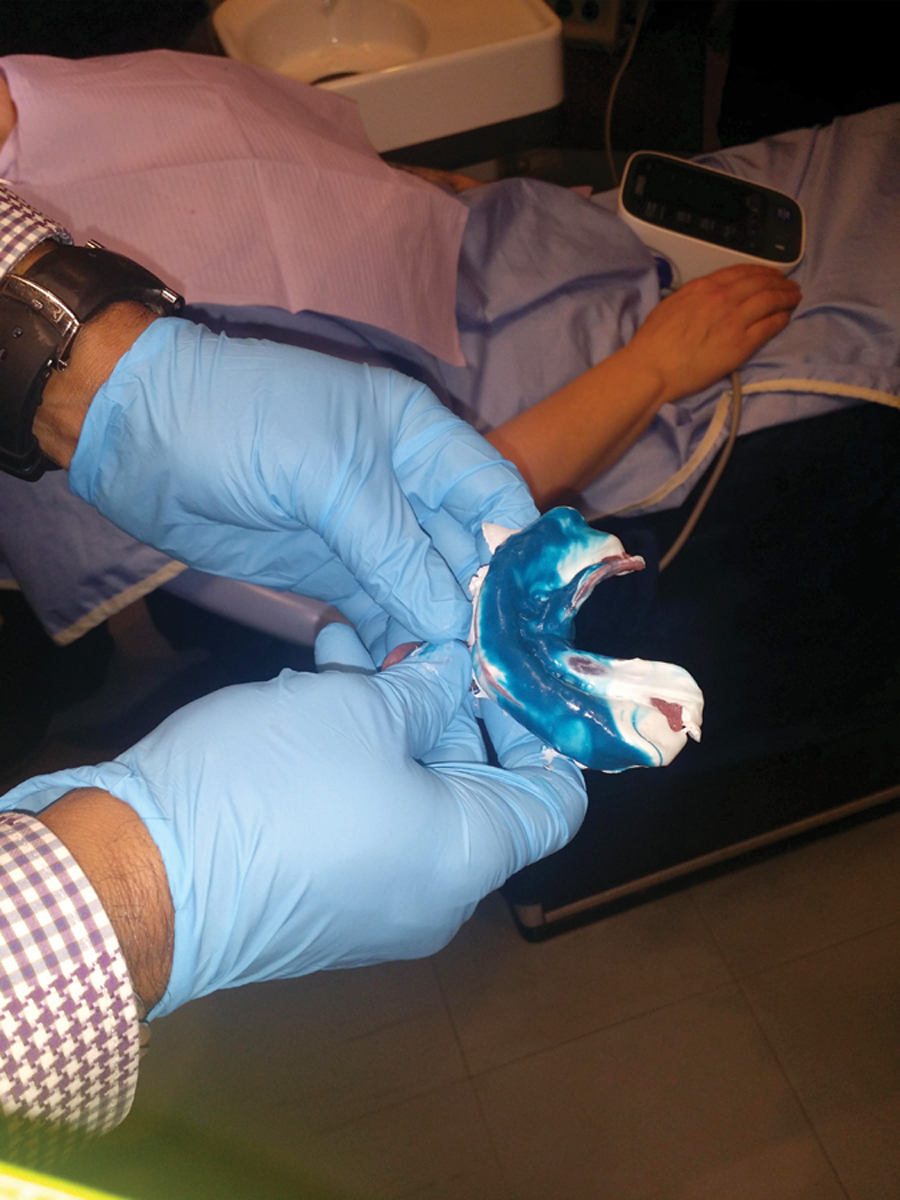
FIGURE 25. Upper and lower impressions with 10 closed tray impression copings.
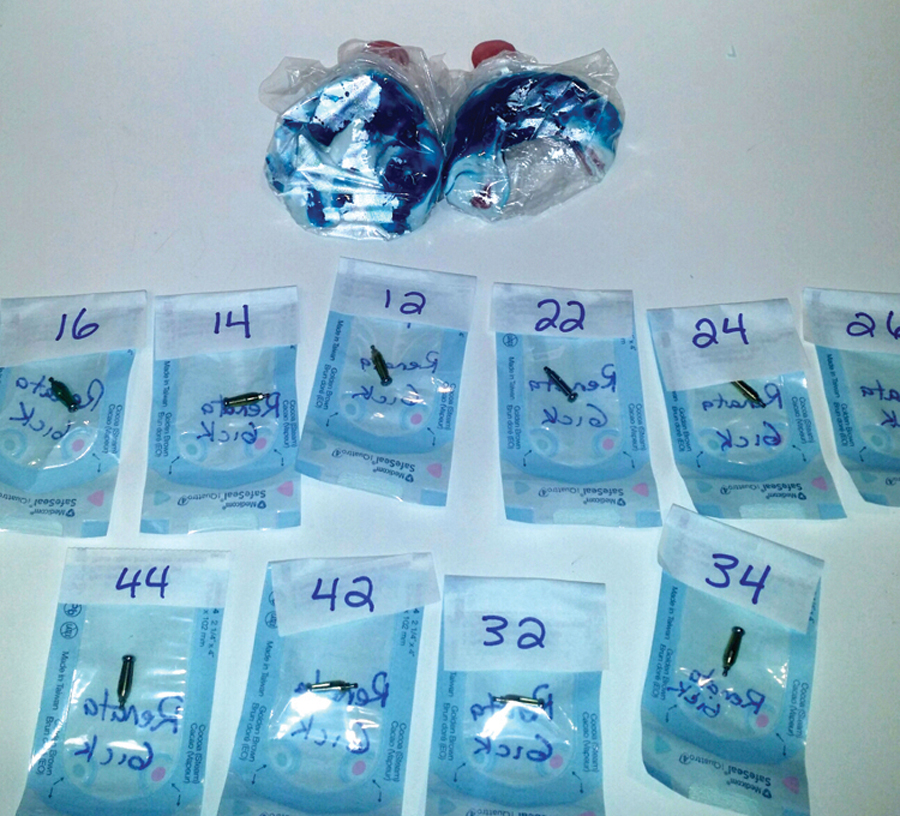
FIGURE 26. Removing lower healing collar.
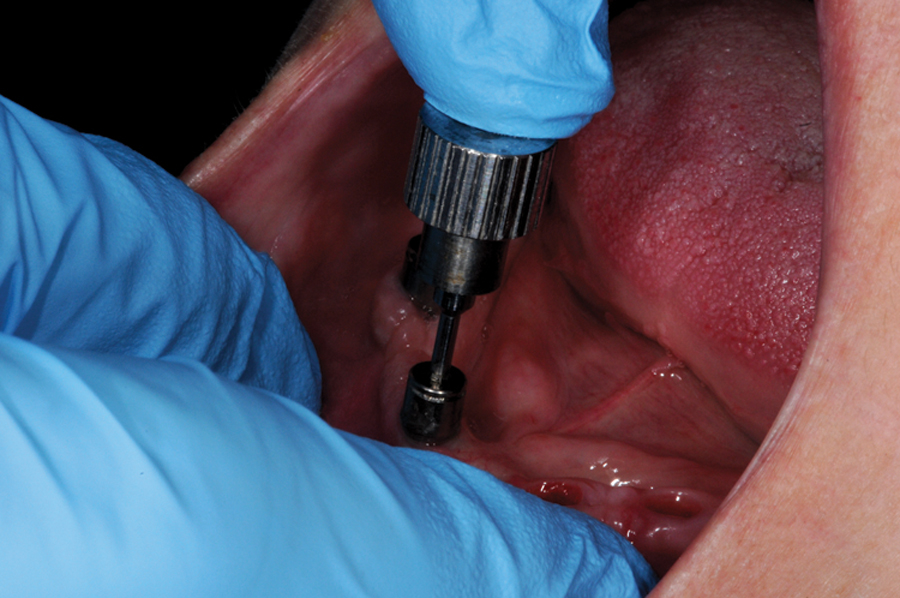
FIGURE 28. Removing upper healing collars.
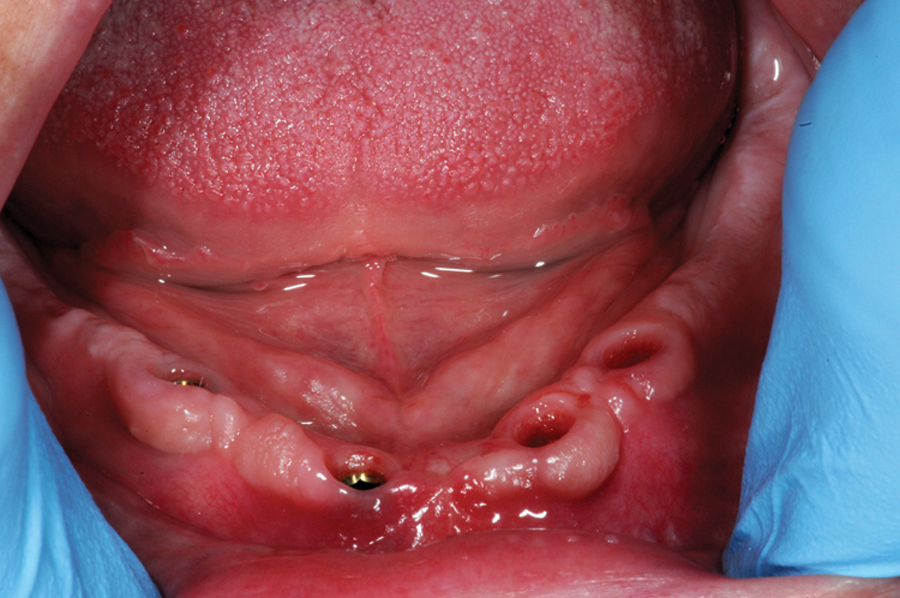
FIGURE 29. 6 upper implants with healing collars removed.
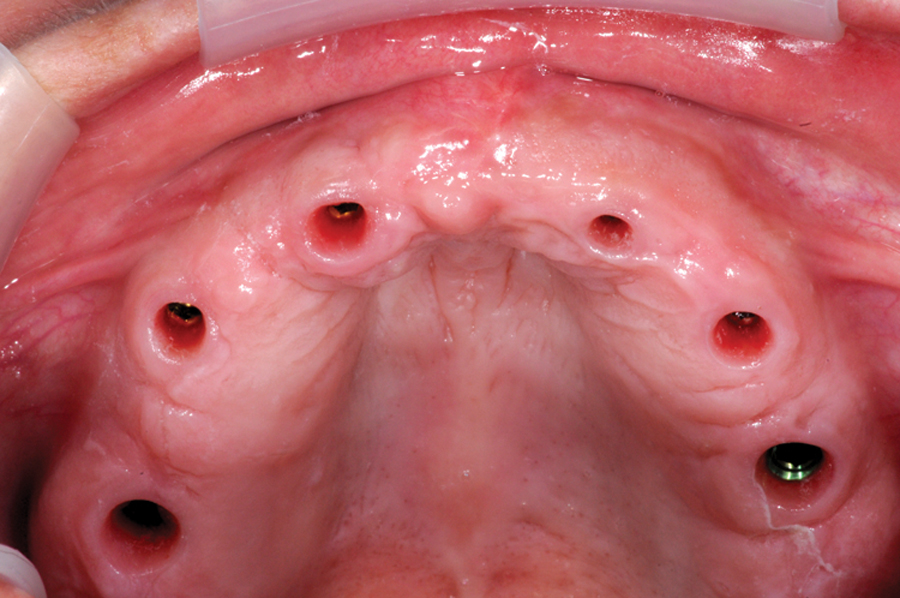
FIGURE 30. Removing the prosthesis from the model.

Presentation of Treatment Plan
The treatment plan was submitted to the AACD and was accepted. The treatment plan was then presented to the patient. Discussion of the treatment plan phases were reviewed with the patient thoroughly. The patient was also asked to reiterate her expectations. Determining and managing the patients expectations is key to a successful outcome. As dentists providing a cosmetic service, we know the scientific realities of what can and cannot be accomplished. These realities need to be communicated to the patient, such as (for example) the idea that we are not only restoring the teeth but how we also have to aesthetically restore the missing soft tissues and underlying hard tissues due to resorption. The patient consented to the treatment plan.
FIGURE 31. Applying topical prior to try-in of frameworks.

FIGURE 32. Lower framework with waxed-up teeth.
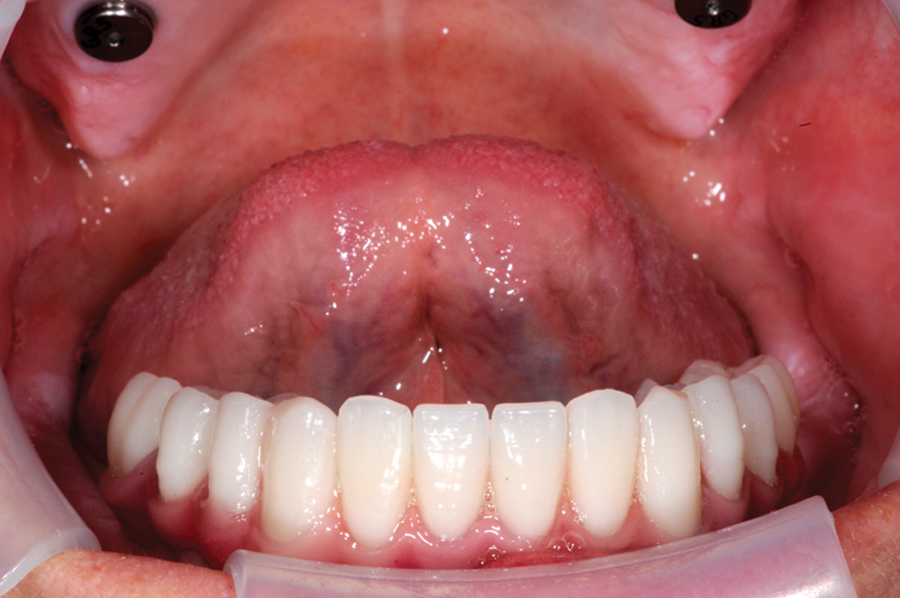
FIGURE 33. Upper framework with waxed-up teeth.
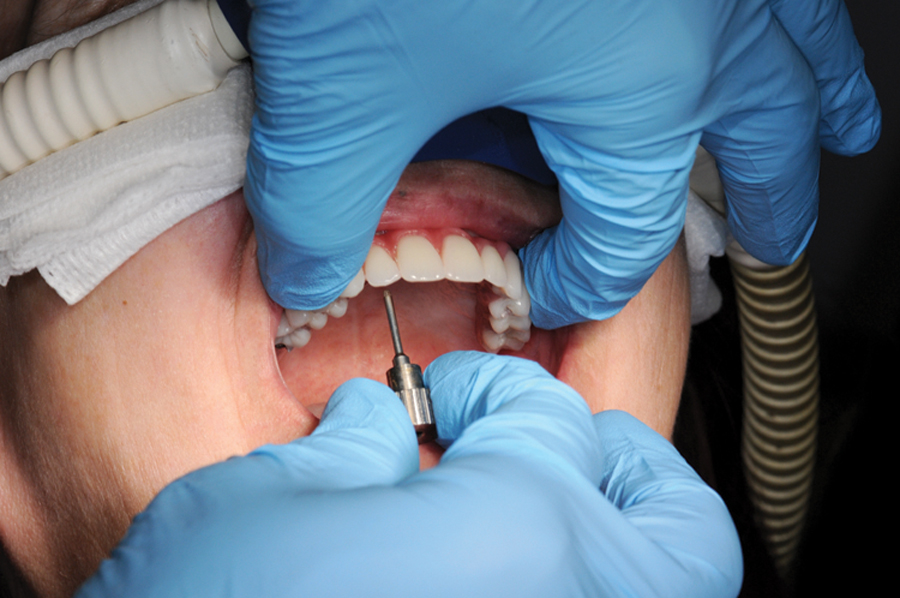
FIGURE 34. Full smile with upper & lower frameworks.
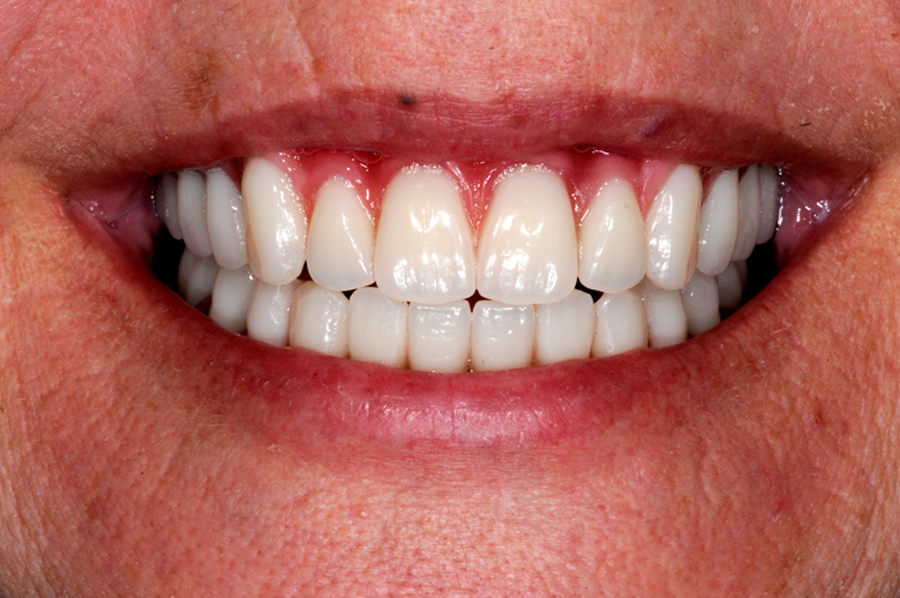
FIGURE 35. Left lateral smile.

FIGURE 36. Right lateral smile.

FIGURE 37. Upper occlusal view of framework and teeth.

FIGURE 38. Lower occusal view of framework and teeth.

FIGURE 39. Evaluating the aestheticsof the maxillary prosthesis.

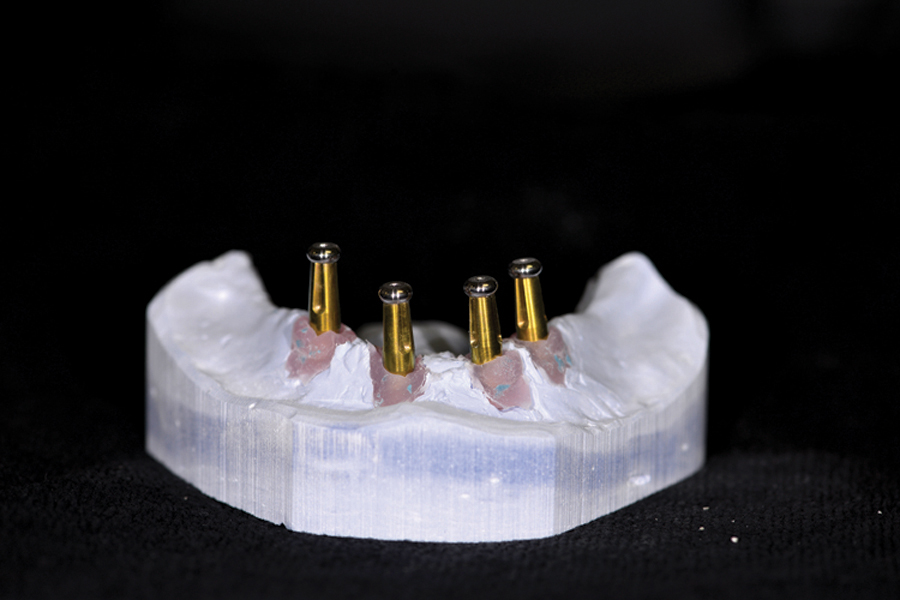
FIGURE 40. Maxillary Impression loaded with implant replicas.

Surgical Phase of Treatment – Dr David Psutka
The surgical procedure was carried out in the coauthor’s surgical suite using full sterile protocol. General Anesthesia was induced with intravenous propofol and maintained with propofol-remifentanyl continuous intravenous infusion. The patient had a naso-tracheal intubation and was ventilated with 100% oxygen during the surgery. She received intravenous ancef (1000 mg) and decadron (10mg).
The surgery included full mucoperiosteal flap elevation and exposure of the maxilla and mandible. The BiohorizonsTM drilling protocol was used for osteotomy preparation, all under copious saline irrigation. Bone quality was general type III. Implant positioning and alignment was determined with the use of a surgical guide splint fabricated preoperatively.
Bilateral lateral window sinus elevation procedures were carried out simultaneous to implant placement. The sinus floor was grafted with Bio-OssTM xenograft material. All implants were 12 mm in length with the 16 and 26 implants being wide diameter. The 22 was narrow diameter and the remainder were regular diameter. Six maxillary implants and four mandibular implants were placed. All resisted insertion torques of 45 NCm. Therefore healing abutments were placed immediately.
Hemostasis was good. Closure was obtained with 4-0 vicryl.
The patient was awakened and discharged home after an hour in the recovery room. Routine postoperative home care was prescribed as well as Clavulin 500 mg tid for a week. Oxycocet was prescribed for analgesia.
The patient was seen weekly at first. She had an uncomplicated recovery. No transitional appliance was used as the patient could not tolerate dentures.
The patient was seen at three months. Clinical and radiographic confirmation of successful implant healing was acquired and the patient was referred back to the restoring author for prosthodontic treatment.
A further post surgical assessment was carried out following insertion of the prostheses. Healthy periimplant tissue health was confirmed. Oral hygiene measures were reviewed and emphasized.
FIGURE 41. Mandibular Impression loaded with implant replicas.

FIGURE 42. Maxillary model poured (Capturing soft tissue around replicas)

FIGURE 43. (Same as #43)

FIGURE 44. Mandibular model poured (Capturing soft tissue around replicas).

FIGURE 45.
Post Surgical Appointments
The patient came in for post-op and observational appointments with Dr. Psutka and myself each month for a three to four month period. At the three month mark, Dr. Psutka tested the implants to make sure they were all good(integrated successfully into the bone) and gave the green light to proceed with the restorative phase of the treatment.
The patient was introduced to AACD Accredited laboratory technician, Trevor Laingchild. Through consultations and further communications with the patient, her aesthetic desires were further discussed. More diagnostic information was gathered through measurements and digital photographs. It was conveyed to the patient that tooth material and missing gum tissue will be replaced and we would be using fixed implant supported maxillary and mandibular prothesis. It was reiterated that the prosthesis would not be resting on her oral mucosa as this was a concern to the patient.
FIGURE 46. Bite taken with implant supported temporary cylinders. (Verification of accuracy of implant positions taken with X-rays).

FIGURE 47. Models mounted according to bite and occlusal plane in harmony to the intra – pupillary line. Denture teeth set up considering the contours of the bite rims and anatomical tooth selection.
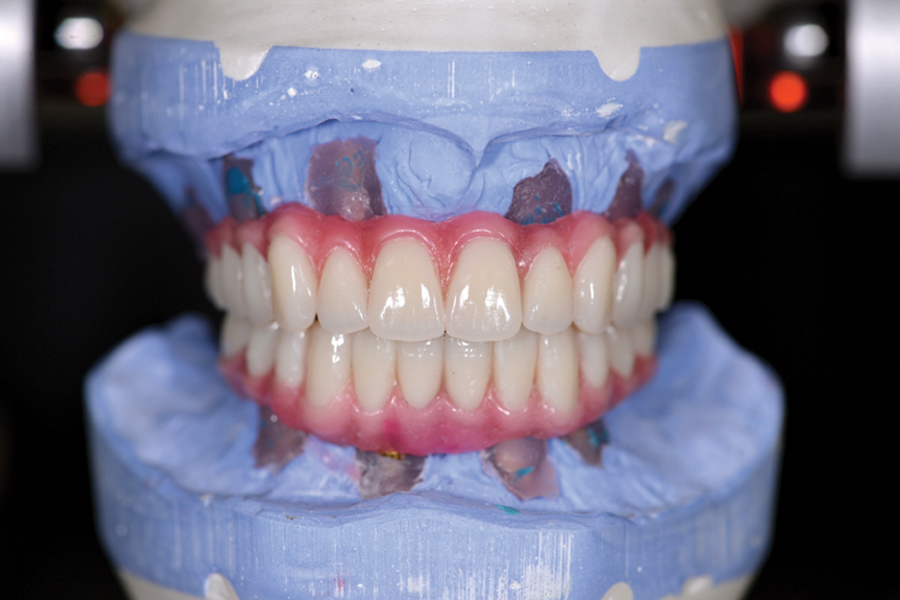
FIGURE 48. Left lateral view of try-in on articulator.
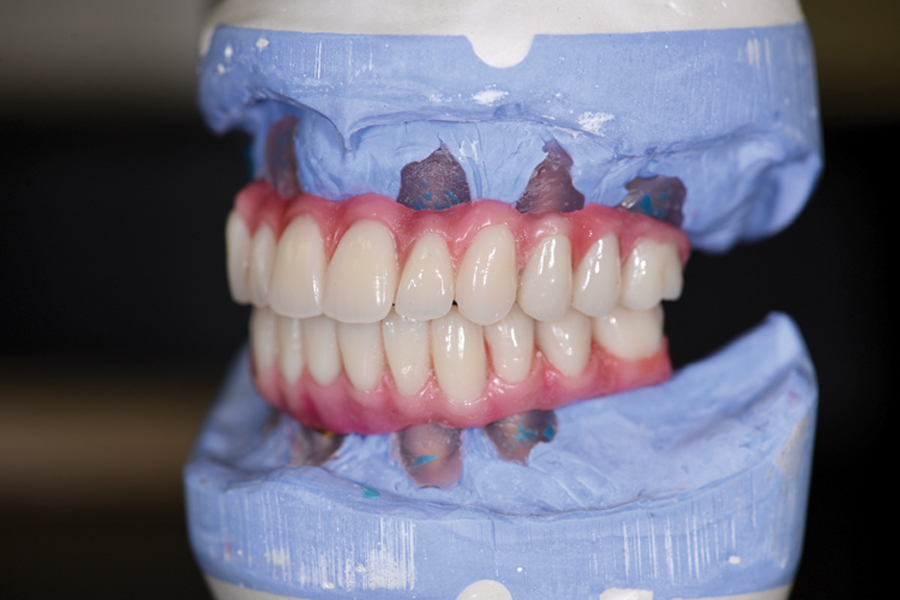
FIGURE 49. Right lateral view of wax-up.

FIGURE 50. Intra-oral try-in (retracted).
Final Impressions
With the assistance of Dr. Oleh Korol, Oral and Maxillofacial Surgeon, the patient was given IV sedation to do the final impressions. The patient’s gag reflex was so severe that she could not cope having impressions taken. Once under sedation the closed tray impression copings were inserted and the final impressions were easily obtained.
The six upper healing collars were removed and replaced with six impression copings.
Similarly on the lower, the four healing collars were removed and replaced with four impression copings. BiohorizonsTM donated the implants and all implant related hardware and materials for this case such as lab analogs, healing collars, and impression copings.
After fully hand tightening the impression copings, radiographs of both the upper and lower arches were taken to verify that the impression copings were fully seated. With this confirmation final impressions with light and heavy body polyvinyl siloxane were taken of the upper and lower arches using custom trays.
With the final impressions completed, each of the impression copings were removed one by one and placed in sealable pouches and labelled to match with the corresponding position of the implant. The healing collars were then replaced.
At this stage the case was ready for the technician, Trevor Laingchild, to fabricate the fixed prosthesis for both the maxilla and the mandible.
FIGURE 51. Intra-oral try-in (Evaluation of tooth position, with relationship to phonetics, occlusion, function, lip support and overall appearance).
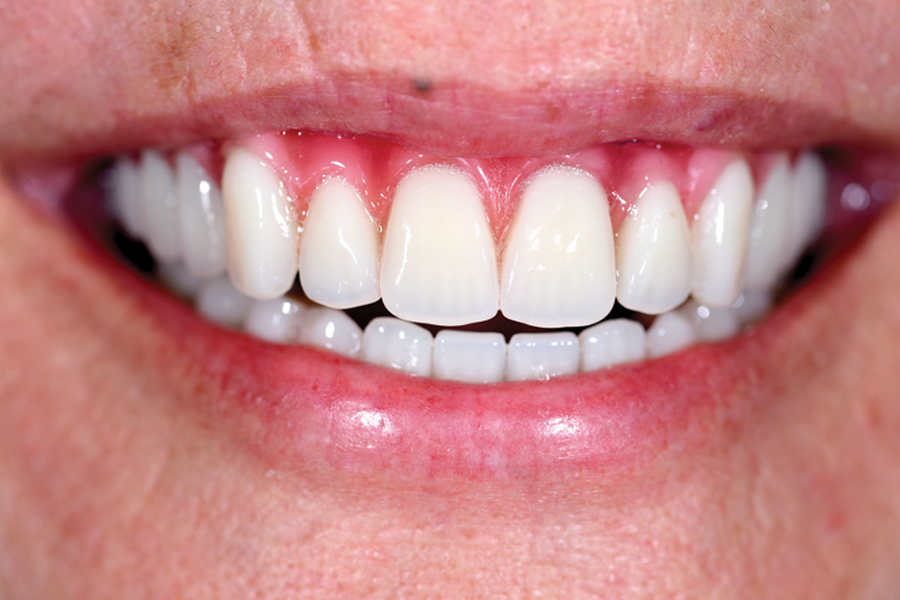
FIGURE 52. Right lateral view of try-in.
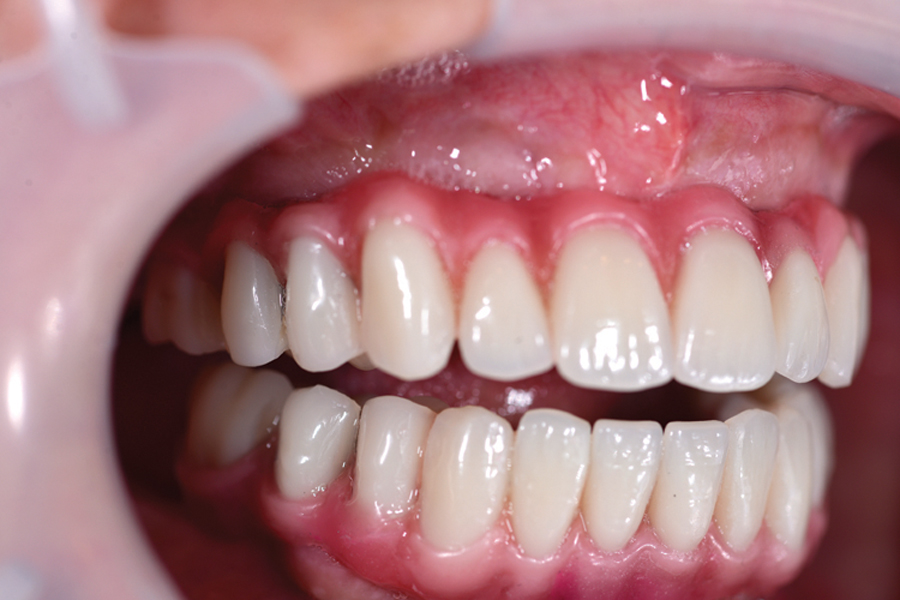
FIGURE 53. Left lateral view of try- in.
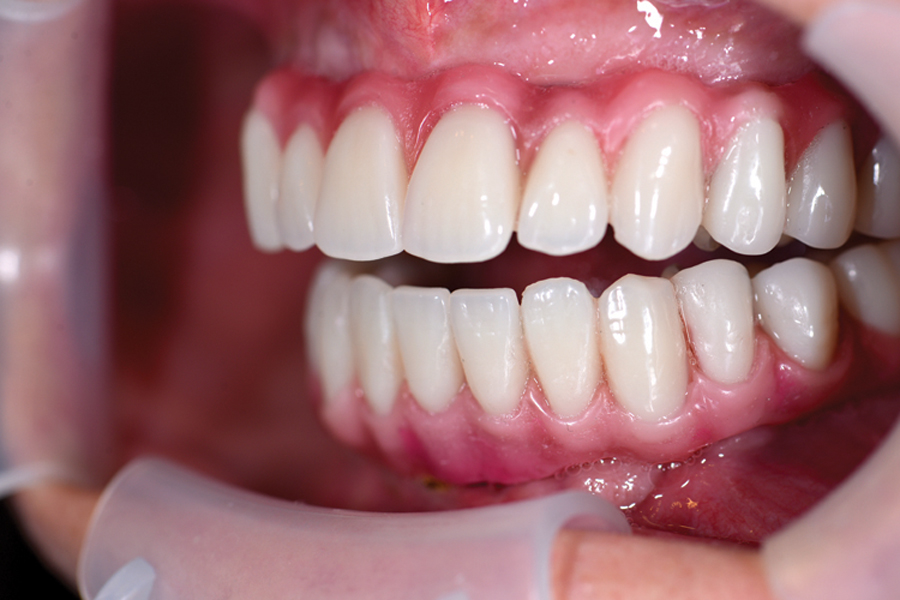
FIGURE 54. After successful try-in, a matrix is utilized in order to place the correct position of the retaining cylinders, within the framework (Mandibular).
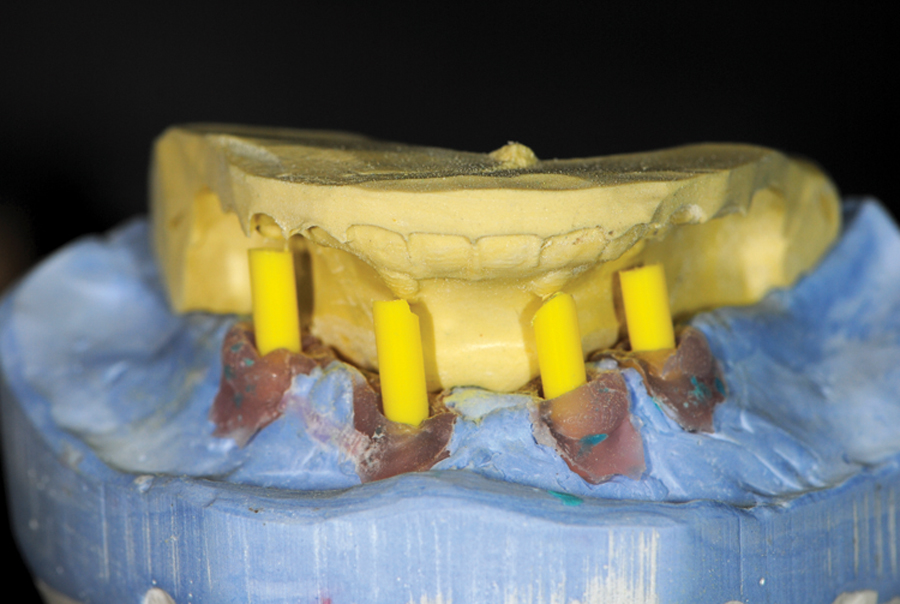
FIGURE 55. After successful try-in, a matrix is utilized in order to place the correct position of the retaining cylinders, within the framework. (Maxillary)
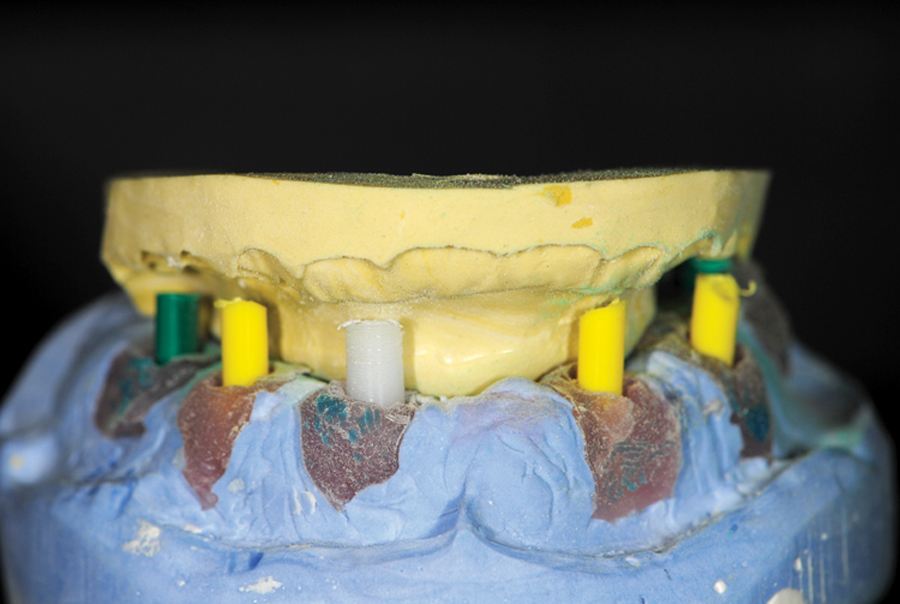
FIGURE 56. Wax-up of framework within the matrix (Mandibular).

FIGURE 57. Wax-up of framework within the matrix (Maxillary).

FIGURE 58. Image showing sprueing technique for the casting of the framework (Mandibular).

FIGURE 59. Fitting of cast framework within the dimensions and position of the denture teeth (Mandibular).

Bite Registration
On the bite registration appointment the healing collars were removed without any local or sedation. The upper and lower cast frame work with wax rims were hand tightened to verify fit and to make sure that the framework was fully seating passively into the implants. The framework did fit passively into the implant and the fit was verified with radiographs.
The wax rims were then adjusted and modified while still in the patient’s mouth. The vertical dimension of occlusion was established. Upper and lower lip support, the position of the central incisors, while lips were in repose and full smile were marked. The plane of occlusion of the teeth was verified to make sure it was parallel with the pupils of the patients eyes and freeway space was assessed.
The bite was then registered and photographs were taken by Trevor Laingchild who was present during this stage in our office so that he could assess how the wax rims were looking in the patient’s mouth. The bite registration was done with IvoclarTM virtual bite registration material. After the bite was registered the framework was removed and the healing collars were replaced.
FIGURE 60. Fitting of cast framework within the dimensions and position of the denture teeth (Maxillary).
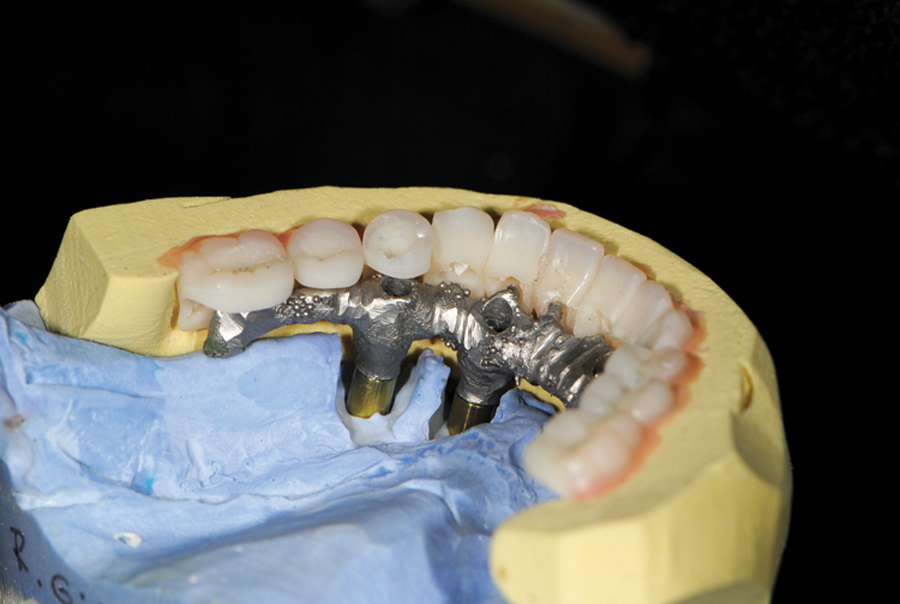
FIGURE 61. After fitting accurately under microscope the framework is opaqued in order to mask aesthetically the metal within the denture.

FIGURE 62. Waxing of denture teeth to the opaqued framework(Maxillary)

FIGURE 63.
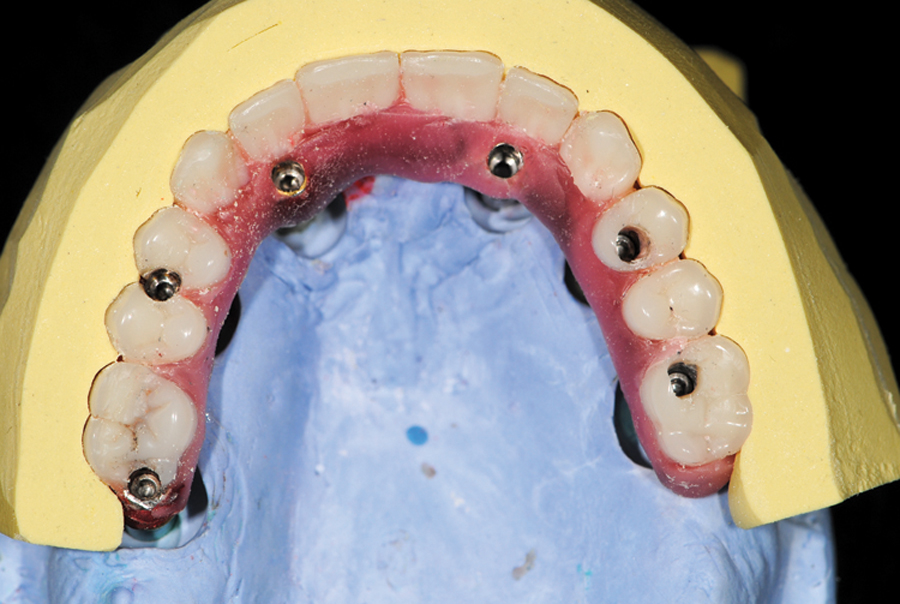
FIGURE 64. Opaqued framework (Mandibular).

Try-in
The patient was brought back for a final try-in to check the upper and lower framework with the teeth. This appointment was done without anesthesia. The healing collars were removed and the cast framework with the teeth set in the wax was placed on the implants.
The same inspections were made checking the lips at rest, in repose and active. Digital photographs were taken for further study, the patient’s feedback was also noted. The framework with the teeth set in the wax allowed us to assess the aesthetics, lip support, and the vertical freeway space and vertical dimension. Occlusion was also verified.
This assessment was done to analyze and confirm aesthetics. We also wanted to be certain that the patient was happy with the aesthetics and felt comfortable with her smile. Renata was happy with the aesthetics and feel of her appliances. She consented to proceed with the completion of the upper and lower prosthesis with teeth.
The framework was removed and the healing collars were replaced.
FIGURE 65. Acrylic processing of both dentures (Mandibular and Maxillary).
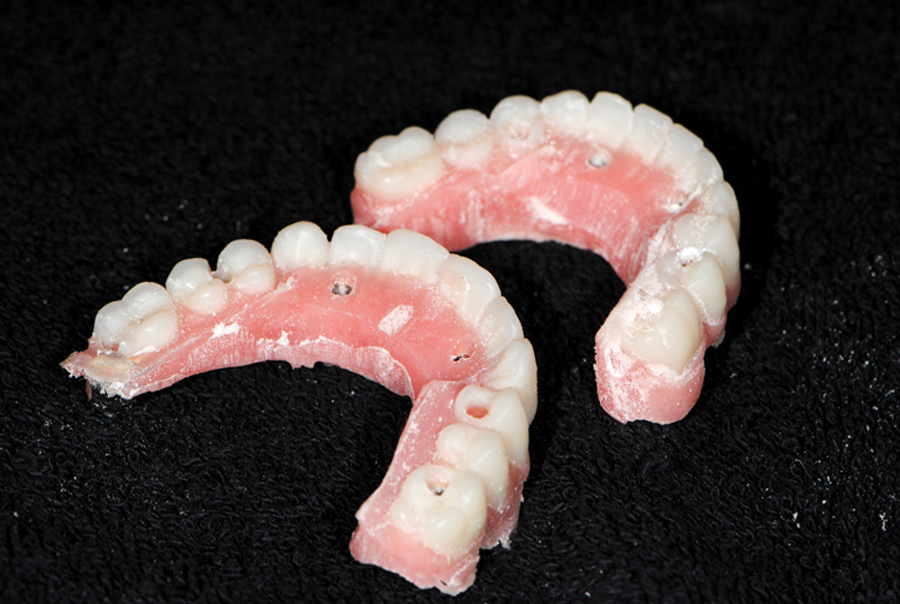
FIGURE 66.
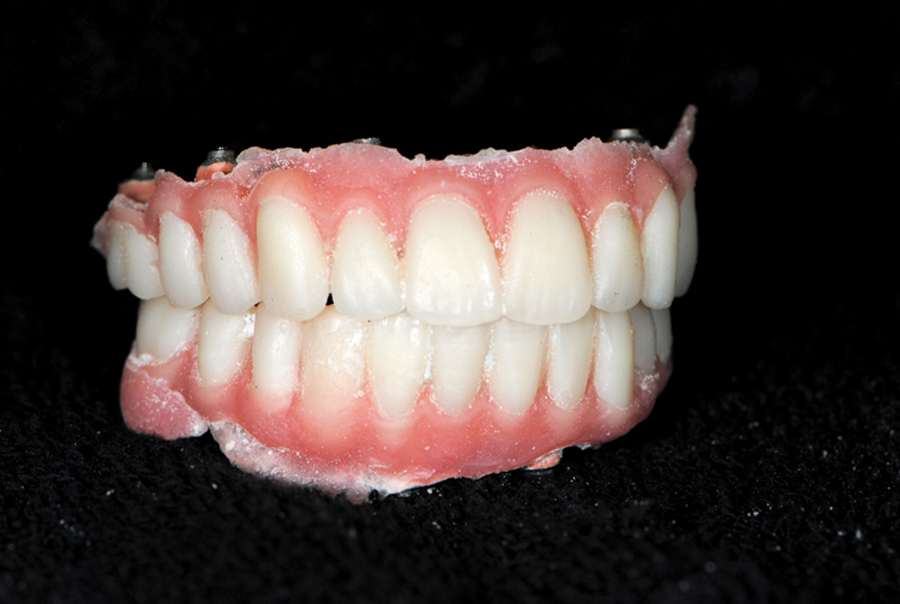
FIGURE 67. Processed acrylic dentures fitted back to articulator. Adjustments made to confirm occlusion and denture base form. Special attention is taken to ensure no fitting surface concavities.

FIGURE 68. Polished dentures showing aesthetic tissue shading.

FIGURE 69.
Lab Phase of Treatment-Trevor Laingchild RDT A AACD
The treatment plan, which was prescribed by Dr. Arun Narang, included both a fixed implant supported maxillary and mandibular full arch prosthesis.
The following is a pictorial overview of the complete laboratory fabrication process.
It was such a pleasant and rewarding experience to help Renata in her quest to regain a level of oral fitness and wellbeing. The laboratory fabrication process went exactly according to plan and the final result was beautiful. My interaction with Dr. Narang and Renata during the clinical appointments was paramount as to ensure a great communication within the restorative team. The aesthetic and functional demands were met for Renata and to see her joy after being edentulous for so many years was extremely gratifying.
Trevor Laingchild would like to thank Mike Mistur, RDT, for his amazing technical contribution to the successful outcome of this clinical case.
FIGURE 70. Polished dentures showing aesthetic tissue shading. (Same as 69 & 70)
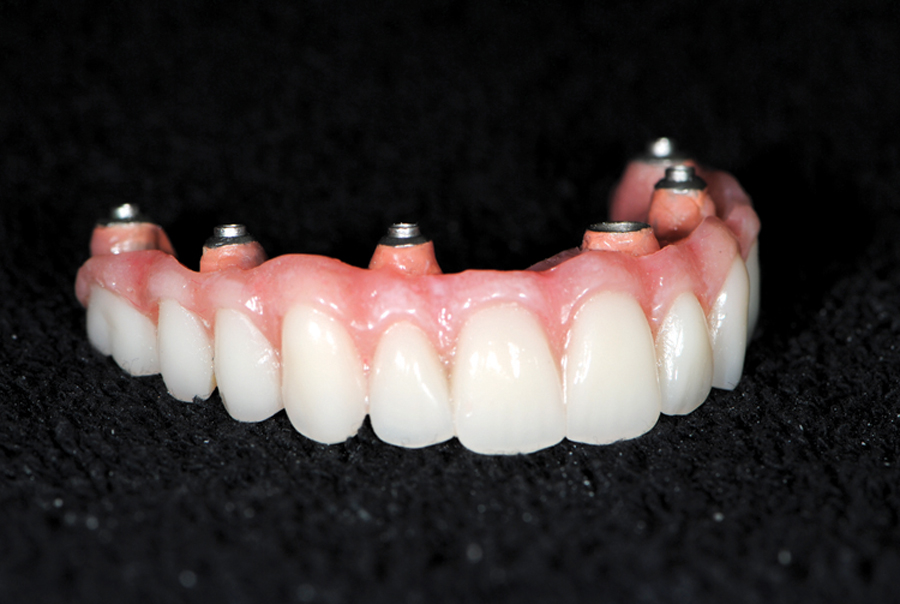
FIGURE 71. Polished dentures on articulator.

FIGURE 72. Full-face with framework & teeth inserted.

FIGURE 73. Full smile non-retracted.

FIGURE 74. Smile retracted.

Insertion of the Restoration
This appointment was done without local anesthesia. The healing caps were removed and the cast framework finished fixed prosthesis for the upper and lower arches were inserted and hand tightened. The fit was verified with radiographs of upper and lower arches to make sure the prosthesis were fully seating in the implant. The patient was shown the final restoration in her mouth to give us her approval and to make sure she was happy with the final aesthetic results and that she was comfortable with her occlusion. She was happy with the results and consented to proceed with the conclusion of the case.
Each individual implant was then torqued 35 N-cm. The access holes were covered with plumbers tape and pink RenamelTM microfilled resin, which was cured and polished. Post-operative photographs were taken.
The patient was asked to come back three additional times to check occlusion. At each appointment time we checked occlusion centric relation, protrusive contacts and left and right lateral excursive contacts to make sure everything was balanced and comfortable for the patient. The patient was ecstatic with her new smile and teeth.
FIGURE 75. Occlusal view of upper arch.
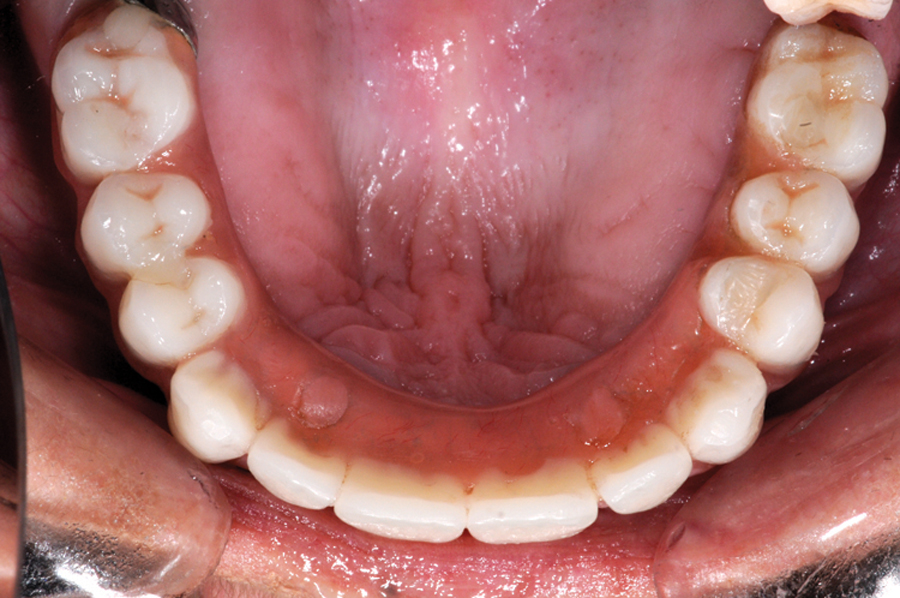
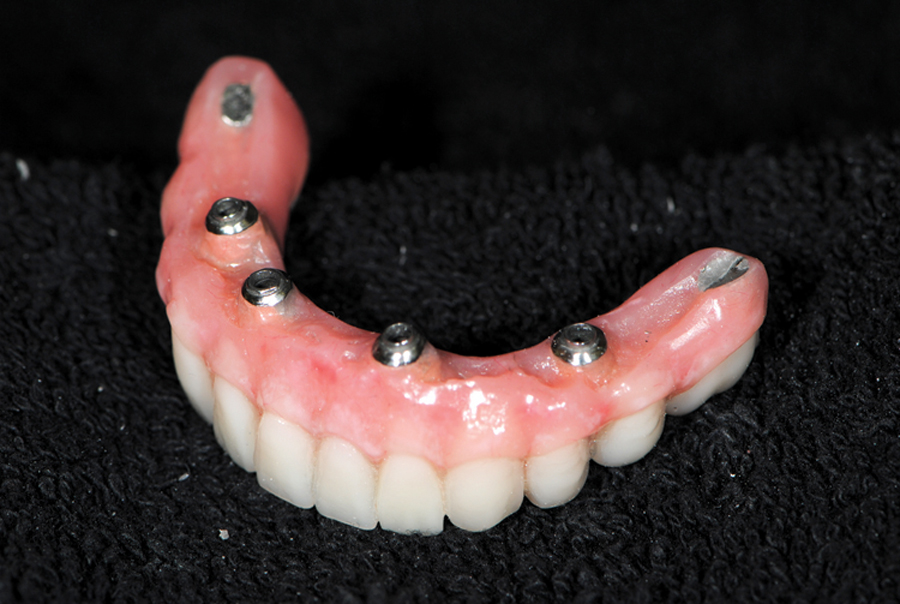
FIGURE 76. Occlusal view of lower arch.
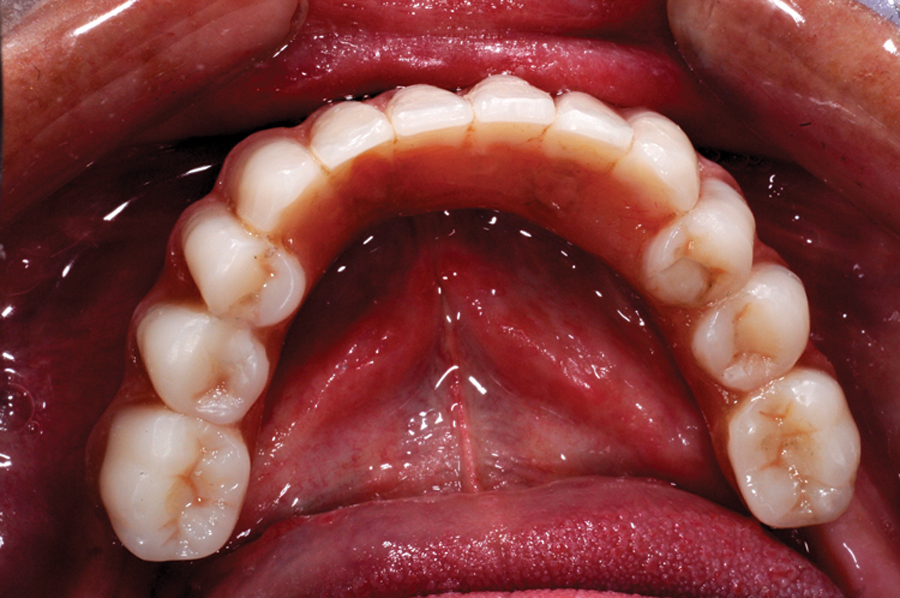
FIGURE 77. Verification radiographs to make sure frameworks are fully seated on implants.
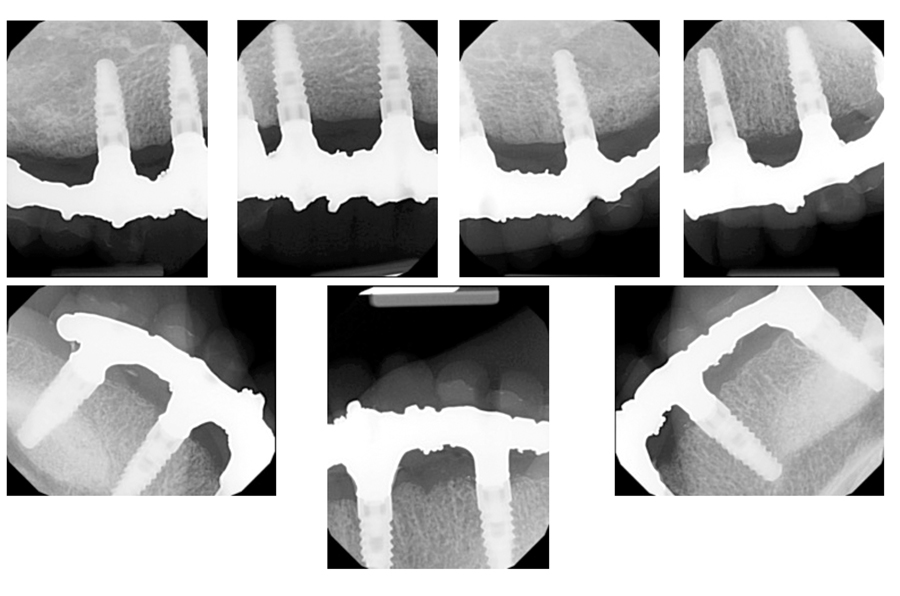
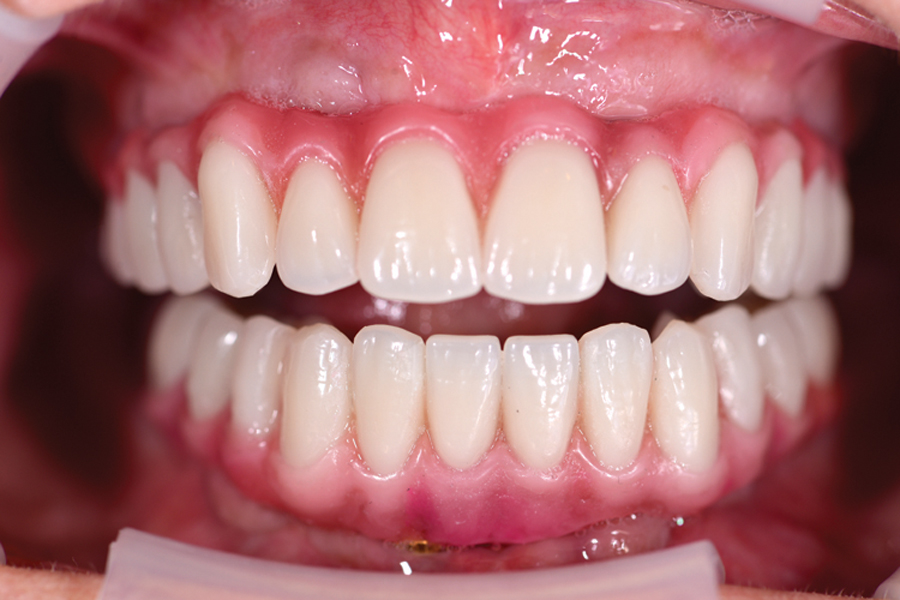
FIGURE 78. Final panoramic radiograph of maxillary and mandibular prosthesis.
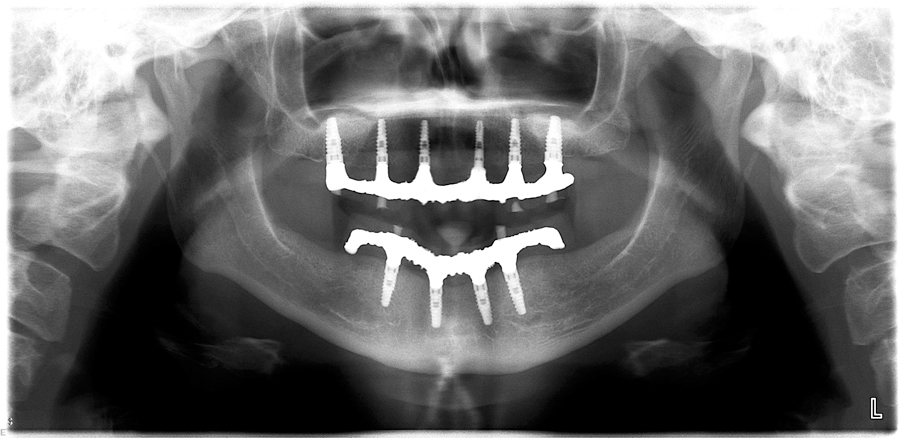
FIGURE 79. Glamour photo.

Conclusion
Since Renata’s smile makeover life has changed for the better. She has overcome her physical and aesthetic challenges that have impaired her for almost a decade.
Being able to eat a more complete and balanced diet means Renata’s health has improved and is on the mend. The confidence she exudes is easily seen in her body language. She stands tall, speaks to others with full eye contact while smiling and laughing. Psychologically she has become the social, outgoing woman she once was. Not only has Renata’s smile been restored but her faith in humanity.
Renata knows that none of this would have been possible without the help of a special group of people who donated their expertise and time to make Renata’s dream of a smile a reality.
A special thank you to the American Academy of Cosmetic Dentistry (AACD) that conceived the ‘The Smile Story’ and put it into action. A special thanks also to Oral Radiologist Dr. Milan Madhavji , Anesthesiologist Dr. Zbigniew Wajtasik and Oral Surgeon Dr. Oleh Korol. Also thank you to BioHorizons Implants for donating the implants and all parts, and Ivoclar-Vivadent for donating the teeth for the upper and lower prosthesis. OH
Dr. Arun Narang is founder of Dr. Arun Narang & Associates. Dr. Narang manages and practises in three multidisciplinary dental offices in Mississauga and Oakville, Ontario area. Dr. Narang has over 32 years experience in general and cosmetic dentistry.
Dr. Narang has served as the Past President and Executive Member of the Toronto Academy of Cosmetic Dentistry (TACD). He also served as the Co-Chair of the AACD Profession Education Committee. Dr. Narang is an active member of the AACD and currently serves on the Board of Directors.
Dr. Narang was a co-creator and hosted “Smile File” on Rogers TV. He has been published in the Mississauga News & Oakville Beaver. He has been featured as a guest and asked to be an expert source in various news coverages.
Dr. Narang earned his dental degree from the University of Toronto. Dr. Narang is a Fellow of the International Congress of Oral Implantology, Fellow of International Academy of Dentofacial Aesthetics, and belongs to the International Straightwire and Orthopaedic Study Club.
Dr. David PSutka is an oral and maxillofacial surgeon who maintains a private practice with focus on implant, orthognathic and TMJ surgery in Mississauga, and is staff surgeon at Credit Valley Hospital and Trillium Health Centre.
Dr. Psutka is senior staff oral and maxillofacial surgeon and co-founder of the Mount Sinai Hospital Centre for Excellence in TMJ Reconstructive Surgery and attending surgeon at the University of Toronto and teach staff at the University of Toronto Residency Program in Oral and Maxillofacial Surgery and Anesthesia. He is also an examiner for the Royal College of Dentists of Canada.
Dr. Psutka is past president of the Ontario Society of Oral and Maxillofacial Surgery and the Halton Peel Dental Association. Dr. Psutka received the Ontario Dental Association Service Award in 2005.
Trevor Laingchild’s sense of adventure has taken him on an international road in his profession. After formal Dental Education in London, England, he managed a Dental Laboratory in Germany served as Chief Dental Technician for an American Hospital in Saudi Arabia. Further experiences included, expanding his technical horizons whilst working in Norway, Scandinavia. He currently owns and operates dental studios in Burlington and in Yorkville, Toronto.
Trevor is an Accredited member and an Examiner within the American Academy of Cosmetic Dentistry and has served on the Board of Directors. In addition he is a Certified LVI Master Aesthetic Technician. Trevor is very active lecturing and teaching whilst conducting numerous hands on courses in all aspects of restorative aesthetics, of which, he has had numerous articles published worldwide.
Oral Health welcomes this original article.
References
1. Frederic P. Miller, Agnes F. Vandome, McBrewster John VDM Publishing, May 5, 2010
2. Balaji SM.Indian J Dent Res. 2008 Oct-Dec;19(4):344-8. Review.PMID: 19075440
3. Balaji SM. Indian J Dent Res. 2008 Oct-Dec;19(4):344-8. Review.PMID: 19075440
4. Levy HP. Ehlers-Danlos Syndrome, Hypermobility Type. GeneReviews. September 13, 2012; http://www.ncbi.nlm.nih.gov/books/NBK1279/. & 2 TNXB. Genetics Home Reference (GHR). May 2006; http://ghr.nlm.nih.gov/gene/TNXB.


