
Introduction
Primum non nocere – “first do no harm”–Hippocrates In today’s society, as life expectancy increases, patients expect their teeth to last a lifetime as healthy dentition is important for a good quality of life.1-4 Endodontic therapy is usually the last resort to retain natural teeth and teeth requiring root canal treatment are often structurally compromised due to caries and cracks. Minimally invasive surgical techniques have been utilized in medicine for many years,5 however its adoption in dentistry has been much slower. As newer technologies emerge and develop, minimally invasive approaches are possible today in endodontics while still adhering to biological principles of treatment. As clinicians striving to provide high quality care, we all want to know what the best current available evidence is. The quality of the evidence for the long-term effectiveness of the mechanical objectives of endodontic therapy is weak and thus treatment protocols are highly variable amongst clinicians and oftentimes, the treatment approaches that are the most expedient prevail. Traditional objectives have been focused on maximizing the visual field of access preparations, preparing canals to certain dimensions to facilitate a ‘look’ of the radiographic obturation which is used as a proxy for ‘cleanliness’ of the canal systems.6,7 The long-term survival of endodontically treated teeth (ETT) has been investigated through epidemiology.8-16 These studies suggest that maintaining dentin and achieving appropriate restorative management following endodontic procedures are two of the most critical factors for tooth survival and longevity which is really what our patients desire. Directed Dentin Conservation stems from the restorative requirements for ETT to survive long-term. Some approaches to achieving adequate immediate restoration of ETT were described in our previous article.17 This article discusses the armamentarium available to the clinician to maintain residual dentin structure during endodontic therapy without compromising root canal disinfection and obturation. The two main opportunities to maintain dentin structure present to the clinician during access cavity preparation and root canal instrumentation.
Armamentarium for Conservative Access Cavity Preparation
Access preparation is defined as the removal of a coronal portion of the pulp complex to facilitate canal location and debridement.18 Despite the lack of compelling clinical evidence, a set of rules for endodontic access, established at a time where the endodontic armamentarium had significant limitations, continues to be promoted today to achieve ‘endodontic success’ while decreasing procedural time and difficulty. These rules include: complete unroofing of the pulp chamber and complete visualization of the pulp chamber floor, wall-to-floor junctions and canal orifices with one view.18 This concept of straight-line access was meant to provide the clinician with convenience, at a time where high magnification and illumination, flexible heat-treated nickel titanium (NiTi) instruments and Cone Beam Computed Tomography (CBCT) were not available. With the advent of these new technologies, instead of prescribing a “one size fits all” access cavity design, it is now possible to customize the access based on the tooth’s particular presentation, in order to maintain as much healthy dentin as possible and achieve the best possible outcome that our patients desire.
Access Cavity Design in Anterior Teeth
Traditional access cavity design in anterior teeth involved entry on the lingual or palatal surface using a round bur, through the cingulum (cingulum access), complete “lingual shoulder” removal and full pulp horn unroofing leading to a triangular access outline form.7 This approach was chosen to favour the aesthetic demand, however, unnecessary internal dentin removal, facial gouging or perforation and weakening of the tooth at a critical location (pericervical dentin) often occurs19 (Figs. 1 & 2). As mentioned in our previous article, the pericervical dentin (PCD) refers to the dentin located 4 mm coronal and 6 mm apical to crestal bone. It has been proposed that PCD plays a crucial role in transferring occlusal forces along the root and that maintaining intact PCD is arguably the single most important factor in achieving long-term retention of ETT.20 The cingulum access, due to the initial orientation of the bur angulated towards the facial surface of the tooth, can also increase the risk of facial perforation. Two previously published articles in the endodontic literature suggesting a more incisal approach for anterior endodontic access have recently been revisited.21,22 The new model for anterior access involves moving the entry point away from the cingulum and towards the incisal edge.19 This allows for the preservation of PCD, the least amount of dentin removed, the straightest path to both the facial and lingual/palatal canals and better canal debridement compared to the cingulum access.21 In cases where there is attrition, the access is initiated in the middle of the incisal edge (Fig. 3). Bur selection is also critical for anterior access. Round burs that have traditionally been recommended for endodontic access, are contraindicated. The inherent shape of a round bur creates an “inverse funnel”, where the size of the access cavity is wider as it progresses deeper23 (Fig. 2). Using a bur that minimizes gouging and maintains the narrowest part of the access preparation near the PCD is recommended19 (Fig. 4). This approach maintains as much PCD as possible, an area under severe tensile forces when the anterior tooth is in function24 (Fig. 5). Additionally, data from a CBCT scan, if indicated, can help the clinician visualize the coronal projection of the canal and plan the exact entry point in order to achieve a straight-line access (Fig. 5). Rubber dam isolation that includes adjacent teeth can also help the clinician to visualize the angulation of the roots (Fig. 3).
Fig. 1

Fig. 2

Fig. 3
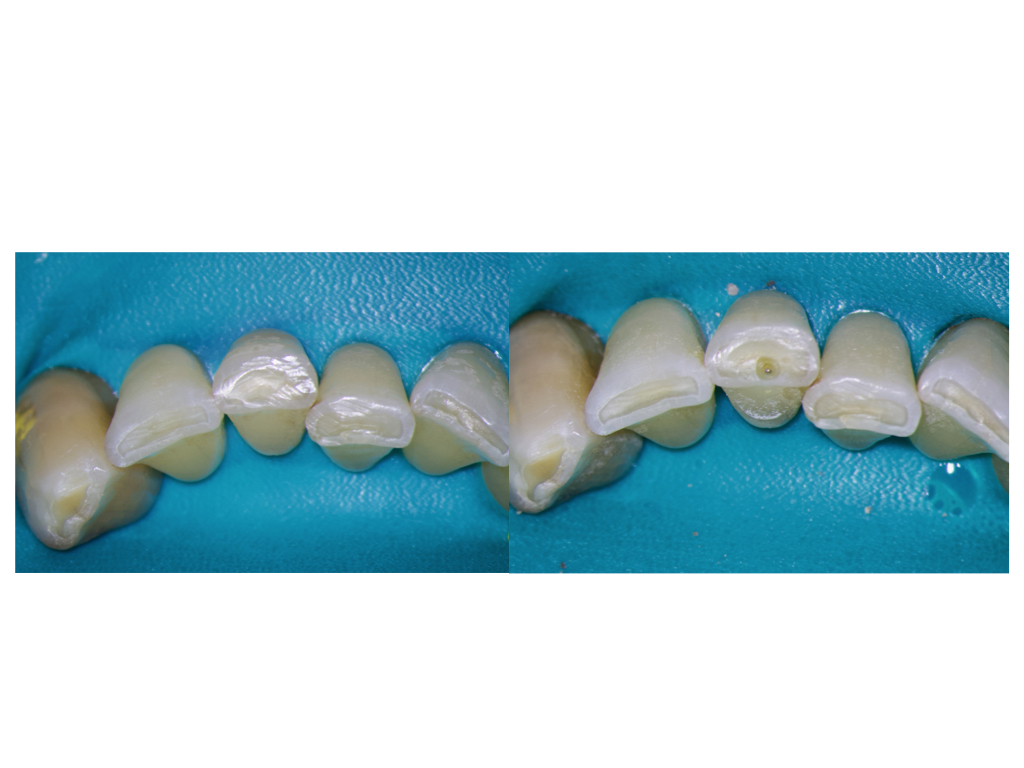
Fig. 4

Fig. 5

Restorative and Caries-Leveraged Access
Tooth structures of no value, as described by Clark and Khademi, include tertiary dentin, undermined enamel, caries and restorations.23 These areas should therefore be leveraged during access preparation (Fig. 6).
Fig. 6
The premise of classic endodontic access is to gain straight-line access into the root canal systems usually through all coronal structures or dental materials; whereas carefully removing materials of no value (leveraging) allows for better visualisation and greater volume of residual dentin, which is the foundation to fracture resistance and long-term retention of ETT.25,26 Leveraged access designs often lead to the preservation of the “soffit”. The “soffit” comprises of undermined dentin at the level of the pulp chamber roof, which is thought to provide additional strength20 (Fig. 7). Advancements in dental materials include modern flexible martensitic heat-treated NiTi rotary files with regressive taper that can be pre-bent (Fig. 8), high magnification and illumination and smaller burs allowing to gain access to canal orifices even in the absence of true ‘straight-line access’. Data from 2D and 3D (CBCT) radiography can also be utilized to approximate the depth of the pulp chamber and design the access cavity. Figures 7 and 9 are examples of caries/restorative leveraged mesialized/distalized access designs. Buccally and lingually located structures that can be leveraged can also dictate the access entry point (Figs 10 & 11).
Fig. 7

Fig. 8

Fig. 9

Fig. 10

Fig. 11

Stepped Access
The stepped access cavity design can be used in both anterior and posterior teeth. It is the design of choice for most accesses through indirect restorations like crowns and onlays. It involves cutting a larger outline in restorative materials down to the level at which dentin is encountered23 (Figs 12-13). The clinician can then assess the location and angulation of the entry point to the pulp chamber based on its anticipated location and dentin color map. The stepped access can also leverage direct restorative materials, leading to an unobstructed path to dentin which facilitates conservative access to the pulp chamber (Figs. 14-15). “TRUSS” ACCESS The “truss” access exemplifies the orifice directed access approach. The truss access is best indicated when there is mesial and/or distal caries or a proximal restoration. In mandibular molars, with minimal canal convergence and a wide platform at the level of the pulpal floor, the “truss” access is the access of choice in order to achieve a straight-line path to the canals while maintaining maximal residual dentin. This preserved dentin structure arguably helps to resist tensile and compressive forces by bracing the lingual and buccal dentin walls (Fig. 16). This type of access should be carefully planned using 2D radiography (adequately angled bitewing) and CBCT scan if indicated. Because the distal canal(s) of lower molars usually project towards the mesial and are the larger canals, it is usually recommended to gain access to the distal canal orifice(s) first (Fig. 17). The presence of restorative material can guide the clinician to the pulp chamber or canal orifice. Once the distal canal orifice(s) is/are located, based on pre-operative radiographic data, the distance from the distal canal orifice(s) to the mesial orifices(s) can be calculated. This distance can be transferred clinically using a periodontal probe to locate the entry point to the mesial canal(s). This type of access requires acquired skills and can have the potential to create additional damage if not executed properly. Misdirection or the use of round burs can lead to iatrogenic errors and unnecessary gouging. Thus, proper case selection and armamentarium, including adequate preoperative radiographs and using tapered burs, is required. By using bent endodontic hand files or ultrasonic tips and by activating the irrigating solutions, disinfection of the pulp chamber is not compromised (Fig 18).
Fig. 12
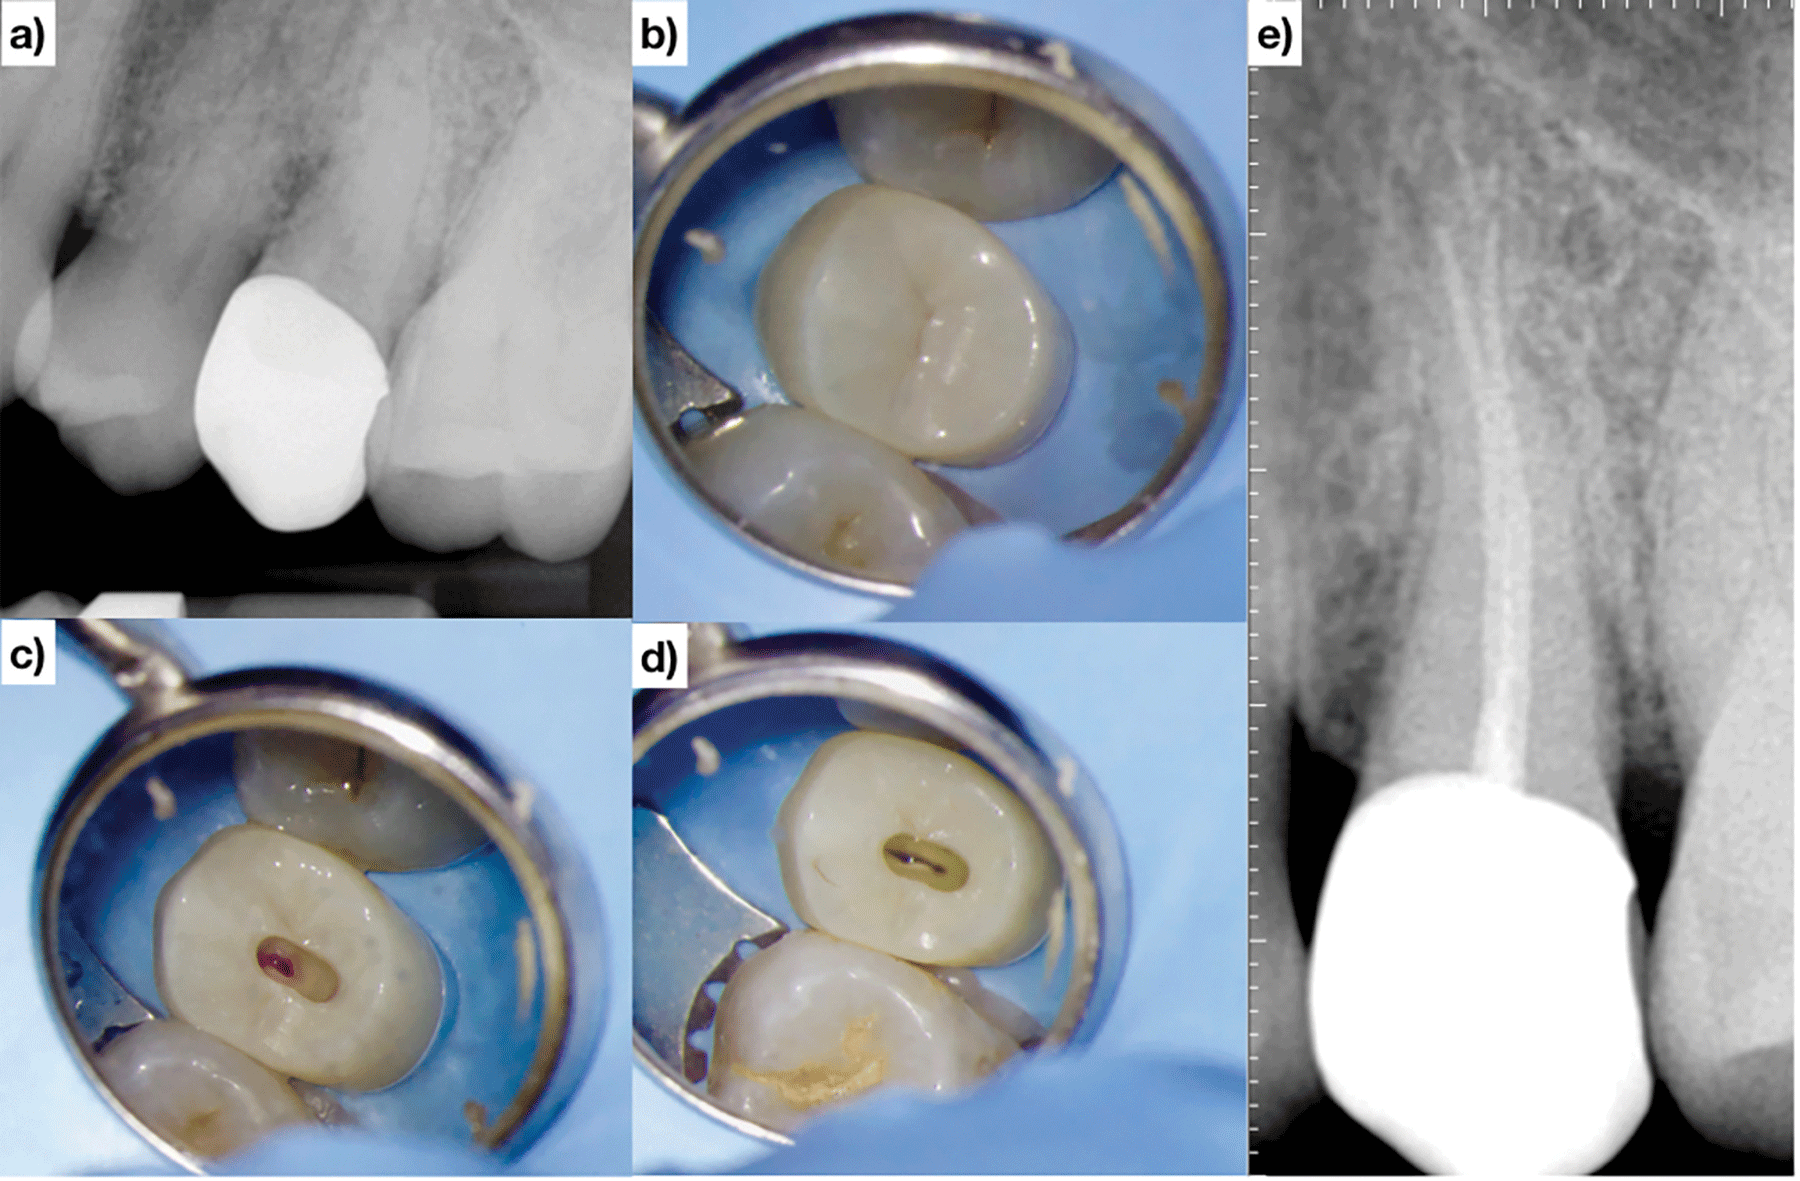
Fig. 13
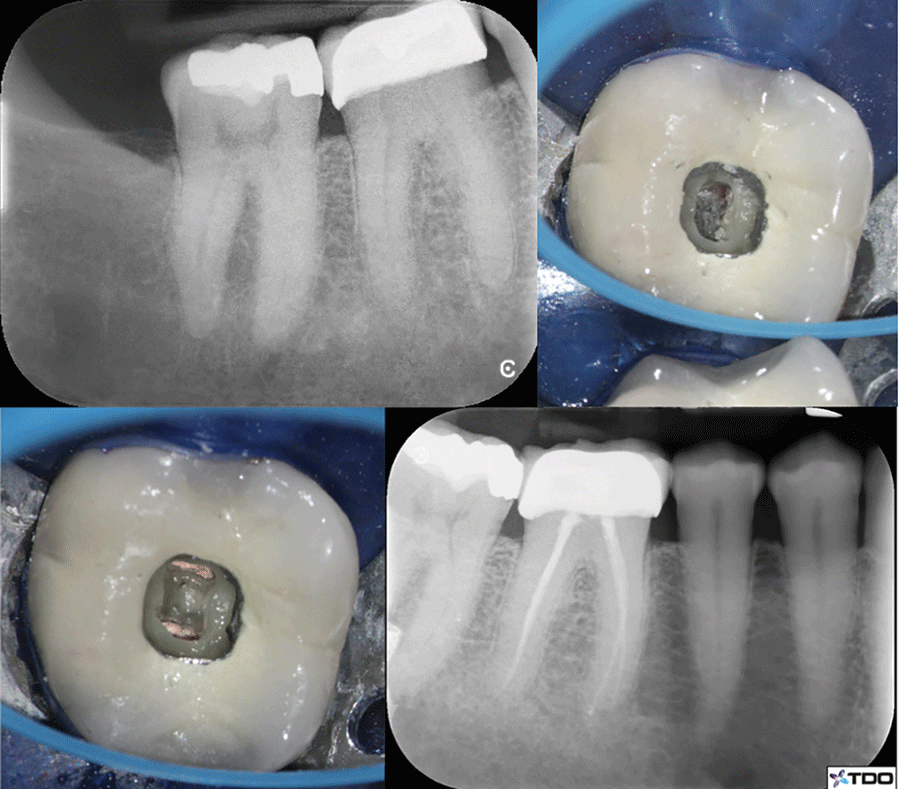
Fig. 14

Fig. 15

Fig. 16
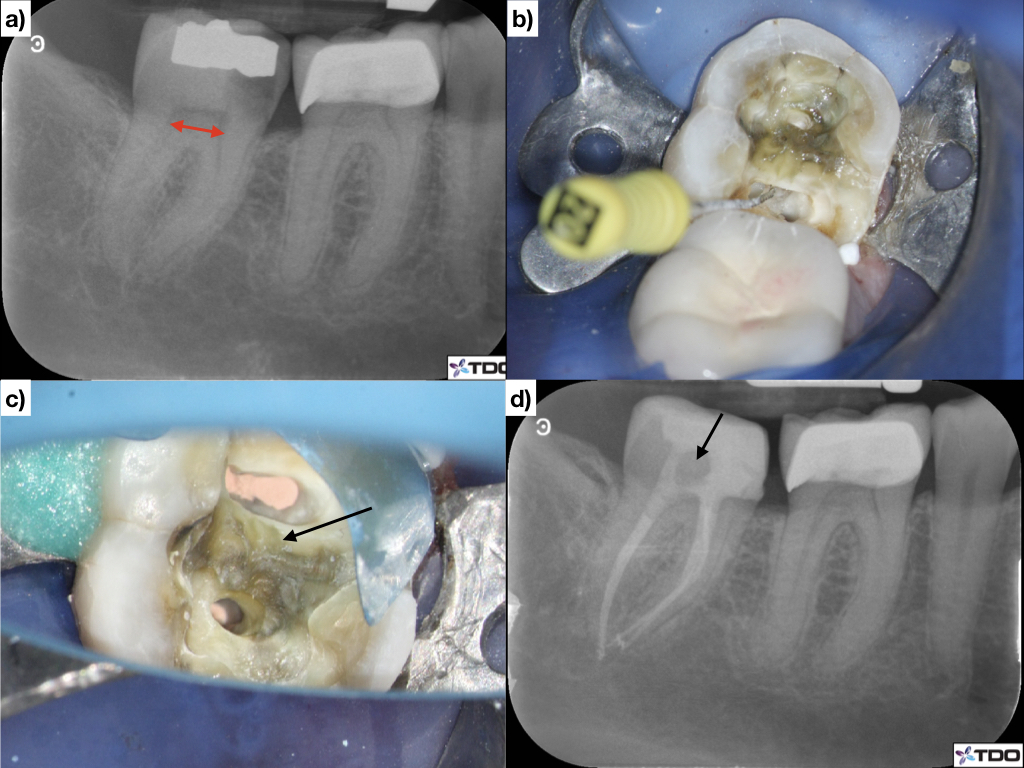
Fig. 17

Fig. 18

Access Design of the Minimally/Nonrestored Posterior Tooth
As a general rule, for mandibular and maxillary molars, the most coronal portion of the pulp chamber is usually the mesio-buccal pulp horn which can sometimes be confirmed by a pre-operative bitewing radiograph (in the absence of radiopaque coronal restoration). Therefore, the clinician should consider penetrating the pulp chamber by aiming at the expected location of the mesiobuccal pulp horn/canal orifice. Access can subsequently be extended as needed, to locate all canal orifices. Additionally, due to the anatomy of most molars, the straight-line access to the distal canals (in mandibular molars) and to the distobuccal and palatal canals (in maxillary molars) inherently projects coronally to the mesial.23 Therefore, full unroofing of the distal portion of the pulp chamber is not necessary to gain straight-line access to these canals as this can lead to unnecessary gouging of dentin and weakening of PCD. Due to these factors, a conservative access in these teeth may have a slight mesial tilt (Fig. 18). Furthermore, “The Law of Centrality” states that the pulp chamber is located at the center of the tooth and the root canal is located at the center of the root at the CEJ level.27 Based on this, access design in virgin or minimally restored premolars will often be centralized (Fig. 20). Preoperative probing can help determining the outline of the expected canal orifices location of any tooth type at the level of the CEJ.
Fig. 19

Fig. 20

Armamentarium for Conservative Root Canal Instrumentation
For many years, the purpose of root canal instrumentation has been based on concepts from the 1970s and centered around the “mechanical objectives” that would ”ensure the biological goals for long-term success”.6,28 The focus of such objectives was to create a canal preparation with a diameter that increases coronally and decreases apically. Based on these objectives, an apical size and taper of at least 25/.08 has been recommended in order to allow for deep exchange of irrigating solutions and resistance form for three dimensional obturation.29 This approach is based on the theory that deep exchange of irrigation solution and deep compaction of thermally softened gutta percha leads to enhanced disinfection and allows for fluid-tight seal obturation which in turn leads to successful treatment.30 These procedural clinical endpoints are surrogate measures that have weak correlations to a clinical outcome of interest to our patients. Surrogate measures are specific dependent variables used to evaluate treatment effectiveness and facilitate investigation in cases where the actual clinical outcome of interest cannot be evaluated. The use of surrogate measures often generalizes findings and fails to capture individual patient factors. Furthermore, the mechanical objectives mentioned above also served as a solution to the instrument limitations that early endodontists were facing at the time: stiff stainless steel hand files and large-diameter hand pluggers and a lack of magnification and illumination.
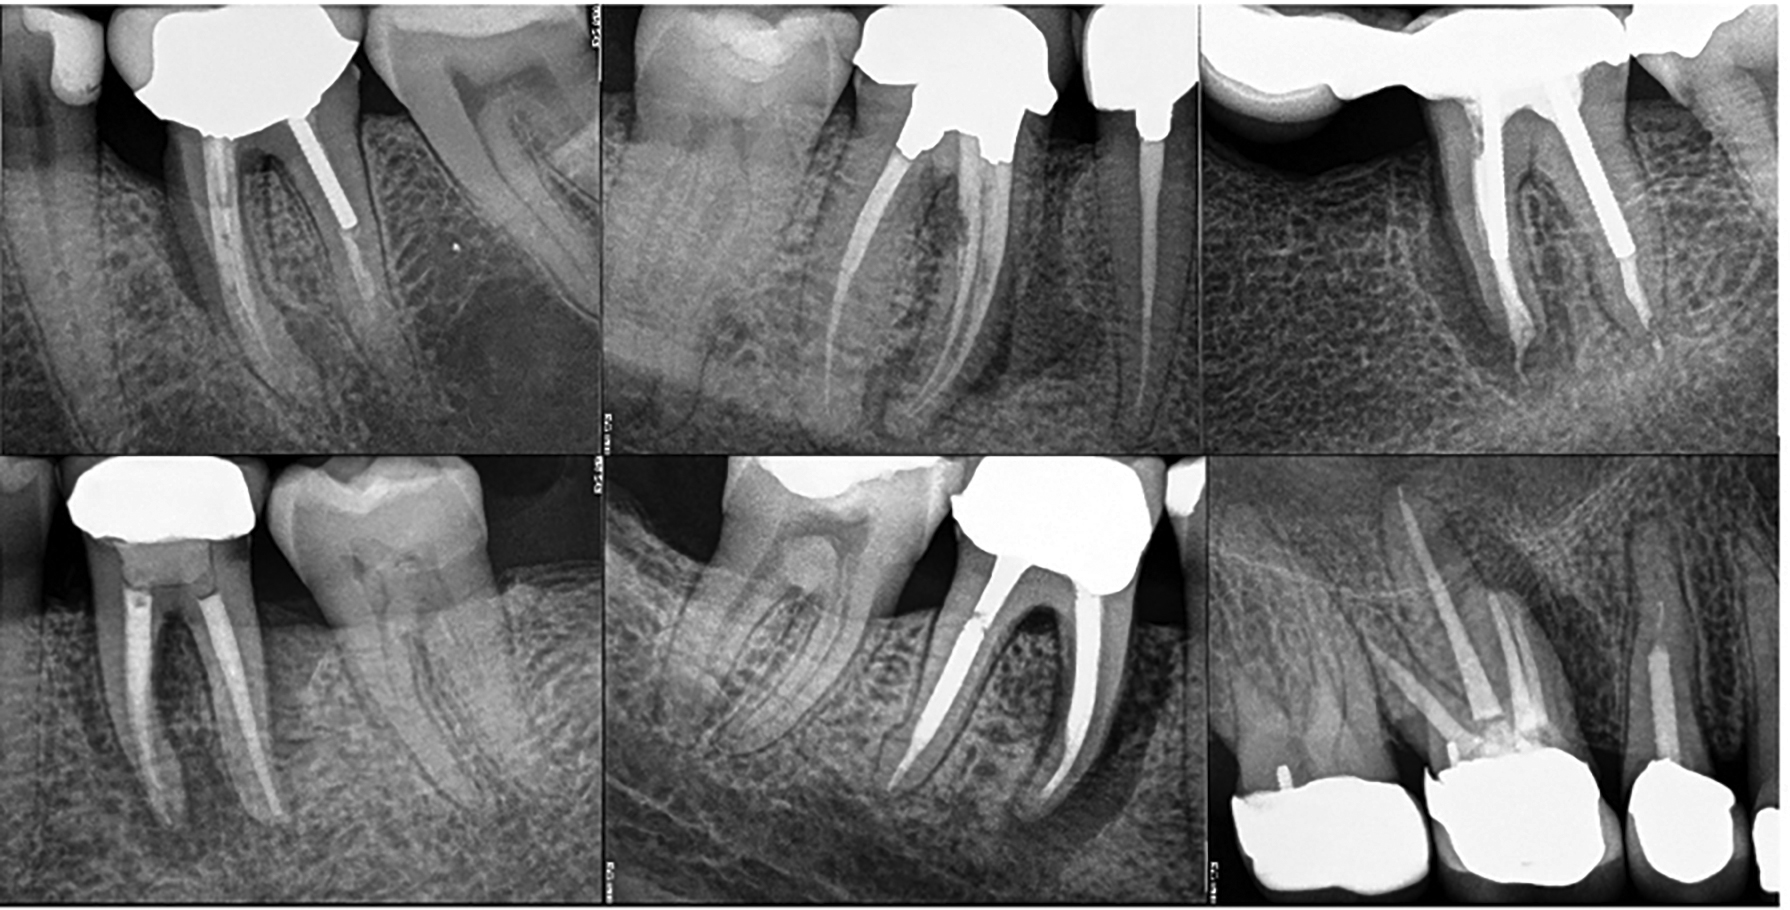
It is now increasingly evident that attempting to fulfill those mechanical objectives may in fact decrease the survival rate of ETT by contributing to structural failures associated with excessive root dentin removal31. Both traditional shaping techniques and contemporary conservative canal instrumentation approaches lack the high level of evidence needed to confirm their superiority over one another, but observational studies overwhelmingly suggest that loss of ETT is far more commonly due to structural failures, including vertical root fractures , as opposed to true endodontic failures8-16 (Fig. 21). Therefore, without ignoring the biological objectives of disinfection and obturation, a particularly focused attention should be given to conserving residual root canal dentin. This section discusses the armamentarium used for conservative root canal instrumentation, and disinfection/obturation of such canals.
Fig. 21
Shaping and Obturation
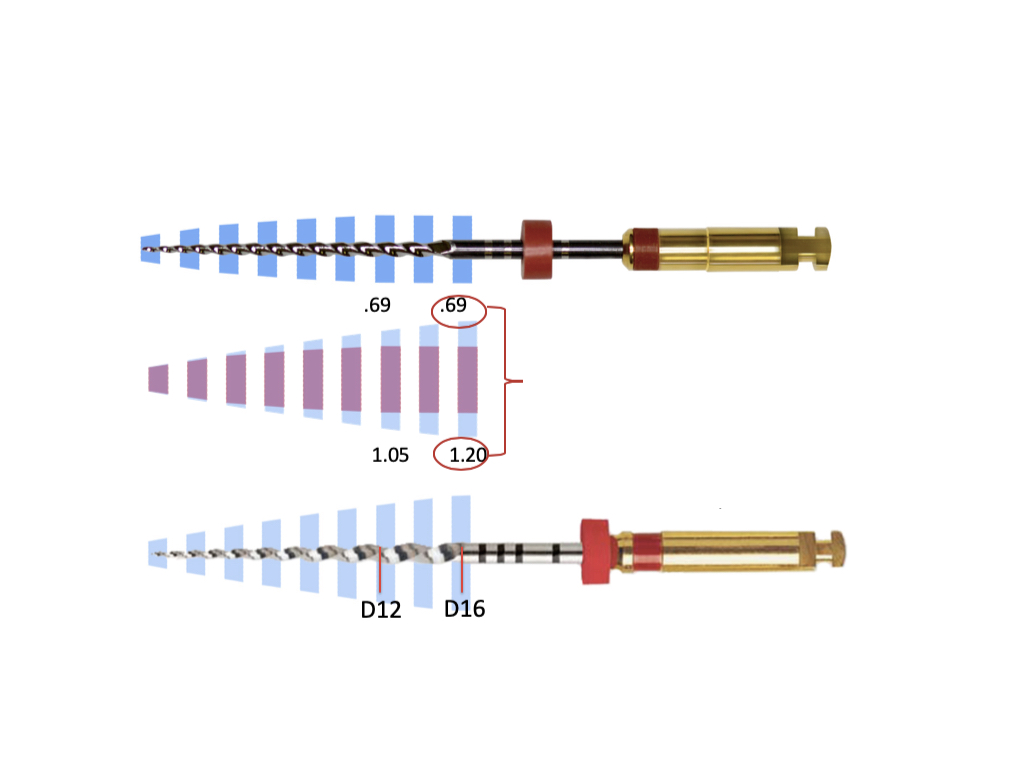
Perhaps the most critical factor involved in achieving conservative root canal shaping is the clinician’s choice of instruments. Large, stiff instruments that will remove excessive dentin or will increase the chance of root perforation or instrument separation should be avoided; such instruments include Gates Glidden drills, large orifice openers, rotary files with excessive coronal taper and/and lacking flexibility or large stainless steel hand files. As a general rule, instruments for conservative and safe shaping should be made of heat-treated NiTi material and have a regressive taper at the coronal portion. Different heat-treated regressive taper rotary file systems are available in the endodontic market. They have a significantly smaller diameter at the level of the canal orifice when compared to many of the popular rotary or reciprocating files. For instance, the most widely used files today have a Maximum Flute Diameter (MFD) at the level of the orifice ranging from 1.00mm to 1.20mm and the constant 0.04% taper rotary files have a MFD at the same level ranging from 0.84mm to 0.89mm. Most regressive taper files with the same tip size have a MFD at the same level of approximately 0.64mm to 0.69mm. These smaller MFD values translates to more dentin preservation (Fig. 22).
Fig. 22
The decision to end the shaping procedure once a certain apical size has been reached depends on many factors including pre-operative size and curvature of the canal, how easily the files progress apically during instrumentation and the clinician’s comfort and ability to eventually obturate the canal. Therefore, different clinicians may develop different comfort zones for a range of apical size preparations. Regardless of the apical size, the maintenance of the peri-cervical dentin should remain one of the main focus of shaping procedures.
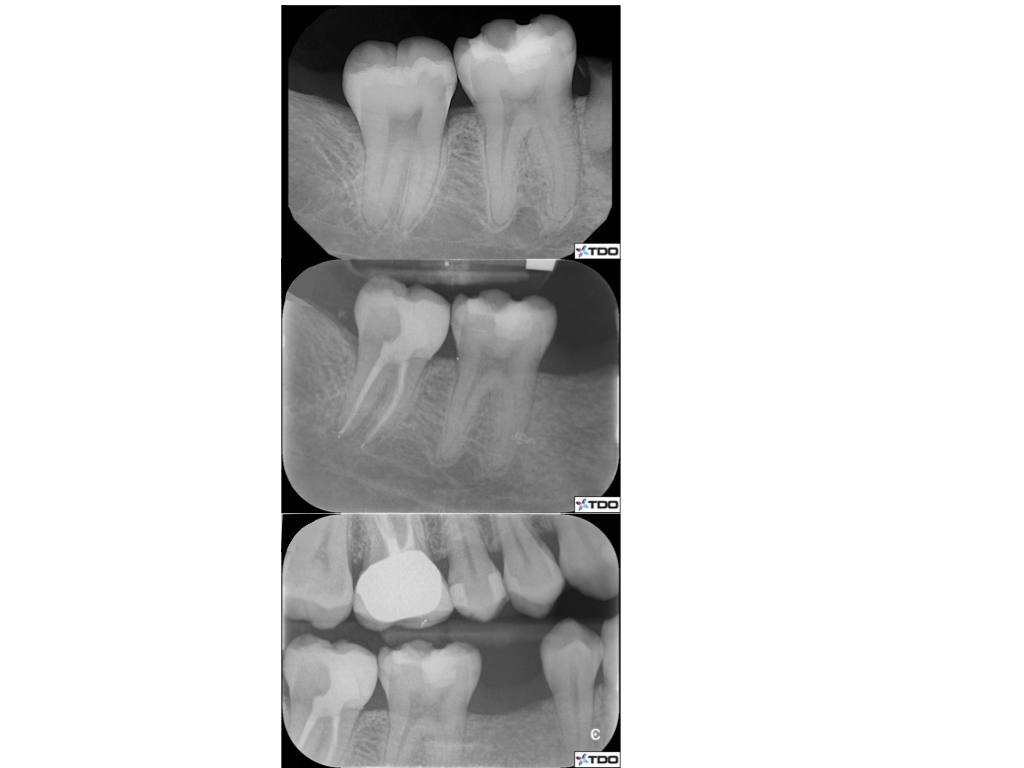
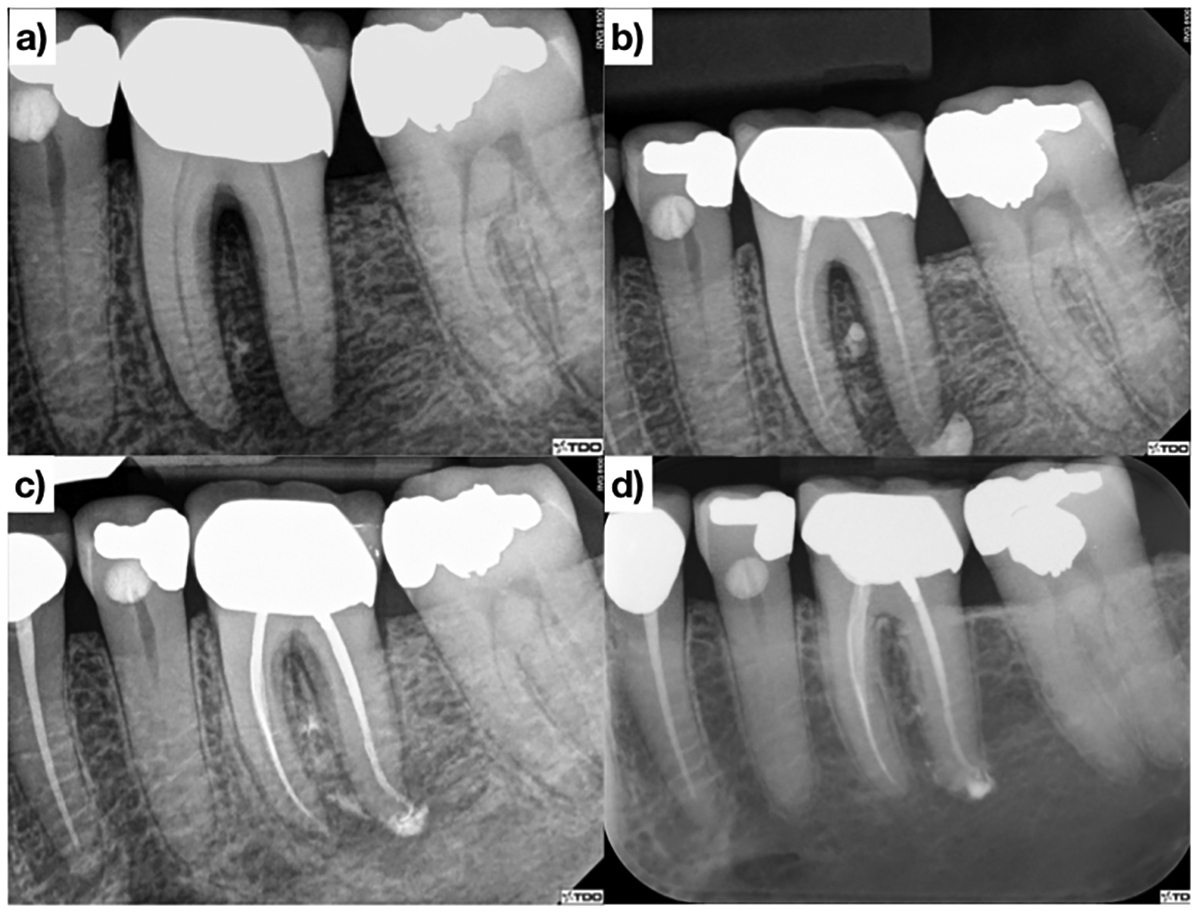
Although conservation of residual dentin during endodontic therapy may be one of the most important controllable factors to achieve patient-centered outcomes, disinfection and obturation procedures should not be omitted. The use of a 30-gauge tip irrigation needle, with a closed end and a side port, facilitates delivering irrigation solution in smaller canals. An interappointment medication such as calcium hydroxide paste, may be used to enhance disinfection, especially if the tooth presents with symptoms, a sinus tract, swelling or a periapical radiolucency of significant size. 30-gauge delivery tips that can be pre-bent are useful when delivering interappointment medication deep in the canal (Fig. 25B). Sonic and ultrasonic instruments also help activating irrigating solutions and are a good adjunct for enhanced disinfection. The common issue clinicians encounter when transitioning to more conservative instrumentation is the difficulty during the obturation phase of treatment. While standardized gutta percha cones are available, there have been issues with the predictability of the fit of these cones. It is the authors’ opinion that the use of smaller non-standardized gutta percha cones help with cone fitting. Most conservatively instrumented canals can be obturated with laserverified Medium-Fine (MF) fitted gutta percha cones (Fig. 23). The use of small heat tips also helps when warm vertical compaction of gutta percha is used as the obturation technique (Fig. 23). Figures 24 and 25 show that radiographic healing at follow-ups can be predictably achieved while maintaining maximal residual radicular dentin.
Fig. 23
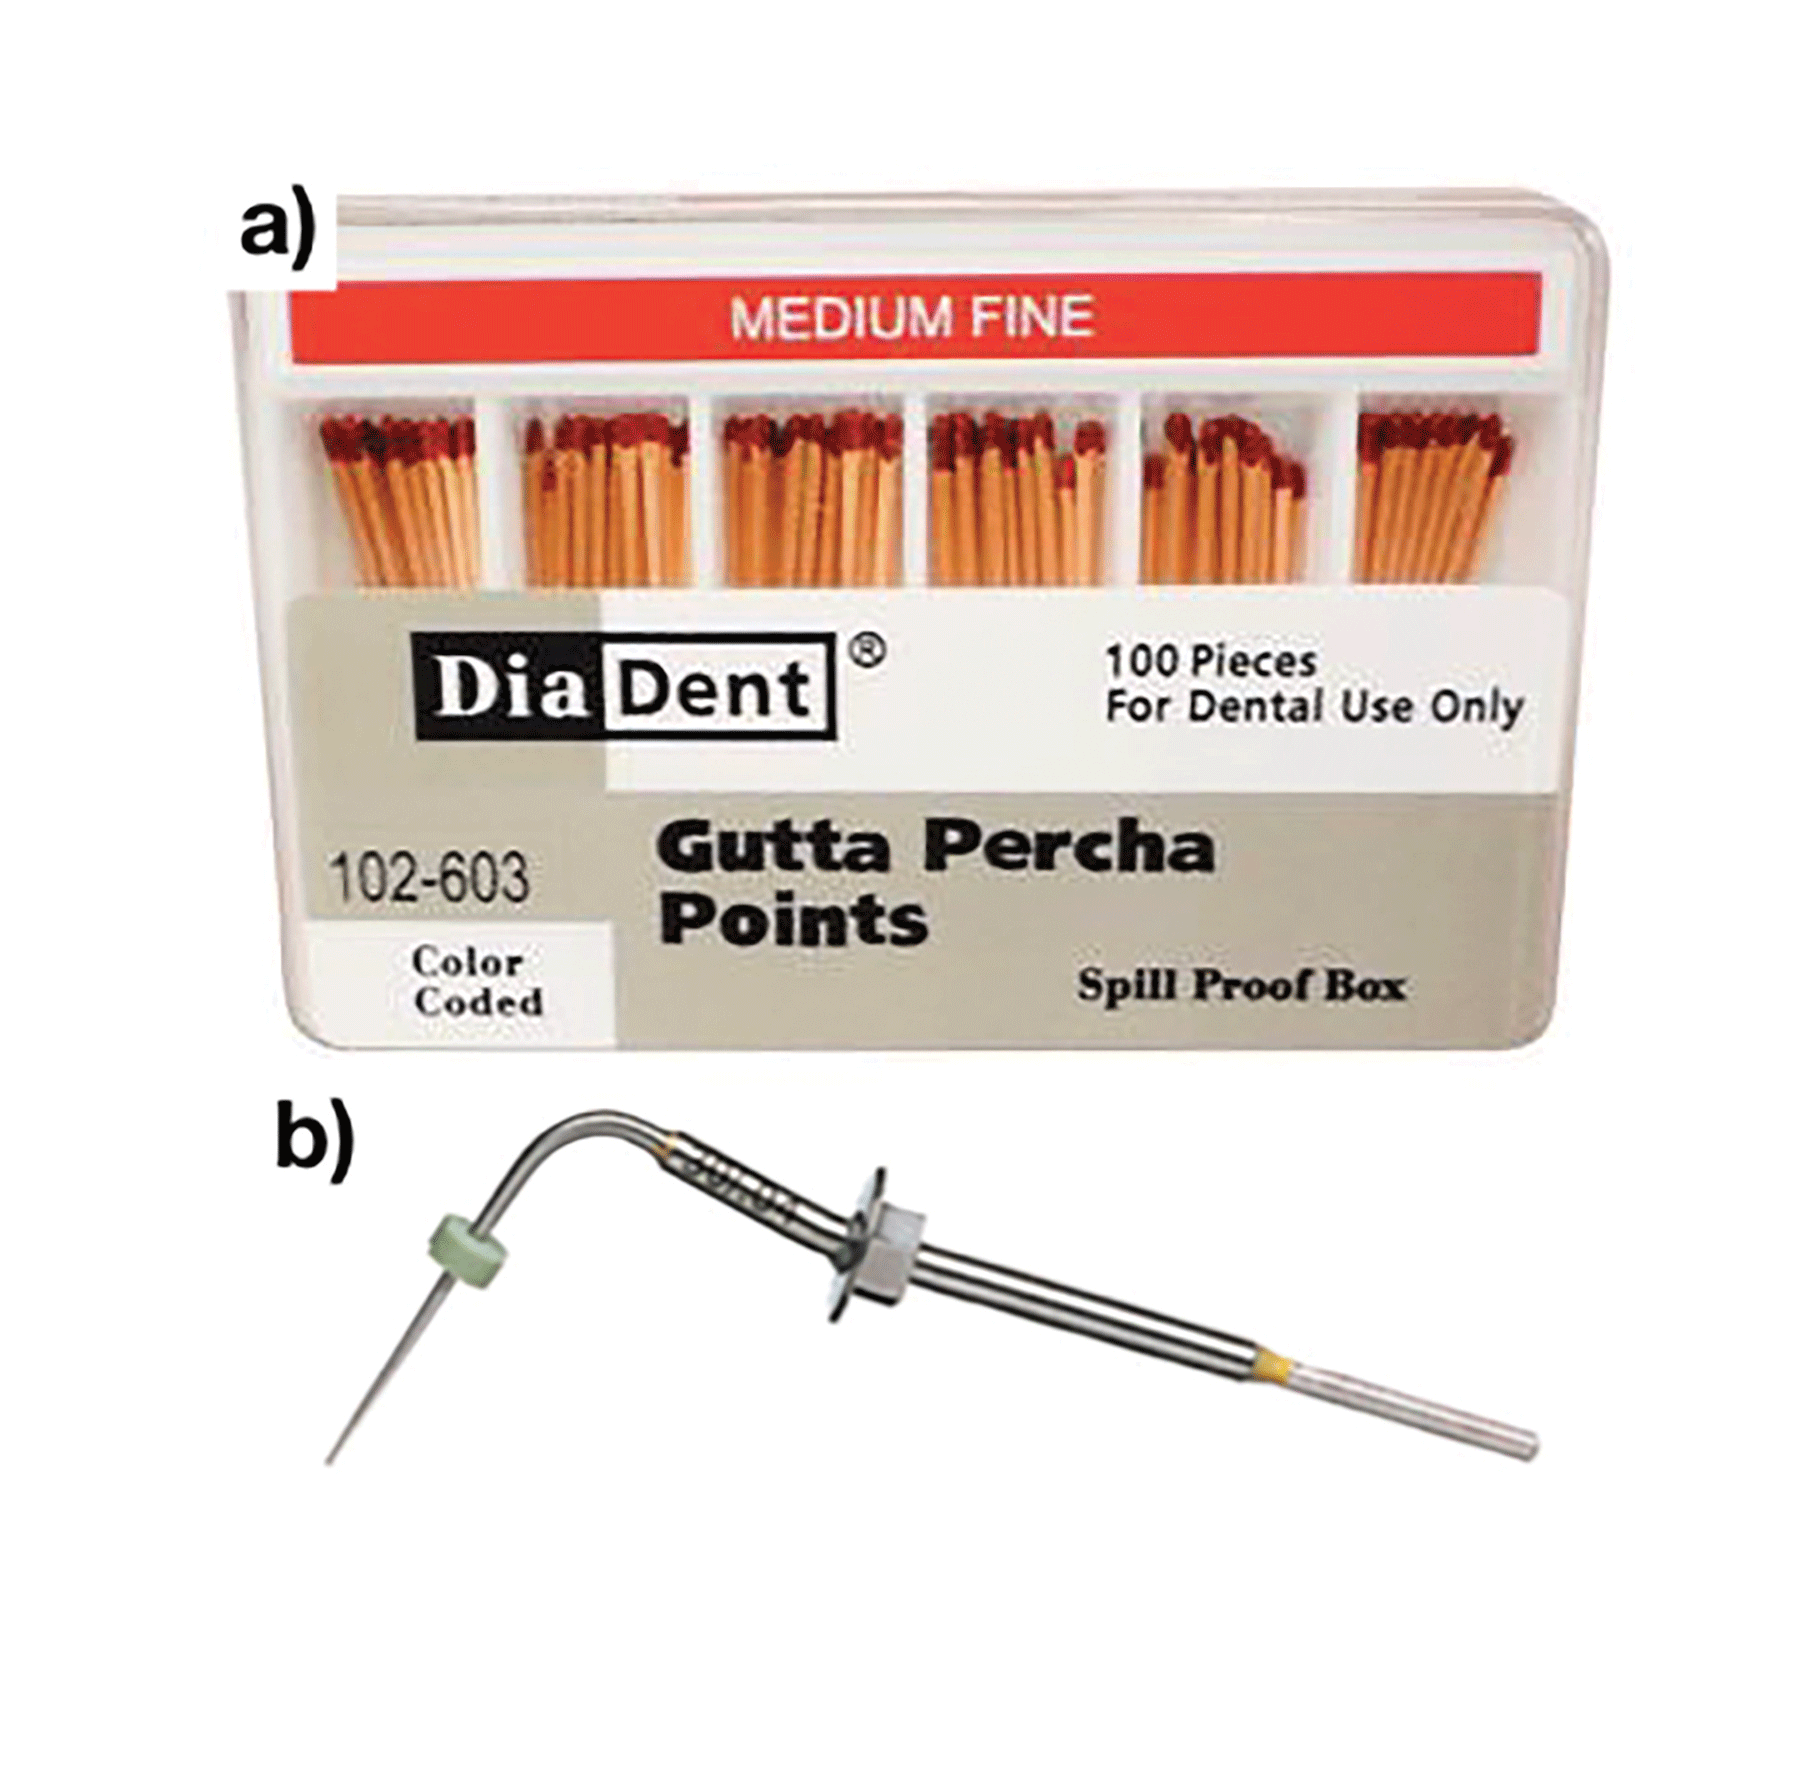
Fig. 24

Fig. 25
Conclusion
Patients perceive value for endodontic therapy when it provides a useful service, especially when weighing the investment of time and money required to reach a desirable outcome. The main obstacle facing any clinician when introducing and implementing a new approach to endodontics is the cognitive dissonance they may face for the beliefs they hold to be true against what they currently practice. Access design and canal instrumentation has been continuously changing over the years and as better and more user-friendly technologies emerge, clinicians can now perform the same clinical steps with a minimal procedural footprint whilst achieving desirable patientcentered outcomes. Dynamic Navigation, using CBCT data, for conservative endodontic access is on the horizon and will pave the way for an exciting next decade in endodontics.
Oral Health welcomes this original article.
References
- Dugas NN, Lawrence HP, Teplitsky P, Friedman S. Quality of life and satisfaction outcomes of endodontic treatment. J Endod. 2002.
- Azarpazhooh A, Dao T, Ungar WJ, Da Costa J, Figueiredo R, Krahn M, et al. Patients’ values related to treatment options for teeth with apical periodontitis. J Endod. 2016.
- Liu P, McGrath C, Cheung GSP. Improvement in oral health-related quality of life after endodontic treatment: A prospective longitudinal study. J Endod. 2014.
- Hamasha AA, Hatiwsh A. Quality of life and satisfaction of patients after nonsurgical primary root canal treatment provided by undergraduate students, graduate students and endodontic specialists. Int Endod J. 2013.
- Radojcić B, Jokić R, Grebeldinger S, Meljnikov I, Radojić N. History of minimally invasive surgery. Med Pregl. 2009.
- Ruddle CJ. Predictably successful endodontics. Dent Today. 2015.
- Hargreaves KM, Berman LH, Rotstein I. Cohen’s Pathways of The Pulp 11th Ed. Journal of Chemical Information and Modeling. 2016.
- Olcay K, Ataoglu H, Belli S. Evaluation of Related Factors in the Failure of Endodontically Treated Teeth: A Cross-sectional Study. J Endod. 2018.
- Prati C, Pirani C, Zamparini F, Gatto MR, Gandolfi MG. A 20-year historical prospective cohort study of root canal treatments. A Multilevel analysis. International Endodontic Journal. 2018.
- Landys Borén D, Jonasson P, Kvist T. Long-term survival of endodontically treated teeth at a public dental specialist clinic. J Endod. 2015;41(2):176–81.
- Zadik Y, Sandler V, Bechor R, Salehrabi R. Analysis of factors related to extraction of endodontically treated teeth. Oral Surg Oral Med Oral Pathol Oral Radiol Endod. 2008;
- Lee AHC, Cheung GSP, Wong MCM. Long-term outcome of primary non-surgical root canal treatment. Clin Oral Investig. 2012.
- Fonzar F, Fonzar A, Buttolo P, Worthington H V, Esposito M. The prognosis of root canal therapy: a 10-year retrospective cohort study on 411 patients with 1175 endodontically treated teeth. Eur J Oral Implantol. 2009.
- Sjögren U, Hägglund B, Sundqvist G, Wing K. Factors affecting the longterm results of endodontic treatment. J Endod. 1990.
- Vire D. Failure of endodontically treated teeth: classification and evaluation. J Endod. 1991.
- Sebring D, Kvist T, Derks J. Indications for Extraction before Implant Therapy: Focus on Endodontic Status. J Endod. 2019.
- Nadeau B, Jung D, Vora V. Trends towards conservative endodontic treatment. 2019; Available from: https://www.oralhealthgroup.com/features/trends-towards-conservative-endodontic-treatment/
- AAE. Access Openign and Canal Location. Am Assoc Endod. 2010;1–8.
- Clark D, Khademi J. Modern endodontic access and dentin conservation, Part 2. Dent Today. 2009.
- Clark D, Khademi J, Herbranson E. The new science of strong endo teeth. Dent Today. 2013.
- Mannan G, Smallwood ER, Gulabivala K. Effect of access cavity location and design on degree and distribution of instrumented root canal surface in maxillary anterior teeth. Int Endod J. 2001.
- LaTurno SAL, Zillich RM. Straight-line endodontic access to anterior teeth. Oral Surgery, Oral Med Oral Pathol. 1985.
- Clark D, Khademi J. Modern Molar Endodontic Access and Directed Dentin Conservation. Dental Clinics of North America. 2010.
- Magne P, Belser U. Natural Oral Esthetics. In: Bonded porcelain restorations in the anterior dentition: a biomimetic approach. 2002.
- Lertchirakarn V, Palamara JE a, Messer HH. Patterns of vertical root fracture: factors affecting stress distribution in the root canal. J Endod. 2003.
- Tamse A, Fuss Z, Lustig J, Kaplavi J. An evaluation of endodontically treated vertically fractured teeth. J Endod. 1999.
- Krasner P, Rankow HJ. Anatomy of the pulp-chamber floor. J Endod. 2004.
- Schilder H. Cleaning and Shaping the Root Canal. Dent Clin North Am. 1974.
- Ruddle CJ. Endodontics 101: Back to basics. Dentistry Today. 2018.
- Schilder H, Hargreaves KM. Filling root canals in three dimensions. J Endod. 2006.
- Tang W, Wu Y, Smales RJ. Identifying and Reducing Risks for Potential Fractures in Endodontically Treated Teeth. Journal of Endodontics. 2010.
About the Author
 Bobby Nadeau graduated with a DDS degree from Dalhousie University and a Master of Science in Endodontics from the University of Toronto. He is in full time private practice in Kingston, ON. Dr. Nadeau may be contacted at bobby.nadeau@mail.utoronto.ca and can be followed on Instagram @nadeau.endo.
 Dale Jung graduated from UCLA School of Dentistry with a DDS and earned his certificate in endodontics at New York University College of Dentistry. Dr. Jung can be followed on Instagram @jungendo.
 Viraj Vora graduated from the University of Western Ontario with a DDS and a Master of Science with a Certificate of Specialty in Endodontics from the University of Michigan. Dr. Vora is in full time private practice in Vaughan, ON, limited to microscopic conservative endodontics and restorative dentistry. He may be contacted at viraj@endodonticcentre.ca and followed on Instagram @virajendo.


