
Abstract
This case report involves a 24-year-old female patient that was not pleased with her existing anterior restorations that were discolored and did not restore the teeth to esthetically pleasing proportions. She was also interested in a “fuller” smile. The patient wanted to achieve these goals in the most conservative way, maximizing the preservation of sound tooth structure. To address the patient’s goals, it was decided to restore her smile with direct composite veneer restorations. The case report describes a very predictable way to manage the application of the composite resin around the gingival margin and in the interproximate areas with a specialized customized matrix.
Introduction
Direct Composite Resin Veneers are one of the most technically and artistically demanding treatment modalities for the dentist. A significant problem is a time efficient and controlled application of the composite resin around the gingival margin and in interproximate areas. Lack of control in this area and time-consuming isolation or retraction techniques lead to unpredictable or in-efficient results. Many times, they are presented as a “lesser” treatment option as compared to porcelain laminate veneers, and treatment decisions are made based on the dentist’s preference, rather than clinical indication. When executed properly, they provide the opportunity to restore a patient’s smile with highly predictable and long-term functioning restorations with high patient and doctor satisfaction. In this article, the author will describe the use of a specialized matrix technique that allows for controlled and efficient application of the composite resin during the fabrication of direct composite resin veneers.
Patient Dental History
The patient had no significant medical history. Her overall health was excellent. In the past, her restorative treatment had included a broad range of dental care. Besides wisdom tooth extractions, this had included an extraction of tooth #46 (#30) due to a failed root canal therapy, as well as root canal therapy #36 (#19) and more recently, crowns on teeth #26, #36 and #47 (#14, #19 and #31), as well as a few smaller direct restorations. Her periodontal health was good, with probing depth mostly ranging between 2-3 mm and only minor scattered bleeding. She had shown signs of generalized gingivitis and had been enrolled in a professional recare protocol, as well as a better oral hygiene home-care protocol to address this. She had been unhappy with the appearance of her front teeth since she was first seen at the authors office but had not been ready to replace the restorations. After a gingivectomy and some osseous recontouring had been performed to address some gingival asymmetries (Fig. 1), she inquired about further options to enhance her smile and address the discolored restorations.
Fig. 1
Pre-op before gingival and osseous recontouring.
Diagnosis and Treatment Planning
After analyzing study models and clinical pictures (Figs. 2-11), a wax-up was created to achieve idealized proportions of the anterior teeth and to build out the buccal corridor. A mold was created of this wax-up and with injectable temporary material, a mock-up simulating the restoration of only the six anterior teeth was created. Next, the mock-up was extended to the premolar areas. Both the clinical situation, as well as pictures, were reviewed with the patient. This gave the patient an ideal preview of the new dimensions of the anterior teeth and the significant improvement of her smile by extending the restorations to the premolars to truly give her the “fuller” smile she was looking for (Fig. 12). The decision was made to treat teeth #14-#24 with direct composite resin veneers to achieve the most esthetic, yet most conservative treatment. A putty matrix was created from the wax-up to aid in the replacement of the lingual enamel and to establish position of the incisal edges on the anterior teeth and buccal cusps on the premolars.
Fig. 2
Un-retracted smile pre-op frontal view.
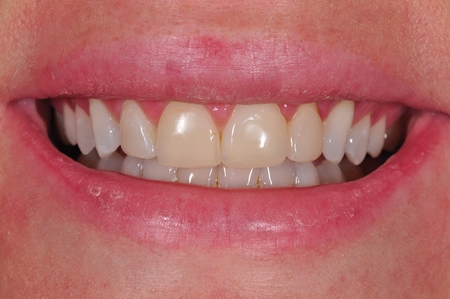
Fig. 3
Un-retracted smile pre-op right lateral view.
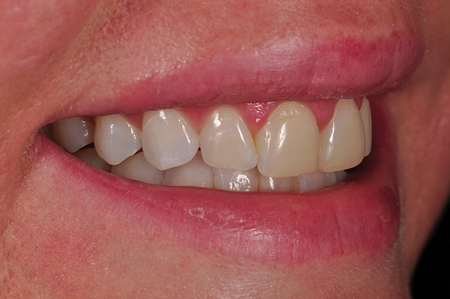
Fig. 4
Un-retracted smile pre-op left lateral view.

Fig. 5
Retracted pre-op frontal view.
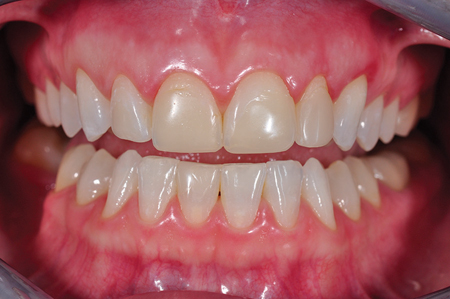
Fig. 6
Retracted pre-op right lateral view.

Fig. 7
Retracted pre-op left lateral view.
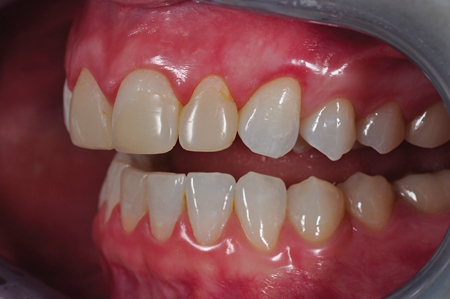
Fig. 8
Pre-op frontal view 1:1.

Fig. 9
Pre-op right lateral view 1:1.
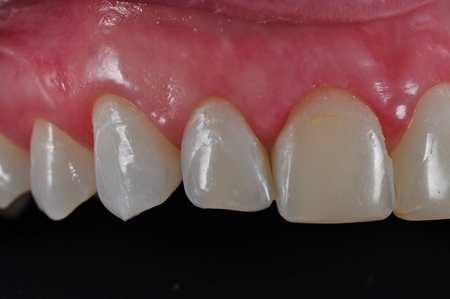
Fig. 10
Pre-op left lateral view 1:1.

Fig. 11
Pre-op occlusal view.

Fig. 12
10-unit mock up #14-#24.

Description of Treatment
At the treatment appointment, teeth #14-24 were anesthetized using local infiltration with 4% Septocaine with 1:100,000 epinephrine. The preparations for the veneers were minimally invasive and consisted in removal of the existing composite restoration on teeth #11, #21 and #22 (#8, #9 and #10) and were limited to a roughening of the enamel surface with a fine grid diamond bur (Meisinger) and coarse Soflex discs (3M Oral Health) on the other teeth (Fig. 13).
Following the application of a low-viscosity 37% phosphoric etchant (Scotchbond etchant gel, 3M Oral Health) for 30 seconds, the preparation was rinsed with water for 15 seconds and then air-dried. A filled, light-cure total-etch dental adhesive system (Optibond FL, Kerr) was applied according to the manufacturer’s directions and cured for 10 seconds. Using the putty matrix, a nano-filled composite material in Shade B1E (Filtek Supreme Ultra, 3M Oral Health) was applied to replace the palatal enamel and establish the incisal edge position of tooth #11 (#8) (Fig. 14). Interproximate excess was cleaned up with a #12 surgical blade and diamond finishing strips (Brasseler USA).
A specialized mylar matrix band system, the Margin Perfect Matrix (www.marginperfectmatrix.com) was placed on tooth #21 (#8) and secured with an unfilled bond resin (Heliobond, Ivoclar Vivadent), which was applied to the dried adjacent teeth and soft tissues, then cured with a visible light source (Elipar S10, 3M Oral Health) for 10 seconds to hold it in place (Fig. 15). This created a sealed mold gingivally and interproximately, that allowed for predictable placement of the composite material.
Fig. 13
Composite removal and tooth preparation.

Fig. 14
Palatal shelf created with putty matrix.
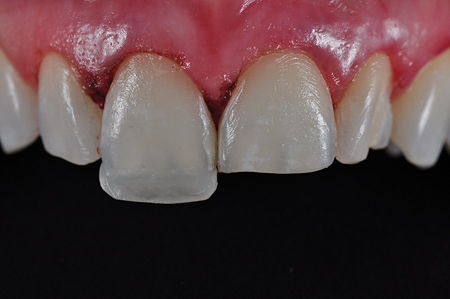
Fig. 15
Margin Perfect Matrix secured with Heliobond.

This technique eliminates some of the challenges associated with the shaping and polishing of anterior resin restorations, especially when working along or below the free gingival margin. Advantages of placing this matrix band include creating a sealed system for the operator that is free from saliva, hemorrhage, and crevicular fluids. It allows the clinician to apply the restoration in a clean, dry environment and obtain an ideal seal with today’s dentin bonding agents. Another benefit is the absence of an oxygen inhibition layer at the interface with the gingiva, where the composite material is cured against the mylar surface. This leaves a highly polished, very bio-compatible surface, which eliminates the need to use rotary instruments below the free gingival margin for finishing, and allows for ideal gingival health next to the composite restoration in the long-term. Not only is the placement of the Matrix very time efficient but it also allows a very efficient application of the composite resin, and is very helpful to achieve predictable primary contours. The facial surface was rinsed and reconditioned with another etch step and another application of the bonding system to reach the areas interproximately and sub-gingivally that were not reached prior to placement of the Margin Perfect Matrix. Then begins the application of the facial composite layers with an internal layer of A2D composite to replace the dentin in the areas where length was added to the teeth, and to create the mamelons inside the lingual B1E enamel shell (Fig. 16).
Next a thin bead of flowable resin (Filtek Supreme Flow B1, 3M Oral Health) was applied along the cervical margins and Shade B1B was applied and manipulated in the matrix band with a composite spatula (Hu-Friedy). The body shade was applied to the cervical third and overlapped the dentin extending into the middle third where it was overlaying the dentin shaded material. The composite was light-cured for 20 seconds at this point. The final layer consisted of a layer of B1 Enamel that was placed over the whole facial aspect of the restoration which resulted in a thinner layer in the cervical third as compared to the middle and especially the incisal third where the material filled the spaces between the dentin mamelons and extended to the incisal edge. The Heliobond collar was removed with a scaler and the contour strip with a hemostat (Fig. 17). Excess composite on the lingual was removed with a #12 surgical blade. Supra-gingival shaping as well as surface anatomy and finishing was accomplished with a 12-fluted, spiral-bladed carbide bur (Meisinger), Soflex discs and PoGo (Dentsply Caulk) polishing points (Fig. 18). The same process was repeated for the remaining teeth. Final polishing of the restorations was achieved using an aluminum oxide polishing paste (Enamelize, Cosmedent) with Flexibuff discs (Cosmedent).
Fig. 16
Application of Dentin Shade.

Fig. 17
After removal of Margin Perfect Matrix.

Fig. 18
After initial contouring and shaping with carbide bur and soflex discs.

Conclusions
There are many techniques described to manage the placement of the composite resin around the gingival margin and interproximately during the fabrication of direct composite Veneers including, but not limited to: placement of retraction cord, placement of several partial matrices, matrix pull through techniques or isolation against the adjacent teeth and gingiva with PTFE tape and placing the composite in a free hand approach.
In the author’s opinion, there is not a more predictable or efficient way to apply the composite resin then with the use of the Margin Perfect Matrix, as it provides total control over the interproximate and gingival areas in a very time efficient way. This allows the clinician to use direct composite veneers as a minimally-invasive and cost-efficient treatment of choice to create beautiful and long-lasting restorations (Figs. 19-28, three months post-op). The application of this technique is certainly not limited to direct composite veneers, but can be applied in any clinical situation where a clinician desires total control over gingival and interproximate areas during the application of composite resin. OH
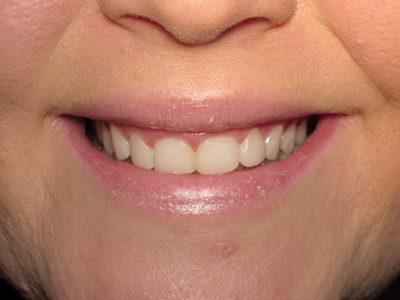
Fig. 19
Un-retracted smile post-op frontal view.

Fig. 20
Un-retracted smile post-op right lateral view.
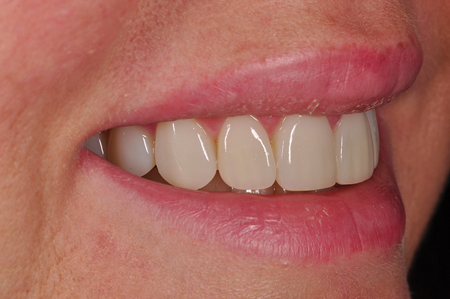
Fig. 21
Un-retracted smile post-op left lateral view.
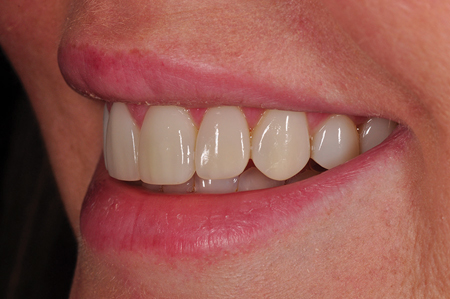
Fig. 22
Retracted smile post-op frontal view.

Fig. 23
Retracted smile post-op right lateral view.

Fig. 24
Retracted smile post-op left lateral view.

Fig. 25
Post-op 1:1 frontal view.

Fig. 26
Post-op 1:1 right lateral view.
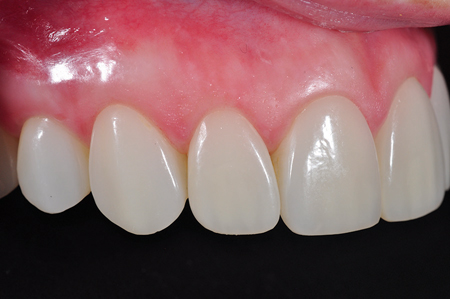
Fig. 27
Post-op 1:1 left lateral view.

Fig. 28
Post-op occlusal view.

Oral Health welcomes this original article.
Disclosures
The author has no financial interest in the Margin Perfect Matrix but will be forever grateful to Dr. Paul Belvedere to invent, introduce and teach this outstanding technique to help dentists all over the world to provide better restorations for their patients. Dr. Paul Belvedere was a creative inventor, a dedicated teacher, an amazing mentor and wonderful friend to many in our profession around the globe. Dr. Belvedere passed away a few days after being honored by his family, friends and colleagues at the ASDA meeting in Austin, TX, USA in the fall of 2017.
References
- Hatkar, P. Preserving Natural Tooth Structure with Composite Resin. J Cosmetic Dent. 2010;(3):26-34
- Belvedere PC, Lambert DL. Advancing your direct composites through the use of a specialized matrix. Oral Health. 2002;92(4):75-83.
- LeSage B, Milnar F, Wohlberg J. Achieving the epitome of composite art: creating natural tooth esthetics, texture and anatomy using appropriate preparation and layering techniques. J Cosmetic Dent. 2008;(3):132-41
- Devoto W, Saracinelli M, Manauta J. Composite in everyday practice: how to choose the right material and simplify application techniques in the anterior teeth. Eur J Esthet Dent. 2010 Spring;5(1):102-24.
- Khashayar G, Dozic A, Kleverlaan CJ, Feilzer AJ, Roeters J., Devoto W. The influence of varying layer thicknesses on the color predictability of two different composite layering concepts, Clinical procedure. Dent Mater. 2014 May;30(5):493-8.
- Peyton J. Choosing the Right Tools. J Cosmetic Dent. 2011;(3):36-38
- K William Mopper, DDS, MS; Contouring, Finishing and Polishing Anterior Composites, Inside Dentistry 2011: 62-70
About the Author
 Dr. med. dent. Holger P. Meiser graduated from the Ruprecht-Karls University School of Dentistry in Heidelberg/Germany in 2002. He went on to complete residencies and fellowships in Advanced General Dentistry and Implant Dentistry at the University of Minnesota Dental School where he also earned a certificate in Contemporary Restorative and Esthetic Dentistry. He has fulfilled the requirements to achieve Mastership in the Academy of General Dentistry, Associate Fellowship in the American Academy of Implant Dentistry and Membership in the American Society for Dental Aesthetics. He maintains a private practice in Minnetonka, MN, USA, focusing on restorative and implant dentistry. He serves as adjunct faculty in the Implant Program at the University of Minnesota. Please feel free to contact him with questions at holger@holgerdentalgroup.com
RELATED ARTICLE: Low Tech Approach – High Five Results! The Beauty Of The Direct Composite Mock-Up
Follow the Oral Health Group on Facebook, Instagram, Twitter and LinkedIn for the latest updates on news, clinical articles, practice management and more!


