
Introduction
For many dental students the first-year class focused on Dental Anatomy and Morphology is their initial “real” introduction to a life-long, in-depth professional relationship with teeth. While the lecture portion of the course may closely resemble the format of many biology classes encountered in college, the laboratory component traditionally introduces one of the most unique challenges in the curriculum – an introduction to dental waxing. A quick search of internet student dental forums yields results that are filled with posts from dental students expressing strong opinions and often frustrations surrounding learning this new skill. For some students, their only expressed goal is to pass the laboratory course so they “never have to wax anything again as long as they live.” As a first-year dental student, it is difficult to fully grasp the benefits gained from the waxing lab. More than 20 years later, I find it to be one of the most useful skills gained in dental school.
With any functional aesthetic driven dental treatment it is important to begin with an understanding of the end result. Failed cases can easily be caused by a disparity between the dentist’s plan and the patient’s vision. While digital cosmetic imaging is becoming more ubiquitous in achieving that goal, diagnostic waxing is still a simple alternative that can easily be transferred to a clinical mockup or used as a treatment guide without the requirement of additional specialized equipment.
Case Study
Diagnosis
A 35-year-old female in good medical and dental health presented for restorative consultation stating she maintains annual dental cleanings and has whitened her teeth in the past. The patient stated that she was unhappy with the size, shape and character of her upper front two teeth. (Fig. 1) She also stated that she disliked the space between her front two teeth and the chipped edges of her front two teeth bothered her. Options for restoring the patient’s damaged central incisors, closing the diastema, and changing the shape of the patient’s two front teeth were discussed at length. Areas of demineralization were brought to the patient’s attention and replacement of aging restorations was also discussed. The patient declined orthodontic treatment options, porcelain veneer options, and treatment of other aging restorations due to time and financial concerns.1,2 She was most interested in pursuing composite resin restorations on her front two teeth due to the conservative nature of the procedure, and expressed her desire to have a beautiful, “natural” appearance of her front two teeth without pursuing additional treatment options.
Fig. 1

Preoperative records were made including periapical radiographs, diagnostic casts, and a stick bite registration.1 (Figs. 2 & 3) No additional significant pathologic concerns were found. Clinical examination revealed a Class I dental relationship with no significant occlusal interferences. A diastema was noted in the area interproximal to #8 and 9. Evidence of pathologic wear was found on the patient’s anterior central incisors, however, the patient exhibited no symptoms of any temporomandibular disorder and appeared asymptomatic during a T.M.J. evaluation.1
Fig. 2

Fig. 3

Treatment Plan
Following discussion of aesthetic restorative options for her smile, the patient elected to pursue restoration of teeth #8 and 9 with composite resin veneers. The patient emphasized that a natural, conservative result was her primary goal. Proper care for the future restorations was discussed including nightly wear of a hard protective occlusal guard/orthodontic retainer, and the importance of optimal maintenance including regular cleanings and examinations was stressed.1
A comprehensive set of records was made to document the patient’s preoperative condition. Alginate impressions were made of both arches, and study models were fabricated in die stone.1,3,4,5 Occlusion was recorded with a Futar D (Kettenbach; Eschenburg, Germany) polyvinyl siloxane stick bite registration. Digital photographs documenting the preoperative shade, texture, and shape of surrounding teeth were made.1,3,4,5 Records were utilized to develop an additive full contour diagnostic wax up of teeth #8 and 9.
The relationship of the interpupillary plane was related to the maxillary diagnostic cast utilizing the stick bite registration, and horizontal and vertical marks were made on the cast to facilitate visualization during design of the wax up. (Fig. 4) Digital calipers were utilized to establish the distance between the distal edges of teeth #8 and 9 to be restored. (Fig. 5) The total distance measured just over 16mm, establishing the required width of each central incisor to be just over 8mm to close the diastema as directed. (Fig. 6) Utilizing smile design principles, the length of each central incisor was calculated to be slightly over 10mm at a width to length ratio of 80%.2
Fig. 4

Fig. 5
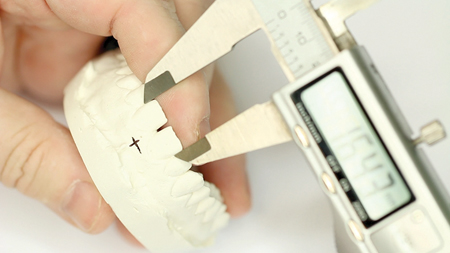
Fig. 6

Having determined the proper dimensions of teeth #8 and 9, an additive wax up was performed using GEO Classic gray opaque modeling wax (Renfert GmbH; Hilzingen, Germany). Mesial and distal line angles and incisal edge were first established using a beavertail waxing instrument with the Kerr Ultra Waxer II (Kerr Corp; Orange, CA). (Fig. 7) Accurate design of the line angles provided the foundation for transitions between the reflective and deflective zones which established the critical symmetry between the central incisors. (Fig. 8) Once the basic outline form of the incisor was established, the beavertail instrument was used to fill in the facial area to slight excess of full contour. (Figs. 9,10, & 11) A Lecron/Half Hollenbeck wax sculpting instrument (Kerr Corp; Orange, CA) was used to refine the primary tooth anatomy and to begin to establish the secondary anatomy to mimic lobe development. (Figs. 12 & 13) At that point, wax was added and removed as needed to refine the tooth shapes, and a flat plane was used to evaluate incisal length and symmetry. (Fig. 14) Careful attention was given to the incisal contours to ensure that they conformed to the patient’s anterior guidance.1 Noting contour development during the waxing process allowed for advance planning of building the final composite restorations. Adjustments in wax were more easily performed than in composite to give the operator a clear picture of the proposed final result. (Figs. 15,16, & 17) A Genie Putty (Sultan Healthcare; York, PA) polyvinyl siloxane stent was then formed to fabricate an incisal lingual matrix. (Fig. 18)
Fig. 7

Fig. 8

Fig. 9

Fig. 10
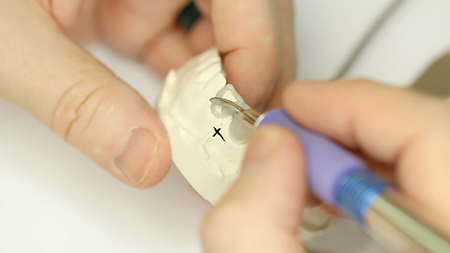
Fig. 11
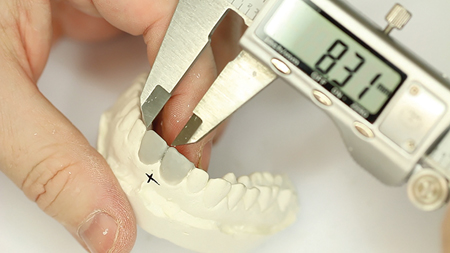
Fig. 12

Fig. 13
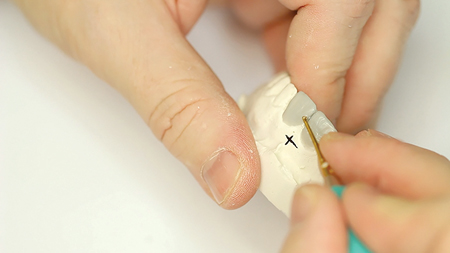
Fig. 14
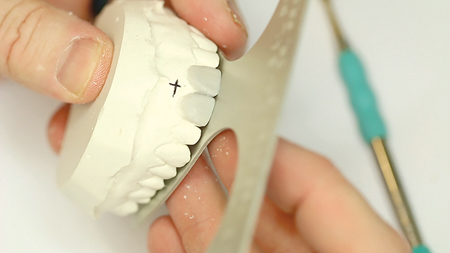
Fig. 15

Fig. 16
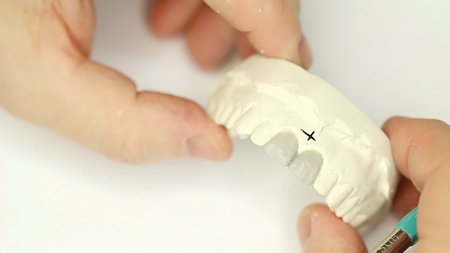
Fig. 17

Fig. 18

Description of Treatment
The patient was able to view and approve the diagnostic wax up prior to restoration of # 8 and 9 with closure of her diastema.1,3 A regular size Optragate retractor (Ivoclar Vivadent; Amherst, NY) was placed in the patient’s mouth for comfort and isolation while elevating the patient’s upper lip. A custom shade guide was used to determine the appropriate resin shade choices for the planned restorations.1,3 (Fig. 19) The lingual and incisal matrix was tried in the patient’s mouth for fit.
Fig. 19

Due to the conservative nature of this procedure, only topical anaesthetic was used for this treatment. The patient’s lips were adequately and comfortably retracted for the entire procedure using an Optragate lip retractor (Ivoclar Vivadent; Amherst, NY). The Optragate, saliva ejector, and HVE provided adequate isolation from moisture and contamination during the restorative procedure. The surface of the tooth to be restored was cleaned with pumice, rinsed, and a 37% phosphoric acid gel, Etch-37 (Bisco, Inc; Schaumberg, IL), was then applied to the facial, incisal, and lingual areas of #8 and 9 intended to serve as the restorative interface and agitated for a duration of 20 seconds. The acid etchant was then removed by rinsing with copious amounts of water and excess moisture was removed with a short blast of air. Direct lighting was removed while All Bond Universal, a single-component, total etch adhesive (Bisco, Inc; Schaumberg, IL), was applied to the etched tooth structure. The adhesive primer was evaporated while the bonding agent was thinned with oil free air, and then cured for 20 seconds. The incisal matrix was seated in place filled with a thin layer of MW nanofilled milky-white, semi-translucent resin (Tokuyama Dental America, Inc; Encintas, CA) in the interproximal diastema and incisal areas to be restored. (Fig. 20) The MW layer was adapted against the tooth structure and matrix on #8 and 9 with a gold tipped composite instrument and cured for 20 seconds with a Bluephase LED curing light (Ivoclar Vivadent; Amherst, NY). This layer serves to provide for a lingual and incisal support framework as well as a halo effect to enhance the incisal appearance of #8 and 9.3,6 Next, an A101 Bioclear interproximal matrix (Bioclear Matrix Systems; Tacoma, WA) was placed mesial to #8 to establish subgingival emergence into the diastema space. DA1 dentin resin was added apically into the matrix and contoured incisally to seamlessly connect to the composite built within the lingual matrix. This layer prevented show through from the lingual and masked the transition from natural tooth to the restored zone. The new composite layer was then cured, and the process was repeated with the mesial surface of #9 to close the diastema and develop a natural emergence profile. A body layer of BL2 composite was then applied to cover the entire facial aspect of each tooth including the restored areas. Secondary anatomy was formed just short of full contour with the BL2 composite prior to curing. A final, thin layer of EB1 composite was then added to bring the restorations up to full contour. The EB1 layer provided an appearance of depth to the restoration due to its semi-translucent properties. This layer was smoothed and shaped with an artist’s brush to provide an even surface and minimize the incorporation of any air pockets. (Figs. 21 & 22) A final cure was applied for 60 seconds.
Fig. 20

Fig. 21

Fig. 22

The incisal edges were leveled and gross contoured using a coarse abrasive Mini FlexiDisc (Cosmedent Inc; Chicago, IL). (Fig. 23) The labial and lingual surfaces were then gross contoured a using a coarse grit flame diamond (Brasseler USA Dental; Savannah, GA), a medium grit Mini FlexiDisc (Cosmedent Inc; Chicago, IL), and diamond finishing burs (Brasseler USA Dental; Savannah, GA). (Figs. 24 & 25) Interproximal areas were contoured with Epitex finishing strips (GC America Inc; Alsip; IL). Labial texture was accentuated with a coarse flame diamond (Brasseler USA Dental; Savannah, GA) using a light touch while moving back and forth in a mesial to distal direction. Final polish was performed with a Medium Grit FlexiCup (Cosmedent Inc; Chicago, IL) and DiaComp Feather Lite polishers (Brasseler USA Dental; Savannah, GA). (Figs. 26 & 27) The Optragate isolation was removed and proper occlusion was verified in centric occlusion and excursive motions. The patient’s teeth were inspected for any excess restorative material. Her occlusion was checked again and smooth interproximal areas were verified with dental floss. Post-operative home care instructions were given and the patient was scheduled for a follow-up appointment in two weeks for a final check for function and aesthetic evaluation. (Fig. 28)
Fig. 23

Fig. 24

Fig. 25

Fig. 26

Fig. 27

Fig. 28

Conclusion
The introduction to waxing in the first year of dental school gives future practitioners a valuable tool that can be used throughout the lifetime of their practice. Three dimensional planned design of restorative cases in wax provides a preview of what a practitioner can deliver utilizing definitive restorative materials. With careful planning and precise execution, traditional techniques combined with contemporary materials can provide exceptional results. (Fig. 29)
Fig. 29

Oral Health welcomes this original article.
References
- Dawson, Peter E. Evaluation, Diagnosis, and Treatment of Occlusal Problems. The C.V. Mosby Co.: St Louis, MO; 1989.
- American Academy of Cosmetic Dentistry. Contemporary Concepts in Smile Design: Diagnosis and Treatment Evaluation in Comprehensive Cosmetic Dentistry. Madison (WI): The Academy; 2014.
- Magne, Pascal. Bonded Porcelain Restorations in the Anterior Dentition A Biomimetic Approach. Quintessence Books: Chicago, IL; 2002.
- Gurel, Galip. The Science and Art of Porcelain Laminate Veneers. Quintessence Books: Chicago, IL; 2003.
- Rufenacht CR. Fundamentals of Aesthetics. Quintessence Books: Chicago, IL; 1992.
- Fradeani, Mauro. Aesthetic Analysis A Systematic Approach to Prosthetic Treatment Volume 1. Quintessence Books: Chicago, IL; 2004.
About the Author
 Dr. Rowe maintains a private practice dedicated to excellence in general, cosmetic and complex restorative dentistry located in Jonesboro, Arkansas. He is an Accredited Member of the American Academy of Cosmetic Dentistry, past member and Chairman of the American Board of Cosmetic Dentistry, and has served as the AACD’s Chairman of Accreditation. He also serves as an Accreditation Examiner for the American Academy of Cosmetic Dentistry. Dr. Rowe is a graduate of the University of Tennessee College of Dentistry, and is a formally trained artist who graduated from Washington and Lee University with a Bachelor of Arts degree in Studio Art. Dr. Rowe enjoys sharing his passion for cosmetic dentistry materials and techniques. Contact him through his office at info@rowesmiles.com or 870.932.4126.


