
INTRODUCTION
The goal of modern dentistry is to restore the patient to normal contour, function, comfort, esthetics, speech, and health, whether by removing caries from a tooth or replacing several teeth. What makes implant dentistry unique is the ability to achieve this goal, regardless of the atrophy, disease, or injury of the stomatognathic system. However, the more teeth a patient is missing, the more challenging this task becomes. As a result of continued research, diagnostic tools, treatment planning, implant designs, materials, and techniques, predictable success is now a reality for the rehabilitation of many challenging clinical situations.
The increased need and use of implant-related treatments result from the combined effect of several factors, including (1) aging population living longer, (2) tooth loss related to age, (3) consequences of fixed prosthesis failure, (4) anatomical consequences of edentulism, (5) poor performance of removable prostheses, (6) consequences of removable partial dentures, (7) psychological aspects of tooth loss and needs and desires of aging baby boomers, (8) predictable long-term results of implant-supported prostheses, (9) advantages of implant-supported restorations, and (10) increased public awareness.
The completely edentulous patient is too often treated as though cost were the primary factor in establishing a treatment plan. However, the doctor and staff should specifically ask about the patient’s desires. Some patients have a strong psychologic need to have a fixed prosthesis as similar to natural teeth as possible. On the other hand, some patients do not express serious concerns whether the restoration is fixed or removable as long as specific problems are addressed. To assess the ideal final prosthetic design, the existing anatomy is evaluated after it has been determined whether a fixed or removable restoration is desired. An axiom of implant treatment is to provide the most predictable, most cost-effective treatment that will satisfy the patient’s anatomical needs and personal desires.1
TREATMENT PLANNING WITH DENTAL IMPLANTS–MAXILLA
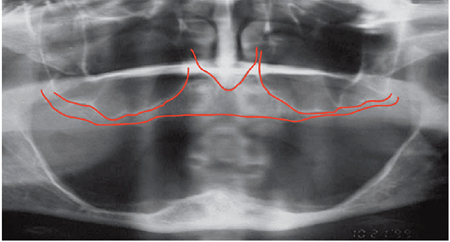
Treatment of the severely resorbed edentulous maxilla with a fixed profile prosthesis, presents with a set of unique problems. Bilateral maxillary sinuses that have pneumatised (Fig. 1) limit the practitioner’s ability to place implants in the posterior portion of the maxilla, which is necessary to establish adequate anterior-posterior distribution of the implants to support the occlusal loads generated and transferred to the alveolus by the fixed prosthesis.
Fig. 1
Achieving adequate phonetics and stable masticatory function with a fixed maxillary prosthesis are the principle concerns in this group of patients. The dental practitioner must be aware of the extent of tissue loss in the edentulous patient to fabricate an aesthetic and functional fixed prosthesis. For the surgeon, the limited residual alveolar bone as well as the existence of the maxillary sinuses pose a number of challenges in treating this group of patients with a fixed prosthesis. The comprehensive evaluation of the edentulous maxilla is further complicated by the fact that both bone and soft tissue loss can begin before tooth removal as a result of generalized periodontitis, creating the appearance of long teeth. Therefore, two to four implants are placed in the premaxilla between edentulous areas of the inter canine space to support the retentive components of an implant-retained, tissue-supported overdenture. (Fig. 2)
Fig. 2
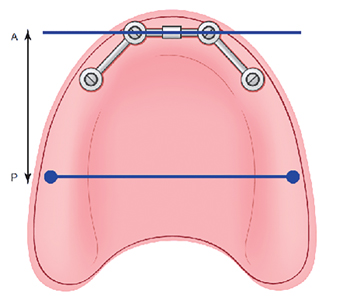
Fig. 3

RADIOGRAPHIC EVALUATION FOR THE EDENTULOUS MAXILLA:
The criterion for adoption of a surgical protocol for treatment of the edentulous maxilla with a fixed prosthesis is the identification of the presence or absence of the zones of the maxilla. This is accomplished by reviewing the patient’s radiographs. When immediate loading of the maxilla is considered, I recommend a graftless approach. Division of the edentulous maxilla into three radiographic zones allows for a systematic assessment of the residual alveolar bone available for implant placement, which helps determine an appropriate surgical approach. The relationship between the residual maxillary alveolus and the nasal cavity and the position and size of the maxillary sinuses are evaluated radiographically. The alveolar bone of the anterior maxilla from cuspid to cuspid is designated as zone 1, the premolar region is zone II, and the molar region is designated as zone III. Analysis of radiographic results according to this schema can enable the surgical and restorative teams to devise a preliminary treatment plan. In complex or borderline situations, three-dimensional radiographic evaluation may still be necessary to confirm preliminary conclusions. The presence or absence of maxillary zones strongly influences surgical technique (Fig. 4). If zones I, II, and III are present, axial implants may be placed. (Fig. 5) If zones I and II are present, the tilted implant prosthesis (Fig. 6) may be considered. If zone I is the only zone present, zygomatic treatment (Fig. 7) is considered. A severely atrophied maxilla presents with complete resorption of the maxillary alveolus. Therefore, zones I, II, and III are absent. For these rare cases, quad-zygomatic treatment may be considered. (Fig. 8). Because the surgical protocol for these treatments does not involve bone grafting, immediate loading of the implants is considered if the surgical criteria are met.
Fig. 4
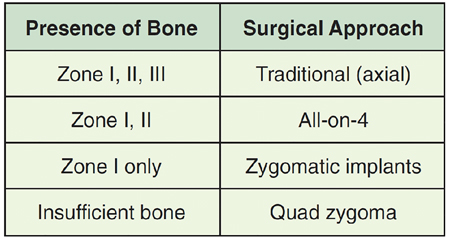
Fig. 5

Fig. 6
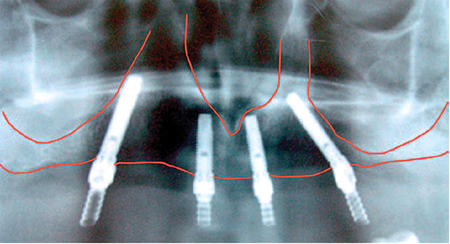
Fig. 7
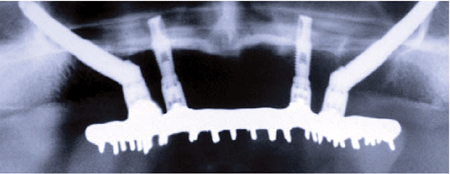
Fig. 8

TREATMENT PLANNING WITH DENTAL IMPLANTS – MANDIBLE
The use of fixed, implant-supported prostheses in the edentulous mandible has been well studied. Maló, Rangert, and Nobre reported a cumulative success rate of 96.7% in their study published in 2003. The findings in the literature are consistent with the original studies published by Brånemark, and limit four implants in each arch to support a fixed prosthesis. The results obtained with the immediate load approach for treatment of the edentulous mandible are also consistent with the surgical success results seen in the traditional two-stage approach. The ability to treat this group of patients without grafting and in a single appointment is encouraging and warrants updating. To begin treatment using an implant-supported fixed prosthesis, it is important to appreciate that this treatment option can be used for the already edentulous patient as well as for the patient who has non-restorable teeth or failing implants planned for removal. (Figs. 9-12) The ability to simultaneously remove the patient’s failing teeth, place the implants, and convert the immediate denture into a fixed provisional prosthesis is the key to patient acceptance of this treatment concept.
Fig. 9

Fig. 10

Fig. 11

Fig. 12
To predictably execute this treatment, four criteria should be considered during the treatment planning period:
- Presence or absence of composite defect
- Type of final prosthesis to be fabricated
- Visibility or lack of visibility of the transition line
- Position of the mental foramen and loop of the inferior alveolar nerve
1. Composite defect:
Most patients with edentulous mandibles demonstrate a degree of composite defect (Fig. 13) Patients who have non-restorable mandibular teeth planned for extraction also present with composite defects because periodontal disease has reduced the vertical bony height. Therefore, it is generally accepted that most patients with edentulous mandibles will have a degree of vertical and horizontal composite defect as the mandibular alveolus resorbs inferiorly and posteriorly (Fig. 14)
Fig. 13
Fig. 14

2. Choice of final prosthesis:
The conventional “Toronto” bridge” (Fig. 15) can be used, because neither air-escape nor phonetics are clinical problems in the mandible as they are in the maxilla. Unavailability of appropriate abutments at that time and the resultant use of “standard” abutments for fabrication of the original hybrid prosthesis were the major reasons for the gap between the intaglio surface of the conventional hybrid prosthesis and the soft tissues. Today the design of the mandibular profile prosthesis as described by Schnitman is recommended (Fig. 16). Substitution of the multiunit abutments, as used in the maxillary profile prosthesis, allows for a more anatomically correct mandibular prosthetic design. (Fig. 17) For cases in which the edentulous defect is tooth-only, a ceramometal prosthesis (FP-1 type restoration) can be fabricated.
Fig. 15
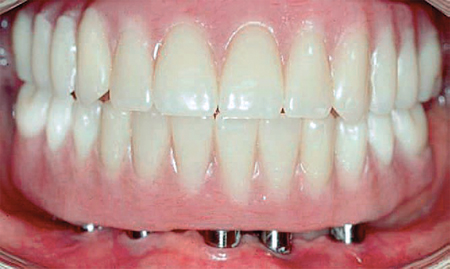
Fig. 16
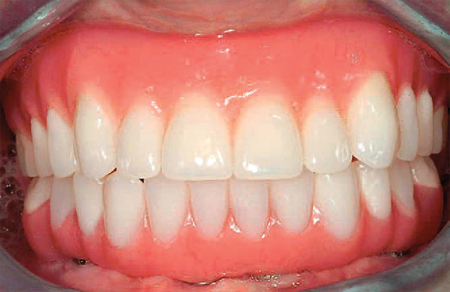
Fig. 17

3. Transition line:
The transition line between the base of the profile prosthesis and the patient’s gingival crest is generally not visible in the mandible (Fig. 18). The natural lower-lip drape makes the final aesthetics of the mandibular fixed profile prosthesis acceptable for most patients.
Fig. 18

4. Position of the mental foramen:
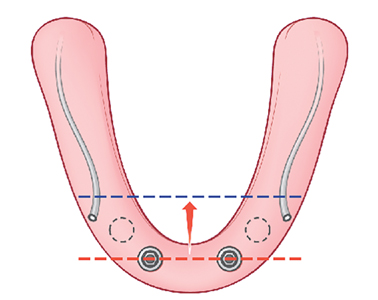
According to the “cornerstone” concept as presented by Duyck, placement of four implants is biomechanically stable for the support of a fixed mandibular prosthesis.
The goal is to have the largest possible anterior-posterior (AP) distribution between the anterior most and posterior implants. The position of the mental foramen, however, limits placement of the two distal implants, which forces the surgeon to place the implants anterior to the mental foramen and not in the desired prosthetic position as demonstrated by the blue line in Figure 19. To place the implant platform as posteriorly as possible, tilting the implant platform distal to the mental foramen is considered because this platform as increases the AP distribution and limits the cantilever arm of the prosthesis (Fig. 20). It has been reported that limiting the cantilever arm of the distal extension to 15 mm or less is consistent with favorable survival of the implants and the prosthesis.
Fig. 19

Fig. 20
To achieve prosthesis survival, it is important to identify the position of the mental foramen. This may be accomplished using conventional panoramic radiographs as well as cone beam computed tomography (CT) The anatomy of the inferior alveolar nerve as it exits the mental foramen has been studied and reported in the literature by Rosenquist. Arozouman et al., Bavitz et al.,Misch and Crawford, and Kaya et al.
The main trunk of the inferior alveolar nerve enters the mandible on its lingual surface and is protected by a bony projection known as the lingula. It travels through the body of the mandible and branches into the mental and incisive nerves. The inferior alveolar nerve loops superiorly and then exits the mental foramen posteriorly, exiting the mental foramen pointing posteriorly.
Upon exiting the foramen, it makes gentle curves anteriorly to supply the cutaneous portion of the mandibular mucosa and the lower lip with its branches. On radiographic studies, the length of the loop has been reported to be between 1 and 5 mm. Arzouman et al. and Misch and Crawford have reported lengths of up to 7 mm in their study using dried mandible.
At this time, however, a safe clinical guideline is needed for treatment of the edentulous mandible. The outline of the inferior alveolar canal as it passes the mental foramen can readily be measured and evaluated on panoramic radiographic examination as well as on cone beam CT. To place an implant within a “safety zone,” the distal aspect of the implant needs to be approximately 2 mm anterior to the most anterior aspect of the inferior alveolar loop; consideration for the diameter of the intended implant to be placed must be kept in mind as measurements are made for the initiation of the osteotomy. Because the diameter of the most commonly used implant for the treatment of the fully edentulous patients is 4 mm, the radius of the implant is 2 mm. The osteotomy should place the mid-body of the most distal implant 4-5 mm anterior to the loop of the inferior alveolar nerve, as described in the surgical protocol described, to avoid insult to the nerve. Appreciation of the safety zone is necessary because the proximity of the implant to the nerve generally results in either neuropraxia or the loss of the implant secondary to soft tissue encapsulation from the epineurium of the nerve instead of bone, resulting in failure of the implant to osseointegrate. (Fig. 21)
Fig. 21
RADIOGRAPHIC EVALUATION FOR THE EDENTULOUS MANDIBLE
The panoramic radiographic scan is still the radiograph of choice for general evaluation of the edentulous mandible. This radiograph permits observation of the path of the inferior alveolar canal, topography of the alveolar ridge, and the general state of the remaining teeth in the maxilla and the mandible. Using the panoramic radiograph as the only radiographic study has its limitations. The width of the mandible cannot be seen and the intra-foraminal distance cannot be accurately measured as the “curved” mandible if flattened on this two-dimensional study. Therefore, the only helpful measurement from a panoramic radiograph is in the vertical axis. To further appreciate the topography of the mandible, a CT or cone beam CT scan may be necessary. Conventional lateral cephalometric film also shows the volume and width of the anterior mandible.
Straumann Pro-Arch Protocol with BLX implants:
Straumann® Pro Arch is based on the treatment concept introduced by Paulo Malo (Malo et al., 2003b) and offers a safe, reliable and less complex treatment option for patients requiring full-arch treatments. Patients and clinicians benefit from the combination of the individualized prosthetics and the surgical advantages of the Straumann® SLActive® surface as well as the unique material properties of Roxolid®.
Primary stability is a prerequisite for immediate implant loading and warrants the rigidity and successful osseointegration of a full-arch fixed restoration (Branemark et al., 1977; Meredith, 1998).
The Straumann® BLX Implant System is the next generation solution for confidence beyond immediacy. Straumann® BLX has been designed for immediacy, and is also suitable for all other treatment protocols – ranging from immediate to conventional placement and loading – to suit the dentist’s preference. The intelligent implant concept allows for Straumann Dynamic Bone Management and is designed for immediate protocols in all bone types. With a simplified but versatile portfolio, featuring one connection and under-contoured prosthetics to deliver esthetics with ease.
Reduced Treatment complexity by Straumann:
The concept of Straumann® Pro Arch is a fixed rehabilitation which encompasses the whole procedure from removal of hopeless teeth, immediate placement of four implants and immediate loading of the implants with a temporary bridge. It also includes the treatment planning steps before surgery and afterwards when converting the temporary bridge to the final full-arch prosthesis. A recent literature review concluded that two posterior and two anterior implants are appropriate if their placement does not necessitate major bone grafting procedures (Mericske Stern and Worni, 2014). However, missing teeth lead within short time to significant bone resorption which is especially challenging in the posterior region of the maxillary arch. In the past and with conventional implant treatment modalities, patients with bone loss had to undergo the lengthy procedure of bone augmentation. The full arch restoration with only four instead of 5-8 implants reduces the number of surgeries as bone grafting procedure is not performed and reduces therefore treatment complexity, which can result in cost savings of several thousand dollars per jaw for the patient (Babbush et al., 2014) and in saved chair time for the doctor. By tilting the distal implant, a more posterior position can be reached which reduces the distal cantilever of the prosthesis and avoids the need for bone grafting procedures (Malo et al., 2005). Another advantage is that longer implants can be placed without interfering with the mental foramina in the mandible or the need for sinus floor augmentation in severely resorbed maxilla. A standard implant length of at least 10 mm has been indicated (Malo et al., 2003a). To today’s knowledge, tilting of implants also provides a larger prosthetic base and reduces the force acting on the implants (Krekmanov et al., 2000). Therefore, the Straumann® Pro Arch treatment solution is less time-consuming and less costly in comparison with conventional implant treatment modalities of the edentulous and soon-to-be edentulous jaw.
Patient Information:
An ASA 2(ALLERGY, LIST OF MEDICATIONS), 70 year young Caucasian male patient had reported to the office with a chief complaint “I WANT IMPLANTS TO FIX MY TEETH”. Is a known smoker for over 25 years (WITH SOCIAL DRINKING HABITS) and has been partially edentulous for over 15 years. Dislikes the idea of wearing a partial denture and has avoided seeing the dentist unless in pain. He was diagnosed with generalized severe chronic periodontitis about 12 years ago and denied any periodontal therapy.
He had seen multiple clinicans for the purpose of teeth replacement and declined treatment due to extensive surgical plans such as bilateral sinus lifts for posterior maxilla, block grafts for the anterior maxilla, vertical ridge augmentation for the posterior mandible.
Clinical examination:
Extra-Oral: (Fig. 22)
– Euryprosopic facial form
– Acute naso-labial angle
– Deep mento-labial groove
– Pseudo-Class 3 facial profile
– Symmetry, movement, skin, lymph nodes, sinuses, muscles of mastication and orofacial region, thyroid, temporomandibular joint, salivary glands – WNL
Fig. 22

Intra-Oral: (Fig. 23)
– Teeth present: 13-46-43 (grade 1+ mobility)
– Decay noted on the mesial surface of 43, buccal and distal of 13
– Enlarged tongue (due to long term edentulism)
– Irregularly resorbed alveolar ridges
Fig. 23

Vital Signs:
All within normal physiological limits
Over a period of multiple consultations, (Fig. 24) various treatment plans were discussed with all risks, benefits and alternatives. During the final consult–the patient was well motivated and understood the treatment workflow including the surgical plan, need for some GBR, a transitional healing phase prior to receiving the final restoration.
Fig. 24
Based on the patients needs, psychological profile, medical health status, and financial abilities, a treatment plan of the following was finalized:
– extraction of remaining natural teeth, alveoloplasty
– 4 implants for the mandible and a hybrid final prosthesis (High Water design)
– 4 implants for the maxilla with GBR on buccal due to inadequate horizontal dimensions, 2 stage, final restoration with a final metal re-inforced upper denture supported on 4 locator attachments
– A treatment time of 6 months was planned
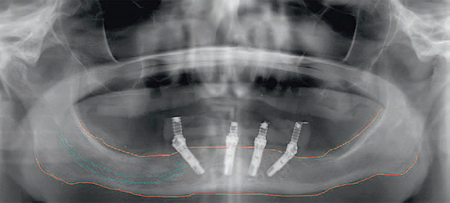
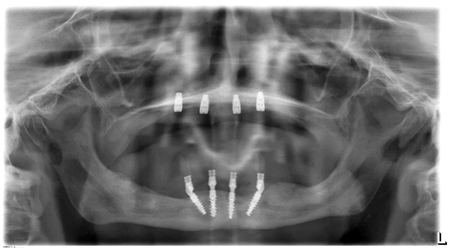
Following the Straumann Pro-Arch protocol, based on CBCT evaluation (Figs. 25, 26) of the maxilla and mandible, the position of the implants were planned using the Integrated Implantology Software from the CT.
Fig. 25
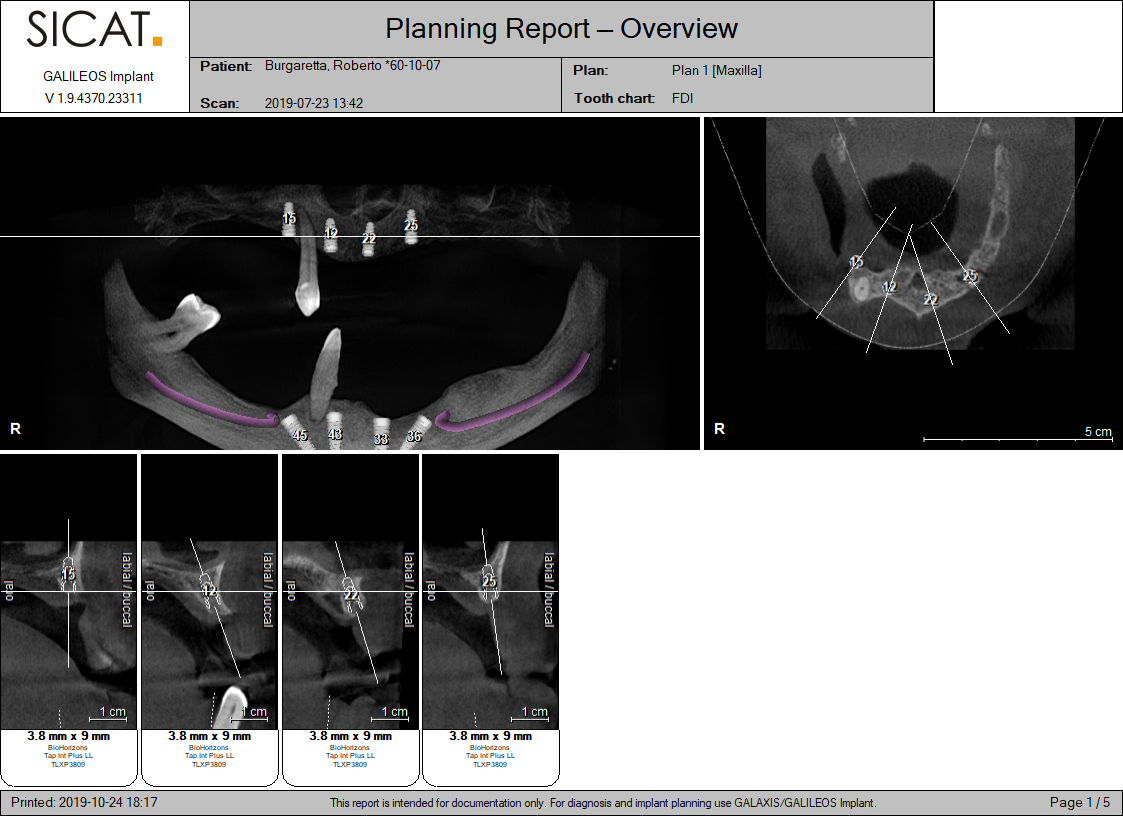
Fig. 26

Photographs, study models, teeth set up, duplicate dentures to convert as surgical guides were all fabricated prior to the surgical appointment.
Premedications with Amox 500mg, 19 capsules, To take 4 caps, 1 hour prior to surgery and continue 1 cap, TID for 5 days, Ibuprofen 400mg, 16 tablets, to take 1 tab, 1 hour prior to surgery and continue 4-6 hourly for 3-5 days, Dexamethasone 4mg, 8 tabs, to take 2 tabs, 1 hour prior to surgery and continue BID for 3 days.
Chlorhexidine gluconate 0.12% was prescribed along with the use of a soft bristled tooth brush and tongue scrapper.
Surgical Appointment:
Procedure was performed under IV sedation.
Pre-surgical mouth rinsing for 30 seconds with chlorhexidine gluconate 0.12%. The surgical protocol begins with the administration of local anesthetic. Lidocaine 2% with 1:100,000 epinephrine is used. After adequate time is allowed for the local anesthetic to take effect, a crestal incision is made to expose the alveolus. (Fig. 27) The incision extends approximately to the mesial aspect of the second molar region. Blunt dissection is used to identify the mental foramen. Once the mental foramen has been identified, a minimum distance of 5 mm measured anteriorly is allowed for the loop of the inferior alveolar nerve before its termination as the mental nerve. The lingual flap was tied using surgical silk to allow for better visualization. Using a 5mm flat diamond and surgical handpiece, alveoplasty was performed to create a uniform flat bone table. (Fig. 28)
Fig. 27
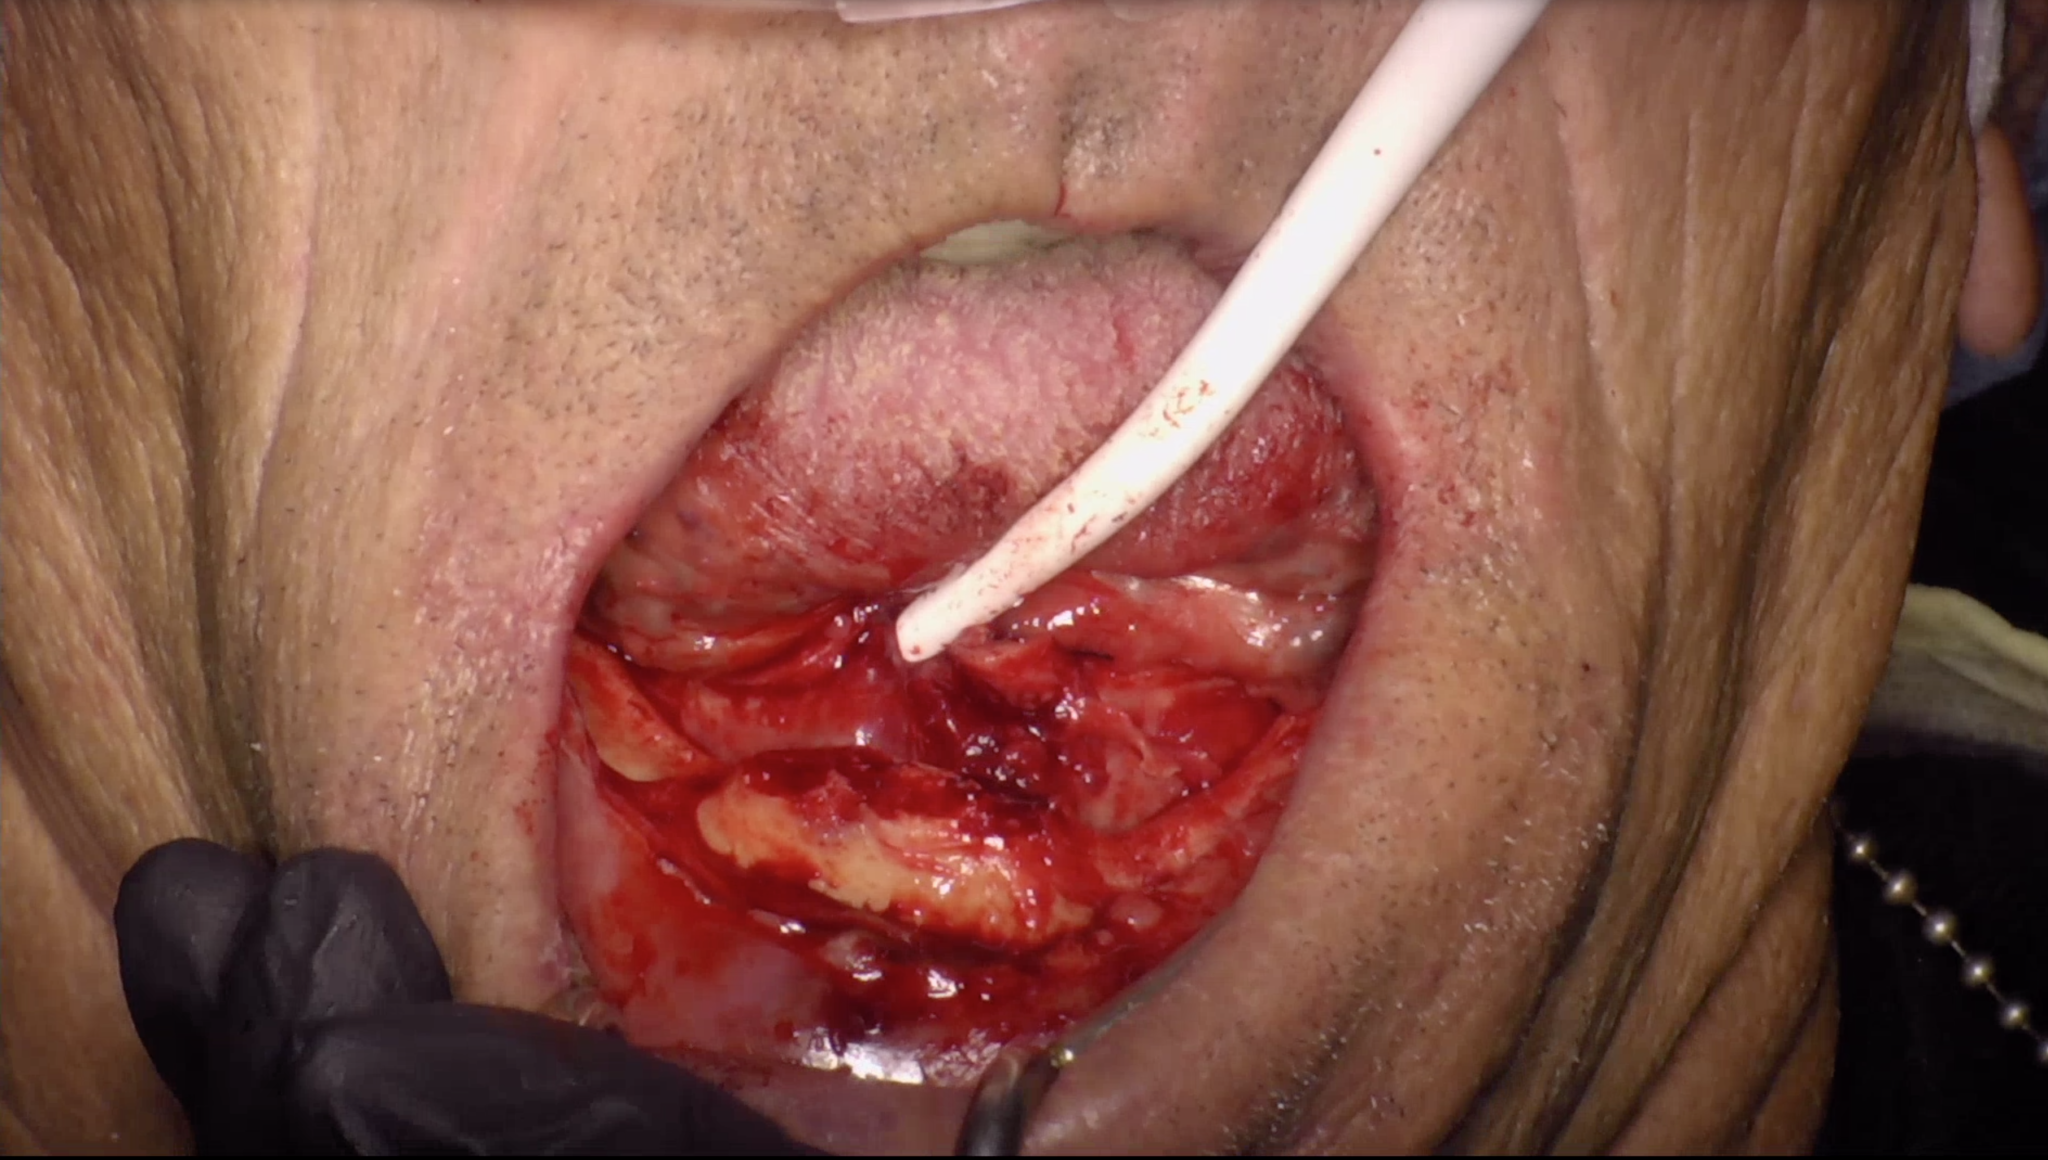
Fig. 28

At this time, the surgeon is ready to initiate the osteotomy using surgical stent converted from the teeth setup guide, and with the 2-mm pilot drill osteotomies are prepared at full depth of 13mm. (Fig. 29) The calibrated guide pins (Fig. 30) are then placed and radiographic confirmation is done. (Figs. 31, 32, 33)
Fig. 29

Fig. 30
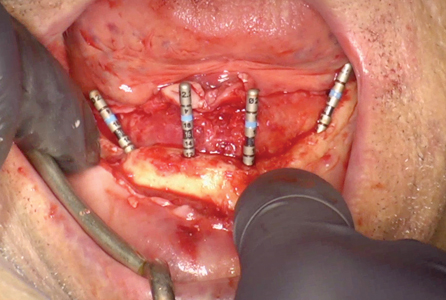
Fig. 31
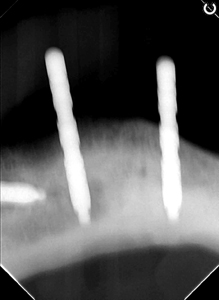
Fig. 32
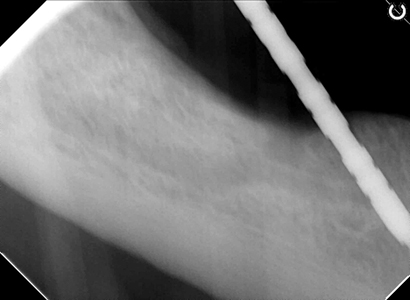
Fig. 33

The osteotomy is completed for most cases using a final 2.8-mm drill (in severely resorbed ridges and very dense bone, a 3- or 3.2-mm final osteotomy drill with or without a bone tap may be used. The Straumann BLX implants (Fig. 34) are placed with the implant handpiece motor set at 20 Ncm. As the resistance during placement of the implant increases and stalls the handpiece, the insertion torque is increased to 40 Ncm. It may be necessary to hand torque implants into their final seating if the insertion torque exceeds the 40-Ncm setting of the handpiece motor. The posterior implant axis is corrected by the placement of 30° multiunit abutments, which are torqued to 20 Ncm (Fig. 35) Two temporary abutments are placed on the anterior implants until indexing of the denture is completed, determining whether straight or 17° angulated abutments should be used. This completes the surgical procedure. Temporary plastic caps are placed on the 30° abutments and the soft tissues are adapted to all four abutments.
Fig. 34
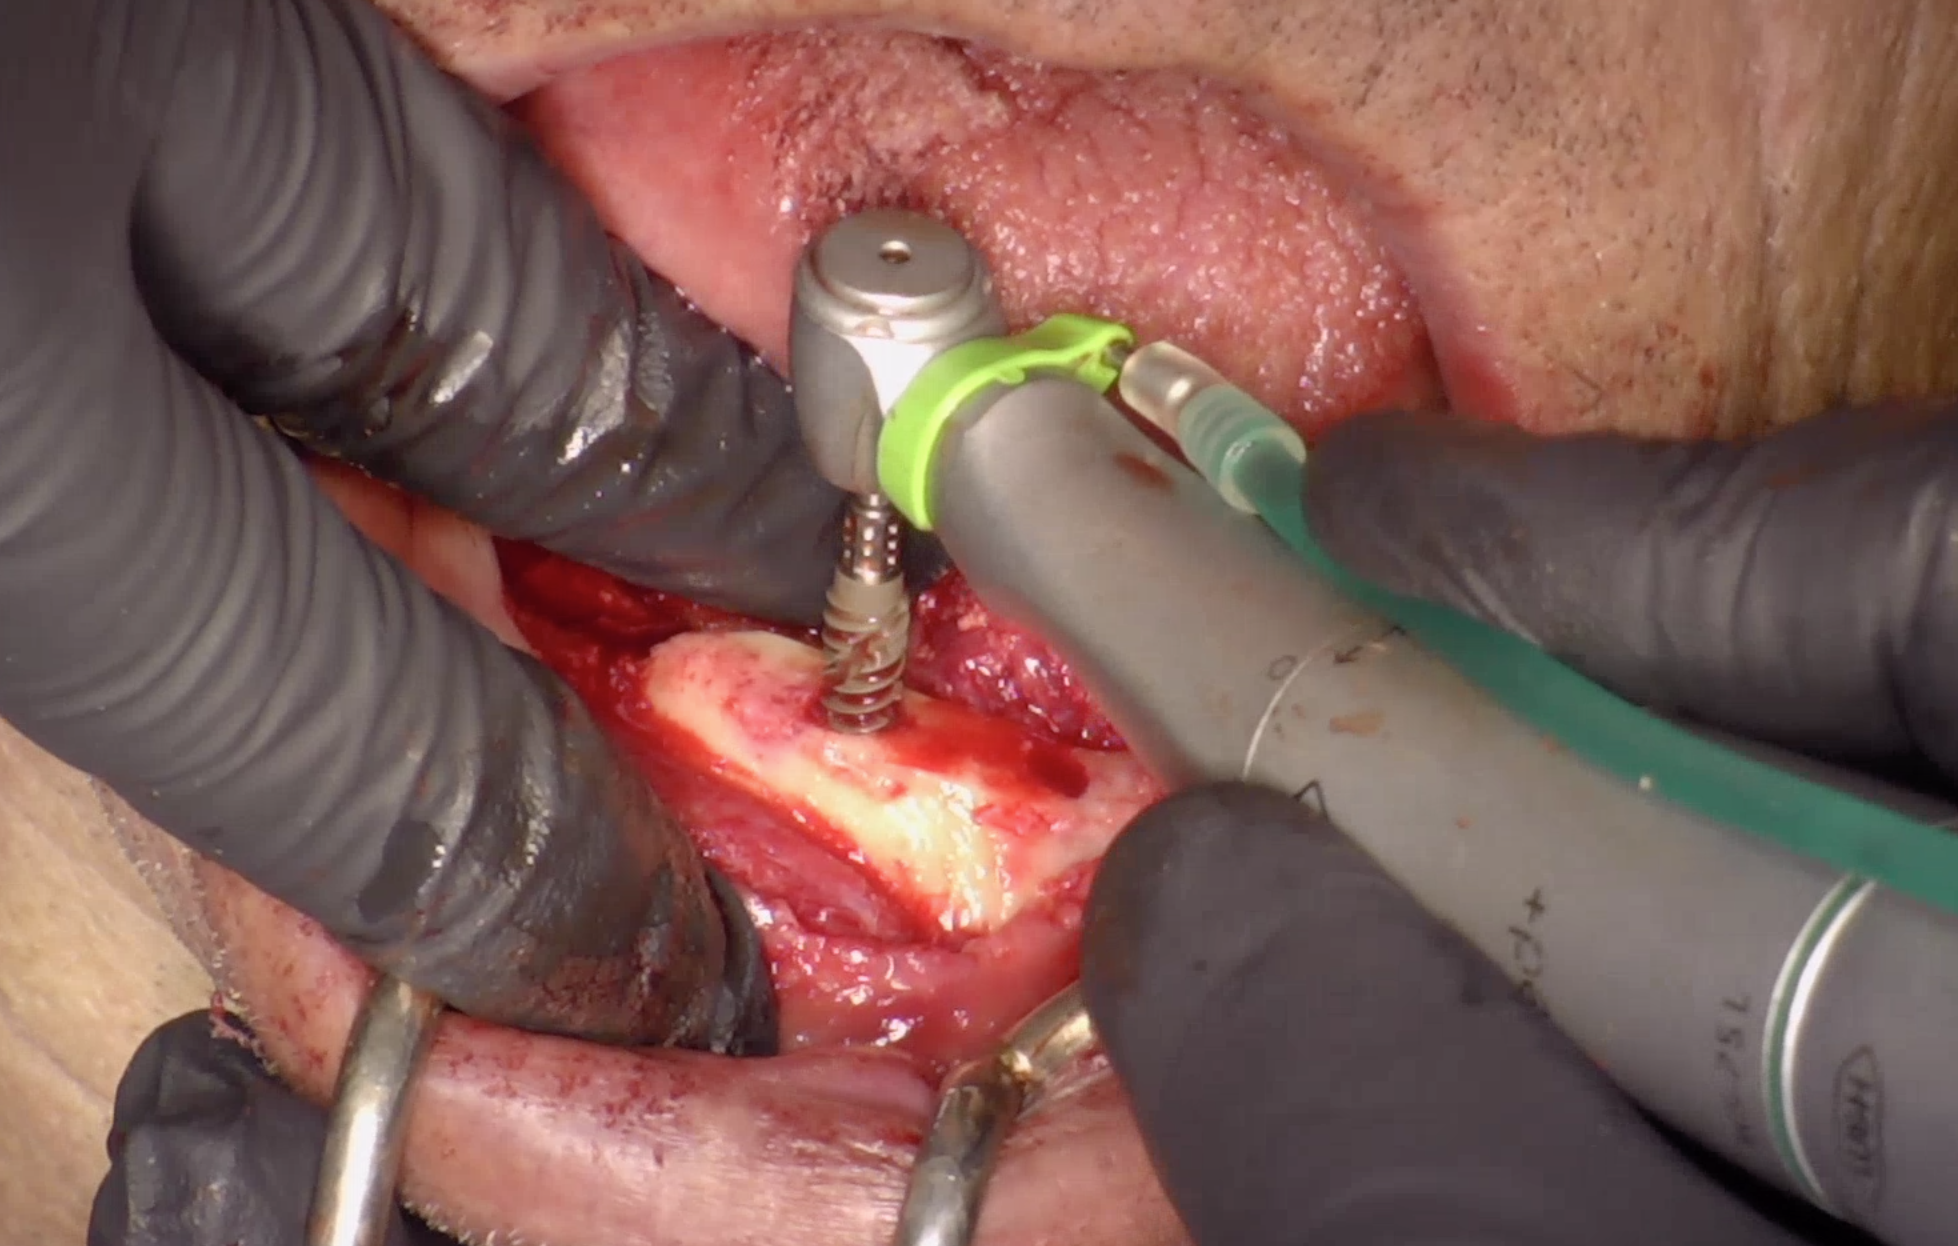
Fig. 35
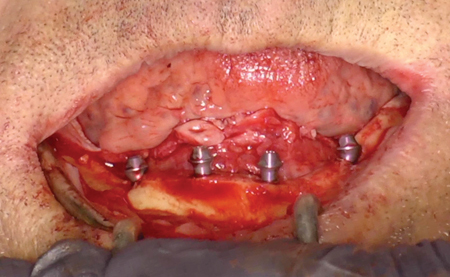
On completion of the surgical component, the provisional lower denture was modified and the temporary cylinders of the anterior 2 implants were picked up for in house lab conversion. Meanwhile the maxillary surgical phase was initiated. (Fig. 36)
Fig. 36

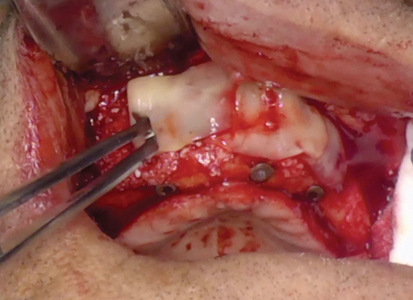
The preoperative radiographic examination determines the presence of zone I and zone II bone. Clinical evaluation and CBCT of the buccal plate of the edentulous maxilla demonstrated an “hour glass” depression between the maxillary alveolus and the maxilla proper. Local anesthetic administration, including circumvestibular infiltration of the maxilla and greater palatine, and nasopalatine nerve block are completed. A “hockey stick” releasing incision over the tuberosity of the maxilla is initiated and carried full thickness over the edentulous maxillary alveolar ridge to the opposite tuberosity. Elevation of a full-thickness flap exposes the maxilla. (Fig. 37) Alveoloplasty to reduce the depth of the buccal concavity is performed. (Fig. 38)
Fig. 37
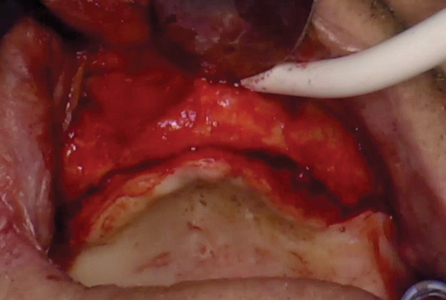
Fig. 38

The osteotomy with a 2 mm drill (Fig. 39) of the 4 implant positions are now initiated based on the the surgical guide made from the denture setup and the guide pins (Fig. 40) are placed to be verified by an intraoperative periapical radiograph. (Figs. 41, 42) Regular 4-mm thread diameter platform implants are used. (Fig. 43) The recommended final osteotomy diameter in type I and II bone is 3 mm. Because the posterior maxilla is primarily cancellous and therefore type III bone, to achieve 40 Ncm of insertion torque, the double-threaded implants are generally inserted in an undersized 2.4-mm osteotomy (Fig. 44).
Fig. 39
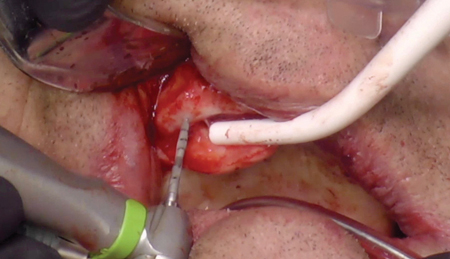
Fig. 40
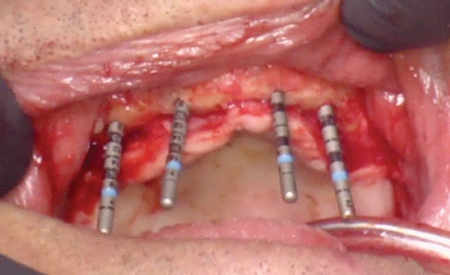
Fig. 41

Fig. 42

Fig. 43
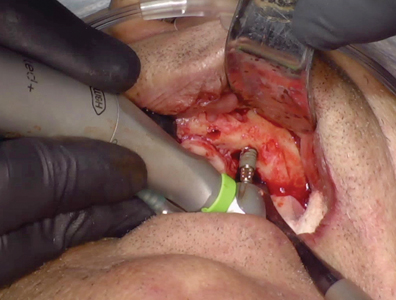
Fig. 44

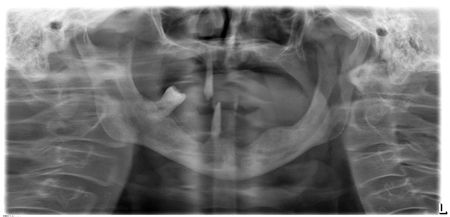
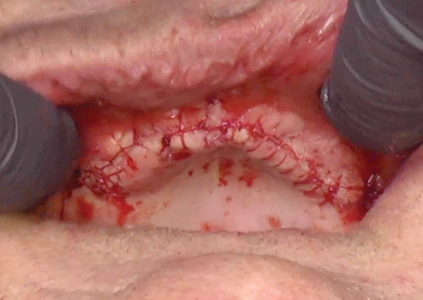
On complete implant placements, achieving adequate primary stability, the cover screws are placed and hand torqued. Due to the inadequate buccal bone thickness, pre-treatment planning involved the process of GBR (Fig. 45) – where allografts and xenografts were combined and placed. A-PRF protocols were followed and membranes (Fig. 46) were made chair side and placed over the graft material, over which a porcine derived collagen membrane was placed and primary closure was achieved. (Fig. 47). The provisional upper complete denture (Fig. 50) was relined with a soft liner and delivered, meanwhile the in-house lab technician had completed the fabrication of the lower screw retained provisional (Fig. 49) which was then torqued into the lower implants. A final panoramic radiograph was then taken. (Fig. 48) Post surgical instructions were given verbally and in writing. The patient was then reviewed after 2 weeks with no post surgical complications. He was maintaining good oral hygiene and is currently in the healing phase. (Fig. 51)
Fig. 45
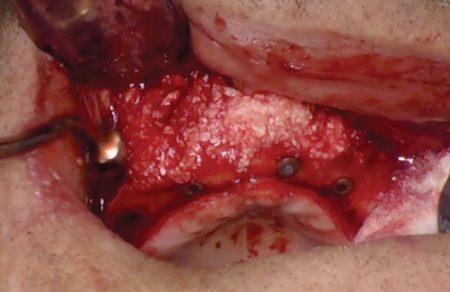
Fig. 46
and maxilla.
Fig. 47
and maxilla.
Fig. 48
and maxilla.
Fig. 49

and maxilla.
Fig. 50

and maxilla.
Fig. 51

and maxilla.
Prosthetic Phase:
The patient had reported to the office 4 months later, healthy and with no concerns about his removable upper denture and screw retained lower provisional prosthesis. An indirect prosthetic workflow was chosen. Accordingly, the correct height of the abutments was chosen with single-use try-in abutments. They click into the implant connection, and vertical marks allow for easy identification of the correct abutment. It is strongly advisable to select the abutments clinically and not subsequently on the master cast. The height of the abutments was chosen to fulfill two requirements: first, the housing of the matrices should not touch the peri-implant mucosa to avoid trauma to the sensitive tissues. Therefore, the shoulder of the abutment should be placed at least 1mm above the mucosa. The second consideration for the height selection comprises the path of insertion of the overdenture. In order to avoid interferences, the uppermost platforms of the abutments in one jaw should form an even plane, which ideally is parallel to the occlusal plane. The technician provided special trays on the basis of preliminary alginate impressions. The impression posts were screwed in and their seating was carefully verified. Subsequently, the impression was taken using the high-precision viscoelastic impression material. The master cast was produced in a class IV stone that carried the appropriate implant analogs. On this master cast the occlusal wax rim was produced with already incorporated female parts to ensure maximum stability of the base plate. The technician provided the set-up, and the patient consented to finalize the overdenture. On delivery, the Novaloc abutments were screwed into the implants and torqued with 35Ncm, and the denture was fitted. Esthetics, phonetics and function were achieved with classic prosthodontics principles incorporated. (Figs. 52-61)
Fig. 52

Fig. 53
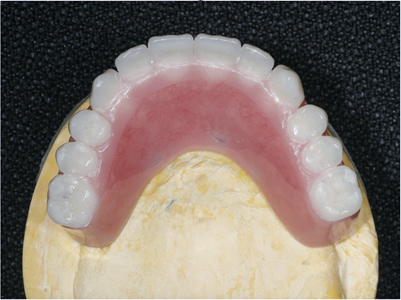
Fig. 54

Fig. 55

Fig. 56
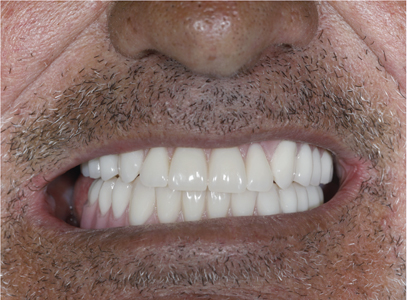
Fig. 57
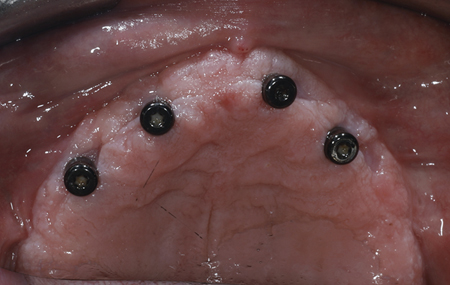
Fig. 58
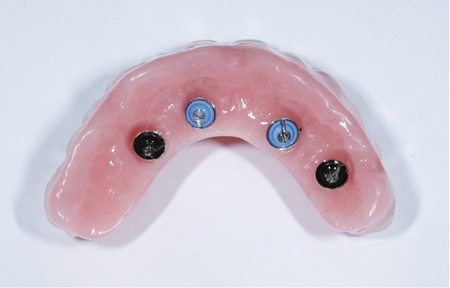
Fig. 59
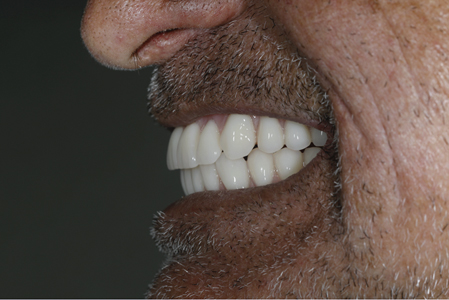
Fig. 60

Fig. 61

Discussion:
Implant-supported prostheses are successful treatment modalities that can be very helpful for patients with multiple missing teeth. Excessive bone loss and alveolar ridge deformities following long-term edentulism and previous history of untreated periodontitis had caused limitations in the implant placements mandible and maxilla, given that the patient had denied options of extensive GBR and sinus augmentation procedures due to cost and other limitations. This patient had been very co cooperative and understood the benefits of all the treatment options presented prior to treatment and opted for a fixed lower and removable overdenture for the maxilla.
A fixed full-arch prosthesis on the day of surgery quickly leads to improved patient satisfaction – with regards to function, esthetics, sense, speech and self-esteem.8 Tilting of the posterior implants avoids the need for time-consuming bone grafting procedures, while immediate loading shortens time-to-teeth. The concept is the least expensive in comparison with conventional implant treatment modalities of the edentulous and soon-to-be edentulous jaw.9
Respecting individual patients’ needs and expectations, the new Straumann® Pro Arch offers dental professionals the opportunity to provide fixed full-arch treatments with an immediate temporary restoration. There are the advantages of reduced complexity by addressing the individual anatomical situation and leveraging the unique Roxolid material of the BLX Straumann implants. This technique also uniquely preserves bone and reduces invasive grafting procedure and more treatment options with smaller implants.
The upper removable over denture utilizes the Straumann Novaloc Retentive System for hybrid dentures that offers an innovative carbon-based abutment coating with an excellent wear resistance, overcoming up to 60° implant divergence. Both the straight and 15° angled abutments are available in various abutment heights, covering a broad range of clinical implant situations. Together with its durable PEEK2 matrices, the Novaloc Retentive System provides a unique and long-lasting attachment performance.
Conclusion:
Patients with unrestored edentulism often present with emotional and psychological problems such as behaving in a way that keeps the tooth loss secret, declining self-confidence and social isolation.10 People having fewer than 9 teeth reported more impact on health related quality of life than people suffering from cancer. Osseointegrated dental implants allow for proper chewing and speaking, increases comfort, appearance and self-confidence, reduces bone resorption and usually improves patient’s nutritional status. Also facial appearance is greatly improved with compared to conventional complete dentures as the patient’s facial muscles are freed from the burden of having to stabilize dentures. The Straumann Pro Arch fixed solution for the lower and the use of the Novaloc locator attachments for the upper helps to give back quality of life to this patient.
Oral Health welcomes this original article.
References
- Malo P, Friberg B, Polizzi G, Gualini F, Vighagen T, Rangert B (2003a). Clin Implant Dent Relat Res 5 Suppl 1:37-46.
- Malo P, Rangert B, Nobre M (2005). Clin Implant Dent Relat Res 7 Suppl 1:S88-S94.
- Babbush CA, Kanawati A, Kotsakis GA, Hinrichs JE (2014). Implant Dent 23(2):218-224.
- Mericske-Stern R, Worni A (2014). Eur J Oral Implantol 7 Suppl 2:S133-S153.
- Branemark PI, Hansson BO, Adell R, Breine U, Lindstrom J, Hallen O et al. (1977). Scand J Plast Reconstr Surg Suppl 16:1-132.
- Malo P, Rangert B, Nobre M (2003b). Clin Implant Dent Relat Res 5 Suppl 1:2-9.
- Krekmanov L, Kahn M, Rangert B, Lindstrom H (2000). Int J Oral Maxillofac Implants 15(3):405-414.
- Mozzati M, Arata V, Gallesio G, Mussano F, Carossa S. Immediate postextractive dental implant placement with immediate loading on four implants for mandibular full-arch rehabilitation: a retrospective analysis. Clin Implant Dent Relat Res 2013;15:332-40
- Babbush CA, Kanawati A, Kotsakis GA, Hinrichs JE. Patient-related and financial outcomes analysis of conventional full-arch rehabilitation versus the All-on-4 concept: A cohort study. Implant Dent 2014;23:218–24
- Patil MS, Patil SB (2009). Gerodontology 26(1):72-77.
About the Authors
 Dr. Mark Lin, graduated from the dental program at University of Detroit Mercy, then completed a one-year General Practice Residency program at Miami Valley Hospital in Dayton, OH. He practiced general dentistry for 13 years, then completed post-graduate training in the specialty of prosthodontics at the University of Toronto. He maintains a full-time specialty practice as a prosthodontist at Dr. Mark Lin Prosthodontic Centre.
 Dr. Joshua Shieh is a Fellow of the International Congress of Oral Implantology and of the Acad. of General Dentistry, member of the American Acad. of Cosmetic Dentistry, Clin. Instructor at the Oral Rehabilitation Unit, Dept of Periodontics, Faculty of Dentistry at University of Toronto. He currently practises as a general dentist in Mississauga, Ont. drjoshuashieh@gmail.com
To see more articles from the 2020 Prosthodontic issue of Oral Health, please click here!


