
We are tasked to help our patients attain a more desirable cosmetic outcome; often, there is a choice between direct and indirect procedures. Direct procedures are generally less invasive; the practitioner only needs to remove old restorations and any pathology present. Restoring to achieve a long-term desirable outcome requires proper planning and execution to create ideal emergence profiles for a healthy and esthetic outcome. At times, there are limiting factors that prevent conventional matrixing to develop these profiles. The following case solves one of these limiting factors: a lingually bonded retainer.
This patient, an executive for a large company, wished to have straight teeth and a more pleasant smile. However, he did not want his restorations changed. He elected to try lingual braces (as opposed to clear aligner therapy) to straighten out his teeth to the smile that he envisioned. He felt that wearing conventional braces or clear aligners at his age would be perceived poorly.
Since lingual braces are not a service provided at the practice, he found an orthodontist who was adept at treating with lingual braces. After the orthodontic procedure was completed (without consultation with the referring dentist), the patient had a totally different desire for his smile.
He now wished to reshape his central incisors. His original intention for straight teeth had now morphed into a new strategy that included replacing the old composites and balancing the centrals in shape and size. Unfortunately, as there was no communication with the orthodontist, the practitioner was not informed of the patient’s wishes until he was in final retention with a lingually bonded retainer from lateral to lateral. (Fig. 1). The final orthodontic positioning was correct with respect to the gingival zeniths as observed in the post-treatment smile (Fig. 2). The patient was concerned with the irregularity of the anterior incisal edges and the mismatched interproximal incisal embrasure angles. Tooth 11 was chisel-shaped, its distal-incisal edge was too long, and it exhibited lingual-incisal edge wear from earlier abrasive parafunctional activities (Fig. 3). The adjacent central, 21, was over-contoured, creating a visual cant in the tooth’s position in relation to the right central.
Fig. 1

Fig. 2
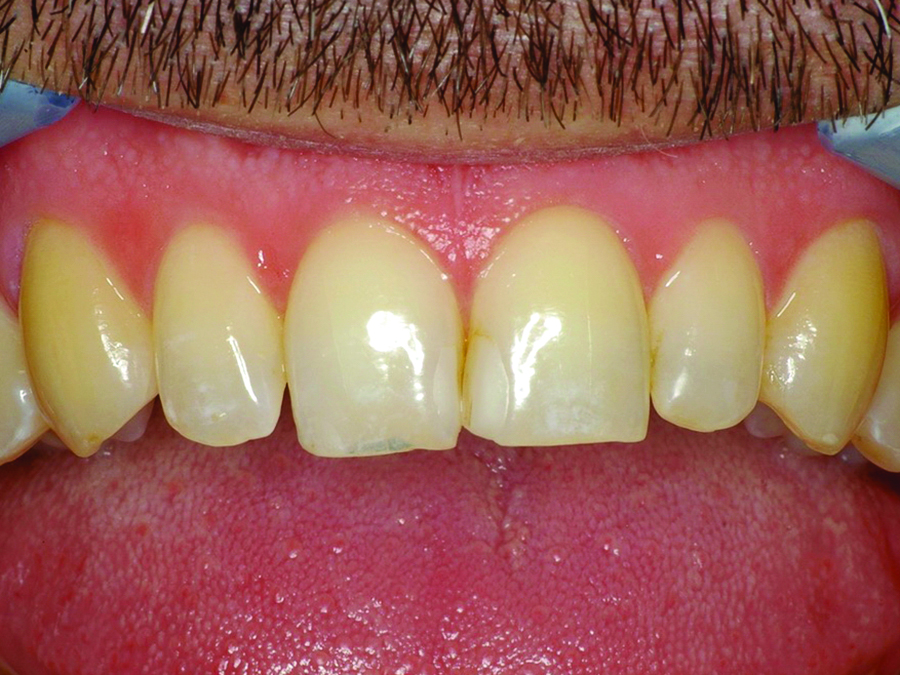
Fig. 3

The treatment plan included: restoration of the two centrals with direct bonded composite to re-establish form and function, and to remove potential pathology from the stained and washed out restoration on both teeth. Various shades of composite were tested to verify the desired value and chroma needed to recreate natural and matching esthetics. The test swatches were recorded and removed.
Teeth 11 and 21 were air abraded, removing all the old restorative materials and texturing all surfaces to be bonded. Air abrasion creates a very adherable surface and permits the optimization of the mesio-distal dimensions of both centrals. The lingually bonded retainer wire was now visible between the reshaped centrals (Fig. 4) and prevented the placement of a conventional straight mylar strip to create the desired interproximal contour and profile. It was decided to use a special contoured strip to isolate and restore the interproximal area.

of 11 at the distal incisal edge offers a better balance form to the final incisal edge position. Removal, with air abrasion only,
of the old restorative materials on 11 and 21 creates a space between the teeth and shows the lingually bonded retainer.
The Margin Perfect Matrix (MPM), which can be shaped and sealed well to the tooth and the mucosa, was used in this case. The strip was pulled tightly to the tooth to keep the free gingival margin sealed from sulcular fluids that could potentially leak under it, compromising the adhesion of the restoration A resin sealer was placed on the outside of the strip to keep the seal tight while the composite restorative was inserted and shaped. This properly positioned matrix (Fig. 5) helps to create the contours necessary to satisfy the cosmetic desires of the
patient and clinician, and to develop the hygienically-maintainable emergence micro-environment that ensures long-term clinical success.
Fig. 5

Contouring the MPM 3-dimensionally allowed the matrix to wrap around the tooth and to seal interproximally to create ideal emergence profiles (Fig. 5). The hermetic seal that is created within the gingival sulcus allows the bonding agents and restorative materials to create a glossy smooth surface that encourages the soft tissues to respond well, and to establish an anatomic emergence profile that will maintain the gingival contours around the restored teeth. (Technique videos can be found at www.marginperfectmatrix.com )
A flat MPM mylar strip (Fig. 6) is rolled between the fingers in various directions to create a memorized shape (Fig. 7) that will adapt around the tooth. This creates the shape that will develop the proper dental contours for the restoration. Once the strip has been placed circumferentially around the tooth, it is stabilized with unfilled bond resin placed on the outside of the strip. The bond resin is cured to create a framework that stabilizes the MPM’s shape for manipulation of the bonding resins and composites. The composite is thus adapted well to both the tooth and the matrix. After polymerization, the composite that is adapted to the mylar material of the MPM achieves an extremely smooth surface that has no oxygen inhibited layer that must be removed or polished. This smooth and glossy surface is ideal for maintaining soft tissue health and simplifies the polishing process.
Fig. 6

Fig. 7

It was decided to restore tooth 21 first as the issues to be addressed were less serious: the cant of the tooth and mesial-incisal angle defect. Thus, it was easier to design the final width, shape and contour. Then, tooth 11 was restored to match 21. Once the MPM was securely in place around 11 (Fig. 5), the restorative surface was etched with ortho-phosphoric acid. Acid was applied to all bondable surfaces (total etch technique), and then thoroughly rinsed and dried. Since little or no dentin was exposed during preparation, drying was more thorough for the 5th generation bond system. PQ1 (Ultradent, South Jordan UT) coated the entire preparation surface and was then thoroughly thinned with a steady stream of dry, oil-free air followed by a five-second polymerization of the adhesive with an LED curing light. The previously selected composite (Supreme Ultra, 3M, St. Paul, MN) was injected into the MPM mold with a PLT compule to prevent any air entrapment
The MPM was removed from 11 and the final contours were adapted to match the adjacent restored tooth. Both restorations were polished, but in this case only a light polish with an Astropol polisher (Ivoclar, Buffalo NY) was necessary to bring out the final luster to match the surface shine and texture of the other teeth. The immediate post-operative retracted view shows minimal tissue trauma with excellent emergence profiles complementing the harmonious color and contours of the now restored centrals (Fig. 8).
Fig. 8

The final restorative outcome presented here (Fig. 9) was accomplished to fulfill the esthetic desires of the patient. The restorations were accomplished with very little tooth reduction and through the use of additive dentistry to reshape the teeth. The complexity of the restoration was increased by having to work around a lingually bonded retainer. On completion of the orthodontic phase, the patient had a self-discovery that he had a desire for a higher level of esthetics. The restorations have now been in functional service for six years, and he has indicated that he is still very happy.
Fig. 9

Oral Health welcomes this original article.
About the Author
 Dr. Mark Malterud is a graduate of the University of Minnesota and practices Minimally invasive Biomimetic Dentistry in St. Paul, Minnesota. His focuses on comprehensive care with a philosophy of preserving tooth structure and vitality. He has served as President of Minnesota AGD and Region 10 Trustee. Mark enjoys participating actively in numerous outdoor sports.
RELATED ARTICLE: Aesthetic Crown and Bridge Restorations Using a Fully Digital Workflow


