
Introduction
Achieving a successful outcome in aesthetic dentistry can be a formidable challenge for all dental practitioners, regardless of their experience level. The patient describes their expectations for the case to the dentist, who then diligently works with provisional restorations to satisfy those aesthetic desires, only to have to rely on the dental technician (ceramist) to duplicate what the dentist and patient have worked out “in the mouth.” This process may involve several appointments, adjustments, and try-ins until a case can finally be delivered successfully. The digital world now offers the dentist many different tools to design and communicate outcomes to the patient and laboratory that can take much of the “guess work” out of creating an aesthetic result that the patient will be happy with. For dentists that have been in practice for several years, digital technologies may be difficult to incorporate into their practices because of costs and/or suffering through the “learning curve” to adopt a different workflow from what they are accustomed to. However, every dentist can enter the digital workflow, taking conventional impressions and interocclusal records as long as the dental technician can scan the impressions or master casts and convert to STL files. This article will describe one way to use digital technology in a unique way to “close the loop” between the patient, dentist, and technician with a goal to provide a predictable outcome that saves much of the “trial and error” and chair time that is typically associated with difficult aesthetic challenges.
Digital Smile Design and Aesthetic Communication
The elements of smile design have been taught and applied by dentists for several years. The digital aspect of smile design now allows the dentist and/or dental technician to take preoperative photographs along with conventional impressions and interocclusal records, then manipulate parameters within a software to design potential aesthetic and functional outcomes. Next, this digital information can be programed into a milling machine to produce a three-dimensional copy or prototype that can be evaluated in the patient’s mouth. The challenge with digital smile design when used solely as a tool for patient presentation is that sometimes a proper evaluation can only be made if the digitally manipulated image can somehow be transformed into the patient’s smile. Just because something looks good on a computer screen, doesn’t necessarily mean it will look and function well in the patient’s oral cavity. Only when the prospective prototype is placed “between the patient’s ears”, can a realistic aesthetic and functional evaluation can be made.1-3
Entering The Digital Workflow
The first step before starting any aesthetic case is a patient interview…..what does the patient want? What does the patient not like about their smile? Digital photographs are made of the patient’s full face, full smile, retracted in centric occlusion, retracted with teeth slightly separated, “E” position, and full maxillary and mandibular occlusal views. These photos will help the patient and dentist discuss what is possible to achieve and help to set the patient’s expectations. Also, photographs with shade tabs will aid the ceramist in choosing an initial shade for the restorations, as well as making decisions on individual characterization, such as cervical chroma, incisal translucency and internal effects. One camera on the market designed specifically for dentistry, the EyeSpecial III (Shofu Dental) has a particular setting that will isolate the shade of the tooth and shade tab graying out the rest of the intraoral structures. (Fig. 1) With this information, the ceramist can create custom shade tabs that can be used to verify the final shade prior to fabrication of the definitive restorations. A digital aesthetic proposal for the case is then designed based on the diagnostic and visual information provided.
Fig. 1

The Digital Aesthetic Proposal
Using the power of digital design and in-lab milling, it is possible to create several “versions” of potential smile designs that can be milled from polymethylmethacrylate (PMMA) and evaluated in the patient’s mouth for aesthetic approval and functional design. It has been suggested that when making emotional decisions, having a choice between 2 or 3 options will make someone feel more confident they are making the correct choice.4 Based on this premise, digitally produced PMMA prototypes can be milled and tried in to give the patient a more realistic choice in the emotional part of the decision-making process. This process can save hours of chair time and “hit or miss” decision making when adjusting and editing the provisional restorations manually.
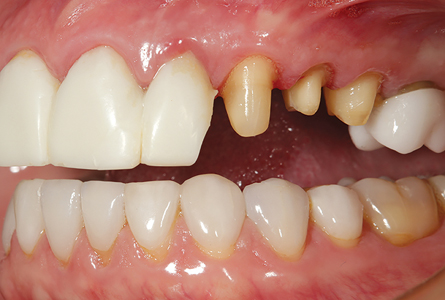
The patient featured in the article had chosen to upgrade her 10-year-old porcelain veneer restorations to brighten the shade. The ceramic material was carefully removed with rotary instrumentation and diamond burs down to the original preparations. After minor modifications to gingival margin placement, a master impression was made using the two-cord impression technique. First, a # 00 retraction cord is placed at the base of the gingival sulcus of each preparation. Next, a # 1 cord is placed on top of the # 00 at the level of the preparation margins. When ready to proceed with the impression, the # 1 cord is removed leaving the # 00 in place. Next, a light bodied impression material is placed in the intracrevicular space around each preparation and the impression tray with heavy bodied tray material is put to place over the preparations until set. In this case, the basic shapes and contours of the original restorations where satisfactory to construct provisional restorations, so a PVS stent of the original restorations was made before the restorations were removed. After preparation, the stent was filled with a rubberized urethane provisional material, contoured chairside, and luted to place using a flowable composite. (Fig. 2)
Fig. 2
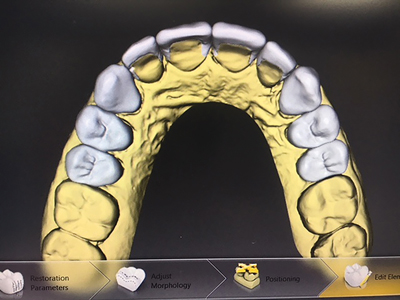
The master impression is poured by the ceramist and then scanned to create the digital master model. (Fig. 3) From that point the opposing model is also digitized as well as the bite relationship. The case is then “mounted” on a digital articulator and a case proposal is designed for the ten zirconium veneer restorations. The technician can work out canine discussion and anterior guidance in the “virtual world” as the restoration contours are shaped and modified in the software. (Figs. 4 & 5) Using this finished proposal, PMMA restorations are then milled for both right and left posterior segments (first, second premolars, and cuspid) and the four maxillary anterior teeth (lateral and central incisors). For the purposes of providing a choice of slightly modified aesthetic parameters for the patient to evaluate, two other proposals are designed by the ceramist for the maxillary incisor teeth with slight variations to incisal edges, embrasures, and surface texture. The plan at the patient’s “dress rehearsal” is to cement the canine-premolar segments with provisional cement. The occlusion and canine guidance built into these segments will not vary in the evaluation, only the three different incisor segments will be looked at and evaluated by the patient.
Fig. 3

Fig. 4

Fig. 5
The Patient “Dress Rehearsal”
The two posterior PMMA provisional segments are shown in Fig. 6. The chairside provisional restorations fabricated at the preparation appointment are removed and the preparations are cleaned with an antibacterial scrub (Consepsis: Ultradent). (Figs. 7 & 8) The milled PMMA provisional segments 4,5,6 and 11,12,13 are then cemented with provisional cement and the excess is cleaned from the restoration margins. Fig. 9 shows the posterior PMMA provisional segments in place with the preparations of the lateral and central incisors ready to evaluate the anterior proposed aesthetic designs. PMMA prototype # 1 is shown in Fig. 10. This first proposal was based on the patient’s preoperative smile design seen in Fig. 4. Fig. 11 shows PMMA prototype #1 sitting on preparations 7,8,9, and 10. Note that the marginal gingival tissues have been “molded” by the contours of original provisional restorations placed at the time of tooth preparation, so that the tissues will not necessarily fill the contours of the milled PMMA provisional restorations at initial placement. The second proposal, seen in Fig. 12, was designed to be a bit more angular than the first proposal. Whereas the first proposal has more “softened” incisal angles and embrasures, like the patients’ original restorations, this second PMMA proposal has more squared incisal angles and minor irregularities in the incisal edges to achieve a more natural appearance. Fig. 13 shows PMMA prototype # 2 in the patients’ smile. Note the reflection of the facial surfaces of the second proposal as compared to the first. While the first prototype is smoother in surface texture, the second proposal is more textured to accentuate the individual lobes of the facial surface. Fig. 14 shows the third and final aesthetic proposal for this case. It is a combination of proposals 1 and 2. While the incisal angles and embrasures are softened as in PMMA prototype #1, the facial surfaces are textured, similar to PMMA prototype #2. After reviewing all three proposals, the patient chose proposal #3 as the one to use to mill her definitive restorations. The prototype is also checked for canine guidance and anterior disclusion and modified, if necessary. (Figs. 16 & 17) Next, PMMA prototype #3 is cemented with temporary cement. At a postoperative visit, full smile straight on and side view photographs are taken. (Figs.18 and 19) Note the beautiful aesthetic textures of these prototype restorations. The patient can now take these restorations for a “test drive” to verify she is completely satisfied with the smile design. Once she signs off her approval that she is happy with the result, the ceramist will use the same STL files to mill the definitive restorations based on PMMA prototype #3.
Fig. 6

Fig. 7

Fig. 8
11, 12, and 13 prior to placement of the PMMA prototype restorations.
Fig. 9

Fig. 10

Fig. 11

Fig. 12
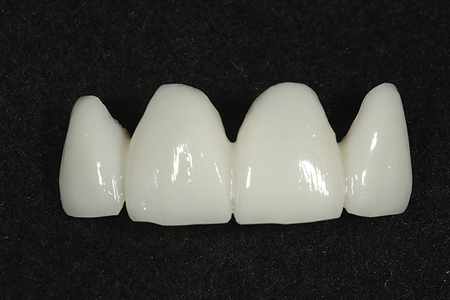
Fig. 13

Fig. 14

Fig. 15

Fig. 16

Fig. 17

Fig. 18

Fig. 19

Delivery of the Definitive Restorations
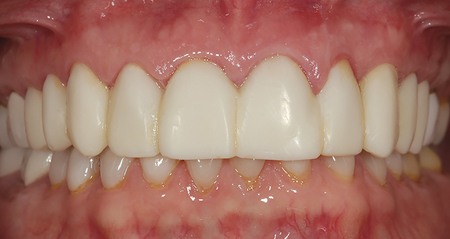
The definitive restorations are milled and shown on the master model in Fig. 20. Once the patient is anesthetized, the PMMA prototype restorations are removed, and the preparations cleaned with an antibacterial scrub. Each individual restoration is tried on the respective preparation and evaluated for marginal integrity. Next, all ten restorations are tried on collectively to evaluate interproximal contacts and occlusion. The definitive restorations are milled zirconia that was cut back to layer in effects. The restorations are first cleaned with a cleaning agent (ZirClean: Bisco) remove any surface contamination from the try-in phase. After rinsing and drying, the restorations are then treated with a metallic primer (Z-Prime Plus: Bisco) that will enhance the bond of resin cement to zirconium. The preparations are etched with 38% phosphoric acid (Etch-Rite: Pulpdent) for 15 seconds, then rinsed with water from the air water syringe for 15 seconds. After air drying, the preparations are rewet with a dentin desensitizer, then the excess is removed with a high-volume suction leaving the preparations visibly moist. The restorations are then cemented with resin cement (Embrace Resin Cement: Pulpdent) two at a time, starting with the central incisors then moving distally to the second premolars. As each two restorations are tack cured, the resin cement excess removed with a sable brush, then the restorations are light cured per manufacturer’s instructions. Dental floss is used interproximally prior to full curing to be sure the resin cement has been cleared out. Figure 21 is a retracted view of the definitive restorations after cementation. Figs. 22 & 23 are postoperative straight on and lateral views of the patients’ smile. Compare these views to the photos of the PMMA prototypes shown in Figs. 18 and 19. Based on the patients’ preview of the three aesthetic proposals and her definitive choice of prototype #3, the delivery was smooth, and the patient loved the final result.
Fig. 20

Fig. 21

Fig. 22

right side. Compare to the Figure 18 to see how nicely the definitive restoration followed the approved prototype PMMA restoration.
Fig. 23

Conclusion
Using digital smile design technologies, the dentist can enter the digital workflow via chairside scanning or through the digital dental laboratory, to help design and refine aesthetic parameters of a case and create polymethylmethacrylate (PMMA) prototypes which the patient can then wear and evaluate to arrive at the final aesthetics of their case prior to completion. This step helps ensure patient acceptance and allows the dentist complete confidence that the delivery of the definitive restorations will be a resounding success!
Oral Health welcomes this original article.
Acknowledgement: The author would like to acknowledge the expertise of master ceramist and digital smile design specialist, Mr. Vincent Devaud, CFC, MDT, of West Hollywood, CA for his beautifully artistic work on this case.
References
- Ward DH, Proportional Smile Design: Using the Recurring Esthetic Dental Proportion to Correlate the Widths and Lengths of the Maxillary Anterior Teeth with the Size of the Face, Dental Clinics of North America, 01 Jul 2015, 59(3):623-638.
- McLaren EA, Culp L, Smile Analysis – The Photoshop Smile Design Technique – Pt 1, Journal of Cosmetic Dentistry 2013, Vol 29(1), 94-108.
- Bhuvaneswaran M, Principles of Smile Design (2010), Journal of Conservative Dentistry, 13(4): 225-232
- Iyengar S, The Art of Choosing, Twelve / Hachette Book Group, March 9, 2011.
About the Author
 Robert A. Lowe Diplomat, American Board of Aesthetic Dentistry. Assistant Professor, Department of Oral Rehabilitation. MUSC James B. Edwards College of Dental Medicine.
RELATED ARTICLE: The Use of Digital Smile Design for Everyday Dentistry


