
Introduction
Wendy Jordan, a professional model, presented to my office for general care. After radiographic and clinical examination, it was determined that she needed only a prophylaxis. Her overall dental health was good with no periodontal disease or active caries. In a subsequent re-care appointment, we discussed the possibility of orthodontic realignment of her maxillary anterior teeth. Her portrait as she presented is shown in Figure 1 and Figure 2 shows Wendy’s smile. In Figure 3, you can see that her maxillary central incisors were mal-aligned with the left central incisor overlapping the right. Her mandibular left central incisor had been endodontically treated and had darkened in color. Figure 4 shows that she was in Class I occlusion with slight mal-alignment of her maxillary premolars. The pre-operative occlusal view from premolar to premolar is shown in Figure 5 and Figure 6 shows the opposing view of the mandibular arch.
Wendy desired a smile that showed better alignment of her maxillary central incisors and wanted the darkened endodontically treated mandibular incisor to more closely match the color of the adjacent teeth.
While fixed orthodontic wires or clear alignment trays could be used to perfect alignment in both arches, Wendy was not interested in those treatment options because she felt they would interfere with her busy modeling career. I introduced her to a removable device called the Inman Aligner that can align anterior teeth in a period of weeks. This interested her very much.
Fig. 1

Fig. 2

Fig. 3

Fig. 4

Fig. 5

Fig. 6

Treatment Planning
The Inman Aligner was invented by Don Inman of Inman Orthodontic Laboratory in Coral Springs, Florida, USA. It is an ingenious removable appliance that can correct protrusion or crowding of anterior teeth with 3.0 mm of crowding or less. Most cases can be finished in as little as six to eighteen weeks. It has Nickel Titanium coil springs that power two aligner bows that oppose each other; one on the lingual and one on the facial. The gentle forces are active over a large range of movement which is why the device works so quickly. Slight interproximal reduction (IPR) is accomplished with diamond coated strips during office visits every two weeks and composite buttons are added as needed. After proper tooth position has been accomplished, fixed or removable retention is required.
Wendy decided that she would like to be treated with the aligner for straightening of the maxillary central incisors. She also chose a direct composite resin veneer for the darkened mandibular central incisor. Both treatments were chosen for their fast results and affordability.
Treatment
During her first treatment appointment, accurate impressions of both arches were taken. For the maxillary impression, an A-silicone material (Panasil Monophase Medium, Kettenbach) was used in a full arch tray. For the opposing mandibular impression, a medium viscosity A-Silicon alginate substitute (Silginate, Kettenbach) was used in a full arch tray. An accurate occlusal registration was taken (FUTAR, Kettenbach). The patient was appointed for delivery. The impressions, occlusal registration and laboratory prescription were sent to Inman Orthodontic Laboratory for design and fabrication of the aligner.
Laboratory Fabrication
At the laboratory, the impressions were poured and scanned. The aligner was designed with the help of digital technology and a printed model of the end result was fabricated. Along with the Inman Aligner itself, a lab prescription for exactly where and how much to strip during IPR and directions for proper placement and timing of the composite buttons was delivered back to my office.
Aligner Delivery
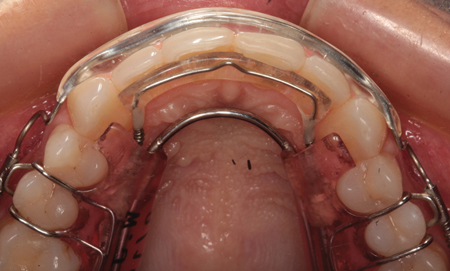
Figure 7 shows the facial view of the Inman Aligner in place at the delivery appointment. In Figure 8, the incisal view clearly shows the degree of crowding. Interproximal stripping was accomplished with diamond coated strips (FitStrip, Garison Dental Solutions) per the prescription provided by the laboratory. A composite resin “button” was placed on the lingual of the right central as directed by the lab. Where stripping was accomplished, the tooth surfaces were polished smooth with aluminum oxide strips (Epitex, GC America) and a fluoride varnish was applied. Wendy was instructed about placement and removal technique. She was asked to make sure she wore the appliance a minimum of 16 hours a day, and remove the appliance for four to eight hours a day. She was appointed in two weeks for evaluation and adjustments if needed.
Fig. 7

Fig. 8

Eight Weeks Later
Wendy returned to the office for three evaluation and adjustment appointments over the next eight weeks. Figure 9 shows the Inman Aligner in place at eight weeks. The incisal view can be seen in Figure 10. At this point, the patient was satisfied with the alignment and an impression was taken for fabrication of a clear, removable plastic retainer. Composite resin (Nanoceram Bright, DMP) was used to restore the darkened mandibular central incisor and the patient was appointed to receive the final maxillary retainer. In the meantime, she wore the aligner for retention.
Fig. 9
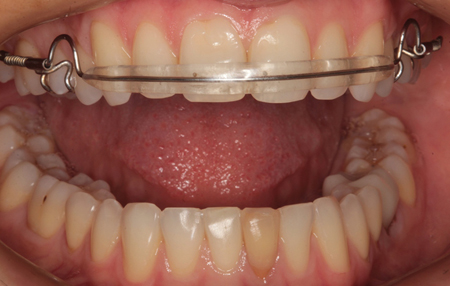
Fig. 10
The Final Result
In Figure 11, you can see the final result from the facial view and Figures 12 and 13 show the incisal views after treatment. Wendy was much more satisfied with her new smile
(Figs. 14 & 15).
Fig. 11

Fig. 12

Fig. 13
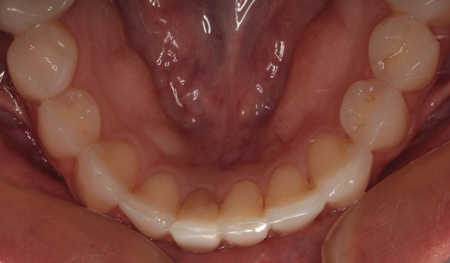
Fig. 14

Fig. 15

The Mrs. North Carolina America Pageant
For many years, my practice has supported the Mrs. North Carolina and Mrs. South Carolina beauty pageants. The winner of each of these state pageants goes on to compete in the Mrs. America Pageant. As a Platinum sponsor, we donate a complimentary smile makeover for the each of the winners before they compete for the national title. Some have wanted whitening only, others have wanted a complete oral rejuvenation. Whatever the need or desire, we try to fulfill it.
Because of our affiliation with the Mrs. America Pageant, we often refer patients or acquaintances who we feel may be candidates. We recommended to Wendy that she apply to compete and referred her to the directors. She was accepted, and she competed and won the Mrs. North Carolina Pageant.
After winning the title, Wendy returned to our office to discuss her options. One option was to do nothing. After all, she had won the state pageant with the smile she had. But, like many of the pageant winners who were going on to the national contest, she wanted to improve her smile even more. In discussing her desires, we determined that she wanted a lighter color and a smile that was broader and filled her buccal corridor making her smile look wider and whiter. Without posterior orthodontic treatment, this would require veneering twelve maxillary and ten mandibular teeth. Because of her excellent dental health, we determined that she would be a candidate for such elective dentistry. She understood that, even though the restorations would be elective, they would require some tooth reduction and probably some maintenance with time. She also understood that, even though a long-term result was expected, replacement may prove necessary in the future. Wendy understood and considered that the value of her improved smile would be worth any future maintenance or replacement.
The Process
The first step was to take a facebow transfer record to position the model of her upper arch on a semi-adjustable articulator (Denar, Whip Mix). Maxillary and mandibular full arch impressions were taken using Silginate. A centric relation occclusal registration was also taken using Futar.
The impressions, occlusal registration and facebow transfer jig was sent to the dental laboratory (da Vinci Dental Studios, West Hills, Cal. USA). At the laboratory, two sets of models were poured and mounted. A wax-up of the proposed contours was performed on one of the sets of mounted models and a putty stint was fabricated over both arches of the wax up. These would be used to form the provisional restorations.
Preparation
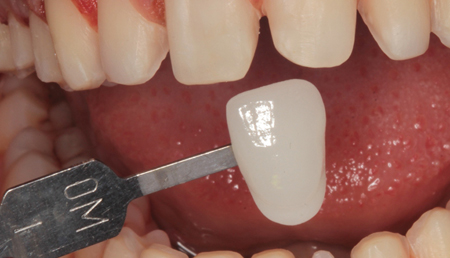
At the preparation appointment, the mandibular teeth were prepared for lithium disylicate (IPS e.max, Ivoclar) restorations. A bite registration was made and labeled bite #1. The maxillary teeth were prepared next and a new bite registration taken labeled bite #2. This would allow the lab to remount the prepared casts by “jumping the models to the articulator so that a new facebow record was not needed. The prepared teeth can be seen in occlusion in Figure 16. Note that the maxillary central incisors had developmental fluting in the facial of the root structure. The margins were prepared around the fluted areas to make cleaning this area possible. To improve the proximal contact form an onlay was prepared on the rotated second premolar and a “wrap around” veneer was prepared on the first molar. A 360-degree preparation was use for the still slightly rotated left central incisor. The finished maxillary preparations can be seen in Figure 17. The endodontically treated mandibular incisor was prepared for a full crown. The other treated madibular teeth were prepared for veneers from second premolar to second premolar (Fig. 18). A diode soft tissue laser (Picasso, AMD) was used to improve the tissue and help with hemostasis in several areas. Wendy determined that her desired shade was OM1 on the Vita 3D Shade Guide (Fig. 19).
Fig. 16

Fig. 17
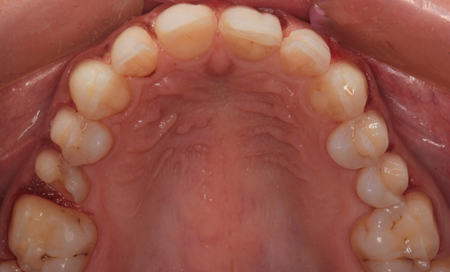
Fig. 18

Fig. 19
Impressions and Prototype Fabrication
Final impressions were taken with Panasil A-Silicone impression material using Panasil Putty in the tray for the heavy body and Panasil Extra Light Body was injected around the sulcus areas of the prepared teeth. By using this technique, I find that heavy body tends to drive the light body into the sulcus and excellent impressions are the norm.
Prototype Fabrication
The laboratory fabricated putty stints formed over the wax up models were used to fabricate the provisional restorations. These are more than just temporaries. They become prototypes for the final restorations. Material can be reduced or additions can be made with flowable composite to adjust for desired contours or occlusion. Changes can be communicated to the laboratory before the final restorations are fabricated. Figures 19 and 20 show the prototype restorations in place. In this case, no changes were wanted or required.
Fig. 20

Laboratory Fabrication
At the dental laboratory, 22 e.max restorations were fabricated and returned to my office. In Figures 22 and 23, you can see the final maxillary and mandibular restorations on the working model. The maxillary restorations, photographed on a mirror surface are shown in Figure 24 and the mandibular restorations can be seen in Figure 25.
Fig. 22

Fig. 23
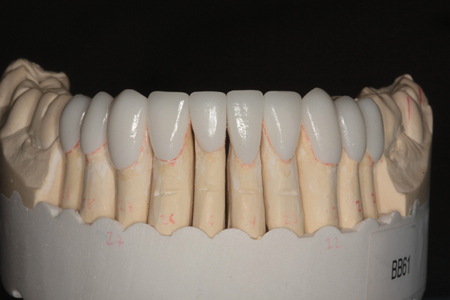
Fig. 24
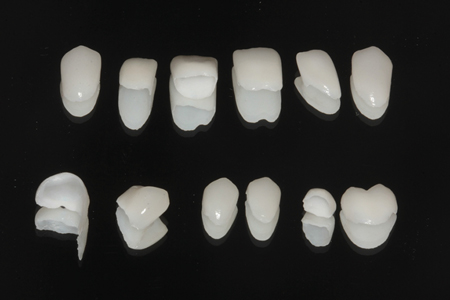
Fig. 25

Placement
At the placement appointment, the provisional restorations were removed and the final restorations were tried in to check for marginal fit, proximal contacts and esthetics. The patient approved the result and the restorations were removed, thoroughly cleaned and dried. Each of the intaglio surfaces which, had been etched at the dental laboratory, were treated with silane and air dried. The prepared tooth surfaces were treated with phosphoric acid gel for ten seconds, rinsed thoroughly and lightly air dried. A universal bonding agent (AllBond Universal, Bisco Dental) was applied liberally to all prepared surfaces, air dried and light cured with an LED curing light for ten seconds. A light cured luting composite (Choice 2, Bisco Dental) was placed on the internal surfaces of each restoration and they were placed on the prepared teeth. In each arch, the anterior six restorations were placed together and then the posterior restorations were placed one side at a time. Each ceramic restoration was tack cured for two seconds each and excess uncured luting agent was removed with an instrument or brush. Floss was gently worked into the interproximal areas to remove uncured excess there. All restorations were then thoroughly light cured for twenty seconds each on facial and lingual surfaces. Residual cured luting composite was removed with a small carbide finishing bur. Occlusion was checked and adjusted where needed. All adjusted surfaces were polished with fine diamonds and porcelain polishing points. Interproximal areas were adjusted with fine diamond strips (Gateway Strips, Brasseler) where needed, and polished with aluminum oxide coated strips. All surfaces were polished with diamond polishing paste.
The Final Result
The finished case can be seen from the retracted facial view in Figure 26 and with the teeth in occlusion in Figure 27. The maxillary and mandibular occlusal views are shown in Figures 28 and 29. Wendy was happy that we achieved the wider, whiter smile she was looking for (Fig. 30). Her portrait with her new smile can be seen in Figure 31.
Fig. 26
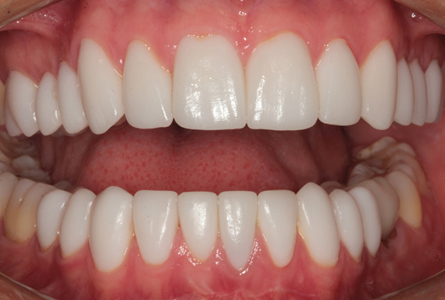
Fig. 27
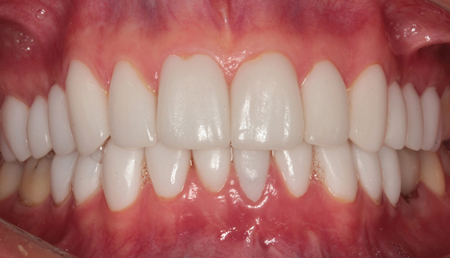
Fig. 28
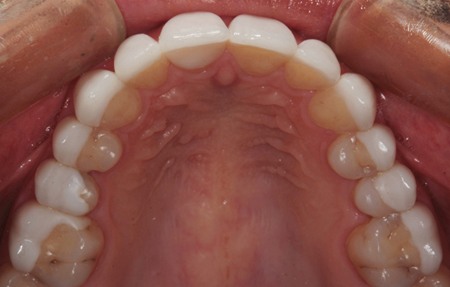
Fig. 29

Fig. 30

Fig. 31

Conclusion
Wendy won First Runner Up in the 2017 Mrs. America Pageant ahead of 50 other beautiful women. Her beautiful smile is certainly not the only reason for her huge success, but she feels it was definitely a contributing factor. OH
Oral Health welcomes this original article.
Acknowledgement
Dr. Nash would like to thank the excellent ceramist at da Vinci Dental Studios for the superb work in this case.
About the Author
 Dr. Ross Nash earned his undergraduate degree from North Carolina State University in Textile Engineering in 1970 and worked as an engineer before entering dental school in 1974 at the University of North Carolina School of Dentistry, Chapel Hill, NC. He graduated in 1978 and has focused his general practice in the area of cosmetic and esthetic dentistry since 1980. He is the founder of the Nash Institute for Dental Learning – a post graduate training facility in Huntersville, NC. In addition to practicing full time, Dr. Nash has also been directly responsible for the invention of dental instruments and dental materials. He is a regular keynote speaker for dental meetings throughout the United States and abroad. His smiles have won awards and have graced the covers of many dental publications and his dental photography has been used by many manufacturers to feature their products. Of the nearly 8000 American Academy of Cosmetic Dentistry members worldwide, Dr. Nash is one of less than 70 who have achieved the exclusive level of Accredited Fellow and the only one in North or South Carolina. He is a strong advocate for continuing education; completing over 4500 hours of personal credits and teaching more than 7000 hours on various topics in Cosmetic Dentistry in the United States, Europe, Canada, Asia, Australia and South America. He has been an editor and editorial advisor for dental publications, and has authored chapters in two dental textbooks on esthetic dentistry. Dr. Nash has been listed as a top dental educator and presenter by Dentistry Today consecutively for the past 12 years.


