
The demand for aesthetic dentistry is increasing as more and more patients come to desire the perfect or natural looking smiles. The professional approach of restorative dentistry has changed significantly with the development of new techniques augmented with advanced dental materials, enabling clinicians to achieve aesthetic improvements and aesthetically pleasing results.
In aesthetic cases, a direct 3D mock up (smile preview) that will fulfill their individual expectations is crucial. A direct intraoral mock-up is created by veneering, using a freehand technique, composite resin onto the tooth surface without applying any adhesive bonding agent. The desired tooth form and anatomy were designed for optimal aesthetics using a nonstick sculpting instrument then, the composite resin was cured with a polywaved LED curing light. This procedure was repeated until all of the teeth being restored had been designed. Since this will be the first direct communication and first impression of the new design with the patients, the dentist should spend some time on it, in order to give the best visualization of the final design at this point. Yet this outcome that can be discussed with the patient, and minor or major modifications can be done until the patient is happy with this outcome. Upon getting their aesthetic approval, a solid treatment planning should be made. This is the key to fulfilling the individual expectations of the patient and ensuring a guided treatment with stress-free, repeatable procedures.
Contemporary CAD/CAM systems are not only efficient and productive; they are also accurate when used properly. 6 Additionally, development of new (or improved) materials including aesthetic glass ceramics, high-strength ceramics, and composite resin materials (for both definitive and provisional restorations) has allowed clinicians to use digital dentistry for a growing number of clinical procedures7 with long-term clinical success. 8 Therefore, the use of digital technology, advanced restorative materials, effective diagnostic and communication tools, and minimally invasive techniques (such as the Aesthetic Pre-evaluative Temporary [APT] technique) enable clinicians to achieve highly aesthetic clinical outcomes that can surpass patient expectations while preserving tooth structure. 9
The photos, videos and impressions that are taken from this direct mock up should be followed by a conventional or digital wax up in the lab, in which the form, function and phonetics can be perfected.
The second appointment is the one for the tooth preparation. And this wax up should be applied in the patient’s mouth, named as APT (Aesthetic Pre-evaluative Temporaries) before any other procedure is done. This will help to ensure a predictable outcome that the patient should definitely agree and approve at this stage.
Only after then the patient can be anesthetized and the preps are done through this APT, which can be used as a very solid reference for the depth that the dentist wants to obtain during this procedure. The main concern here is to be as minimally invasive as possible during the tooth preparation. Research shows that when the preps for porcelain laminate veneers are limited to enamel, 12 year success rates can be as high as 98.9%, since the less complexity of the bonding procedures and the bond strength being significantly higher compared to bonding on dentin, specifically the root surfaces.
Case Study
The 30-year-old female patient presents to the practice since she was not happy with her smile, mainly because of because of her short and small teeth (Fig. 1). Initial photo documentation illustrated several aesthetic problems. She had previously done composite fillings, which were continuously chipping, on the incisal edges of the centrals (Fig. 2). The periodontal condition of the teeth were healthy (Fig. 3).
Fig. 1
The patient’s smile before the treatment started.

Fig. 2
Close up maxillary teeth, note the unsufficient sizes of the teeth.

Fig. 3
Close up of both maxillary and mandibular teeth.

Direct Aesthetic Simulation
A very important step in identifying the expectations of the patient and proving the clinical feasibility is to simulate the aesthetic outcome directly in the mouth in 3D. In this case, Ecusphere Shape (DMG) was used, without any bonding procedure, to sculpt the first idea of an optimized aesthetic result.
First, the labial facade was contoured to visualize the aesthetic smile design, after finalizing the upper direct mock up from the second right premolar to the second left premolar.
After minimal changes, the first simulated outcome was finally satisfactory for the dentist and for the patient (Fig. 4).
Fig. 4
Diagnostic direct mock up in the mouth using the composite (Ecusphere Shape).

Laboratory Communication
So, at this stage in the patient’s treatment, the following information was shared with the dental laboratory team: a digital impression and model of the existing dentition; a digital impression of the mock-up to guide the dental technician for the digital wax up; a digital impression and model of lower dentition for articulation; photo-documentation along with digital video recording for smile relation. Using these tools, the ceramist was then able to fabricate a digital laboratory wax-up of the restorations with all the minute details required for optimal aesthetics (Fig. 5). It should be noted that the incorporation of minute details of surface anatomy and tooth forms are helpful in milling aesthetically pleasing provisional restorations as well (Fig. 6a, 6b).
Fig. 5
Digitally created aesthetic and functional APTs.

Fig. 6a
Digital impression of the initial situation.

Fig. 6b
Digital impression of the first mock up

Indirect Aesthetic and Functional Simulation
Using the direct intraoral mock up as a reference, the technician was able to digitally create the ideal aesthetic and functional outcome with the help of the Cerec Premium Software. The reconstruction of the aesthetic zone was copied from the direct mock up. All the proportions including the actual width and height of the direct mock up can be precisely bio-copied, and the final shape and texture is encarved over that design digitally. Once the digital wax up is finalized, a PMMA material is used to be milled, for the production of the APTs (Aesthetic Pre-evaluative Temporaries), and in addition the digital wax up models were printed through their STL files. The silicone templates to control the preparation depths were produced on the printed models (Figs. 7a, 7b).
Fig. 7a
The digital wax up using the Cerec Premium Software.
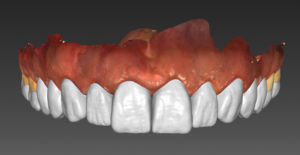
Fig. 7b
The APTs are milled from PMMA.

Checking The Smile Preview With The Apts
The milled APTs were placed over the untouched teeth, without any anesthesia. The APT provides a final opportunity to share the outcome with the patient in terms of aesthetic outcome (Fig. 8). And the biggest benefit of using them at the very beginning of the treatment creates a lot of advantages, since all the corrections can be done over these APTs if needed. Once the approval of the patient is taken, and if the dentist is as well happy with the aesthetic and functional design, the patient can then be anesthetized, and the teeth can be prepared (Fig. 9).
Fig. 8
Digitally designed and produced APTs.

Fig. 9
The digitally milled APTs in the mouth over the untouched teeth (note that there is no need to even partially bond the APTs on the teeth).

Tooth Preparation Guided With the APT
The ideal way of achieving a very precise preparation depth can only be done through a guided preparation. After checking the final details with the patient, the APT, representing the final aesthetic facial and incised contours, should be left on the teeth, and the preparation should be done through the APTs, as the most solid reference for the depth cutter burs (Fig. 10).
In this case the depth cutter was used to create three horizontal cuts in the cervical, central and incisal parts of the mock up (Fig. 11). The incisal edges were reduced with two vertical cuts of 1.5 mm, as a butt joint to create enough space for the technician in this delicate aesthetic area (Fig. 12). Utilizing the depth marks, the complete incisal edge was reduced evenly with a butt-joint preparation, and due to the additive nature of the APT, if the additive length for the new incisal edge position is more than 1.5 mms, then there will be no sound tooth structure removal at the incised edge of the natural tooth. The horizontal preparation lines that are on the facial of the teeth were marked with a pencil. The residual APT was removed with a scaler. Surfaces that would need to be reduced during the preparation remained with the imprint of the pencil (Fig. 13).
After targeted reduction of the enamel with a coarse diamond bur, the vestibular preparations were extended evenly along the buccal surfaces from the incisal areas to the gingival areas, smooth chamfers in the enamel there. From this point on the preps should be carried on with high magnification either with loops or under the microscope. In order to achieve the highest precision the dentist should use an electric hand piece with controlled rpm and torque (WOLF handpiece). The cervical preparations were extended into the proximal areas. Here the preparation margins were shaped with a light chamfer, remaining on the labial sides of the interproximal contact points, without loosening of the proximal contact surfaces for stable conditions without any drifting (Fig. 14). The preparation surfaces were smoothened with a polishing disc (Sof-Lex 3M ) (Fig. 15). The tooth shade that was decided to be seen after the treatment, and the stump shade(the shade of the prepared tooth surface) is taken before the impression.
Fig. 10
To facilitate solid guidance for the exact preparation depth, initial preparation is performed through the APT, using a selected depth cutter, mainly depending on the color changes.

Fig. 11
Depth cutter used in three different levels of the facial surface of the tooth, in three different angles.

Fig. 12
1.5 mm of vertical cuts at the incisal edges, in order to create the ideal butt joint preparation.

Fig. 13
After the horizontal and vertical depths are created, than the APT is removed, the depth cutter’s marks on the teeth are visible. Note the minimal reduction of the facial enamel.

Fig. 14
Gingival margin preparation is done, as a very shallow champher under the microscope with the extra fine grided round headed fissure diamond bur.

Fig. 15
All the sharp corners are smoothened with sand paper composite polishing disks.

Impression and Provisionalization
Since this case will be handled fully digitally, the impression as well is taken digitally with OmniCam, Cerec. Provisionalization was performed using Luxatemp Star (DMG), the provisional composite material. Due to the small dimensions of the prepared teeth, the retention of provisionals on the prepared teeth were low. Provisionals were prepared intraorally, using the silicone index, trimmed and polished chair side and temporarily cemented with TempoCem (DMG).
Veneer Fabrication
As soon as the lab receives the digital impression of prepared teeth, the previously designed veneers (through digital wax up) are superimposed over the virtual tooth prep design, new margin adaptations are checked, and sent to the milling machine (MCX5, SIRONA). If the fit of these veneers needed to be checked physically before being sent to the dentist, than from the STL file of the final impression a master model is 3D printed and the veneers are placed on the model (Figs. 16-18).
Fig. 16
The superimposed images of prepped teeth and digital wax up.
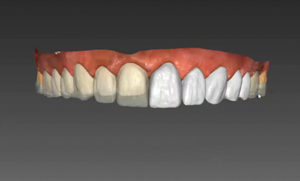
Fig. 17
Digitally produced CAD veneers.

Fig. 18
Try in of the veneers.

Veneer Cementation
The provisionals were removed with a scaler and tooth surfaces were cleaned with Consepsis Scrub (Ultradent). The definitive placements of the restorations were performed using Variolink Veneer (Ivoclar Vivadent).
The restorations were tried in using the glycerin gel try in pastes of the Variolink Veneer cementation system, simulating the final outcome perfectly (Fig. 19). When the fit and shade results were satisfactory for the clinician and the patient, final adhesive seating could be performed completely predictably. The cores were cleaned again with water spray and the veneers were luted in situ.
The feldspathic veneers milled out of Sirona (vita) Feldspathic blocks are etched with 9.6% HF. All veneers were silanated with Monobond-S (Ivoclar Vivadent), to enhance the bond strength (Fig. 20). The preparations were conditioned for 20 seconds with 37% phosphoric acid, for adhesive bonding with Syntac system (Ivoclar Vivadent).
First the upper centrals were treated simultaneously to ensure symmetrical positioning. Neighbouring teeth were protected with teflon tape (Fig. 21). The veneers were loaded with the Variolink veneer adhesive cement and placed gently over the teeth, being rolled from the incisal to cervical.
Once the restorations were finally seated, initial light-curing for only one to two seconds per veneer was performed from all sides. The excess of the cured gelatinous luting cement could now be removed easily with a scaler. The situation subsequently underwent final light curing for 40 seconds per veneer from each side. Final adjustments in the marginal areas were carried out with a rubber polisher (Figs. 22, 23).
Fig. 19
Application of different concentrations of HF, silane and adhesive on Feldspathic and E.Max CAD veneers.

Fig. 20
Centrals are conditioned with %37 Phosphoric acid for 30 seconds, under rubber dam isolation and neighbouring teeth protected by teflon tape.

Fig. 21
All the upper veneers cemented, margins cleaned and polished under rubber dam isolation.

Fig. 22
Full smile of the patient with the Cad-Cam Veneers.

Fig. 23
Final aesthetic outcome.

Conclusion
Porcelain laminate veneers are among the most esthetic means of creating a more pleasing and beautiful smile. However, for the ultimate immediate and long-term clinical success, the dentist should be very precise in planning and design in advance, detailed communication with both the patient and dental laboratory team, using minimally invasive techniques and advanced technologies, and the selection of ideal materials that have the required mechanical and physical properties to complement the clinical requirements that are specific to each case.
The use of digital technology offers innovative workflow for implementing advanced digital solutions for patient treatment, and using clinical procedures like the APT technique help achieve clinical results that are both extremely accurate and minimally invasive. Following consistent and thoughtful clinical procedures, as demonstrated in this case report article, can consistently provide predictable aesthetic and functional outcomes for your patients. OH
Oral Health welcomes this original article.
References
1. Gurel G (2003) Predictable,precise and repeatable tooth preparation for porcelain laminate veneers. Prac Proceed Aesthet Dent 15;17-24
2. Gurel G (2007) Porcelain laminate veneers. Minimal tooth preparation by design. Dent Clin North Am 51;419-431
3. Magne P, Belser UC (2004) Novel porcelain laminate preparation approach driven by diagnosticc mock up. J Esthet Restor Dent 16;7-16.
4. Aykor A, Ozel E (2009) Five year clinical evaluation of 300 teeth restored with porcelain laminate veneers using total etch and a modified self etch adhesive system. Oper Dent 34;516-523.
5. Vafiadis D, Goldstein G. Single visit fabrication of a porcelain laminate veneer with CAD/CAM technology: a clinical report.J Prosthet Dent. 2011 Aug;106(2):71-3.
6. Alghazzawi TF1, Lemons J, Liu PR, Essig ME, Janowski GM. Evaluation of the optical properties of CAD-CAM generated yttria-stabilized zirconia and glass-ceramic laminate veneers. J Prosthet Dent. 2012 May;107(5):300-8.
7. Schmitter M1, Seydler B B. Minimally invasive lithium disilicate ceramic veneers fabricated using chairside CAD/CAM: a clinical report. J Prosthet Dent. 2012 Feb;107(2):71-4.
8. Peumans M, Van Meerbeek B, Lambrechts P, et al. Porcelain veneers: A review of the literature. J Dent. 2000;28:163-177.
9. Reinhardt JW, Capilouto ML. Composite resin esthetic dentistry survey in New England. J Am Den Assoc. 1990;120:541-544.
10. Fasbinder DJ. Computerized technology for restorative dentistry. Am J Dent. 2013;26:115-120.
11. Miyazaki T, Hotta Y, Kunii J, et al. A review of dental CAD/CAM: Current status and future perspectives from 20 years of experience. Dent Mater J. 2009;28:44-56.
12. Ellingsen LA, Fasbinder DJ. In vitro evaluation of CAD/CAM ceramic crowns [abstract 2641]. J Dent Res. 2001;81:331.
13. Fasbinder DJ. Materials for chairside CAD/CAM restorations. Compend Contin Edu Dent. 2010;31:702-709.
About the Author
 Dr. Galip Gurel graduated from the University of Istanbul, Dental School in 1981. He continued his education at the University of Kentucky, Department of Prosthodontics. Received his MSc degree from Yeditepe University in, Istanbul.
Dr. Gurel is the founder and the honorary president of EDAD (Turkish Academy of Aesthetic Dentistry). He was the President of the European Academy of Esthetic Dentistry (EAED) for 2011 & 2012.
He received “The Smigel” award in October 2014 which is granted biennially by New York University College of Dentistry to honor the best esthetic dentists in the world for the social contribution they create, their support for the improvement of esthetic dentistry ,their vision and determination and their ability to present innovative ideas around dentistry globally and the education they provide to the dental health professionals about advanced esthetics, technology and the new techniques in general dentistry.
He is also a member of the American Society for Dental Aesthetics (ASDA) and American Academy of Restorative Dentistry (AARD) and the honorary diplomate of the American Board of Aesthetic Dentistry (ABAD) . He is also the editor-in-chief of the Quintessence Magazine in Turkey and on the editorial board of the AACD journal, PPAD (Practical Procedure & Aesthetic Dentistry), EJED (European Journal of Esthetic Dentistry).
He has been lecturing on dental aesthetics all over the world and giving post graduate lectures on aesthetics dentistry. He is a visiting professor at the New York University (USA) , Marseille Dental University (France) and Istanbul Yeditepe University (Turkey).
He is the author of “The Science and Art of Porcelain Laminate Veneers” published by Quintessence publications in 2003 translated into 12 different languages. He has been practicing in his own clinic in Istanbul, specializing in Aesthetic Dentistry, since 1984.


