
In order to establish a comprehensive treatment plan, it is essential for the entire dental team to be able to visualize the final result before commencing treatment. A compromised or wrong treatment choice can affect a patient’s dental and medical health as well as their appearance. Orthodontists often are first in a decision-making process that can have lifetime consequences. Meticulous orthodontic planning is essential.
Historically orthodontists were not accustomed to dealing with patients requiring restorative intervention. However, patients often present with issues that are both orthodontic and restorative. The objectives of orthodontics may be different for the restorative patient compared to a patient not requiring restoration. 1) The teeth may have to be positioned by the orthodontist to facilitate specific restorations. 2) The teeth may have to be restored or placed in a provisional restoration before, during or after orthodontic treatment 3) Orthodontics may be required to correct tooth positions that may impede oral hygiene. 4) Orthodontics may be performed for elective or necessary periodontal reasons.
It is paramount for the dental health professional to recognize and be able to think globally and not limit their vision to their own specialty. With a coordinated treatment plan and a multidisciplinary team approach we can achieve predictable and pleasing results satisfying our patients for a lifetime.
Case Study
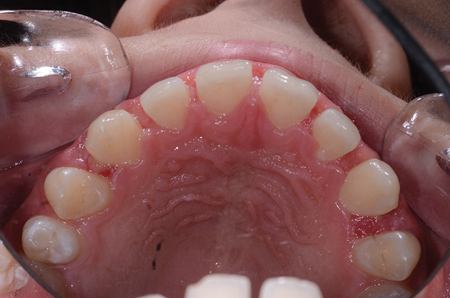
A 14-year-old patient and his parents presented desiring orthodontic treatment to “close the spaces” between his teeth (Fig. 1). Our evaluation concluded that he had a handsome oval shaped face, and near ideal dental arch width. We explained that the spaces between his teeth were mainly due to the fact that the teeth were misshaped and too small to accommodate the width of his dental arches (Fig. 2). We discussed the boy’s present and future facial aesthetics. As the patient and his parents wanted to ensure that his appearance remain unaltered it was decided to restore his teeth to ideal proportions rather than pull in and constrict his dentition. Bringing the teeth together could create occlusal and airway problems for his lifetime. These issues would be very difficult to resolve at a later date. By carefully explaining all the facts and potential solutions a patient is given the information they need to make an informed decision.
Fig. 1
Spaced teeth at initial presentation.

Fig. 2
Occlusal view of spaced teeth and wide dental arch.
Although the interdental spaces could be closed with direct composite bonding I felt that to be an enormous and challenging task. Each space would have to be closed from two sides and the proportions kept to ideal. This is not easy to do…. even for a very experienced practitioner!
In order to achieve a result that would be dimensionally appropriate and have a very smooth and unpitted surface finish we chose to use lab fabricated composite resin micro-additions which could conventionally be bonded to the patient’s teeth. This would allow him to have larger teeth and provide us with the ability to adjust, add to and repair the restorations if necessary. The patient’s teeth would not have to be prepared or damaged. These composite additions would establish a new tooth dimension for the orthodontist to view as the patient’s natural teeth in their planning.
When planning for tooth size we try to respect the golden proportions of a 70-75% width to length ratio for the maxillary central incisors. As the boy’s teeth were 10 mm. long and were going to be widened we decided to use an 11 mm long central incisor as our reference not to lose the ideal proportion. As we deemed the teeth long enough incisally, we elected to lengthen the teeth gingivally by 1 mm to be able to achieve the desired width to length proportion. A simple 1 mm gingivectomy was performed, which did not infringe upon the biologic width of the attached gingiva (Fig. 3). The lateral incisors were allocated a 9.5 mm length and the canines 11 mm to match the centrals (Fig. 4). A diode laser troughed the tissue interproximally allowing us to establish a natural emergence profile. It is most important to attain an emergence profile that does not make the teeth appear “boxy” or create overhanging food traps. Expasyl Gingival Retraction Paste (Kerr) was placed for two minutes (Fig. 5) and then thoroughly rinsed (Fig. 6) in order to have clean exposed prep margins for our Trios Digital Scan (3 Shape) (Fig. 7). The scan provides us with an impression, bite registration and shade selection.
Fig. 3
Laser gingivecomy creating 11 mm. central incisors.
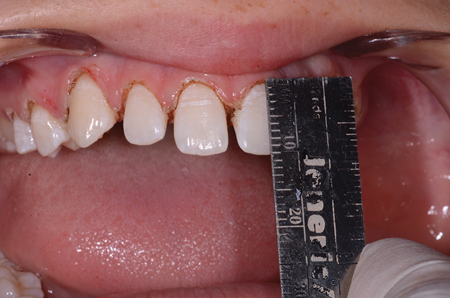

Fig. 4
Laser gingivecomy creating 9.5 lateral incisors and 11 mm. canines.


Fig. 5
Expasyl Retraction Paste.


Fig. 6
Subgingival interproximal emergence profile.

Fig. 7
Trios Intraoral Scan.

For the sake of this article, a conventional polyvinyl impression and a bite registration were also taken for the benefit of those dentists who do not have a digital scan. The results should be identical.
The maxillary impression was taken using a metal Rim-Lock tray (Caulk) and Honigum Pro-Putty and Pro-Light (DMG America). The putty material is extremely firm which displaces the light body subgingivally into the sulcus yielding a sharp highly accurate impression (Figs. 8 & 9). The subgingival detail is critical as the microadditions to the teeth have to follow a natural emergence from the gingiva. The lower opposing model was taken with StatusBlue (DMG) a polyvinyl alginate substitute. The bite registration was achieved with LuxaBite (DMG America) an acrylic material, which does not flex and is highly accurate. LuxaBite should be applied sparingly to just the incisal and occlusal surfaces of the teeth so as not to engage in any undercuts (Fig. 10). LuxaBite allows extremely accurate mounting of the models decreasing adjustments and potential remakes.
Fig. 8
Honigum impression with a Rim-Lock tray.


Fig. 9
Final polyvinyl impression.

Fig. 10
Luxabite registration.


The dental lab technician chose to work with conventional stone models mounted on an Artex Articulator (Jensen) (Fig. 11). As these models would be the working models for the shaping of the composite microveneers, the stone surface was sealed with Tanaka Stone Surface Sealer (Tanaka Dental Products). To prevent the composite from adhering to the models, Isostiff Separator was applied (Renfert USA). A duplicate model was used for the lab technician to create a diagnostic waxup, from canine to canine, as a guide to visualize the proportions of the micro composite additions (Fig. 12). The microveneers were created with Enamel 1 Gradia composite (GC America). Incremental layers of Vita B1 shade composite were light cured for ten seconds with the GC Steplight SL1 (GC America). Final curing was done with a Labolight LV4 (GC America) after placing Gradia Air Barrier (GC America) The contours of the cured composite were adjusted with diamonds, carbides, rubber wheels and points. Final polishing was achieved with Legabril Diamond Polish (Cendres & Metamucil). The restorations were steam cleaned, sandblasted to prepare the inner surface for bonding and individually packaged for easy identification (Fig. 13).
Fig. 11
Stone models on an Artex articulator.

Fig. 12
Wax additions on the stone model.

Fig. 13
Individually boxed composite micro-veneer additions.

The installation of composite microveneer additions require a stringent protocol. However, since the restorations are prefabricated the most challenging work had already been done and all we have to concentrate on is placement. The patient’s teeth were treated for 15 seconds with Uni-Etch (Bisco) and Allbond Universal (Bisco) was applied according to protocol (Fig. 14). A very thin coating of Renamel Flowable Microfill (Cosmedent) was applied to the internal surface of the composite micro additions and then light cured bonded, one at a time, into place (Fig. 15). The restorations were then finished using polishing carbides, strips and the Top Finisher System (Cosmedent) (Fig. 16).
Fig. 14
Etching and bonding.


Fig. 15
Individual placement of the micro-veneers.


Fig. 16
Creation of a new tooth dimension.

We have now established a new dimension for our patient’s maxillary incisors and essentially the orthodontist can now view them as the size of his natural teeth. A new Itero scan was taken (Fig. 17) and Insignia orthodontic software (Ormco) determined what orthodontic movement was necessary.
Fig. 17
Itero orthodontic scan.

Fig. 18
Insignia custom brackets and wire.

Fig. 19
Insignia custom brackets and wire.

Insignia personalized brackets were created with custom torque built in. Every wire was prefabricated with first and second order bends designed specifically for the case.
Predictable dentistry should be the everyday goal in our practices. By recognition, case planning and knowing what treatment and technology to use complex problems often have a simple solution. OH
Oral Health welcomes this original article.
About the Author
 Dr. Elliot Mechanic has been practicing multi-disciplinary restorative aesthetic dentistry in Montreal, Canada since 1979. He received his Bachelor of Science (1975) and Doctor of Dental Surgery (1979) degrees from McGill University. education. He is a diplomate of the American Board of Aesthetic Dentistry, a Fellow of the European Society of Cosmetic Dentistry and the International Academy of Dental Facial Aesthetics. He is the author of over forty dental publications and the book, “Aesthetic Dentistry/Smile Design: The patient guide”, which has been published in 9 languages.


