

Dentists today live during exciting times where advancements in materials, techniques, and diagnostics allow us to predictably improve the quality of our patients’ lives and their overall health. Digital treatment planning and workflow enables clinicians to accurately attain healthy form and function of the stomatognathic system even with the most complex of cases. Patients often seek aesthetic dental care to improve their appearance and function and often present with numerous complications and factors that require a comprehensive focus to attain a successful aesthetic result. If all factors present are not treated, a clinician can make improvements, but the case will not be ultimately successful. Identifying all of these factors and involving the patient with these treatment goals is essential.1-3 Besides providing aesthetic solutions for our patients, we should aim to preserve and improve our patients’ systemic health with the treatment options, techniques, and materials utilized. A healthy dentition and periodontium, stable temporomandibular joint health, and airway health should all be taken into account. The gentleman in this case presented with obvious aesthetic and functional deficits associated with the effects of severe wear, periodontal disease, and tooth loss. Through meticulous treatment planning using digital smile design and workflow for both surgical and restorative treatment phases, the quality of life and systemic health of our patients can be dramatically impacted.
Case Report
Diagnosis and Treatment Planning
Upon examination, biological, functional, and aesthetic deficits were present. (Figs. 1-10) Several periodontal defects were located in the maxillary and mandibular anterior sextants and bilateral posterior quadrants. Severe wear due to attrition with compensatory supra-eruption of the mandibular anterior alveolar crest contributed to occlusal plane discrepancies. Irregularities in the Curve of Wilson and Curve of Spee resulted in occlusal disharmony with no anterior guidance. (Figs. 5-10) Excessive overbite and overjet with vertical maxillary anterior excess was noted. (Figs. 8-10) Other aesthetic deficiencies included a lip line that did not match the smile line, irregular and asymmetrical gingival zeniths, incisal embrasures, and incisal edge position. (Fig. 2) The patient’s profile view showed a retruded chin and deficient lower 1/3 face height. (Fig. 4) Increasing the lower 1/3 face height would allow for improved chin prominence and a more youthful appearance. This “Triangle of Youth”, present in people with ideal vertical facial thirds, as described by Gelb, is an inverted triangle from the facial view, in which three straight lines connect both the most lateral aspects of the right and left cheek bones to the mental protuberance of the chin.4 An aged face is often due to a loss of ideal lower facial 1/3 height and a retruded chin, in which from the facial view, a triangle can be outlined with a straight line connecting the left and right angle of the mandible to the inferior aspect of the nasal bone.4 Treatment objectives were to restore ideal function and aesthetics by correcting theses various deficiencies.
Fig. 1

Fig. 2

Fig. 3

Fig. 4

Fig. 5

Fig. 6

Fig. 7

Fig. 8

Fig. 9

Fig. 10

Fig. 11

When numerous functional and aesthetic challenges are present, one of the first steps in establishing an aesthetic reconstruction is to define the proper plane of occlusion.5 According to Dawson, “the form of the occlusal plane is directly related to specific functional requirements, alignment of teeth in relationship to the arc of closure for best resistance to loading and ease of access for positioning of the food on the occlusal surface”.6 Without a proper plane of occlusion, the remaining features that establish proper form and function are adversely affected. Tooth dimensions and embrasures will not be balanced and oriented properly and an aesthetic outcome will be compromised.7 To restore proper form and function and correct the identified deficiencies, our treatment plan involved full arch implant retained prostheses following a predictable and streamlined digital workflow.
Clinical Protocol
Using the NavaGation Synergy Guided Workflow (Absolute Dental Lab, Durham, NC) the restorative and surgical planning phase began with collaboration between the guided surgery specialist – Matt Vrhovac (Absolute Dental Lab, Durham, NC), surgeon – Dr. Teresa Biggerstaff (Kernersville, NC), and restorative dentist – Dr. Tyler Wynne (Clemmons, NC). To correct the patient’s aesthetic and functional deficiencies, the planning began by obtaining an accurate CBCT scan taken at the patient’s current vertical dimension of occlusion in centric relation position. Several digital photographs were taken including full face smile photos to identify the lip position and high smile line, profile photos, as well as retracted views. (Canon Rebel 5Ti with 100 mm L macro lens with both Canon EL-100 flash system and a Canon MR-14EX II macro flash). Digital photos are essential for the digital treatment planning workflow, as they are needed to assess aesthetics, tooth position, smile design, and guide the treatment planning process.
A digital wax up was designed using 3Shape software to idealize the occlusal plane and correct the aesthetic and functional deficiencies. Prevu Smile Simulations (PreVu Dental) was used to superimpose the digital wax-up onto the patient’s digital photos enabling the guided surgery specialist, surgeon, and restorative dentist to evaluate the smile plan for implant placement based upon the final prostheses. During the treatment planning meeting the surgeon and guided surgery specialist planned for implant position, model matching, and bone-reduction using Absolute Dental Lab’s in-house surgical planning software and coDiagnostix by Dental Wings software. (Figs. 12 to 15) The plan was to place 8 maxillary implants and 5 mandibular implants for zirconia full arch implant retained prostheses. (Figs. 14 & 15)
Fig. 12

Fig. 13

Fig. 14

Fig. 15

To streamline an accurate and precise surgical protocol, Absolute Dental Lab’s NavaGation Synergy Guided workflow was utilized. A unilateral key fixation foundation guide was placed and the position verified with a PMMA 3D printed Flexcera (Desktop Health) tooth stabilization guide aligner. Following extraction of the failed dentition, a 3D printed Flexcera (Desktop Health) scalloped maxillary bone reduction guide was used to idealize the maxillary alveolar ridge contours and a mandibular bone reduction guide was used to reduce the supra-erupted mandibular anterior osseous segment. Buccal fixation pins were used to secure the foundation and bone reduction guides accurately and securely to the maxillary and mandibular alveolus. Implant placement guides were subsequently utilized to guide precise implant placement. Eight Straumann bone level tapered Roxolid SLActive regular crossfit implant fixtures were placed in the maxillary arch, two 4.8mm X 8mm fixtures in tooth Nos. 3 and 14 sites, one 4.1mm X 12mm fixture in tooth No. 5 site, and five 4.1mm X 14mm fixtures in teeth Nos. 6, 8, 9, 11, and 12 sites. Five Straumann bone level tapered Roxolid SLActive regular crossfit implant fixtures were placed in the mandibular arch, two 4.8mm X 12mm fixtures in Nos. 19 and 30 sites, two 4.1mm X 14mm fixtures in Nos. 22 and 27 sites and one 4.1mm X 12mm fixture in No. 24 site. Once the implants were placed, the implant positioning guide was removed and regular crossfit screw-retained 17 degree multiunit angled abutments were placed using a 3D printed Flexcera (Desktop Health) multiunit abutment aligner guide. The conversion prostheses made with Flexcera Smile (Desktop Health) were then picked up with a dual-cure polymer, Triad (Dentsply Sirona), after placing the temporary titanium cylinders, each blocked out with silicone block out tubes, onto the multiunit abutments. (Figs. 16 & 17) Teflon tape and flowable Filtex Supreme Ultra (3M) composite was used to seal each access hole prior to assessing occlusion. (Figs. 18 & 19) At this time a PMMA duplicate of the conversion prosthesis, made with Flexcera Smile (Desktop Health), was picked up with the same protocol to help when the time came for the final impression, capturing the desired vertical dimension, tooth position, and healed soft tissues. Bilateral masseter Botox injections were administered to manage excessive occlusal forces during the osseointegration phase.
Fig. 16

Fig. 17

Fig. 18

Fig. 19

Fourty-eight hours after surgery occlusion was assessed and minor adjustments were made to the PMMA conversion protheses. Following five months of osseointegration, a final impression PMMA duplicate of the conversion prostheses were seated and hand tightening to the multiunit abutments and a minor adjustment to the midline was marked on the impression duplicate to communicate with the lab. A light body vinyl polysiloxane (VPS) impression material was used to capture the intaglio space between the tissues and the impression duplicate of both prostheses. During the osseointegration phase, soft tissue shrinkage is a normal sequelae of the healing process, therefore the light body VPS helps to ensure seamless intaglio adaptation of the final prostheses to the soft tissues. A centric relation bite registration was taken using Blu-Mousse vinyl polysiloxane (VPS) Bite Registration (Parkell). (Fig. 20) This NavaGation Synergy Guided surgical and prosthetic protocol (Absolute Dental Lab, Durham, NC) eliminates the need for guesswork, verification jigs, occlusal rims, and wax set ups. The final impression duplicate of the conversion prostheses served as both a final impression tray as well as correct VDO and tooth position guide. At the subsequent visit PMMA prototypes made from Flexcera Smile (Desktop Health) were tried in and aesthetics, function, phonetics, and occlusion were assessed. (Figs. 21-25) Adjustments to the gingival embrasures were also made to idealized the gingival scalloping and guide papillae fill-in, and a final bite registration was obtained using Blu-Mousse vinyl polysiloxane (VPS) Bite Registration (Parkell). The final prostheses were fabricated from full contour solid zirconia Argen High Translucency Plus Mulitlayer 4Yitrium (1250 MPA) and were custom stained and glazed to naturally transition with the gingival characterization. (Figs 26-40) The multiunit prosthetic screws were torqued to manufacture recommendations and access holes sealed with teflon tape and Filtex Supreme Ultra (3M) composite. All full maxillary arch flat plane occlusal night guard was fabricated to be worn indefinitely to reduce and manage occlusal parafunctional forces on the prostheses and implant fixtures.
Fig. 20
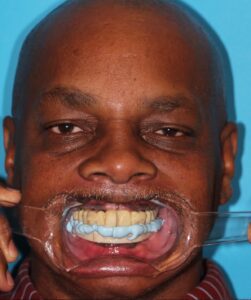
Fig. 21

Fig. 22

Fig. 23

Fig. 24

Fig. 25

Fig. 26

Fig. 27

Fig. 28

Fig. 29

Fig. 30

Fig. 31

Fig. 32

Fig. 33

Fig. 34

Fig. 35

Fig. 36

Fig. 37
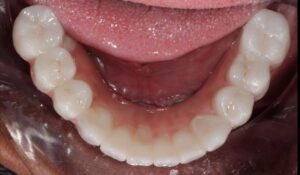
Fig. 38

Fig. 39

Fig. 40

Conclusion
Digital treatment planning for improved aesthetics and function can often be both rewarding for the clinicians and fulfilling for the patient.7 Predictable surgical and prosthetic results are possible with a streamlined digitally guided workflow that eliminates guesswork. The collaboration of the surgeon, restoring dentist, and guided surgery specialist in treatment planning enables visualization of the desired outcome prior to surgery. Numerous aesthetic and functional deficiencies were addressed and resolved in this gentleman’s case resulting in a much improved dental health, function, and appearance. The patient and all involved with the case were pleased with the outcome. (Fig. 40)
Oral Health welcomes this original article.
References
- Johnson PF. Racial norms: esthetic and prosthodontics implications: J Prosthet Dent. 1992;67(4)502-508.
- Peck S, Peck L. Selected aspects of the art and science of facial esthetics. Semin Orthod. 1995;1(2):105-126.
- Nanda RS, Ghosh J. Facial soft tissue harmony and growth in orthodontic treatment. Semin Orthod. 1995;1(2):67-81.
- Gelb, M. Airway Centric Aesthetic Dentistry. American Society for Dental Aesthetics Conference Presentation. 10/21/2022.
- Ahmad I. Geometric considerations in anterior dental aesthetics: restorative principles. Pract Periodontics Aesthetics Dent. 1998;10(7):813-822.
- Dawson, PE. Functional Occlusion from TMJ to Smile Design. 3rd ed. Philadelphia, PA: Elsevier Health Sciences; 2006.
- Wynne T, Wynne WPD. A Multifactorial Approach to Restorative Dentistry: Inside Dentistry. 2015; 11(6): 72-78.
About the Author

Tyler Wynne received his DDS in 2014 from the University of North Carolina School of Dentistry, where he also an adjunct member of the faculty. He practices general dentistry in Clemmons, NC and is an editorial board member of REALITY, Fellow of the International Academy of Dental-Facial Esthetics and AGD. He is a scholar of the Dawson Academy and member of the American Society for Dental Aesthetics.


