
Today’s dentistry allows us to perform conservative cosmetic treatment for smile enhancement. Together with laser soft tissue and bone treatment via a closed flap approach, Botox, and porcelain veneers, we can often achieve a patient’s esthetic goals while maintaining a maximum amount of natural tooth structure.
Clinical Case
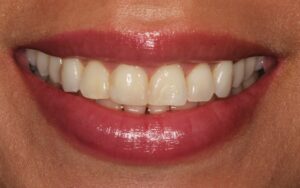
This patient presented with good dental health with no active caries or periodontal disease. Her full-face preoperative image is shown in Fig. 1. In Fig. 2, you can see her smile before treatment. Note that her maxillary teeth appeared well aligned but with a slightly “gummy” smile. However, the right central incisor had a disto/facial/incisal composite restoration to correct for the esthetics of a slightly rotated tooth which can be detected when you look at the retracted view in Fig. 3. In the occlusal view, (Fig. 4) you can see that she had previous composite restorations in the occlusal areas of the right first and second premolars and the occlusal and lingual surfaces of the first molar. The patient wished for a brighter, wider smile with less gingiva showing.
Fig. 1
Fig. 2
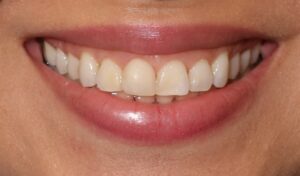
Fig. 3
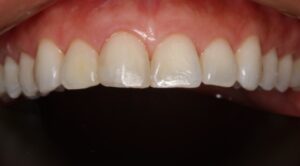
Fig. 4
Laser Treatment
The first course of action was bony and soft tissue crown lengthening using a Waterlase laser. The bone was sounded using a periodontal probe and determined that 1 mm of bone would need to be removed to maintain biological width. An MZ6-9 tip was used to first contour the tissue to the desired height (settings: 3.50W, 15 Hz S, Air 80, water 40)). The tip was then marked with a marker at 2.5 mm. The laser tip was then used to remove the bone up to the marked tip with a closed flap approach (settings: 2.50W, 20 HzH, air 30, water 55).
Fig. 5 shows the tissue directly after laser contouring. The tissue after healing is shown in Fig. 6. Her smile after laser crown lengthening can be seen in Fig. 7.
Fig. 5
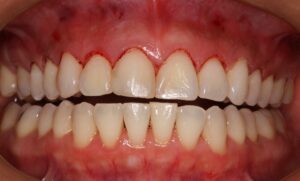
Fig. 6

Fig. 7
Botox Treatment
To reduce the gummy smile slightly more, 4 units of Botox were injected 4 mm superior to the patient’s upper lip (2 units above each canine). The smile after Botox can be seen in Fig. 8.
Fig. 8
Elective Porcelain Veneers
At this point, preoperative impressions were taken as well as facebow transfer record (Denar). The lab (Frontier Dental Lab) was asked to pour up and mount the preoperative models. The maxillary preoperative model is shown in Fig. 9. A digital wax-up was performed. (Fig. 10) A vacuform clear matrix was made over the wax up model. (Fig. 11) The clear stent, seen in Fig. 12, was tried in to establish the preparation needed. (Fig. 13)
Fig. 9
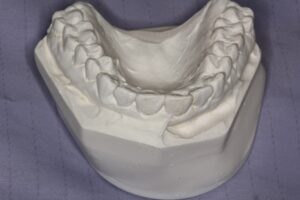
Fig. 10

Fig. 11

Fig. 12

Fig. 13

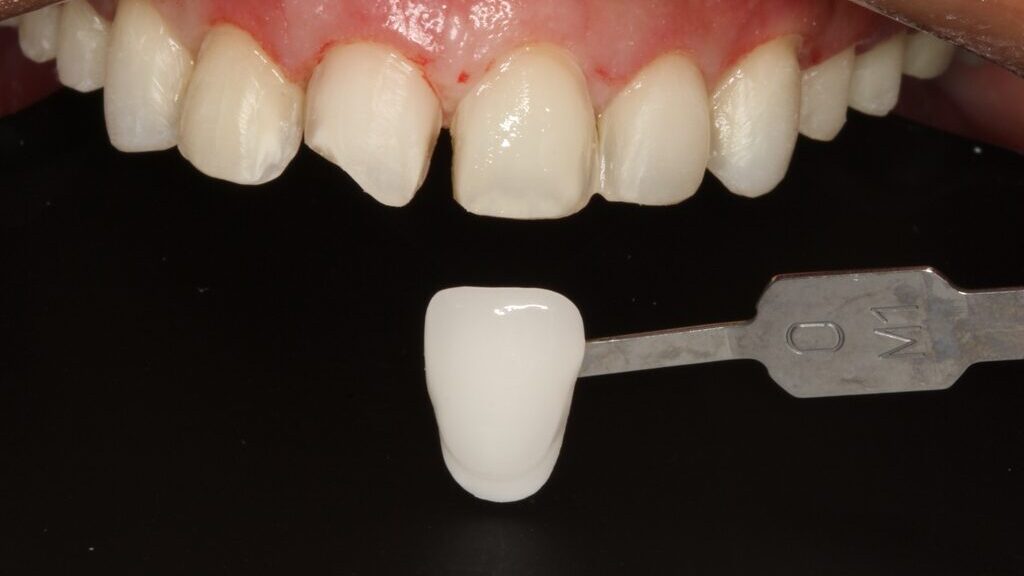
Preparation involved removing the previous composite restorations and preparing for 0.5 mm of facial porcelain and 1.0 mm of incisal porcelain for the canines, lateral and central incisors. A chamfer ended diamond is shown preparing the right central incisor in Fig. 14. Onlay/veneer preparations were complete for the premolars and molars. The final preparations can be seen from the facial view in Fig. 15 and the occlusal view in Fig. 16. Shade OM1 was chosen by the patient. (Fig. 17)
Fig. 14

Fig. 15

Fig. 16

Fig. 17

Final impressions were taken, and new occlusal registration performed. Provisional bis-acrylic restorations were fabricated using a PVS stent formed over the wax-up model. They are shown in place in Fig. 18 from the facial view and the occlusal view in Fig. 19.
Fig. 18

Fig. 19

At the dental laboratory (Frontier Dental Laboratory), twelve eMax restorations were fabricated. They can be seen on the model from the facial view in Fig. 20 and the occlusal view in Fig. 21. They are shown photographed on a mirror surface in Fig. 22.
Fig. 20

Fig. 21

Fig. 22

The restorations were pre-etched in the laboratory with 9.5% HF acid for 30 sec. Each veneer was lightly coated with a layer of silane followed by Universal Bond bonding agent (Tokoyama). The teeth were prepared for bonding using 32% Phosphoric acid (10 sec) followed by 2 coats of Gluma desensitizing agent. Universal Bond bonding agent (Tokoyama) was applied to each tooth. Each veneer was cemented with RelyX veneer cement (3M). The cement was light cured for 2 seconds and the excess was easily removed with a periodontal scaler. The cement was then fully light cured.
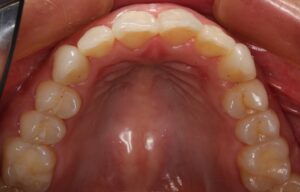
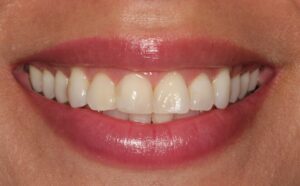
The result can be seen from the occlusal view in Fig. 23 and from the facial view in Fig. 24. Her beautiful new smile is shown in Fig. 25 achieving her desired wider, brighter smile. Her full-face image after treatment can be seen in Fig. 26.
Fig. 23

Fig. 24

Fig. 25

Fig. 26

Conclusion
The desire for smile enhancement is growing in our society. Because of new technologies and materials available today, we can often provide these services in a conservative, minimally invasive way.
Oral Health welcomes this original article.
About the Author

Tyler Wurmlinger is a practicing dentist in Huntersville, North Carolina. He earned his Doctorate of Dental Surgery at the University of Detroit Mercy in 2011. Upon graduating, he spent 4 years practicing in the United States Navy. Since 2015, Dr. Wurmlinger has been practicing dentistry in the greater Charlotte area, with a focus on cosmetic dentistry. He purchased Dr Ross Nash’s practice in 2021 and he is currently a practicing member of The American Academy of Cosmetic Dentistry.


