

To quote a mentor, “the best dentistry is no dentistry”. However, when dentistry needs to be done, it’s best to be done as conservatively as possible. As materials and technologies develop, clinicians can offer more minimally invasive restorative options to patients. However, ensuring long lasting and predictable results requires two things: patience and commitment.
In October 2019, a 50-year-old female patient presented with a 30+ year-old PFM crown on #8. The patient had never had any issues with the functional aspect of the crown, i.e. debonding, chipping or recurrent decay present. However, the esthetics were not up to her satisfaction, and she had always wanted to do something about it. Before determining a restorative plan, a comprehensive exam was completed. The porcelain fused to metal crown on #8 (upper right central incisor) had been completed following root canal therapy when the patient was teenager in France. The patient had sustained significant trauma to that area which prompted the root canal therapy. No significant findings noted on the radiographic and periodontic examination. The patient described her tooth was “purple” prior to placement of the crown due to the trauma. All adjacent teeth were unrestored and not affected by the trauma.
Upon evaluation, three primary restorative challenges presented: 1. Position of the tooth in the arch, 2. Gingival height discrepancy with the adjacent tooth, 3. Shade matching the adjacent virgin natural tooth (#9 – upper left central incisor). Additionally, the patient had never had any issues with chipped porcelain or debonding of the restoration in over three decades, therefore, ensuring long term success of bonding was paramount.
After discussing all treatment options with the patient, she elected to move forward with clear aligner therapy prior to replacing the restoration on #8 (upper right central incisor). The aligner therapy sought to address the first two challenges: reposition the tooth into a more favorable restorative position as well as improve the gingival heigh discrepancy. Unfortunately, the aligner therapy extended longer than originally planned due to
COVID limitations but was completed after one year. Following completion of the orthodontic phase, it is critical to reassess patients. The patient returned for updated records and finalization of the restorative treatment plan.
Although the position of the upper anterior were significantly improved following aligner therapy, additional improvements were necessary with regard to correcting the gingival height discrepancy between #8 (upper right central incisor) and #9 (upper left central incisor). The patient was high risk dento-facially due to significant maxillary gingival display. (Fig. 1) The patient was not interested in pursuing orthognathic surgery to address the vertical maxillary excess, so achieving symmetry of the free gingival margin was key for the achieving long term restorative success. The patient elected to complete minimally invasive trans-sulcular crown lengthening from #7-10 prior to removal of existing restoration. (Figs. 2,3) After 4 weeks of healing, the patient returned for crown removal, prep, impression and provisionalization. (Fig. 9) An analogue wax up of #8 (upper right central incisor) was completed and a putty stent fabricated prior to the visit.
Fig. 1

Fig. 2

Fig. 3

Single anterior porcelain restorations are one of the most difficult procedures we face as clinicians. However, providing reliable solutions to this situation is paramount to ensure minimally invasive dentistry. Successful outcomes hinge on being able to communicate effectively with our lab technicians. However, in this case, due to the significant darkening of the tooth underneath the restoration, effective communication became even more critical. Utilizing eLab protocols developed by Sascha Hein, two critical photos were taken during this case. The eLab photo of #8 (upper right central incisor) and #9 (upper left central incisor) at the very beginning of the appointment to avoid effects of dehydration, (Figs. 4,5) and the eLab photo of #8 (upper right central incisor) once it was prepped. (Figs. 6,7) These two photos provided the lab technician with the tools he needed to not just mask the dark tooth, but match it ideally to the virgin tooth next to it.
Fig. 4

Fig. 5

Fig. 6

Fig. 7

However, even when you do everything right, things can still go wrong. Unfortunately, we hit two initial road blocks with this case. The first, delayed gingival healing post-crown lengthening. As a result, the initial porcelain fused to zirconia crown we received from the lab did not sit far enough subgingival. As a result, a dark line was visible at the margin. (Fig. 9) The second, while the value was dead on, the shade just off compared to #9 (upper left central incisor). (Fig. 10) As a result, the prep was modified to be placed further subgingival to ensure complete coverage of the margin. Extreme care was exerted to ensure no violation of biological width. Bone sounding was completed to confirm 3mm between the alveolar crest and the restoration’s margin.
Fig. 8

Fig. 9

Fig. 10

While the new impression corrected the first road block, after several failed shade matching, a different approach was taken. Porcelain fused to zirconia restorations did not allow the translucency and opacity required for matching the adjacent untouched tooth. However, since we had access to multiple porcelain fused to zirconia crowns, I combined analogue and digital techniques to improve communication with the lab. A porcelain fused to zirconia crown was cemented with TempBond cement and the patient wore the crown for two weeks. At the two-week mark, the patient returned for updated eLab photos with the porcelain fused to zirconia crown in place. (Figs. 11,12) The crown was then removed, and the second eLab photo of the prepped crown was taken. (Figs. 13,14) New impressions were sent to a new lab along with the porcelain fused to zirconia crown that was used for the eLab photos. By sending the crown in the photograph, the lab technician was able to better calibrate the intraoral photographs and achieve a better shade match.
Fig. 11

Fig. 12

Fig. 13

Fig. 14

A new crown was fabricated using a new material. Instead of zirconia, the lab technician felt that an eMAX crown with MO-0 ingot substructure would be sufficient to mask the underlying discoloration of the natural tooth.
At the try in and delivery visit, the provisional restoration was removed, and the final crown tried in prior to administering anesthetic. This technique prevents dehydration of adjacent teeth and ensures more accurate shade evaluation. Once shade was confirmed and patient approved and consented for cementation, the bonding protocol process began. (Fig. 15)
Fig. 15

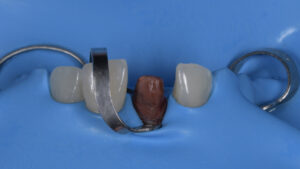
Following administration of anesthetic, a custom rubber dam (NicTone Heavy Gauge) was placed #7-10, with stabilization clamps placed on the first bicuspids. An accessory clamp (B4 by Coltene) was placed on #8 (upper right central incisor) to allow complete visualization of the margin. (Fig. 16) The dam was fully inverted around the prep and the crown was tried in to confirm complete seating of the restoration. Once confirmed the intaglio surface of the crown was prepared first.
Fig. 16
As per the clinician’s instructions, the crown was not etched by the lab. Once the fit of the crown was confirmed, the intaglio surface was etched with Bisco 9.5% HF for 20 seconds and rinsed with copious irrigation. After etching, the surface was cleaned with Bisco 34% H3PO4 for 10 seconds and again rinsed with copious irrigation. Once air dried, fresh silane (two-part bottle system by Bisco) was applied to the intaglio surface and left to sit in a dark box while the tooth was prepared for bonding.
All cement was removed from the prepped tooth using 27-micron Aluminum Oxide with PrepStart. (Fig. 17) The tooth was then etched for 12 seconds with 34% H3PO4 by Bisco and rinsed thoroughly. (Figs. 18,19) Two coats of All Bond Universal by Bisco were applied in 20 second increments, air thinned then light cured for 20 seconds. (Figs. 20,21) The restoration was removed from the dark box and cemented with Bisco’s Duo-Link Resin Luting Cement. Once the restoration was fully seated, the margins were tack cured for 3 seconds on the facial and palatal. (Fig. 22) All excess cement was removed and interproximal contacts verified. (Fig. 23) Once excess cement was removed, the restoration was full cured for 20 seconds on both the facial and palatal. The restoration was then left to allow full chemical cure for 5 minutes. Once full cure was achieved, the rubber dam was removed and margins finalized with fine diamond flame bur. (Fig. 24) Occlusion and interproximal contacts were verified and the final restoration was polished. Patient was instructed to not be alarmed if restoration appeared darker initially due to dehydration of the adjacent teeth from the dam.
Fig. 17

Fig. 18

Fig. 19

Fig. 20

Fig. 21

Fig. 22

Fig. 23

Fig. 24

The patient was thrilled post-delivery with the improved esthetics of the new crown. However, even when one does everything right, things can still go wrong. Enter our third and fourth road blocks. When the patient returned 8 weeks later for follow up photos for the case, the value of #8 (upper right central incisor) dropped dramatically (Figs. 25,26) and a dark gray line developed along the gingival margin. The decision was made to remove the permanently cemented crown and remake it. The patient returned the following visit for removal, re-impression and provisionalization. All steps were repeated as per the previous visits. New eLab photos were taken prior to removal of the permanent crown. (Fig. 27)
Fig. 25

Fig. 26

Fig. 27

As the case progressed with the lab, our fourth road block developed: soft tissue. Where the soft tissue had never posed an issue in any provisional or final crown previously, the tissue began to become inflamed significantly around #8 (upper right central incisor). (Fig. 28) The patient returned and the provisional crown was removed, recontoured cervically and cleaned thoroughly. Additionally the provisional cement was changed from TempBond Clear to TempBond. The patient was left in the new provisional restoration for 6 weeks to ensure adequate soft tissue healing. Once healing was confirmed, the patient returned for new impressions and eLab photos (Fig. 29) with the provisional in place.
Fig. 28

Fig. 29

Due to the failure of the MO-0 ingot to adequately block out the underlying dark tooth post cementation, the decision was made to change to the HO-0 coping. The success of this case would not have been possible without the communication and artistry demonstrated by the lab tech, Dominik Gliniecki at California Dental Arts. (Fig. 30)
Fig. 30

Following the same protocols as the previous try in and delivery, the provisional restoration was removed and the final crown tried in prior to administering anesthetic. (Fig. 31) Once confirming patient approval, rubber dam isolation was completed with a NicTone Heavy Gauge placed from #7-10, with stabilization clamps placed on the first bicuspids. An accessory clamp (B4 by Coltene) was placed on #8 (upper right central incisor) to allow complete visualization of the margin. The dam was fully inverted around the prep and the crown was tried in to confirm complete seating of the restoration. Once confirmed the intaglio surface of the crown was prepared first.
As per the previous delivery, the crown was not etched by the lab. Once the fit of the crown was confirmed, the intaglio surface was etched with Bisco 9.5% HF for 20 seconds and rinsed with copious irrigation. After etching, the surface was cleaned with Bisco 34% H3PO4 for 10 seconds and again rinsed with copious irrigation. Once air dried, fresh silane (two-part bottle system by Bisco) was applied to the intaglio surface and left to sit in a dark box while the tooth was prepared for bonding.
Fig. 31

All cement was removed from the prepped tooth using 27-micron Aluminum Oxide with PrepStart. The tooth was then etched for 12 seconds with 34% H3PO4 by Bisco and rinsed thoroughly. Two coats of All Bond Universal by Bisco were applied in 20 second increments, air thinned then light cured for 20 seconds. After discussing the case with a mentor, the decision was made to change the luting cement for the restoration. The restoration was removed from the dark box and cemented with RelyX Unicem 2 by 3M. Once the restoration was fully seated, the margins were tack cured for 3 seconds on the facial and palatal. All excess cement was removed and interproximal contacts verified. (Fig. 23) Once excess cement was removed, the restoration was full cured for 20 seconds on both the facial and palatal. The restoration was then left to allow full chemical cure for 5 minutes. Once full cure was achieved, the rubber dam was removed and margins finalized with fine diamond flame bur. Occlusion and interproximal contacts were verified and the final restoration was polished. Patient was instructed to not be alarmed if restoration appeared darker initially due to dehydration of the adjacent teeth from the dam. (Fig. 32)
Fig. 32

Thankfully, when the patient returned for follow up photos several months later, the value, shade and tissue remained stable, (Figs. 33/34) resulting in both a happy patient and a happy clinician.
Fig. 33

Fig. 34

Overall, this case posed many difficult challenges. However, it also embodies two of the most important lessons of cosmetic dentistry. The first being, “less is more”, and the second being “less does not mean easier.” The best dentistry is rarely easy dentistry. However, as clinicians we owe our patients dedication to the best care possible, even if it is the harder route. Despite the challenges, this patient was ecstatic with not only the results of her new smile, but the conservative nature in which we achieved it.
Oral Health welcomes this original article.
About the Author

Devin McClintock is a graduate of the State University of New York at Buffalo School of Dental Medicine (2016), where she graduated with honors and a minor concentration in esthetics. Since graduating, her dedication to continuing education has not ceased. She completed two years of General Practice Residency, and she is currently one of a few selected residents completing a two-year program with the American Academy of Cosmetic Dentistry. Additionally, she spends her free time attending courses at the Kois Center in Seattle, WA, as well as assisting with the imPRES lecture series in Charleston, SC.


