
Why do I need to use special custom abutments for the restoration of my implants? I have been using stock abutments for a long time and I have cases that are 20 years old. I am not having any problems. Stock abutments are cheap, and I use the prosthesis to develop the emergence profile for the replacement teeth. Why should I pay extra money to a lab to make well designed custom parts? I would need to raise my prices and lose patients. There is only so much people can afford for implant treatment. I need to remain competitive! What is wrong with that?
You could have heard that coming out of my mouth years ago, after having placed and restored thousands of dental implants using stock abutment retainers. To my defense, things were a lot different then. Nobody seemed to understand how to control excess cement and many common problems like hyperocclusion, open and tight contacts, overhanging, underextended, over-extended and open margins, and the causes of misfit implant-abutment and other connections. All these problems are known risk factors for treatment complications. Their causes seemed to be elusive and generally thought to be due to the clinician’s and/or lab technician’s inexperience or lack of care.
As I was removing some of my prosthetics due to fractured porcelain, open contacts and open margins, I noticed that I was leaving behind residual subgingival cement. Open margins may be visible on X-ray images, while residual subgingival cement is often not. Of course, this was happening despite my best efforts to prevent all these problems. There was no lack of care on my part. It was my lack of understanding that drove me to find out why these problems were occurring.
The literature indicates that “whether the dentists screw-in or cement-in their fixed prosthetics”, the expected rate of peri-implantitis is 15%, mucositis 30%, plus loose and broken screw problems.1-4 If patients have multiple implants, the incidence of these problems increases.5 Complications can make patients wonder whether they have made the right choices about treatment. They can also be very expensive and frustrating for their dentists to manage.
Can we do better? To do better, dentists need to understand the root causes of complications and they need support from the implant industry that supplies them with implants and related products. It only makes sense that dentists should patronize those implant companies that offer them products that foster better treatments. After all, reducing complications is good for patients and good for the dentist’s business. It is also good for the whole implant industry, as reducing complications makes treatment involving dental implants the best choice more of the time.
Many dentists and dental specialists already agree that stock abutments are not usually ideal for use with cemented restorations.6 However, just recommending the use of custom abutments without a clear understanding about why they might be better than stock abutments can be misleading. It is unfortunate that many of the available custom abutments are expensive and are often not much better than stock abutments at preventing the advent of residual subgingival cement. Their current designs are simply not sensitive to the root causes of several prosthesis related problems.7
What are stock abutments? They are mass produced shapes that are attached to the top of implants. The shapes of these abutments can be simple or complex. The complex ones are often expensive and attempt to anticipate the ideal shape necessary to best support the safe attachment of a prosthesis. This goal is indeed very difficult for the manufacturer to achieve. There are basically two types of stock abutments. The Stock Healing Abutment (SHA) and the stock prosthesis-retaining abutment or simply the Stock Abutment.
Not long ago the SHA was called the coverscrew, and it was usually round and available in a limited number of heights and widths. They were used to provide the dentist with access to the top of the implant without a second stage surgery. The SHA also shaped the tissues in the peri-abutment environment (Figs. 1 & 2). The prosthesis that would be anchored to these abutments would often be larger and have a more complex shape than the SHA.
Fig. 1
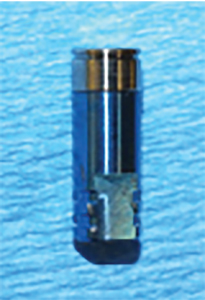
Fig. 2

The Stock Abutment (SA) was used to retain the prosthesis (Fig. 3). Its shape was often not much larger than the healing abutment, to facilitate its seating onto the implant. Their design was not intended to shape the tissues since the prosthesis was to be used to create the emergence profile for the replacement tooth. The prosthesis was to be cemented onto the abutment in the intra-oral environment. Many experts promoted the idea that 3 mm or 1.5 mm subgingival margins were desirable for cemented prosthetics. My research results would indicate that this would only be true if residual subgingival cement and poor subgingival margins were the desirable outcomes of prosthesis installation.7
Fig. 3

It is attached to a blue implant analogue with a similar diameter.
Why do almost all implant companies sell stock abutments to their valued dentist customers? They keep selling them because dentists keep buying them. Are they just pandering to the wants of dentists, or are they promoting their use? Did you know that I could not even find one company that offered directions for cementing fixed prosthetics onto their stock abutments that could reliably prevent both submarginal cement and open margins?
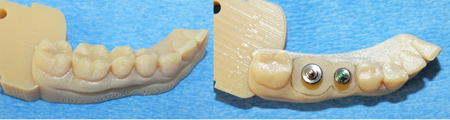
What about those dentists and dental labs that modify stock abutments for use as retainers? Most simple stock abutments only allow for limited modifications. Yes, the height of the abutment can be reduced, its angle can be somewhat modified to allow for a better path of insertion for the prosthesis. Their margins can be somewhat lowered.8 Figure 4 shows such abutment modifications and wide open-margins after prosthesis installation.
Fig. 4
It is difficult or impossible to raise margins on SA or to increase their dimensions to better support the emergence profile of replacement teeth. Indeed, it is also not possible to change the design of the margin or predict the gingival-margin relationship after the prosthesis installation. Many stock abutments simply do not have enough material thickness to work with. Indeed, all the necessary custom variations in shape can be produced efficiently, with the use of CAD/CAM based technology. You will see that this type of site-specific control of abutment shape is necessary to make implant treatment better.
To prevent complications related to prosthesis installation, dentists need to understand their root causes. Treatment complications usually begin as mechanical problems that manifest themselves as open and tight contacts, poor margins, poor connections between implant parts, hyperocclusion, and loose and broken screws, and loose prosthetics. Many of these mechanical problems can foster the growth of oral pathogens in the peri-implant environment. The bacteria that are related to peri-implant disease are about one micron in diameter and are often mobile. Yes, even a 50-micron space under overhangs or in open margins can become a great habitat for millions of oral pathogens. Creating unmaintainable places for oral pathogens to congregate and proliferate can challenge even the healthiest of our patient’s immune systems.7
Did you know that overhanging, overextended and open margins are a common result of our cemented prosthesis installations?7 Did you know that in a University environment, Prosthodontists left behind residual subgingival cement 60% of the time?9 Did you know that 81% of single cemented crowns diagnosed with peri-implant disease were found to have residual subgingival cement?10 Despite those treatment deficiencies and the many more mentioned previously, some patients may do quite well for 10 years or more. However, should dentists depend so much on the patient’s immune system to keep their treatment functional?
Why do you think that patients with a history of periodontitis have a higher rate of peri-implantitis? They have already demonstrated that their immune systems could not overcome the challenge from their oral pathogens. What about our patients that are getting older? Do you think their immune systems are getting stronger and stronger? What about the diabetics or soon to be diabetics, the smokers and the patients with poor maintenance? What about those on heart medications that dry up their saliva? What about the emergence of more and more drug resistant pathogens? Indeed, a local physician that deals with drug resistant pathogens said, “Dental implants are a cesspool of infection!” Yes, dentists really need to do all they can to make their treatment as resistant as possible to potential mechanical and biological problems.
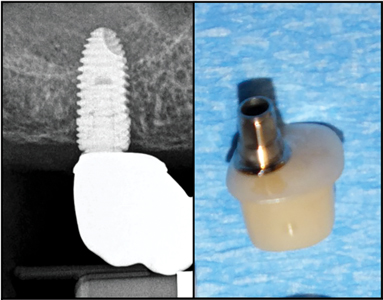
What are the root causes of treatment complications? The first root cause of complications is Prosthesis Dimensional Error (PDE). There is ample evidence in the literature about the accumulation of errors involved in the making of a prosthesis from either/or both physical and digital impressions.11 PDE causes many problems specific to the prosthesis installation technique used. These complications manifest themselves as poor contacts with adjacent teeth, overhanging, overextended, underextended and open prosthesis margins and the advent of subgingival cement. Figure 5 demonstrates how a tight contact can easily precipitate all of these problems with biological consequences usually related to infection.
Fig. 5
The second root cause of complications is called the Tissue Effects (TE). I discovered these while researching the causes of subgingival cement. The first TE I discovered were the Gingival
Effects (GE). The discovery of the GE was key to preventing residual subgingival cement.12
The GE can cause copious amounts of subgingival cement during intra-oral cementation. When the prosthesis is pressed into place onto its retainer, its tissue facing base contacts the adjacent gingiva. It forms a seal with the gingiva and thus traps excess cement in the gingival crevice adjacent to the implant. As the prosthesis continues to be pressed into place, that prosthesis-gingival seal increases. The cement already between the implant and the gingiva, plus the excess cement still exiting the prosthesis is pressurized and forced deep into the subgingival environment. This subgingival cement is often very difficult to locate and clean away.
Using an in vitro model and cementing a crown with a 1 mm subgingival margin resulted the cement going an average distance of 4.5 mm into the subgingival environment. With a 2 mm subgingival margin, the excess cement was injected an average of 6.3 mm subgingivally (Fig. 6). In addition, 100% of these tests resulted in open margins. That experiment demonstrated both the GE and how the gingival Resistance to Displacement (RTD) could cause subgingival cement and open margins.
Fig. 6
A similar experiment in vivo demonstrated the occurrence of both these complications. Residual subgingival ce-ment and open margins are common complications of cemented prosthetics (Figs. 7 & 8).7
Fig. 7
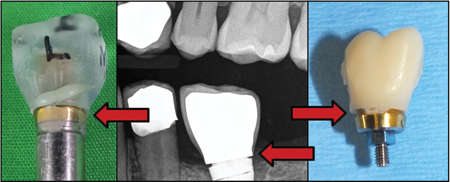
Fig. 8
Gingiva can be quite variable in its RDT. Gingival RTD often increases with 1) its proximity to hard tissues like bone and adjacent teeth, 2) with increasing difference in size between the transgingival opening exposed by the removal of the healing abutment and the prosthesis being installed and 3) the increased flatness of the undersurface of the abutment and/or prosthesis at the time of installation. This increased flatness in design is often a consequence of inadequate space between the top of the implant and the base of the abutment/prosthesis complex. It takes space to develop a more conical emergence profile through the tissues. Narrow conical connections at the top of the implant can exacerbate this problem. A conical abutment base may begin as a 3 mm diameter while an internal hex abutment may begin as a 4.5- or 5.7-mm base. The narrow base increases the space requirement for a tapered emergence profile, especially when replacing a wider tooth. During installation, a flat abutment and/or prosthesis tissue facing surface is more likely to exert a crushing force on the underlying gingiva than a lateral displacing force.
Crushing gingival tissues can cause the patient post-installation pain until the crushed tissues are able to heal themselves (Fig. 9). A similar problem can occur when trying to seat a pontic into place. These TE can keep prosthetic parts from seating properly.
Fig. 9
Of course, there are other peri-implant tissues that can frustrate the efforts of the dentists to properly install a prosthesis.
Bone, adjacent teeth or their replacements also need to be considered. They are usually very resistant to displacement and often need to be adjusted to allow for the proper seating of an abutment and/or prosthesis (Fig. 10).
Fig. 10

Blood or tissue fluids can displace cement from the margins of a crown or fill the spaces between implant parts, including the huge space inside a dental implant. These spaces can all foster the growth of oral pathogens.
How does PDE and the TE frustrate the efforts of the dentist to optimize the cementation of a Single Crown onto a simple Stock Abutment (SA)? A SA may have a diameter that is equal to or smaller than the trans-gingival opening left by the removal of the healing abutment. In this circumstance, the implant-abutment connection can be optimized with a great deal of predictability. The TE are at a minimum and we don’t have to worry about PDE, because at this time, there is no crown attached and thus no tight contacts to push the abutment off its ideal position.
If the shape of the stock abutment gets larger than the shape of the trans-gingival opening, increasing care must be taken to ensure that the hard and soft tissues adjacent to the abutment do not prevent it from seating properly. Proper planning and post-abutment installation X-ray images may help guide this important installation step.
What about the installation of a crown onto its simple Stock Abutment (SA)? Here is where the dentist is likely to face their biggest challenges. It is unlikely that a SA will have an optimal margin position, margin design and emergence profile to facilitate the safe installation of the crown. This SA limitation will make it difficult to prevent the occurrence of residual subgingival cement due to the GE or prevent the occurrence of open margins due to RTD of the peri-crown tissues (Fig. 5).
In addition, PDE will add its unique complexities. The first challenge will be trying to adjust contacts while squeezing the crown into place over the abutment. This may cause the fragile gingiva, lining the trans-gingival opening to the top of the implant, to bleed. Blood and tissue fluids can already contaminate cement and reduce its efficacy. In addition, if a tight contact shifts the crown laterally, then the crown margin may get hung up on an incline planes of the abutment. This will likely cause an underextended margin on one side of the retainer and an overhanging margin on the opposite side. Whenever there is an open margin, there is likely to be a hyperocclusion as the crown is in a lifted state (Fig. 5).
Of course, the margins of the crown will be at various depths below the gingiva, as the stock abutment margin is fixed into position. When the excess cement flows out from under the margins of the crown, it will follow the path of least resistance and thus preferentially flow out from the largest opening connected to the cement space. This is usually the side of the abutment with the biggest crown overhang, opposite the tight contact. Some of the subgingival cement may be displaced from under the margins of the crown by blood or other tissue fluids being squeezed from the peri-implant tissues by the crown during its seating process. This would cause cement voids at the margins of the crown.
Yes, it’s a wonder that these single crowns with subgingival margins can ever be cemented into place without poor margins and residual subgingival cement. When we try to cement bridges and more complex constructs onto SA retainers, both PDE and the TE are increased dramatically. The patient would need to be very lucky to have optimized margins and be free of submarginal cement. Should our patients need to depend on “LUCK” to have their prosthetics installed without misfit parts and/or subgingival cement?
How can we reduce the complexity of our installation process so that we can install our prosthetics properly, every time? Perhaps we need to look back at how we are preparing the case for restoration. Perhaps currently available round stock healing abutments may not be the best choice for many restorations. Round healing abutments with a fixed retaining screw that turns with the healing abutment have their inherent shape limitations.
Let’s think about using a Custom Healing Abutment (CHA) to shape the peri-implant tissues while they heal from implant surgery. It may be possible to use such an abutment some time closer to prosthesis installation, but if the peri-implant tissues are difficult to displace, that process may require an additional tissue releasing surgery (Figs. 11 & 12). The shape of the CHA emerging from the gingiva should be able to accommodate the future site-specific custom abutment and replacement tooth. It can be made of any biocompatible material and should have a freely rotating titanium base and abutment retaining screw for easier handling and positioning. This screw would allow the dentist to order a variety of non-round healing abutments to shape the peri-abutment soft and hard tissues. The abutment shape may be made of titanium, or a titanium base may be used to accommodate an appropriate shape made from zirconia or PMMA. PMMA material is easier to adjust chairside because it is softer than zirconia.
Fig. 11

Fig. 12

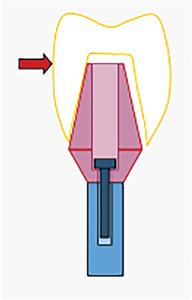
Note: they approach the emerging shape of the replacement teeth.
Once the implant has integrated and the CHA has shaped the peri-implant tissues, it is necessary to capture this shape information and the gingival margin for the lab technician. Now the technician can have a much better chance of predicting both the emergence profile for the definitive custom abutment and the gingival margin height. The lab technician can only guess these dimensions when the prosthetic treatment begins with a stock round healing abutment. Now the lab technician has what is required to create a Well-Designed Custom Abutment (WDCA) and complimentary crown. A WDCA needs to be sensitive to both PDE and the TE, otherwise it’s not well designed.
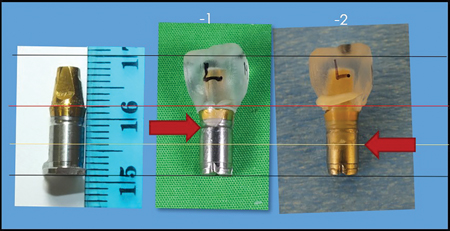
The WDCA needs to push the gingiva out of the way of the crown to prevent the TE from impeding the seating of the crown and to prevent the GE from causing submarginal cement. In addition, this WDCA has an upwards facing margin that directs excess cement out of the tissue spaces, unlike the common tissue facing margins that direct excess cement into the tissue spaces. The Reverse Margin Abutment (RMA) is a WDCA (Figs. 13 & 14).
Fig. 13

Fig. 14

The RMA cannot do it alone. It works together with a Well-Designed Crown such as the Reverse Margin Crown (RMC). Its shape compliments the design of the RMA and includes an external vent constriction in the subgingival environment. This constriction facilitates the flow of excess cement out of the tissue space, unimpeded by contact between the crown and adjacent gingiva. One can say that this shape makes the crown sensitive to and thus prevents the negative TE in the peri-abutment/peri-coronal space. This is a big advantage of the RMA/RMC combination (Figs. 15 & 16).
Fig. 15

Fig. 16

In addition, the RMC is made with cement space on both sides of the crown margins. This allows the crown to float within the upturned RMA margin without causing overhanging, underextended, overextended and open margins. The dentist can thus safely compensate for PDE. All other common margin designs have been causing poor margin problems forever! Labs commonly use excess cement space at their margins to facilitate the process of crown installation. This inevitably resulted in overextended and/or overhanging margins. Yes, the poor margins of the past were just complications of treatment that needed to be borne by patients. Now we can finally prevent this poor margin fit problem.
Safely using adequate cement space makes it easier for the clinician to adjust contacts without needing to fight adjacent soft tissues or needing to worry about getting hung up on the incline planes of retainers during installation. Indeed, the RMC is somewhat self-centering and reduces open margins and related hyperocclusion problems. This margin design simply facilitates the optimized seating of the prosthesis, every time. This optimized installation process does not depend on luck!
Both the RMA and the RMC have been milled out of the same zirconia puck. The esthetics are great, and the zirconia is known to be both durable and biocompatible. The epithelial cells are known to be able to make good connections with a zirconia surface.13 This enhances the ability of the peri-abutment gingiva to make a durable biological seal against invasion by oral pathogens and they can do that beautifully.
I know upwards facing margins look different than the downwards facing margins (Fig. 17). This difference in appearance may detract some dentists from using them. What margin design do you think is easier to maintain? An upwards facing margin or a downwards facing margin? If there was a suspected tissue reaction some excess cement filling the space between the crown and the abutment margin, which margin type do you think is easier to access and clean? Look how easy it is to remove excess cement off the margin on installation day (Figs. 18 & 19).
Fig. 17

Fig. 18

Fig. 19

I wish I could have made the Reverse Margins look the same as the ones we all learned about in dental school. Unfortunately, those margins are also related to all the complications I have already discussed. So, what do you want to do? Do you want to continue to have your patients fall victim to the root causes of complications or do you want to do better? Their complications can be very expensive for you too.
If you don’t like the edge of the abutment margin, just shave it off after crown installation. Your hypothetical problem is solved. However, this margin does not seem to have posed problems for my patients (Fig. 19).
Over the last five years, I have already restored over 750 dental implants for my patients and those referred to me by colleagues. I have recently discovered that Dr. James Miller, an implantologist and lecturer from Oregon, has independently chosen to use the RMA and prosthesis designs for the restoration of 750 implants over the last two years. We both love how well the Reverse Margin System works for us and for our patients. I encourage you to make the change to inflected margins as part of your prosthesis installation system. We really do need to make our treatment results as durable as possible. Its our job.
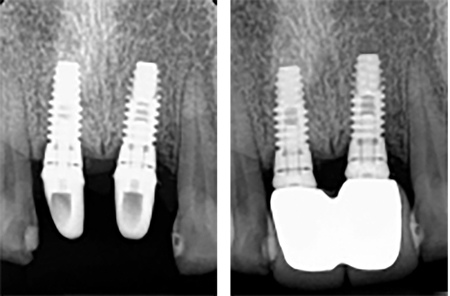
Do you think my patient cares that the RMA appears to be different from conventional margins on an X-ray image? What do you think is more important for my patient (Figs. 20 & 21)? The unique appearance of the RMA on the X-ray image or proof of a well-designed restoration that makes her treatment better. Indeed, the unique appearance of the RMA on an X-ray image of your treatment shows that you too strive to provide the best treatment possible for your patients.
Fig. 20

Fig. 21
In Summary, using custom healing abutments to shape the peri-implant tissues can optimize the installation of the abutment-prosthesis complex. When the design and installation protocol of the abutment-prosthesis complex mitigates the root causes of complications, then it is well designed. Well-designed prosthetics are the key to better implant treatment.
Author’s Note: For the sake of clarity, I did not discuss how PDE and the TE affect the Screw-in System of prosthesis installation. I would be remiss if I did not caution the reader that this system has big problems related to both root causes of complications and related misfit joints. I will discuss those, along with proposed solutions in my next article. For a review of the research that supports my next article and the contents of this current article, I invite you to study my presentation.7 I have lectured about my research findings across the USA and Canada. I look forward to your comments.
Oral Health welcomes this original article.
References
- Atieh MA et al. The Frequency of Peri-implant diseases: A systemic review and meta-analyses. J Periodontol 2013:84(11):1586-1598
- Daubert DM et al. Prevalence and predictive factors for peri-implant disease and implant failure: a cross-sectional analysis. J Periodontol 2015:86(3): 337
- Sherif S et al. A Systematic Review of Screw- versus Cement-Retained Implant Supported Fixed Restorations. J of Prosthodontics 2014 (23)1-9
- Whittneben JG et al. Clinical Performance of Screw- Versus Cement Retained Fixed Implant-Supported Reconstructions: A Systemic Review. The Int J Oral Maxillofac Implants; 2014:29(Suppl):84-98.
- Derks et al. Effectiveness of Implant Therapy Analyzed in a Swedish Population: Prevalence of Peri-implantitis. J Dental Research, 2016 Vol 95(1):43-49
- Wadhwani CPK. Cementation in Dental Implantology. An Evidence-Based Guide. Published by Springer 2015.
- Svoboda ELA. Taming the Old Dragons of Dental Implant Prosthetics. July 6, 2019, PDF Slide Presentation. www.ReverseMargin.com.
- Misch CE. Dental Implant Prosthetics, 2nd Edition, Elsevier Mosby, 2015: Chapter 26:654.
- Korsch M, Obst U, Walther W. Cement-associated peri-implantitis: a retrospective clinical observational study of fixed implant-supported restorations using a methacrylate cement. Volume 25, Issue 7, July 2014, pgs 797-802
- Wilson TG Jr. The Positive Relationship Between Excess Cement and Peri-implant Disease: A Prospective Clinical Endoscopic Study. J. Periodont 2009;1388
- Buzaya MM, Yunus NB. Passive Fit in Screw Retained Multi-unit Implant Prosthesis Understanding and Achieving: A Review of the Literature. J Indian Prosthodont Soc. 2014, Mar;14(1):16-23
- Svoboda ELA. Controlling Excess cement During the Process of Intra-oral Prosthesis Cementation: Overcoming the Gingival Effects. OralHealth, Oct 2015; 52-66.
- Linkevicius T, Vaitelis J. The effect of zirconia or titanium as abutment material on soft peri-implant tissues: a systematic review and meta-analysis. Clin Oral Implants Res Sept 2015:139.
About The Author
 Dr. Emil LA Svoboda graduated from the University of Toronto with a PHD and DDS in 1982. He is a Fellow of the AGD, an Honoured Fellow of the AAID and Diplomate of the ABOI/ID. He has received the Award of Merit for his contributions to organized dentistry. He practices Implant Dentistry at ParkPlace Dental Centre in Brampton, Ontario. Dr. Svoboda has been granted Patent Protection for his innovative Reverse Margin Abutment design. He lectures about his work across North America and loves to work with colleagues that strive to make implant treatment better.
RELATED ARTICLE: Dental Implant Prosthetics: Using a Modified Installation Technique


