
Introduction
For dentists who have a keen interest in Cosmetic Dentistry, it is exciting when a patient expresses an interest to change their smile. It allows us to perform and deliver dentistry that can be immensely rewarding and life changing for a patient. Patients who have high esthetic demands can be a challenge but also can provide a more rewarding experience when their cosmetic dentistry results have been met or even exceeded. What can further compound the difficulty of a case is when a patient presents with a canted occlusal plane.
When evaluating a canted smile, a key point is to determine the level of cant and whether that cant is esthetically acceptable. Kokich et al found that laypersons were not able to detect an asymmetric cant until it reached a 4-degree inclination.1 In a study focusing exclusively on the perceptions of canting of the occlusal plane, a similar finding occurred where orthodontists, general dentists and laypersons were sensitive to a 4-degree occlusal canting.2 Once an occlusal cant has been identified as an esthetic concern for both the patient and clinician, a choice must then be made for the primary treatment modality used to correct it. The treatment modality chosen will be based on the cause of the etiology of the cant, including tooth wear, alterations to tooth eruption and skeletal developmental problems. Treatment options to correct the cant include orthodontics with or without orthognathic surgery, restorative dentistry and periodontal crown lengthening surgery. Often a combination will be needed based on what the other esthetic, functional and dental goals are for the patient. Choosing which treatment option(s) to correct a cant is/are predicated on a systematic breakdown and evaluation of the four main areas of examination (Esthetic, Functional, Structure and Biologic Health).
Patient History
A 50-year-old female presented to our office in good health and as a referral from a local orthodontic office after completion of her treatment. When she had presented for orthodontic treatment, her chief complaints were of a narrow and a “slanted” smile. The orthodontist had assessed that the cant was in part related to her missing tooth #1.3 and subsequent shifting and tipping of her maxillary anterior teeth but was also skeletal in nature. The orthodontic treatment plan was non-extraction with the goals of substituting tooth #1.4 for tooth #1.3, establishing coincident midlines, broadening her archforms (through archwire manipulation) and attempting minor correction of her maxillary cant. Orthognathic surgery was suggested first to help with treatment but was declined by the patient. She was willing to instead correct the cant orthodontically and then restoratively afterwards. To address the cant by orthodontic movement, the maxillary orthodontic brackets were placed at slightly different heights in quadrant one versus quadrant two in order to relatively extrude one segment and relatively intrude the other. In doing so, the orthodontist was mindful of the gingival margins in order to not create a significant asymmetry in the gingival architecture.
Her chief concerns after the orthodontic treatment and presenting to our office were the following:
• Wants a wide smile. She had at multiple times requested that her teeth “fan out.”
• Does not like the appearance of crowns for teeth #2.5, 2.6 with main concern being the visible margins.
• Pointed to the recession for #1.5/1.4 and 4.4 as being unattractive.
• Upper anterior teeth are canted–was wondering if she can mask it with veneers to correct this.
• Was not happy with her overall shade and feels that the posterior teeth are “oddly shaped.”
• Does not want her future crowns and veneers to look like traditional crowns and appear unnatural in terms of their shape and contours.
Clinical Examination and Findings
The key to helping a patient who desires a change in their smile is to first start off with a systematic evaluation of their overall oral and masticatory system health. After a thorough analysis of all the data has been completed, a review of the findings and a sequential treatment plan can then be provided that is customized to both their esthetic demands while at the same time providing optimal functional, structural and biologic stability.
Esthetic: From the photos that were taken for this patient, measurements indicated that there was over a 6-degree cant in her incisal plane up to her right side (Figs. 1 & 2). The cant was measured after lines were drawn level and perpendicular to the framed smile after a grid was placed on the photo in our dental software. The angle was confirmed when checking the facebow-retracted photo to be around 6 degrees. It should be noted that her entire posterior occlusal plane was not as canted as the incisal plane as they were orthodontically leveled by intrusion and extrusion as previously mentioned to create a better overall pre-prosthetic result. This incisal plane cant though was noticeable to her and was more apparent when showing her series of photos. Other significant findings noted in the esthetic analysis were: a) Slightly collapsed buccal corridor with unaesthetic appearance of crowns for #2.5, 2.6. b) Noticeable recession noted over teeth #1.4, 1.5, 1.6. c) Width to Length Ratio of approximately 85% for #1.1 and 2.1. d) Slight black triangle space noted over papilla between #1.1 and 2.1.
Figure 1
Close Up Pre-Op Smile— Lines Drawn for Mildline and Level Incisal Plane. Note the Rise and Cant in the Incisal plane up to her right side.
Figure 2

Retracted Close Up Teeth Apart.
Functional: An evaluation of all components of her masticatory system was performed. Her TMJs were evaluated using a Doppler and no clicking or crepitus was noted on rotation or translation. Load testing of her TMJs was done using bimanual manipulation and no sign of tension or tenderness was noted in either joint. Range of motion was within normal limits. Muscle palpation of masticatory muscles was performed and revealed no tenderness with any muscle. Occlusion was class 1 with a slight anterior open bite (Fig. 3) and group function both sides and no protrusive guidance. It should be noted again that the #1.4 was in substitution for the missing #1.3 and so would be treated as a canine when planning to restore to canine guidance for the right side. Mild generalized wear was noted on all teeth.
Structure: Teeth #1.2, 2.5, 2.6, 3.6 and 4.4 all had existing RCTs and are heavily restored. Teeth #1.7, 1.6, 1.5, 2.2, 2.3, 2.4, 2.7, 3.7, 3.5, 3.4, 4.7, 4.6, 4.5, 4.3 all had existing large restorations affecting the remaining structural integrity of tooth structure (Figs. 4 & 5). Teeth #1.1, 2.1 had moderate sized interproximal restorations and the remaining teeth had no restorations. Caries was present on teeth #1.6 and 2.7.
Figure 3

Upper Occlusal Contacts Pre-Op Photo. Note lack of anterior centric holding contacts.
Figure 4

Lower Occlusal Photo.
Figure 5

Pre-Op X-Rays.
Biologic Health: This patient exhibited mild to moderate generalized horizontal bone loss with localized pocketing for some posterior teeth. Teeth #1.5, 1.4, 1.2, 1.1, 2.1, 2.2, 2.4, 2.5, 2.6, 3.4, 3.5 and 4.4 all had mobility of M1 and Tooth 2.2 having a mobility of M2. For all of her mobile teeth, she was advised that the prognosis was fair to guarded and that each are at risk of eventual tooth loss. Tooth #1.2 it should be noted had a failing RCT in need of endodontic retreatment while tooth #2.3 exhibited reversible pulpitis. She was advised that #2.3 along with other heavily restored teeth that have not had root canal treatment may need so in the future.
Treatment Plan
When looking at where to start a comprehensive and potentially full mouth case, it is important to determine first how to establish functional harmony. In order to establish functional harmony, one must first look at the TMJs. By starting with a specific reference point for the position of the condyle disc assemblies, we can develop balanced simultaneous contacts for all teeth and anterior guidance that is in harmony with the envelope of function. Meeting these criteria will help to promote peaceful neuromusculature for the entire masticatory system. It is for this reason when dealing with functional issues (e.g. wear, mobility, migration of teeth) and/or doing multiple restorations involving changes in the contours, position and size of teeth, that centric relation was chosen as the position of the TMJs to restore too. Centric relation is defined as the relationship of the mandible to the maxilla where the properly aligned condyle-disk assemblies are in the most superior position against the eminentiae irrespective of vertical dimension or tooth position.3 Not only is centric relation physiologically and biomechanically correct, it is the only jaw position that permits an interference free occlusion. By fitting our restorations into this jaw-to-jaw relationship, we can facilitate more predictable outcomes by building to an orthopedically stable position that will allow immediate posterior disclusion of teeth in all excursions.
For developing an ideal smile that is in agreement with the esthetic demands of a patient, a series of guidelines and protocols are important to help a clinician treatment plan this. Many of the concepts of smile design are very well organized and presented in the latest diagnosis and treatment evaluation manual from the American Academy of Cosmetic Dentistry.4 The same approach of analysis is organized in the diagnostic software called the Dawson Diagnostic Wizard. Sequential looks at the patient photos (21 total) are performed to analyze the global, macro, micro and pink esthetics through the 2-D Functional-Esthetic evaluation. The 2-D workup helps us to determine how to set the anterior tooth position and contours where series of 16 steps are followed (Figs. 6 & 7). With that data and a properly set of mounted models in centric relation, a 3-D checklist was then performed with the incisal edges waxed in for both the lower anteriors and upper incisors. It should be noted that one of the most important photos of the 21 taken to evaluate her cant was the facebow shot (Fig. 8). This photo helps both the practitioner and the dental lab to both evaluate the cant and make sure that the upper mounted model was correctly oriented. Once this orientation is deemed correct, all future mountings for this case could then be cross-mounted to the pre-op mounted models without the need to take a facebow record again.
Figure 6

Dawson Wizard Photo Analysis of Labial Embrasure.
Figure 7

Dawson Wizard Numbers for Where to Set Incisal Edges and Gingival Margins for Upper Anteriors.
Figure 8

Facebow Retracted Pre-Op Photo.
Based on the correction needed to correct her cant restoratively the only option was to do an additive equilibration with a diagnostic wax build up of all her teeth to a vertical that was opened just enough to allow for the occlusal stability requirements to be met. The lab completed the additive wax up with the pin on the articulator opened just above 1mm from where the maximal intercuspation position of the pre-op models was. The lab was directed to wax up the teeth to the 2-D checklist analyses and instructions as well as to where the incisal edges were waxed too from the 3-D workup. The occlusion for the wax up was finished to centric stops on all teeth in centric relation with shallow anterior guidance. The patient too had final say on the wax-up and minor adjustments needed to be done to the micro and macro esthetics of it before we had her final approval (Fig. 9). In order to avoid excessive length and build up of the right side teeth to correct the cant, a combination of additive build ups on the right combined with minor reductive adjustments on the left posteriors were done to level the incisal and occlusal cant. The issue with this is that while the teeth on her upper right would need minimal occlusal reduction for the crown preps, the teeth on her left posteriors (#2.5, 2.6, 2.7) would need just beyond the 1.5 mm clearance for IPS E-Max crowns to allow the planes to be leveled. The amount of reduction needed would be confirmed and checked with putty stents made from the wax-up. What did work in her favor was that although tooth #2.7 by having reduction beyond 1.5 mm could result in irreversible damage to the pulp, teeth #2.5 and 2.6 already had pre-existing RCTs.
Figure 9

Final Approved Diagnostic Wax Up.
With regards to the structure, bonded IPS E-Max restorations were recommended for all teeth with an attempt to conserve tooth structure with conservative prep designs where possible. For example Teeth 33-42 were restored as hybrid veneer/crown prep design to allow us to preserve as much non-visible lingual tooth structure while providing the ability to lengthen the incisal edges to allow contact with the upper anterior lingual surfaces. Full/Partial Coverage IPS E-Max restorations were chosen not only to strengthen the weakened teeth listed in the findings, but also to allow a predictable and esthetic redefinition of tooth form and length. Another advantage of porcelain restorations given her previous high caries risk was that these restorations are less susceptible to plaque accumulation than gold, resin or even mineralized tooth structures.5
As for her biologic health, the main concern was how to stabilize the horizontal bone loss and prevent increase mobility. It was explained to her that this bone loss can be attributed to both bacteria and possibly occlusal trauma. As stated in an article by Davies et al: “The periodontal ligament physiologically adapts to increased occlusal loading by resorption of the alveolar crestal bone resulting in increased tooth mobility. This is occlusal trauma and is reversible if the occlusal force is reduced.”6 She was advised that by doing both regular periodontal maintenance appointments (four-month intervals recommended) and occlusal equilibration after her definitive restorations were placed, that this would help to prevent further bone loss and mobility. She was advised that three appointments would most likely be needed to equilibrate her restorations to the occlusal stability requirements as previously listed. Also to treat the recession for her upper right teeth, grafting with alloderm was recommended. This would help to create balance for the gingival heights for both her right and left side.
A key point in any treatment plan is to understand the principles needed to develop long-term esthetic and functional stability. Only then can deviations from these smile design concepts occur as the practitioner will know where and to what limits he or she can push the boundaries. For this patient, she had requested multiple times for her teeth to fan out as though they were progressively increasing distal axial inclination when moving posteriorly. This is in violation though of the smile design concept that teeth should have mesial axial inclinations moving posteriorly, with the main purpose being to allow functional forces to be supported optimally by both the buttressing bone and periodontal architecture.7 For this patient we were agreeable to bend this rule by offering a slight distal axial inclination for the crowns, knowing that the final occlusal contacts would be on flat surfaces with the forces directed down the long axis of each tooth.
The final treatment plan sequence that was developed for this patient was as follows:
PHASE 1 – Biologic Health
• Restore Caries tooth #2.7.
• Endodontic Retreatment for #1.2.
• Alloderm Grafting Teeth #1.3, 1.4, 1.5, 1.6.
PHASE 2 – Functional Stability
• Prep All Lower Teeth and Temporize.
• Evaluate Lower Temps for Esthetics, Function and Comfort.
• Occlusal Equilibration – Adjustments to Upper Teeth.
PHASE 3 – Definitive Restorations
• Insert Lower Crowns/Onlays.
• Prep And Temporize Full Arch Upper Teeth.
• Evaluate Upper Temps for Esthetics, Function, Speech and Comfort.
• Insert Upper Crowns/Onlays.
• Dual Arch B-Splint Nightguard.
Treatment Progress And Results
PHASE 1: Treatment was completed first to establish biologic health and to allow healing for the grafting three months prior to PHASE 2 treatment. PHASE 2: Treatment began with the prep of all lower teeth and temporization. Temporaries were splinted in sections and occlusal equilibration was done with the adjustments on the opposing upper arch teeth. The reason for this was that the upper teeth would eventually be prepped and so best to adjust them as opposed to the lower temps that were created to the ideal occlusal and incisal planes as per the wax up. It should be noted that endodontic treatment was needed prior to final crown insertions for teeth #4.6 and 4.7 as they both presented with symptoms after the preps were done. This was not unexpected though given the pre-existing large restorations that were near the pulp for both teeth.
The patient requested that the temps for the lower anteriors be tapered and not “stumpy.” She also did not want a picket fence arrangement of these teeth. Tapered lower anteriors were planned already as per the wax up to allow for eventual centric holding stops against the upper linguals. Modifications were done though to the primary anatomy of the anteriors to create a more tapered look and also to create more irregular appearing incisal edges (Fig. 10). After meeting her esthetic demands and her giving final approval, an impression of the temporaries was taken and sent along with the other impressions to fabricate the lower crowns. The lab was advised to duplicate the temporaries for the incisal edge position and overall contours. Centric relation records were taken with the anterior temps in place first and then creating registrations for the posterior prepped teeth using bimanual manipulation to confirm the correct positioning of the TMJs. The anterior temporaries were left in place to provide a stable anterior stop for the posterior registrations knowing too that the stops were already equilibrated to a centric relation position. After the posterior records were done, they were left in place and a registration of the anterior prepped teeth was done (Fig. 11). All three records were used then to mount the lower prep model. The patient then went to the lab to go over the micro-esthetic details (e.g. incisal embrasures, degree of surface texture, incisal translucency, polychromaticity and overall shade) before the crowns were processed for insertion.
Figure 10

Temp Crowns Lower Arch Evalauting Incisal and Occlusal Planes.
After the lower crowns were inserted, the upper teeth were then prepped at the next visit and temporized. The provisional phase of restorations is the time to develop the functional matrix for the upper anterior teeth.3 The functional matrix is a precise system of developing the optimal anterior tooth contours in relation to the TMJs and Muscles of Mastication. Specific contours developed include centric relation holding stops, labial planes, incisal edge position, lingual contours to facilitate anterior guidance that is in harmony with the envelope of function and lastly the contour from the centric relation stop to the palatal gingival margin. Working out these contours is critical to allowing the lab to fabricate precise contours for the definitive final restorations with minimal chairside adjustments. Similar to the lower anteriors, the upper temporaries needed modifications at her post op evaluation appointment. Specifically composite resin was added to the 11, 21 incisal edges and the buccal surfaces for the 16, 15, and 12. The laterals were also shortened to create her esthetic goal for uneven and more natural incisal edges. Once the temporaries were approved, an impression of them was taken and sent to the lab to duplicate as was previously discussed for the lowers (Fig. 12). The micro-esthetics were then worked out with the lab and the patient and her final approval was given after that for processing the crowns.
Figure 11

CR Bite Registration Lower Crowns.
Figure 12

Upper Temps Lower Crowns.
It should be noted that it was communicated to the lab where the interproximal margins were for the upper teeth relative to the bone (was determined through bone sounding for each location). The reason for this was so that the lab could set the proper gingival height of contact between each restoration to ensure papilla fill and thus no formation of black triangles, which was present pre-operatively between #1.1 and 2.1. Specifically the lab was advised to keep the gingival height of contact at less than 5mm from the bone.8
The final upper arch crowns were inserted and then approved by the patient for final cementation. After all the upper crowns were cemented, two appointments were done after that to finalize her equilibration. Final equilibration was completed with no shift occurring from her centric relation to maximal intercuspation position. Clench and fremitus tests were negative with the exception of slight fremitus for tooth #2.2. This was expected given the pre-op mobility of M2. This was explained to the patient and that we would monitor #2.2 along with her other mobile teeth at her periodontal maintenance and re-evaluation appointments. Equilibration appointments were checked throughout with a tekscan to evaluate digitally that the forces and contacts on teeth were present and as balanced as possible (Figs. 13 & 14). After this last equilibration appointment, a dual arch B-Splint Nightguard was made primarily for retention as the lingual wires were removed during the course of our treatment. Final photos were taken and the patient was pleased with the overall results (Figs. 15-23).
Figure 13

Lower Occlusal Photo — Final with Contacts Marked (Blue for Centric, Red for Excursive).
Figure 14

Upper Occlusal Photo — Final with Contacts Marked (Blue for Centric, Red for Excursive).
Laboratory Perspective
As a laboratory owner, it is always a rewarding experience to be involved with the treatment planning, fabrication and successful outcome of a major reconstructive procedure. Having the laboratory involved in the treatment planning and selection of the appropriate materials for the fabrication process, ensures an emotional involvement with the patient and promotes the communication process with the patient and the clinician. As Dr. Pio Modi has alluded too within the article, everything is in the planning. Establishing the end result both in function and aesthetics both in diagnostics and provisionals are paramount. A canted smile reconstruction requires detailed planning in order to straighten and correct the anterior cant, discrepancies in occlusal tables and gingival architecture. Only with this planning can prep design and the appropriate restorative material selection be made. Lithium Disilicate (IPS e-max) was selected as the material of choice due to its all around adaptability to form, function and aesthetics.
Planning of the occlusion and function ensures a longer viability of the restorations. Developing the occlusal stops as seen in Figures 13 and 14 on mostly monolithic material occlusal surfaces, helps support the compressive forces found intra-orally. Doing this will allow for a radio-lucent material to be used (Lithium Disilicate) as opposed to a radio-opaque material (Zirconium Oxide). Using restorative radio-lucent materials have many advantages to the patient and the clinician for any future diagnosis and treatment which may occur. Layering of aesthetic ceramics outside of the loading contacts is made for oral harmony and to achieve all of her desired esthetic results (Figs. 15-24).
Being involved with both the patient and Dr. Modi throughout the planning and treatment seen in this article, not only ensured a better communicative process, but it promotes education, professionalism and an enduring satisfaction for all within the dental laboratory. Trevor Laingchild would like to thank all his staff at dentalstudios Yorkville Burlington for their total professional commitment to the care of this patient.
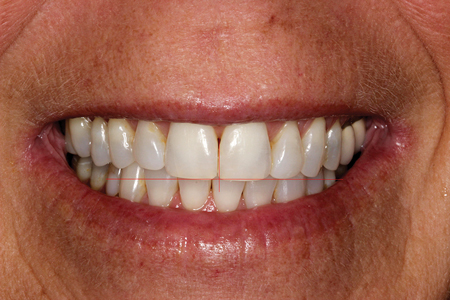
Figure 15

Close Up Smile Final Crowns.
Figure 16

Upper Crowns Final Facebow Retracted Shot.
Figure 17

Tipped Down Smile — Positions of Upper Anterior Crowns to Vermillion Border.
Figure 18

Lips at Rest. Around 3mm of Central Incisor Display.
Figure 19

Close Up Retracted Teeth Apart Final Crowns.
Figure 20

Close Up Retracted Teeth Together Final Crowns.
Figure 21

Right Retracted Teeth Together.
Figure 22

Left Retracted Teeth Together
Figure 23

Close Up Teeth Upper Anteriors Central Shot.
Figure 24

Final Full Face Smile Photo.
Conclusion
As much as we may want to go straight to the veneer preps and insertions for our cosmetic cases, by not doing a thorough treatment plan to address both the esthetic demands and also what is needed to achieve long-term stability, imminent failure may occur. As Dr. Peter Dawson has stated in his lectures and textbooks: “90% of cases that fail, fail not during the restorative phase but in the treatment planning phase. Failing to plan is planning to fail.” Working with an exceptional lab technician and group who understand the esthetic and functional goals of the case while also being able to manage and deliver the micro-esthetic demands of the patient is crucial to delivering a favorable cosmetic result. And by going through a systematic 4-stage evaluation for finishing a case including a) Functional-Esthetic Evaluation using 2-D and 3-D workups b) Diagnostic Wax-up c) Provisional Prototype Restorations to work out the functional matrix and overall occlusion and then finally d) Definitive Restorations, this will ensure both long term predictability and an overall esthetic success for both the patient and practitioner.9 OH
Oral Health welcomes this original article.
Acknowledgement
There were many to thank for all their hard work and efforts with this case. A special thanks to Mr. Trevor Laingchild, RDT, AAACD, Mr. Americo Henriques and Mr. Cristian Angelescu of dental studios Yorkville Burlington, Dr. Greg Dugas, BSc, DDS, MSc (Ortho), FRCDC, and to the team at our office, especially Ms. Kelly DeKruyf (CDA II), for all their help with this treatment.
References
- Kokich VO Jr, Kiyak HA, Shapiro PA. Comparing the perception of dentists and lay people to altered dental esthetics. J Esthet Dent. 1999;11:311-324.
- Olivares,A. Vicente A. Jacobo C et al. Canting of the occlusal plane: Perceptions of dental professionals and laypersons. Med Oral Patol Oral Cir Bucal. 2013 May 1;18 (3):e516-20.
- Dawson PE. Functional Occlusion: From TMJ to Smile Design (Ch. 7). St. Louis: Mosby; 2007
- American Academy of Cosmetic Dentistry (AACD). Contemporary Concepts in Smile Design: Diagnosis and Treatment Evaluation in Comprehensive Cosmetic Dentistry. Madison (WI): AACD; 2014
- Magne P. Belser U. Bonded Porcelain Restorations in the Anterior Dentition: A Biomimetic Approach (Ch. 4). Germany: Quintessence 2002
- Davies SJ Gray RJM Linden GJ James JA. Occlusion: Occlusal Considerations in Periodontics. British Dental Journal 191, 597-604 (2001)
- Dewel BF. Clinical Observations on the axial inclination of teeth. Am J Othod. 1949 Feb;35(2): 98-115.
- Tarnow DP, Magner AW, Fletcher P. The effect of the distance from the contact point to the crest of bone on the presence or absence of the interproximal dental papilla. J Periodontol. 1992 Dec;63(12):995-6.
- Cranham JC. Finlay SW. Timeless Principles in Esthteic Dentistry. Journal of Cosmetic Dentistry. 2012 vol. 28 issue 3: pp 67-68.
 Dr. Pio Z. Modi, B.Sc. DDS, graduated from the University of Toronto Dental School in 2001. He then went on to complete a General Practice Residency at Miami Valley Hosptial in Dayton, Ohio. He is the Associate Director of the Ambassador Program for The Dawson Academy and the Dawson Study Club leader for the Toronto Chapter. He maintains a private practice in Brantford, Ontario with a specific focus on Full Arch Restorative, Cosmetic and Implant/Surgical Dentistry. He is a member of the American Academy of Cosmetic Dentistry, the Canadian Academy of Restorative Dentists and Prosthodontists, and the Academy of General Dentistry.
 Trevor Laingchild’s sense of adventure has taken him on an international road in his profession. After formal Dental Education in London, England, he managed a Dental Laboratory in Germany and served as Chief Dental Technician for an American Hospital in Saudi Arabia. Further experiences included, expanding his technical horizons whilst working in Norway, Scandinavia. As a Registered Dental Technologist, he currently owns and operates dentalstudios with locations in Yorkville and Burlington, both in Ontario, Canada. Trevor is an Accredited Member and an Examiner within the American Academy of Cosmetic Dentistry and a Certified LVI Master Aesthetic Technician. Trevor has held numerous Editorial positions, including Editor-In-Chief on several International Dental Journals, where he has been published numerous times. These experiences have enabled Trevor to lecture and teach both internationally and throughout North America.
RELATED ARTICLE: Creative Smile Design: The Art Of Temporization
Follow the Oral Health Group on Facebook, Instagram, Twitter and LinkedIn for the latest updates on news, clinical articles, practice management and more!


