
Introduction
Few restorative situations provide more stress for a functionally driven esthetic dentist than one involving a missing canine. A missing cuspid creates not only an esthetic issue, but a functional complication, as well. While group function may be viewed as a viable alternative in the absence of a canine, anterior and cuspid guidance is undisputed as the preferred functional relationship for natural dentition. Improper guidance can lead to muscle hyperactivity, pathologic wear, and symptoms of temporomandibular joint disorder.1 A great opportunity for improvement exists in restoring a missing canine, but great care must be taken to avoid functional risks.
Case Study: Diagnosis
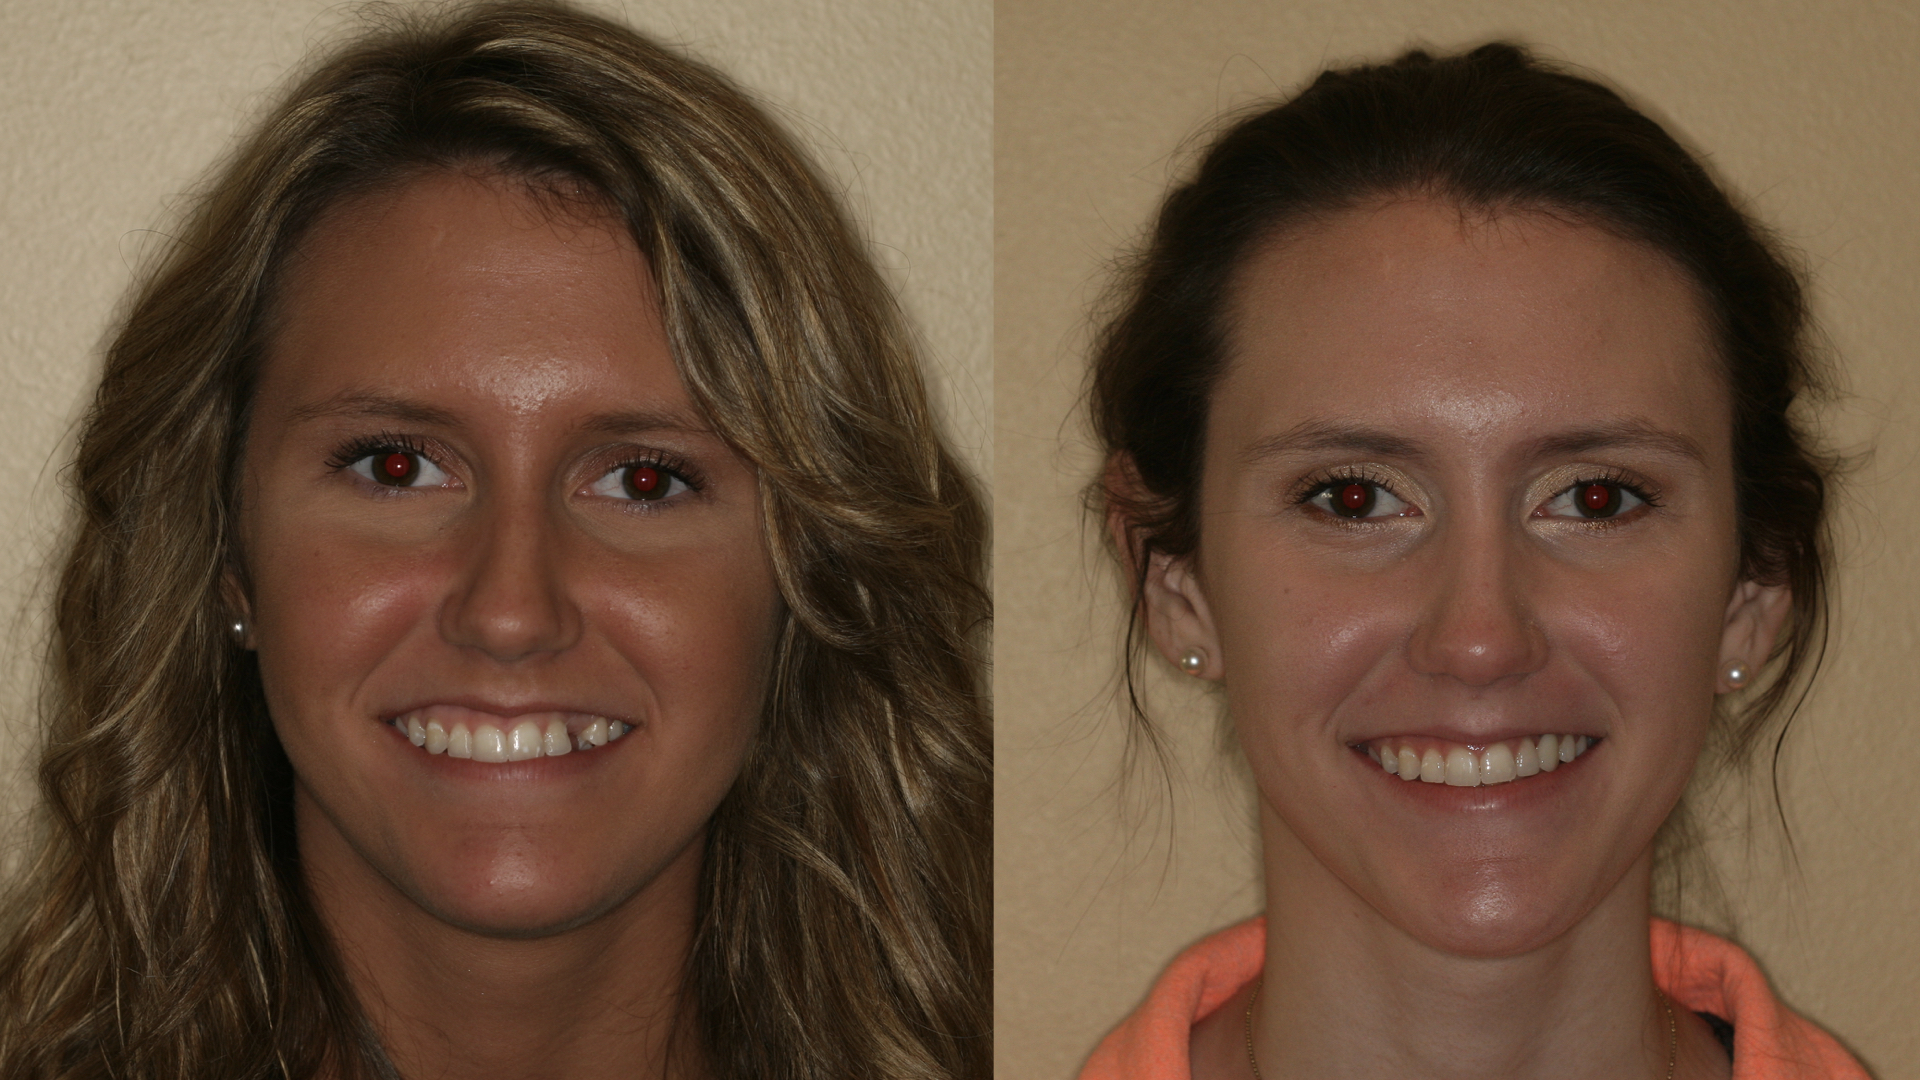
An 18-year-old female in excellent medical and dental health presented for restorative consultation stating she maintains annual dental cleanings, has whitened her teeth in the past, and has just had her braces removed following completion of orthodontic treatment. The patient stated that her upper left permanent canine (#11) had been extracted in her youth due to malpositioning of the tooth. As she grew older, the patient had become unhappy with the alignment of her teeth, so she and her father sought out an orthodontist and requested treatment. Prior to initiation of orthodontic treatment, the orthodontist had discussed the patient’s desires for handling her missing canine, and she stated her intention to eventually restore the missing tooth. Upon completion of her orthodontic treatment, the patient asked for a referral to a restorative dentist and was introduced to our office. (Fig 1). The patient was wearing an orthodontic retainer with a prosthetic #11 attached to the acrylic palate (Fig. 2). She was particularly interested to learn her options for restoring her missing cuspid. Options for restoring the patient’s missing canine were discussed including a removable prosthesis, various designs of fixed partial dentures, or the option of an endosseous dental implant. She expressed her desire to have a beautiful, “natural” smile without pursuing additional orthodontic or periodontal options outside of restoring #11.
Fig. 1
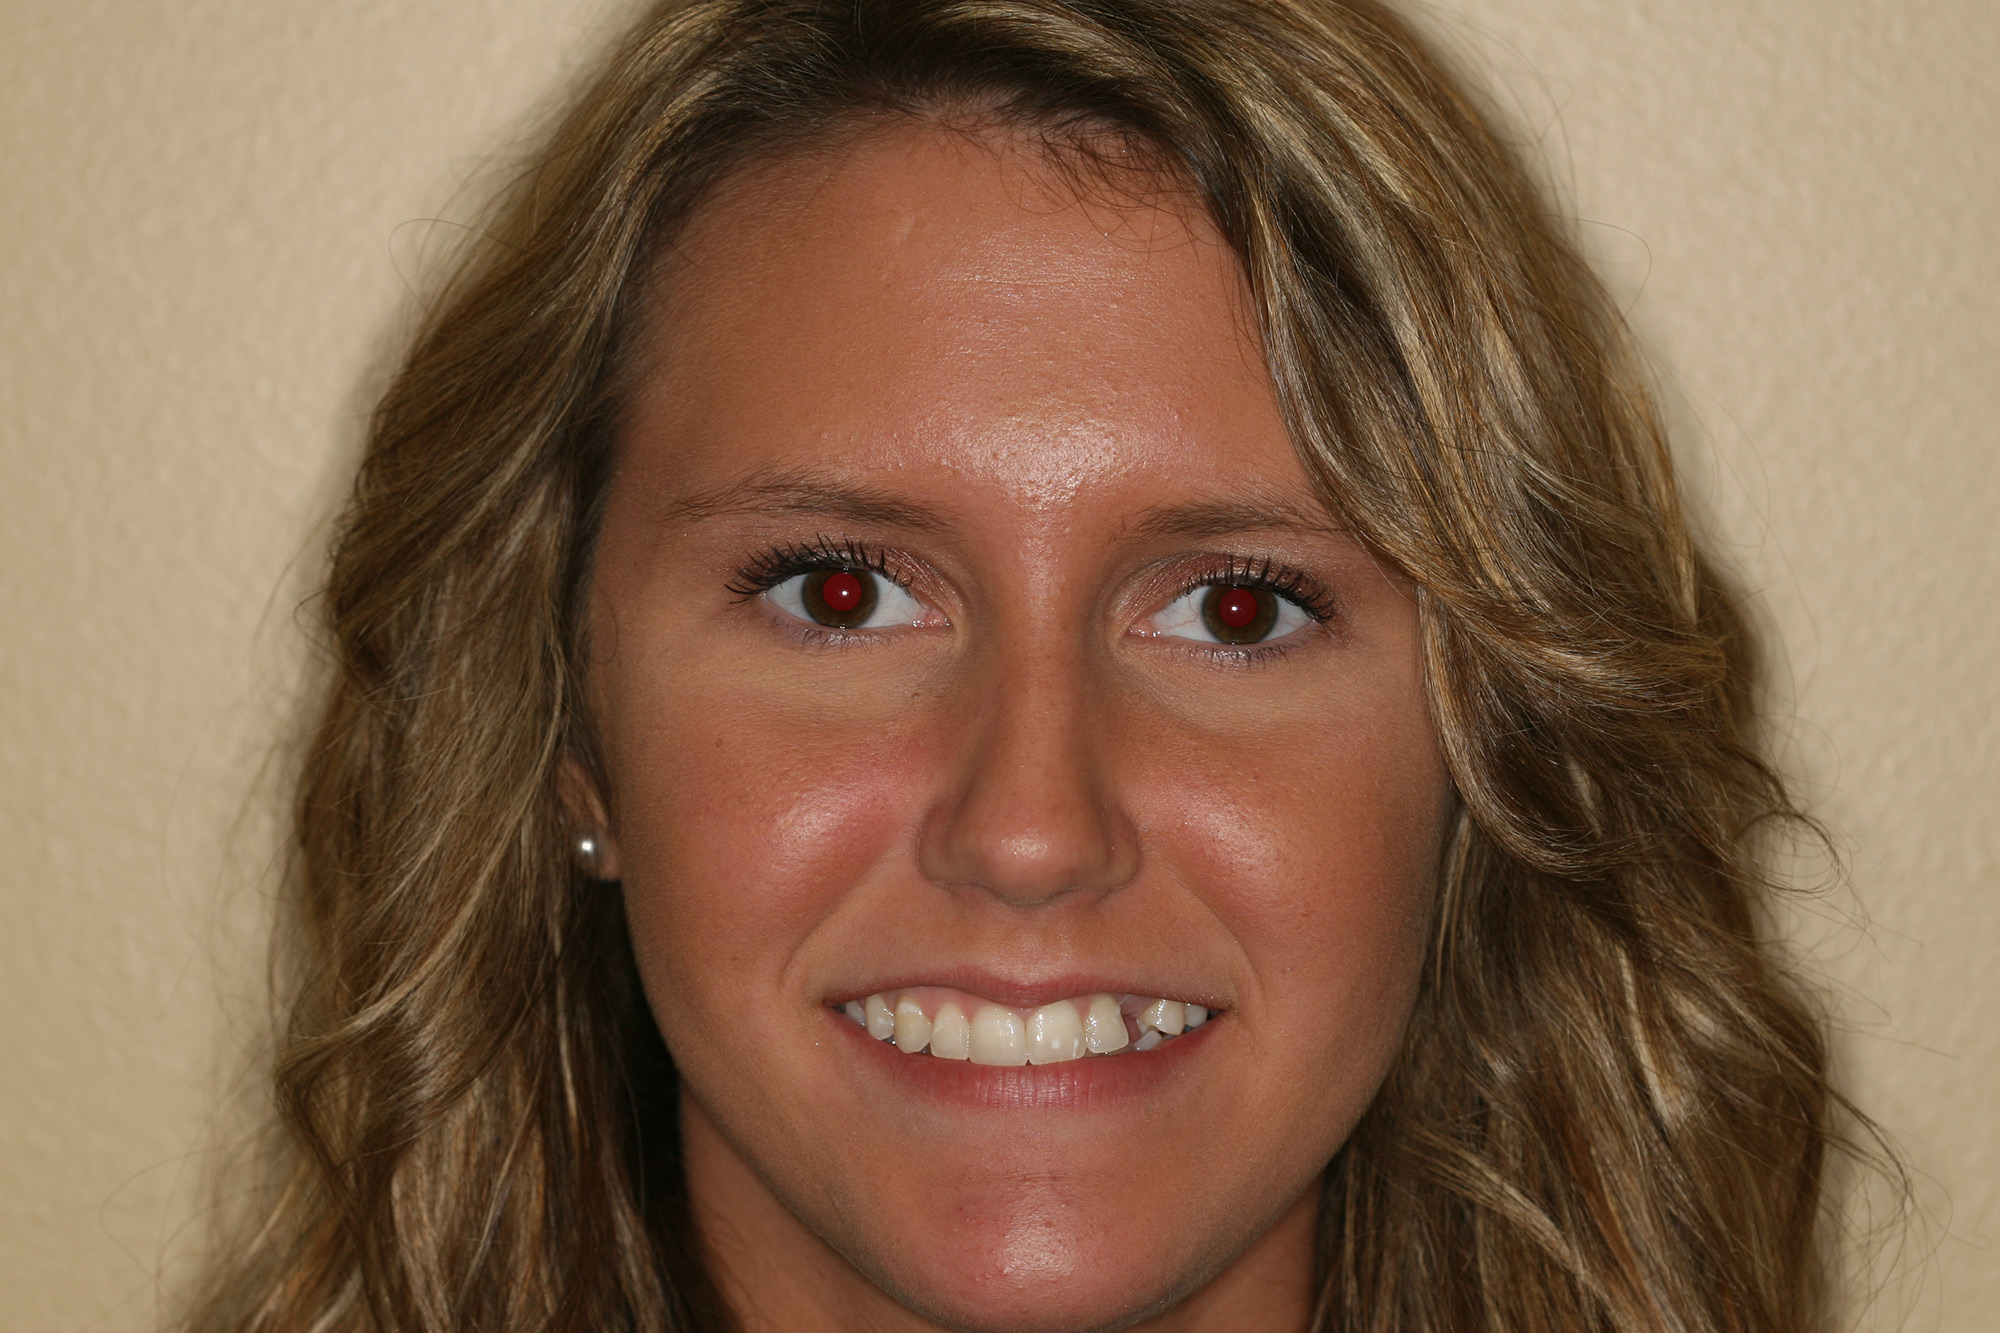
Fig. 2

A panoramic radiograph was made (Fig 3). Other than generalized blunting of tooth roots being noted, there were no significant pathologic concerns found. Adequate space for restoration of the patient’s upper left canine with an endosseous implant was observed. Clinical examination revealed a Class I dental relationship with no significant occlusal interferences. The patient exhibited a maxillary cant and some facial asymmetry. Absence of the maxillary left osseous canine eminence was noted, as well as less than optimal width and height of bone in the area of #11. The angulation of the clinical crown of the patient’s maxillary left lateral incisor was noted to be divergent from her midline (Fig. 4). Several areas of gingival asymmetry were also noted.2 Evidence of mild wear was found on the patient’s anterior teeth, however, the patient exhibited no symptoms of any temporomandibular disorder and appeared asymptomatic during a TMJ evaluation. The patient was then referred to an oral surgeon for a surgical consultation.
Fig. 3
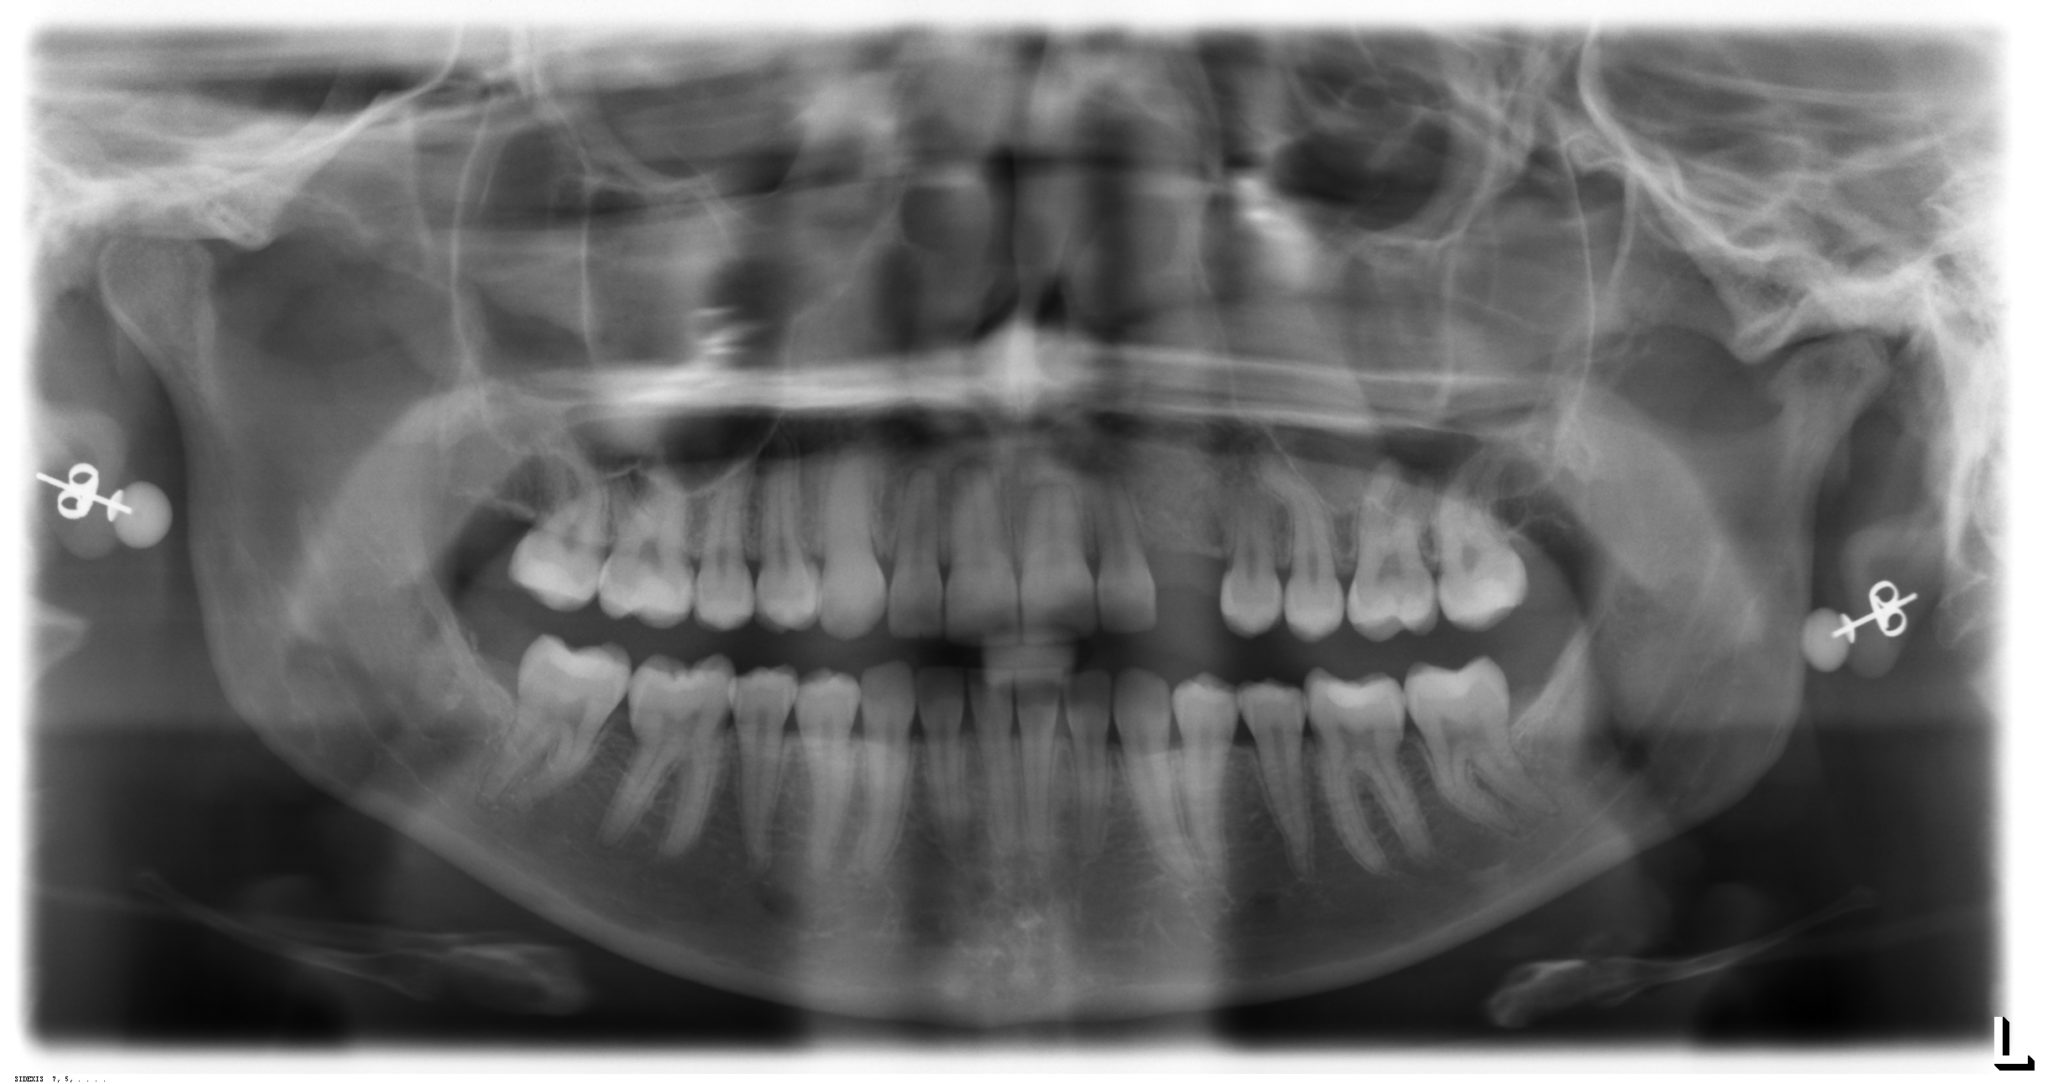
Fig. 4

Treatment Plan
After an interdisciplinary case conference between the oral surgeon and the restorative dentist, the patient was asked to return for a planning appointment.2 Following discussion of esthetic restorative options for her smile, the patient elected to pursue restoration of tooth #11 with an endosseous implant and treatment of tooth #10 with a minimal preparation porcelain veneer. The patient emphasized that a natural, conservative, long-lasting result was her primary goal. Proper care for the future restorations was discussed including nightly wear of a hard-protective occlusal guard/orthodontic retainer, and the importance of optimal maintenance including regular cleanings and examinations was stressed.3
A comprehensive set of records was made of the patient’s preoperative condition including a detailed lab prescription to allow for proper communication between the dentist and the ceramist. Honigum Pro (DMG America; Ridgefield Park, NJ) polyvinyl siloxane impressions were made of both arches, and study models were fabricated in die stone.3,4,5,6 Occlusion was recorded with a Futar D (Kettenbach; Eschenburg, Germany) polyvinyl siloxane bite registration and a facebow transfer. Digital photographs documenting the preoperative shade, texture, and shape of surrounding teeth were made.3,4,6,7 All records were sent to the lab where the study models were mounted on a Stratos 2000 semi-adjustable articulator (Ivoclar Vivadent; Amherst, NY), and teeth #10 and 11 were waxed to full contour. Careful attention was given to the incisal and lingual contours to ensure that they conformed to the patient’s anterior and canine guidance. A Sil-Tech (Ivoclar Vivadent; Amherst, NY) polyvinyl siloxane stent was then formed to fabricate an incisal reduction matrix. A Biocryl X (Great Lakes Dental Technologies; Tonawanda, NY) radiopaque acrylic surgical guide was also fabricated and delivered to the patient’s oral surgeon to assist in implant placement.
Description of Treatment
The patient was able to view and approve the diagnostic wax up presented on mounted study models prior to any preparation of her #10 tooth.3,4 Under color corrected lighting, digital photographs were made from multiple angles with at least two shade tabs per photograph to assist in shade matching and color mapping (hue, chroma, and value) prior to any dehydration of the teeth (Fig. 5).3,4 A shade map was also produced by the dentist to be used as a complimentary guide for the ceramist. The patient was then referred back to the oral surgeon for implant placement surgery.
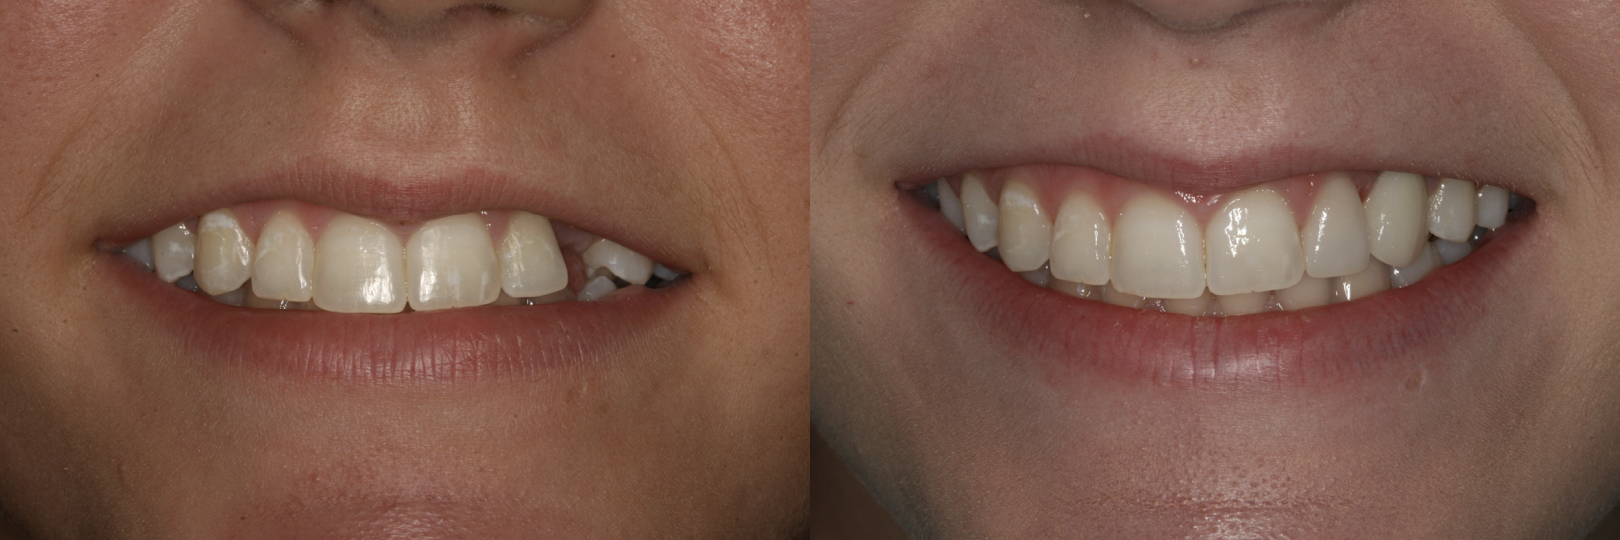
Fig. 5

Profound anesthesia of the #10/11 area was obtained through the use of topical benzocaine and lidocaine HCl 2% and 1:100,000 epinepherine injection (Septodont; Lancaster, PA). The patient’s lips were adequately and comfortably retracted for the entire procedure using an Optragate lip retractor (Ivoclar Vivadent; Amherst, NY).
Initial tooth preparation was completed with a 2000.10 Two Striper super-coarse grit diamond bur (Premier Dental; Plymouth Meeting, PA) in a high-speed handpiece under copious water spray. Adequate incisal (1.5 mm) and facial (.75 mm) porcelain thickness needed to provide room for layering, slight color change, and addition of incisal effects in the porcelain was confirmed with the lingual and incisal polyvinyl siloxane stent.3,4 A well defined cervical margin was established with a 703.8F diamond bur (Premier Dental; Plymouth Meeting, PA) to provide a positive veneer stop with a smooth, cleansable, precise porcelain to tooth interface while allowing for development of proper emergence profile.3,4 Abrasive discs (Cosmedent Inc.; Chicago, IL) in a slow speed handpiece were used to eliminate any sharp angles that could provide for internal stress points.3,4 Photographs of the preparation were made and a preparation shade of st9 (Ivoclar Vivadent; Amherst, NY) was recorded (Fig. 6).
Fig. 6

The patient’s teeth were cleaned with Consepsis chlorhexidine (Ultradent Corp; West Jordan UT). A polyvinyl siloxane stent made from the diagnostic waxup was filled with B1 Luxatemp Ultra (DMG America; Ridgefield Park, NJ) and placed over the prepared tooth and implant placement site and allowed to cure. After approximately one-minute, the stent was gently removed with the provisionals remaining inside. The provisionals were removed from the stent, trimmed, ovate pontic formed, and then seated with Optibond FL resin (Kerr Corp; Orange, CA) bonding the pontic to the mesial of tooth #12. The lingual aspect of the provisionals were reinforced with B1 Luxaflow composite (DMG America; Ridgefield Park, NJ). They were cured for 30 seconds on each tooth with the Bluephase LED curing light (Ivoclar Vivadent; Amherst, NY). Excess material was removed with a #12 scalpel blade, and the provisionals were smoothed and finished with abrasive discs (Cosmedent Inc.; Chicago, IL) and a rubber cup polisher (Cosmedent Inc.; Chicago, IL). Occlusion was verified and checked and the patient was appointed for a post-operative check twenty-four hours later.
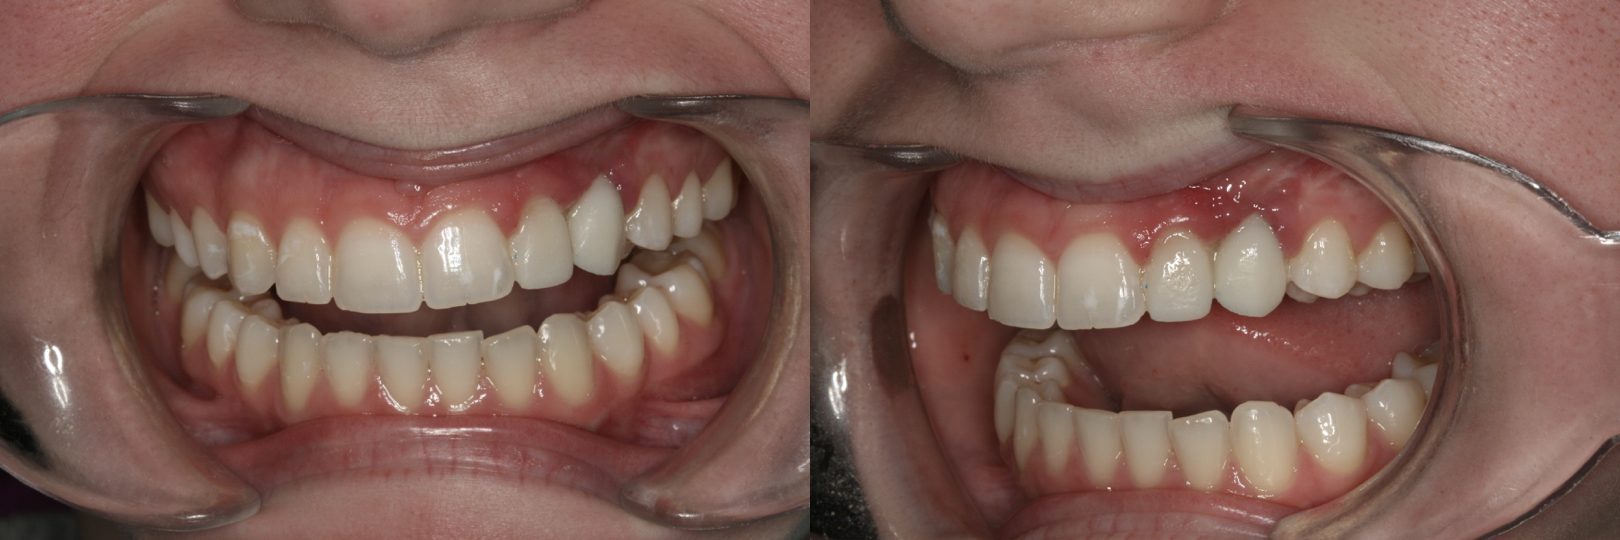
The 24-hour post-operative check appointment was particularly important because it allowed the patient to express feedback based on self-analysis of the proposed shapes and contours of the provisionals (Fig. 7). The patient reviewed and approved the shape of her provisional restorations and the shade tabs selected at the prior appointment. Proper occlusion and anterior guidance were evaluated confirmed utilizing articulating paper and shim stock. Photographs of the approved provisional restorations and shade tabs were made. Other provisional records were made including a Futar D stick bite (Kettenbach; Eschenburg, Germany) in centric occlusion and a Honigum Pro polyvinyl impression (DMG America; Ridgefield Park, NJ) of the approved provisionals. All records were disinfected and sent to the ceramist accompanied by a completed laboratory prescription and all photographs taken to this point. The ceramist was instructed to use the impression of the approved provisionals as a guide for the final shape, size, and contour of the porcelain restorations. The patient was instructed to return to the oral surgeon for implant placement.
Fig. 7
After placement of a NobelActive NP 3.5×13 implant (Nobel Biocare; Zurich, Switzerland) with a cover screw and osseointegration confirmed by the oral surgeon after three months of healing, the patient was referred back to commence implant restoration. During the healing phase the patient had continued to wear the bonded provisional (Fig. 8). The provisional was removed to visualize the implant. The cover screw was removed and an open tray style impression coping was screwed into the implant. A check film radiograph was made to confirm accurate and positive seat of the impression coping. Expa-syl gingival retraction paste (Acteon Group; Mèrignac, France) was expressed around the gingival margins to provide hemostasis and adequate tissue reflection. After three minutes, the paste was rinsed away with a copious, forceful water spray. The preparation and impression coping were dried and a master polyvinyl impression was made with Honigum Pro Light and Heavy impression material (DMG America; Englewood, NJ). Following set of the polyvinyl material, the impression coping was unscrewed and removed as part of the master impression. The implant cover screw was replaced and the provisional was once again bonded into position. A Futar D (Kettenbach; Eschenburg, Germany) stick bite of the teeth in centric occlusion was made and photographed.
Fig. 8
Laboratory Phase
During the final provisional phase, the patient was able to further reevaluate the provisional restorations. If she had requested any changes, they could have been communicated to the ceramist during this period. No changes were requested during this time.
On the ceramist’s receipt of the case, the records were reviewed and the material choice on the prescription was confirmed during a telephone conversation.2 Shape, shade, and characterization were discussed again and finalized in the planning stage. Producing the patient’s desired shade choice dictated e.Max MTBL2 blocks (Ivoclar Vivadent; Amherst, NY) to be milled as a base shade for the veneer and implant crown. Cutback and layering of the milled veneer and implant crown was planned to develop restorations with the requested moderate incisal character and natural gingival staining with a lightly textured, polished gloss finish. Zirconia bonded to a titanium base was used to fabricate a custom implant abutment.
Master full arch working die models were fabricated of the prepared tooth and the implant (with a lab analog) and mounted on a Stratos 2000 semi-adjustable articulator (Ivoclar Vivadent; Amherst, NY) during the laboratory phase. The custom zirconia abutment was fabricated and tried on the model for appropriate emergence profile. Marginal accuracy of the full contour milled veneer and implant crown was then confirmed on the physical die models. Cutback of each full contour milled unit was performed as needed to allow for hand layering of IPS e.Max Ceram porcelain (Ivoclar Vivadent; Amherst, NY) to develop realistic translucency, depth, and character. Following layering and firing, each unit was hand finished and polished. The ceramist meticulously confirmed fit, esthetics, and function. The intaglio of each porcelain unit was lightly sandblasted and then acid etched for one-minute with 9.5% HCl (Keystone Industries; Gibbstown, NJ). The veneer, crown, and abutment were then steam cleaned and carefully packaged for return to the dentist ready for the seat appointment.
Cementation
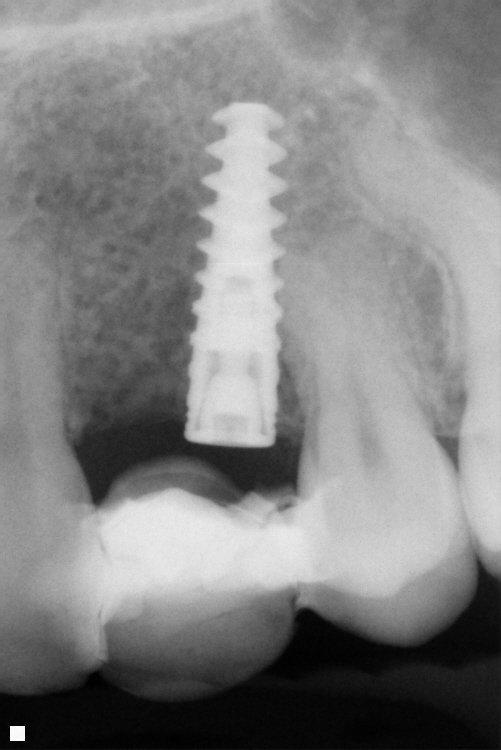
On return from the ceramist, the porcelain restorations and abutment were inspected on the dies for marginal fit and on solid models for proper interproximal contacts. Profound anesthesia was obtained through the use of lidocaine HCl 2% and 1:100,000 epinepherine injection (Septodont; Lancaster, PA). An Optragate lip retractor (Ivoclar Vivadent; Amherst, NY) was placed to assist in isolation. The provisional restoration and cover screw were removed, and the preparation and implant interface were cleaned to remove any residual resin temporary material or debris. The implant abutment was seated using a DuraLay acrylic (Reliance Dental Manufacturing LLC; Alsip, IL) seating jig (Figs. 9 & 10). Positive seat was confirmed with a radiograph prior to torquing the abutment to place (Fig. 11). The seated abutment was then torqued to 35Ncm per manufacturer’s instructions. The porcelain restorations were then tried into the patient’s mouth and evaluated for fit and esthetics (first individually, then together). The patient was then allowed to view and approve the esthetics of her smile in a hand mirror.8
Fig. 9

Fig. 10

Fig. 11

The approved restorations were removed from the patient’s mouth and carefully cleaned with Ivoclean cleaning paste (Ivoclar Vivadent; Amherst, NY) to remove any possible contamination. They were rinsed, dried, and Monobond silane coupling agent (Ivoclar Vivadent; Amherst, NY) was applied to the intaglio.9 Following one minute they were air dried, and a thin coating of All Bond Universal bonding agent (Bisco; Schaumberg, IL) was applied to the inside of the veneers and air thinned. Vitique Clear Veneer Cement (DMG America; Ridgefield Park, NJ) was then applied to the restorations and they were immediately placed into a ResinKeeper light-safe box (Cosmedent Inc.; Chicago, IL) to prevent polymerization of the resin.3,4
The implant abutment was re-torqued to 35Ncm to compensate for any possible settling and teflon tape was placed in the implant screw access hole and covered with flowable composite. The abutment was cleaned with Ivoclean cleaning paste (Ivoclar Vivadent; Amherst, NY) and the #10 preparation was acid etched for 15 seconds with 35% Select HV phosphoric acid gel etchant (Bisco; Schaumberg, IL) followed by rinsing with a copious air and water spray.3,4 The #10 preparation was lightly dried, but not dessicated while the abutment was dried thoroughly.3,4 A thin layer of Z-Prime Plus (Bisco; Schaumberg, IL) zirconia primer was applied to the #11 abutment and air dried. Two coats of All Bond Universal bonding agent (Bisco; Schaumberg, IL) were applied to both #10 and 11 and agitated for 20 seconds prior to air thinning to evaporate solvents. Tooth #10 and abutment #11 were cured for 20 seconds with a Bluephase LED curing light (Ivoclar Vivadent; Amherst, NY). The veneer and crown were then removed from the light-safe box and seated on their respective preparations. Excess cement was removed with a Regular Microbrush (Microbrush International; Grafton, WI) and they were tacked into place for five seconds each with the curing light.10 Additional excess was removed gently with a scaler, floss was passed through the contacts in the apical direction only, and the restorations were then cured fully for an additional 30 seconds each.10 The margins were then inspected and any excess cured cement was removed with a #12 scalpel blade.10 Interproximal areas were cleaned with Epitex finishing strips (GC America; Alsip, IL). DeOx oxygen inhibiting gel (Ultradent Corp; West Jordan, UT) was expressed around all margins and the restorations were cured an additional 10 seconds to finalize polymerization.3,4,9 The lingual aspect was then polished with diamond paste and Flexibuff polishers (Cosmedent Inc.; Chicago, IL) in a slow speed handpiece and isolation was removed.
The patient’s occlusion was checked and smooth, proper contacts were verified with dental floss. Post-operative home care instructions were given and the patient was scheduled for a follow-up appointment for radiographic and photographic documentation as well as a follow-up check for function and esthetic evaluation.
The patient returned the following day. Her functional occlusion was evaluated, and her teeth were inspected for any residual cement. Maxillary and mandibular alginate impressions were made along with a polyvinyl siloxane bite registration for fabrication of a maxillary full arch bite guard/orthodontic retainer for nighttime wear.3 Post-operative home care instructions were given and the patient was scheduled for a follow-up appointment for radiographic and photographic documentation, a final check for function and esthetic evaluation, and delivery of the patient’s maxillary appliance (Figs. 12 & 13).3
Fig. 12

Fig. 13
Conclusion
A missing permanent canine presents a complex esthetic and restorative problem. Meticulous attention to both function and esthetics are essential to achieving restorative success. With careful planning and precise execution, contemporary dentistry is able to deliver beautiful, functional, and long-lasting results that exceed patient expectations (Figs. 14 & 15).
Fig. 14

Fig. 15
Oral Health welcomes this original article.
Acknowledgements: The author would like to express sincere appreciation to Wayne B. Payne, MDT, AAACD and Tyler Payne for their technical expertise and beautiful porcelain work.
References
- Dawson, Peter E. Evaluation, Diagnosis, and Treatment of Occlusal Problems. The C.V. Mosby Co.: St Louis, MO; 1989.
- American Academy of Cosmetic Dentistry. Diagnosis and Treatment Evaluation in Cosmetic Dentistry: A Guide to Accreditation Criteria. Madison (WI): The Academy; 2001.
- Dawson, Peter E. Evaluation, Diagnosis, and Treatment of Occlusal Problems. The C.V. Mosby Co.: St Louis, MO; 1989.
- Magne, Pascal. Bonded Porcelain Restorations in the Anterior Dentition A Biomimetic Approach. Quintessence Books: Chicago, IL; 2002.
- Gurel, Galip. The Science and Art of Porcelain Laminate Veneers. Quintessence Books: Chicago, IL; 2003.
- Rufenacht CR. Fundamentals of Esthetics. Quintessence Books: Chicago, IL; 1992.
- Fradeani, Mauro. Esthetic Analysis A Systematic Approach to Prosthetic Treatment Volume 1. Quintessence Books: Chicago, IL; 2004.
- Goldstein, Ronald E. Esthetics In Dentistry. B.C. Decker, Inc.: Hamilton, Ontario; 1998.
- Flax, Hugh. Smile Enhancement With Laser Technology- Predictable and Esthetic: A Case Report. The Journal of Cosmetic Dentistry. 23(1): 92-98, 2007.
- Touati B, Quintas AF. Aesthetic and Adhesive Cementation for Contemporary Porcelain Crowns. Practical Procedures in Aesthetic Dentistry. 13(8): 611-620, 2001.
About the Author
 Dr. Rowe maintains a private practice dedicated to excellence in general, cosmetic, and complex restorative dentistry in Jonesboro, Arkansas. He is an Accredited Member of the AACD, past member and Chairman of the ABCD, and has served as the AACD’s Chairman of Accreditation. He also serves as an Accreditation Examiner for the AACD. Dr. Rowe has been awarded Fellowships in the International College of Dentists and the Pierre Fauchard Academy. He is a graduate of the University of Tennessee College of Dentistry, and is a formally trained artist having graduated from Washington and Lee University with a BA degree in Studio Art. Dr. Rowe enjoys sharing his passion for cosmetic dentistry materials and techniques, lecturing nationally and internationally, and can be contacted at info@rowesmiles.com or 870.932.4126.


