
ABSTRACT
Quite often patients have the desire to improve their oral care and appearance but don’t know where to start. Compounding the problem is that when the patient is seeking solutions, they are often turned away or trivialized because their practitioner does not have the knowledge or skill to treatment plan the patient’s needs or is not inclined to investigate and present options for the patient, as was the case with this lady. Her dental transformation began when she was referred to a periodontist who had the vision to refer her to an orthodontist and restorative dentist who shared his outlook on the possibilities for the outcome of this case. Through methodical planning in a sequential fashion and ongoing communication between team members resulted in a final result that exceeded the patient’s dreams. It should be noted that a case of this magnitude could not have been accomplished without the patient’s steadfast resolve and determination to follow through with all appointments over the two-year treatment period.
OVERALL PLAN
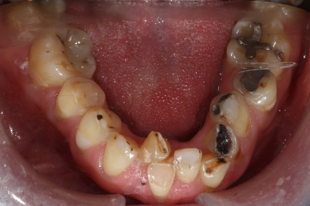
The patient, a 56-year-old female was referred for overall assessment to determine a predictable treatment plan to create an ideal smile that “would make the patient proud of her teeth again”. Due to complications from Cerebral Palsy, the patient is confined to a wheel chair for her mobility. However, once seated in a dental chair, she was extremely cooperative and there were no limitations to performing her treatment. A thorough discussion with the patient confirmed the referring periodontist’s information. The patient was highly motivated to undertake the recommended treatment sequence and was aware that the length of time of treatment was approximately two years. After listening to the patient’s struggles to find someone who would correct her smile without removing all her teeth, I was comfortable moving forward as part of this team (Figs. 1-7). The sequence of events over the next 24 months were as follows;
Fig. 1

Fig. 2

Fig. 3

Fig. 4
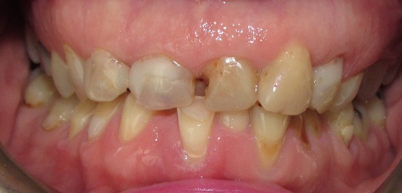
Fig. 5
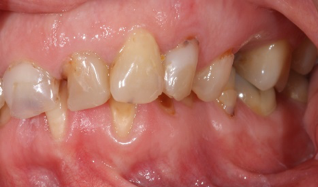
Fig. 6
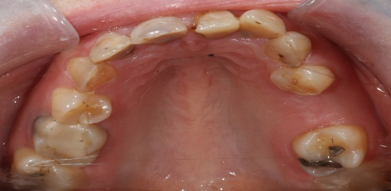
Fig. 7
1) Initial/pre – orthodontic restorative treatment to allow for orthodontic treatment to occur without fear of further destruction of the dentition.
2) Once the dentition was stabilized, the patient began orthodontic treatment.
3) During this phase the patient was on a strict three-month recare schedule alternating between the general dentist and periodontist.
4) Once the orthodontic/retentive phase was complete, the patient underwent maxillary/mandibular crown lengthening to allow for proper heights and contours of teeth.
5) After eight to 10 weeks of healing, 26 full coverage all ceramic restorations were prepared, fabricated and seated.
6) Upper and lower Essix retainers were fabricated to act as retention with alternating three-month recare appointments between the restorative dentist and periodontist.
PRE-ORTHODONTIC RESTORATIVE TREATMENT
As the orthodontic procedure would take between 18-24 months it was imperative that all necessary restorations were complete prior to orthodontics to insure uninterrupted treatment. As such the following treatment was performed;
a) Root canal therapy on tooth #11
b) Post and core restorations and temporary crowns cemented with permanent cement on teeth #’s 16, 12, 11, 21, 23
c) Composite restorations to restore teeth #’s 32, 33, 42, 44 Once complete the patient was referred to the orthodontist for treatment.
ORTHODONTIC PHASE
The goals of orthodontic treatment were aimed at ensuring that the patient’s final restorative outcome would be as minimally invasive as possible requiring the least amount of reduction in tooth structure while ensuring optimal aesthetic and functional outcomes.
Treatment objectives included aligning the dentition (especially the severely crowded lower anterior), expanding the collapsed and lingually inclined arches to fill the buccal corridors and provide a wider final smile, opening up the deep bite and improving the upper dental midline.
A decision was also made to try and reduce or completely close the space for the missing upper left premolar to prevent the need for prosthetic replacement and additional cost and treatment to the patient. Closing this space also facilitated improvement of the skewed upper dental midline. Upper and lower traditional twin fixed appliances (American Orthodontics .022 Mini Masters) were placed with self-ligating Empower (American Orthodontics) appliances placed lower 3-3 to facilitate early complete engagement of all of the rotated incisors except the severely lingually displaced 42. Triad buildups were placed on the upper first premolars to facilitate bite opening mechanics. Initial archwire sequencing in both arches was 0.12 Niti, 18 Niti, 19×25 Niti. Once in rectangular archwires, an upper archwire was placed in the lower arch to facilitate expansion while coiling open space for the blocked out 42. Once space was created, the wire was dropped back to a 12niti to engage the 42 and align it with rest of the arch. An 18×25 SS wire was placed in the upper arch for control during space closure in the upper left and to begin detailing the gingival margins of the upper incisors. Elastics were used in a Class 3 pattern on the right (upper right 6 to lower right 3) and Class 2 on the left (upper left 3 to lower left 6) to improve the midlines and buccal segment relationships (Figs. 8-12).
Fig. 8

Fig. 9

Fig. 10

Fig. 11

Fig. 12

The patient was referred back to both the periodontist and restorative dentist to confirm that the final orthodontic set up would allow them to execute their treatment plans successfully. Once approval of the set up was obtained, appliances were removed and the patient was placed in temporary upper and lower Essix retainers. Overall treatment time was 21 months (Figs. 13-17).
Fig. 13

Fig. 14

Fig. 15

Fig. 16

Fig. 17

After orthodontic treatment, impressions were taken to make diagnostic models. These impressions were poured and mounted in an articulator. Due to erosion the patient had short clinical crowns which made them look wide and short. Our plan was to open the bite to help gain better proportions and to compensate for the erosion. When the models were mounted for review, we were able to see the patient was showing varied gingival heights on their maxillary anterior teeth (Fig. 18). It was decided that a gingivectomy would be performed to balance the gingival heights in the anterior. This would give us a bit more length and symmetry for the final restorations. A surgical stent was created to help guide the periodontist during the gingivectomy. The stent was also used on the diagnostic wax-up model to ensure we were creating a diagnostic model similar to what would be in the mouth after the surgery. In addition, matrices of the max/mn wax up were made to assist with the fabrication of the temporaries during the restorative phase (Figs. 19-21).
Fig. 18

Fig. 19
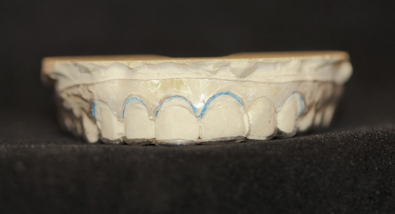
Fig. 20
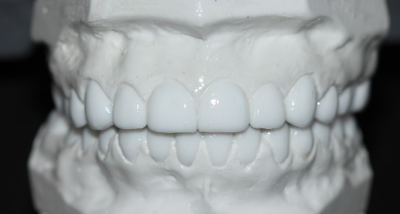
Fig. 21
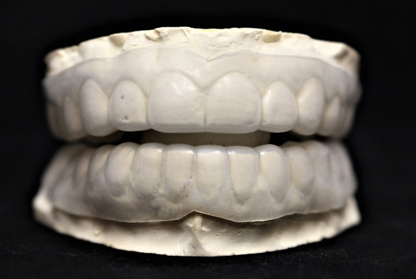
After the bite was opened on the articulator and the gums trimmed on the model, a diagnostic wax-up was completed on the upper and lower models. Ideal occlusion and morphology was created on the models and when complete, forwarded back to the dentist.
Upon receiving the completed wax up models, they were viewed by the dentist, periodontist and patient. Once unanimous approval was given, the periodontist met with the patient to plan the next phase of her treatment.
PERIODONTAL PHASE
The patient was evaluated initially (April 19, 2017) prior to her restorative or orthodontic treatment. This first planning appointment consisted of establishing a tentative rendering for what her final esthetic outcome could potentially look like. A more comprehensive evaluation and consultation of the formalized treatment plan as described above was performed approximately two years later (May 14, 2019) once the orthodontic phase of treatment was completed.
Ideal anterior cosmetics necessitates healthy and inflammation-free periodontal tissues. Garguilo1 described various components of the periodontal attachment complex, giving mean dimensions of 1.07 mm for the connective tissue, 0.97 mm for the epithelial attachment and 0.69 mm for the sulcus depth. These measurements are known today as the “biologic width”. Since full mouth restorative treatment was being planned, it was imperative to reverse engineer the periodontal attachment complex based on the restorative dentist’s treatment plan. Failure to respect this biologic width would ultimately result in chronically inflamed tissues that would undermine the natural aesthetic outcome that the team was seeking (Ingber et. al).2
Periodontal treatment was performed under IV conscious sedation using benzodiazepines. Maxillary and mandibular Essix-style clear overlay stents that were fabricated were used to transfer the new diagnostic model gingival positions and contours. The gingival positions were marked onto the tissues using the tip of an explorer, and the stents were subsequently removed for the duration of the procedure. The markings were connected by an inverse bevel incision in a scalloped/ parabolic formation, with the gingival zenith located just distal to the long axes of the teeth. Golden proportions were observed such that the length of the central incisors and canines were matched, while the lateral incisors were approximately 1 mm incisal. In the mandible, the gingival margins were all placed at an even level. Full thickness mucoperiosteal flaps were raised across the anterior sextants. Osseous resection was performed only on the buccal surfaces so as to create 3 mm of root surface from the gingival margin to the alveolar crest in keeping with Garguilo’s1 estimates for biologic width. In the mandible a connective tissue graft was harvested from the right side of the palate and placed over the labial alveolar bone in order to establish a band of keratinized attached tissue. The flaps were apically repositioned and sutured with 4-0 chromic gut sling suture. Post-operative management included prescriptions for amoxicillin 500mg tid for one-week and chlorhexidine rinse 0.12% bid for two weeks, and the patient was given appropriate postoperative instructions.
A non-steroidal anti-inflammatory drug (ketorolac; 0.5mL of a 30 mg/mL solution) along with a steroidal antiinflammatory drug (dexamethasone sodium phosphate; 1.5mL of a 4mg/mL solution) was injected by IV, and an ice pack was placed extraorally. A week-long course of antibiotics was prescribed along with anti-inflammatories and analgesics. A two-week postsurgical appointment revealed normal healing. After a healing period of approximately eight weeks, when soft tissue shaping was achieved with probable sulcus, the patient was
returned back into the care of the restorative dentist for completion of the restorative phase of treatment.
After 8-10 weeks of healing from the periodontal surgery, the patient was ready to proceed with the next phase in her treatment plan (Figs. 22 & 23). After a follow-up consult with the patient it was recommended and agreed to that the restorative appointments would take place over three full days.
Fig. 22

Fig. 23

RESTORATIVE PHASE: PREPARATION
On the first appointment the Maxillary arch was prepared and a traditional PVS impression was taken (Fig. 24) (3M Corp. Impregum Impression Material, St. Paul, MN.) The Maxillary Arch
was registered for the articulator with a Kois Registration Table (Panadent) and the impression and registration was sent to the lab with instructions to pour and mount with the prepared lower arch to follow shortly. Maxillary temporaries were fabricated in three section 17-13, 12-22, 23–27, using the matrices derived from the diagnostic wax-up (Protemp 3M Corp. St. Paul MN). The occlusion was balanced, and the restorations polished and cemented with Temp ON (Kerr Corp, Romulus MI). One week later the patient attended for preparation of the Mandibular arch in similar fashion and materials to the Maxillary arch (Fig. 25). Lower temporaries were fabricated and balanced with the previously fabricated maxillary temporaries (Figs. 26-30).
Fig. 24

Fig. 25

Fig. 26
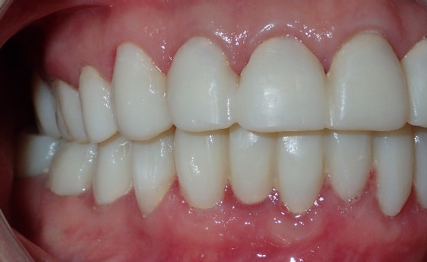
Fig. 27

Fig. 28

Fig. 29

Fig. 30

To maintain Vertical Height of Dimension (VHD) during the preparation stage of both arches the following protocol was adhered to;
a) Preparation of 27-23 – fabrication of temporaries and balanced
b) Preparation of 17-13 – fabrication of temporaries and balanced
c) Preparation of 12-22 – fabrication of temporaries and balanced
d) The same sequence was followed when preparing the lower arch
e) When registering the occlusal relationship the 2nd/3rd quad temps were removed and registered. Once they were placed back the 1st/2nd quad temps were removed and registered and replaced
At the end of the second appointment the Mandibular PVS impression, right and left occlusal relationships, diagnostic wax up, and alginate impressions of the Max/Mn arch temporized were sent to the laboratory to complete the mounting process and fabrication of the Max/Mn restorations. The laboratory instructions requested full contour Zirconia restorations for all premolars and molars, and e Max restorations for all the anterior teeth all in the shade 1M1, Vita Masterpan (Vident, Brea Ca.).
LABORATORY PHASE
In the lab, the impressions were poured, mounted and scanned into our design software. The models of the provisionals were also scanned so that we could overlay the information of what she had in the mouth. By doing this, we could design the final restorations to match the occlusion that the patient was experiencing and comfortable with. By layering scans of the temporaries and the preps in the software, we were able to keep the design of the final crowns close to the provisionals, with improved esthetics (Figs. 31-33). When we had achieved what we wanted in the software for the restorations, we milled the crowns.
Fig. 31

Fig. 32
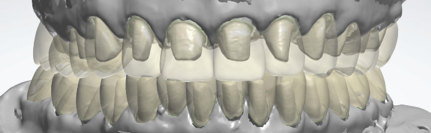
Fig. 33

Materials for the restorations had to be chosen. It was decided to use Emax in the upper and lower 6 anteriors for its superior esthetics, and Zirkonzahn Prettau zirconia with facial cutback from the premolars and molars as this would provide strength and help the zirconia better match the visual characteristics of the Emax crowns.
After milling the crowns, they were finished on the bench, taking care to have the zirconia match the crowns made from Emax. When finished, the crowns were returned to the restorative dentist for insert (Fig. 34).
Fig. 34
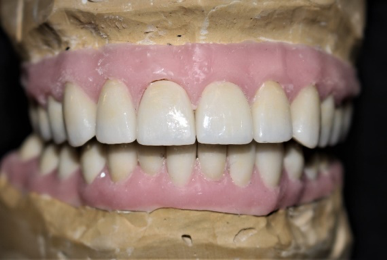
RESTORATIVE PHASE: INSERTION
When the restorations were returned from the lab the crowns were checked on the models to ensure that the fit was ideal and there were no chips or blemishes. The patient was scheduled for the third full day appointment to insert the 26 all ceramic restorations. The max anterior restorations (12, 11, 21, 22) were removed without LA, so as not to cause the upper lip to droop during the preview, and the permanent crowns were tried in using Rely X try in paste (3M Oral Care St. Paul, MN) to simulate cement and add retention during the preview. The patient immediately approved the restorations and requested that they be placed with permanent cement. Local anesthetic was then appropriately applied to the Max/Mn arches.
The remaining temporaries were removed and all the abutments were cleaned with Na OH and Pumice mixture. The rest of the crowns were tried in and the patient confirmed her approval. At this time the VHD was confirmed that it was not altered. The Max/Mn anterior eMax crowns were bonded with Rely X Unicem 2 cement (3M Oral Care, St. Paul, MN) and the Max/Mn full contour Zirconia crowns were cemented with Rely X Luting Plus cement (3M Oral Care. St. Paul MN.)
Once all the restorations were bonded/ cemented, the margins were checked and cleared of any cement remnants and all contacts were flossed. The VHD was re confirmed and using U shaped articulating paper and shim-stock, the occlusion was balanced in CO and that there were no interferences in anterior and lateral excursions. The occlusal surfaces of the adjusted crowns were polished with porcelain polishing cups and the buccal and lingual surfaces were polished with diamond polishing paste (Soft Shine, Water Pik, Fort Collins, CO). Upper and lower alginate impressions were taken and sent to the laboratory for fabrication of Max/ Mn Essix appliances. The patient was dismissed with instructions to eat soft foods for a few days and to alert us immediately if she felt any interferences when eating. In addition, the patient was to do warm salt water rinses to assist in healing of the gingival tissues (Figs. 35-39).
Fig. 35

Fig. 36

Fig. 37

Fig. 38

Fig. 39

The patient returned one-week later for the final assessment, insert of the Essex appliances and final photographs. The patient reported mild sensitivity which dissipated after a few days and is able to enjoy her meals without hesitation. The patient was advised that she will be on alternating three-month recare schedule between the periodontal/ restorative dentist office. At this visit we revisited with the patient the photographs when she first attended and her final shots. For all involved, it was quite dramatic to see the transformation that occurred and how the patient’s outward appearance also changed. For all four professionals involved, the end result and seeing the patient’s smile was extremely gratifying. (Figs. 40A & 40B).
Fig. 40A

Fig. 40B

Oral Health welcomes this original article.
Acknowledgements: The authors would like to acknowledge the outstanding contributions of the following:
- Dr. Gary Glassman DDS, FRCD(C) for Endodontic treatment
- Dr. David Shapiro DDS, MSc (Ortho), FRCD(C) for assistance in Orthodontic treatment
- Vladimir Marinic Certifed Master Technician (Ceramist)
REFERENCES
- Garguilo AW. Dimensions and relationships of the dentogingival junction in humans. J Periodontology 1961; 32:261-7.
- Ingber JS, Rose LF, Coslet JG. The “biologic width” — a concept in periodontics and restorative dentistry. Alpha Omegan 1977; 70(3):62-5.
About the Authors
 Dr. Jordan Soll is a Toronto based general practioner with special interest in appearance related procedures. He is principal of Central Dental Group, Co chairman of the editorial board of Oral Health Journal, and the dental expert for City Line with Tracy Moore.
 Dr. Yair Lenga is a Toronto based periodontist whose experience includes all periodontal and reconstructive procedures including bone regeneration and periodontal plastic surgery. In addition, he has also completed a hospital-based fellowship in anesthesia. He maintains a full-time periodontal practice in the centre of the city.
 Dr. Emily Singer received her DDS and Masters of Orthodontics degrees from the University of Toronto and completed her dental residency at Sick Kids Hospital. She maintains a full time private orthodontic practice in Whitby, Ontario.
 Mr. Steve Somerville is the General Manager of DSG Novo, a lab specializing in cutting-edge digitally focused practices.
RELATED ARTICLE: Lateral Transformation: “How Proper Space Created Function and Esthetics”


