
Abstract
Providing patients with a great aesthetic outcome along with the need for full mouth reconstruction can be very challenging. Full mouth reconstruction is one of the more demanding procedures in dentistry. It draws upon the knowledge and experience of the clinician and relies on the input from a talented laboratory ceramist. The challenges can be overwhelming, but, with proper treatment planning and exploring all options and understanding of the patient’s wants and expectations, the reconstruction is not as difficult as conventional wisdom makes it appear. With the input of a great lab and overcoming numerous deficiencies in the smile, we created the “Fabulous Hollywood Smile” that the patient so desired. Utilizing the elements of “Smile Design” we used pink porcelain to create the illusion of a great smile. 1,5,11,12,17
Introduction
When someone has a terrific smile, it affects them and others in many different ways. A beautiful smile play’s a key role in conveying attractiveness, pleasantness, likeability and confidence. A smile can enhance self-esteem and can contribute to more success in personal and professional relationships. In the search for “eternal youth”, patients are more aware of the aesthetic possibilities of smile beautification from fashion magazines, television, and media in general. Driven by that desire to live and look better, patients want and seek out clinicians that can deliver superior results to correct the years of occlusal wear, restorative “patchwork”, discolorations or simple neglect. 4,17
Providing patients with great aesthetics along with full mouth reconstruction is most challenging. Treatment planning may involve all disciplines of dentistry, such as periodontics, endodontics, orthodontics, prosthodontics and complex restorative modalities. The comprehensive examination and risk assessment is paramount in leading to a successful outcome. Including the patient in the treatment process and decision making is necessary to determine their expectations versus what can be delivered realistically. There is nothing worse than thinking you had a great outcome, only to have the patient tell you it wasn’t what they were expecting. 1,2,3,5,7
In tackling the challenge of creating a beautiful smile, all elements to be considered are contingent on what the patient presents with. Proper elements of “Smile Design” include determining the facial midline, incisal edge position, Maxillary incisal plane (smile line), gingival position and form, lip line, axial inclinations, tooth to tooth contact points and the incisal and gingival embrasures. Additional elements are the variations in tooth shapes, textures, shading, translucencies and proportions. All must be considered in creating an aesthetic smile that adds youthfulness and is overall pleasing to the patient, but most importantly, functions properly. 6,11,12
For the long-term success of any makeover, the occlusion is the common denominator. Providing occlusal harmony and stability is the key to successful function as well as comfort to the patient. It has been said, “there are no easy cases”. 5 Total reconstruction is necessary when there is a lack of anterior guidance, worn posteriors and decreased vertical dimension. For example, two individuals receiving the same treatment may result in much different outcomes. Thus, the occlusal breakdown may be in part due to differences in the cause of the deterioration. With the use of an articulator and accurate models, a prototype (diagnostic wax-up) can be fabricated to an ideal set-up. This is essentially the starting point in reconstructing a patient’s dentition to achieve that terrific smile. 4-8
Using the diagnostic wax-up as our guide, we can now test out the aesthetics and occlusion through our provisionalization process. We can determine through “trial and error”, the information needed to finally restore both arches with confidence. Therefore, the goal is to establish a long-term functioning occlusion that is stable providing the patients with their desired aesthetics.9,10
“Sometimes your joy is the source of your smile, but sometimes your smile can be the source of your joy.” ~ Thich Nhat Hanh
Clinical Case Study
TS is a 58-year-old male unhappy with the appearance of his smile. At his initial consultation, he revealed that he deals with the public as a flight attendant and is embarrassed by his teeth and smile. His desire was to have a “Fabulous Hollywood Smile”.
Clinical exam revealed an uneven gingival display, missing teeth, old restorations, crowns and a bridge, with a major boney concavity on the right posterior maxilla. TMJ was within normal limits with no pain or noise. A crossbite was evident on the left side (#13 vs #20-21). He had generalized bone loss, a few 4 mm pockets, and exposed roots. However, no mobility was present and there was no bleeding upon probing. TS was aware of his condition but his immaculate oral hygiene, and more frequent recare appointments has kept his periodontal condition stable (Figs. 1-5).
Fig. 1
Full smile.

Fig. 2
Retracted view: Uneven gingival display, unsightly crowns, restorative patchwork, discoloration, recession and ridge defect on Maxillary right side, generalized wear.

Fig. 3
Left side occlusion showing crossbite.

Fig. 4
Maxillary occlusal view.

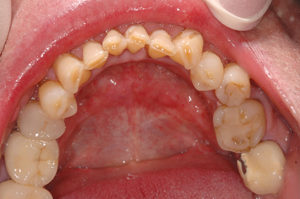
Fig. 5
Mandibular occlusal view.
Synopsis of Exam:
1. Deficient ridge Maxillary right posterior area
2. Generalized bone loss due to periodontal disease, but, maintaining. Attrition and erosion present.
3. Missing teeth: #1,2,5,10 with the canine (11) in the lateral position (10).
4. Crossbite on left side (#13vs#20-21).
5. Discoloration of existing dentition, old unsightly crowns and bridges, failing restorations.
6. Slight loss of vertical dimension with little anterior guidance.
Treatment Plan:
1. Full Mouth Reconstruction.
2. Slightly alter the anterior gingiva to provide better aesthetics of the smile with a more symmetrical display.
3. Mask and/or correct the deficient ridge on the right Maxillary posterior ridge.
4. Align the teeth and establish anterior guidance with a better arch form.
5. Correct the crossbite on the left side.
6. Lengthen the Maxillary incisors to more ideal incisal edge position.
7. Whiter and brighter dentition.
Overall goal:
Give TS a “Hollywood Smile”.
Treatment Protocol
We started with initial impressions, a Facebow mounting, photos, and a centric relation bite registration utilizing a Lucia jig. All information was sent to Valley Dental lab for a Master Diagnostic Wax-up and Model for an ideal set-up (Figs. 6-8). The challenge in this case would be to provide the appearance of a more ideal smile utilizing the principles of smile design. Options were discussed with the laboratory on what would be the most ideal and simplistic way to get the best results with less invasive type procedures (i.e. surgery, grafting, orthodontics). The question was:
Can we provide TS with his “Fabulous Hollywood Smile” without more extensive procedures?
Fig. 6
Ideal wax up together in occlusion.

Fig. 7
Mx occlusal view.

Fig. 8
Mn occlusal view.

It was decided that we could perform the Full Mouth Reconstruction by building out the buccal corridors on the Maxillary arch and create an illusion of proper gingival display utilizing porcelain matched to the patient’s gingival color. In the diagnostic wax- up it was also determined that the vertical dimension did not have to be altered more than 0.5 mm in the anterior.
With the approval of the diagnostic wax-up we still had to wait about one year for TS to save the funds to start his transformation. It shows that if a person really desires something, they will find a way to make it happen.
Treatment: All teeth were prepped for crowns in one day. A preparation guide created from the diagnostic wax up was used to make sure there was adequate tooth reductions to accommodate the proposed restorations. Polyvinyl Impressions were taken along with various photos of the preparations and prep shades. A diode laser was used to raise the gingival levels on #8 and #9 as much we could without impinging on the biologic width (about 1.5 mm). A Facebow transfer was performed using a Denar Slidematic and a stick bite was also taken for proper alignment (Symmetry; Clinicians Choice) of the Maxillary models. Material of choice for Provisionals was Luxatemp Fluorescence in a bleach shade (Zenith, DMG, Englewood, NJ). The temporaries could easily be modified using Luxaflow and then finished with Luxaglaze.
For an accurate bite registration, an anterior index had been fabricated to hold the desired vertical dimension. Preparations were performed segmentally in the posterior and bite registration was taken utilizing the anterior index. The anterior teeth were prepared, and checked for adequate clearance for the restorations with the posterior bite registration in place. Provisionals were fabricated utilizing a silicone putty matrix adapted from the Master Diagnostic wax-up, adjusted for occlusion and the bite registration was confirmed by placing the right-side Provisionals in, and then checking for accuracy of the bite registration. The same was repeated for the left-side.
The patient was seen a few days later to assess the occlusion, phonetics, shading, midline, incisal edge position and any aesthetic changes the patient wanted. After various modifications; photos and impressions of the Provisionals were made and sent to the lab for fabrication of the final restorations.
Both Maxillary and Mandibular anterior restorations along with the bicuspids were fabricated as e.max crowns (lithium disilicate; Ivoclar/Vivadent) (#7-13, #20-29) except for the right Maxillary bridge (#4-6). All posterior molars along with the bridge (#4-6) was fabricated as IPS e.max ZirPress (Ivoclar/ Vivadent) over zirconium oxide frameworks. Final shading was Chromoscope 040/030 blend with a natural translucency hand layered. Pink porcelain, shade G4 was layered over the porcelain at the margins where needed to creatively blend into the gingiva. This enabled us to mask out and enhance the gingival display.
The final restorations were tried in on the models for fit and set up (Figs. 9-15). All e.max crowns were silanated overnight (Bisco). With the patient in the chair, all Maxillary Provisionals were removed and the restorations tried in. When occluding against the lower Provisionals, it was evident that the occlusion was just about perfect. The midline, marginal fit and color was great. The use of the gingival shading created the illusion of good gingival symmetry. The lower Provisionals were removed and tried in and again checked for fit and occlusion.
Fig. 9
Mx model shows extensive ridge defect on right side.

Fig. 10
Mn prep model.
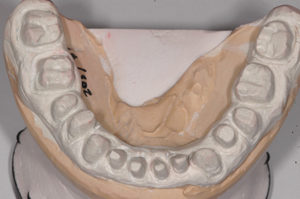
Fig. 11
Preps of upper right side showing defect.

Fig. 12
Mx occlusal.

Fig. 13
Mn occlusal.

Fig. 14
Lower anterior crowns.

Fig. 15
Right side restorations with layered pink porcelain (shade G4).

All e.max crowns were bonded using All Bond Universal (Bisco Dental) as the adhesive and Choice 2 in a translucent shade as the resin cement (Bisco Dental). First the Maxillary crowns, then the mandibular crowns were place. Meticulous cleanup was performed and interproximal areas cleaned and flossed. Each restoration was tacked down at the margin for 10 seconds and flossed a second time. Each crown was light cured for an additional 60 seconds. Final cleanup of any remaining excess was removed with fine fluted carbide finishing burs (Brasseler, USA). The zirconium based crowns and bridge were cemented using the bioactive cement, Ceramir (Doxa Dental, Inc.).
The occlusion was so close, final adjustment, finishing and polishing took less than 40 minutes (Figs. 16-22).
Fig. 16
Mx occlusal.

Fig. 17
Mn occlusal.

Fig. 18
Full arches retracted view in occlusion. Good gingival symmetry, no crossbite on left side, pink porcelain masking out receded areas.

Fig. 19
1:1 close up view lower anterior.

Fig. 20
Close up view of Mx anteriors with black background to accentuate the characterization in the restorations.

Fig. 21
Mx right side out filling out the ridge defect.

Fig. 22
Mx left side; changing the canine into a lateral incisor and the bicuspid into a cuspid.

Discussion
The challenge in this case would be dictated by the aesthetics. What the patient desired was a “Fabulous Hollywood smile”. This term “Hollywood Smile” usually is a personal perception of very white teeth with a perfect alignment. Too many times we see ultra-white teeth that are more opaque and chalky in appearance giving a “fake” look. What we try to create is a bright, vibrant natural looking smile using all the elements of esthetic smile design. Starting with a comprehensive exam, photos, articulated models and input from the dental lab, a systematic approach to restore this case was created. Appling the concept of “RED proportion” (recurring esthetic dental), an ideal and natural smile could be designed. This concept is more intuitive then using the mathematical properties and proportions of “Golden Proportions”. RED proportion is a more objective method of evaluating and designing the smile. To simplify it; it is Naturally occurring versus preferred proportions. From this concept, we get more pleasing proportional tooth sizes allowing greater artistic input from the laboratory ceramist. 13,14,15
With these concepts in mind we get an ideal visualization of what the smile will look like by fabrication of the diagnostic wax up. This provides us with the information and guidelines to proper midline, length to width proportions of the central incisors, laterals and canines. We determine the incisal edge position, axial inclinations and a guide to correcting the buccal corridor defect on the Maxillary right side. By utilizing the use of pink porcelain, we blended various cervical areas giving the appearance of an esthetic gingival display. Thus, we created a more aesthetic appearing smile that is harmonious, symmetrical and natural.
Fig. 23
Pre-op full Face.

Fig. 24
Full face with a total transformation to a much youthful appearance.

Conclusion
The goal was to give TS his “Fabulous Hollywood Smile”. By following step by step procedures, we could create a symbiosis of aesthetics and occlusion. By restoring his smile his personality came to life and changed his entire persona. His smile now fits his personality. 16 As seen in his before and after photos, it led to a dramatic change in his physical appearance (Figs. 23, 24). It always amazes me, but, doesn’t surprise me that if a person wants to change, they will find a way to make it happen. Usually it begins with the smile makeover. OH
Oral Health welcomes this original article.
Acknowledgements
The author wishes to thank Master Ceramist Jenny Wohlberg and Valley Dental Arts Lab for the valuable attention to detail and beautiful restorations for this case. The input and expertise from Ms. Wohlberg was invaluable and truly appreciated.
I also wish to thank my knowledgeable and reliable assistant, Rebecca Balas, for helping in editing this article.
References
1. Spears, FR. Candid Advice Regarding the Complexities of Occlusion. Journal of Cosmetic Dentistry, Fall 2012, Vol. 28, number 3, p14-21.
2. Lerner, J. A Systematic Approach to Full Mouth Reconstruction of the Severely Worn Dentition. Pract. Proced. Aesthet. Dent. 2008; 20(2) 81-87.
3. Spears, FR. Approaches to Vertical Dimension. Adv. Esthet Interdisip Dent. 2006; 2(3) 2-12.
4. Sesemann, MR. Enhancing Facial Appearance with Aesthetic Dentistry, Centric Relation, and Proper Occlusal Management. Pract Proceed Aesthet Dent 2005; 17(9) 615-620.
5. Shavell, HM. The Aesthetics of Occlusion: Form, Function, Finesse. Practical Periodontics and Aesthetic Dentistry. The AACD symposium Edition 1993; vol 5, No3; 47-55.
6. Nixon, RL. Where did The Wear Do? Biofunctional Reconstruction with a Bioesthetic Concept and Materials. Contemporary Esthetics and Restorative Practice. Feb 2002; 64-76. March 2002; 62-69.
7. Shavell, HM. The Bioesthetics of Complete Porcelain Occlusal Rehabilitation Using the Sunrise Ceramic System: A Case Report. The International Journal of Periodontics and Restorative Dentistry. Vol (10) #4, 1990; 257-270.
8. Miller, L. Masters of Esthetic Dentistry. Symbiosis of Esthetics and Occlusion: Thoughts and Opinions of a Master of Esthetic Dentistry. Journal of Esthetic Dentistry. Vol11(3) 1999; 155-165.
9. Garcia, L. The Use of Diagnostic Wax-ups in Treatment Planning. Compendium, March 2003; Vol 24(3) 210-216.
10. Mechanic, E. The Art of Temporization. Facial Changes Through Aesthetic Dentistry. Dentistry Today, April 2005; 84-89.
11. Golub-Evans, J. A Short History of Smile Design. Contemporary Esthetics and Restorative Practice. Feb 1999; 70-73.
12. Morley, J. Smile Design Terminology. Dentistry Today. June 1996; 70.
13. Ward, D. Using the RED Proportion to Engineer the Perfect Smile. Dentistry Today. 2008 27(5) 112-117.
14. Snow, SR. Esthetic Smile Analysis of Maxillary Anterior Tooth Width: The Golden Percentage. Journal of Esthetic Dentistry. 1999 Vol 11(4) 177-184.
15. Mahshid, M, Khoshvaghti, A, Varshosaz, M, Vallaei, N. Evaluation of “Golden Proportion in Individuals with an Esthetic Smile. Journal of Esthetic Restorative Dentistry, 2004; 16(3)185-193.
16. Paolucci, B., Calamita, M., Coachman, C., Gurel, G., Shayder, A. Visagism: The Art of Dental Composition. QDT 2012; 1-14.
17. Mechanic, E. Creative Smile Design. Oral Health. April 2011.
About the Author
 Richard S Bernstein, DDS, PLLC, has been in private practice 31 years in Farmington Hills, Michigan. He graduated from University of Detroit Mercy School of Dentistry with a DDS degree in 1985. He is a member and Fellow of the American Society for Dental Aesthetics, a member American Academy of Cosmetic Dentistry since 1991, has attained Diplomat status in the American Board of Aesthetic Dentistry, a Fellow in Academy of General Dentistry, has a Masters in Biochemistry, and is a Research Associate at the Henry Ford Hospital, for Bone and Mineral Research.
Follow the Oral Health Group on Facebook, Instagram, Twitter and LinkedIn for the latest updates on news, clinical articles, practice management and more!


