
Introduction
Dental implants are at risk of technical complications such as abutment screw loosening, stripping and fracture. If fractured, the screw must be removed without damage to the internal implant connection to preserve the implant’s prosthetic function and maintain prosthodontic restoration 1.
Abutment screw fracture can be the result of unobserved screw loosening due to a structural error, detrimental superstructure, or excessive torque. 2,3,4,5,6 Furthermore, during parafunction (bruxism or clenching), a loading force is conducted through the prosthesis, into the abutment, and is transferred via the abutment screw into the implant fixture and into the contiguous bone. 1,2,3 Occlusal overloading can induce unfavourable bending and tensile motion at the interface of the abutment and fixture, leading to a fatigue fracture of a component in the interface or loosening of the abutment screw. 7 Fractures of the abutment screw are reported to be caused by unobserved micromovements after loading forces have been applied, such as persistent loading of a loose screw. 8
The physical properties of the abutment screw, such as preload and fixture design, can also impact the risk of screw fracture or loosening. 9 Initial preload is the force applied on the threads of the abutment screw during initial torqueing. Preload strength is dependent on many factors including functional torque, lubrication, and the settling effect. 8,10,11 Preload acts as mechanical resistance against the forces produced during mastication or bruxism. 12 The settling of the screw after initial torqueing loosens the initial preload 8; thus, it is recommended that an abutment screw be retightened ten minutes after its primary torque insertion. 1 This is also recommended due to the relaxing of circumferential gingiva that is typically stretched during crown insertion which can contribute to the settling effect. Other factors influencing preload strength are determined by the mechanical properties of the abutment screw, thread and pitch design and depth, length and surface area of the abutment screw to fixture interface, and the design of the abutment screw head to abutment interface.
Abutment screw fracture has been reported as a relatively rare complication. Several procedures to remove a fractured abutment screw have been reported. 1,3,7,13 Various methods for retrieving the fragments of the broken screw without damaging the internal connection of the implant are described in this case series report. The procedures described in this report have been applied successfully by the author. They are intended to serve readers as possible options to approach abutment screw removal complications.
Stripped abutment screw heads are another complication that effects prosthetic screws. They commonly occur due to the following reasons:
1. Incorrect driver used to engage the screw head
2. Driver not fully engaged in screw head
3. Driver is stripped or damaged
4. Over-torqueing abutment screw
5. Fatigue of the abutment screw connection due to multiple torqueing attempts
6. Damage to the screw head by means of clinician using a drill to access the prosthetic screw
Damaged abutment screws can present in several ways:
1. Prosthetic crown, abutment and top of the prosthetic screw have detached from the implant and a fractured portion of the abutment screw is inside the implant either loosely connected or torqued in. Gingival over-growth is common over the implant fixture in this situation.
2. Prosthetic screw stripped and torqued in holding in prosthesis (crown and/or abutment).
3. Prosthetic crown is off the abutment, abutment is connected to implant and prosthetic screw is either stripped or fractured.
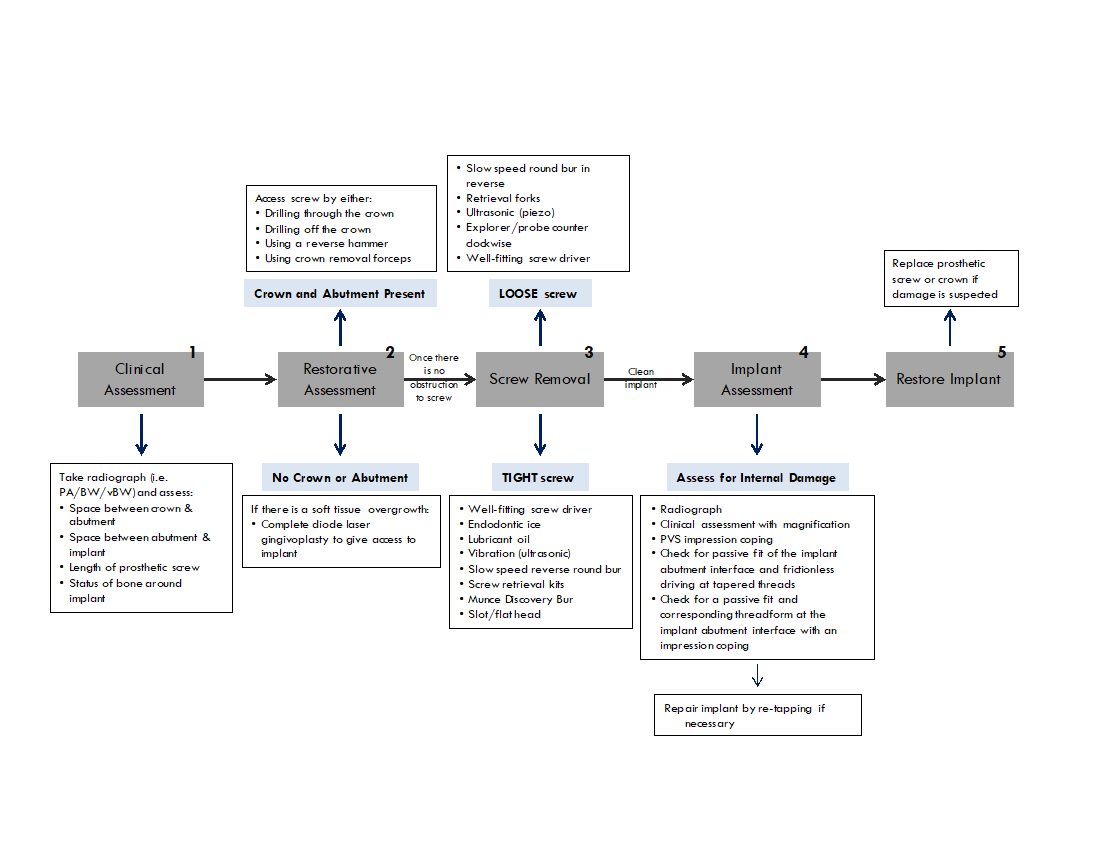
If the screw is inaccessible due to a soft tissue overgrowth, laser removal of the gingiva can be employed to minimize bleeding and give access to the broken fragment. An explorer can then be used to determine if the screw is loose. If loose, the screw can be reversed out with a slow speed round bur, a retrieval fork, a piezo, or an explorer/probe maneuvered counter clockwise. If the fractured screw is not loose, other techniques are utilized and may involve endodontic ice, an oily lubricant, ultrasonic vibration, screw retrieval kits, slow speed burs in reverse, and finally careful manual drilling of the screw. This clinical report focuses on methods involving a Munce Bur® and a round bur in reverse, a tapered Robertson retrieval, and the slot approach for retrieval of the fractured screw.
Case #1
A 71-year-old male had Branemark® implants in 3.6 and 3.7 restored with splinted crowns on meso-abutments. The patient presented with loose screw-retained splinted crowns on 3.6 and 3.7, with a stripped prosthetic screw on 3.6 as seen in Figure 1. It can be observed that the drive (portion of the screw head that engages the driver) had a well-defined hexagonal shape on the 3.7 implant, and the drive was stripped on 3.6. The risks associated with the removal of the abutment screw were reviewed with the patient, and the patient consented to treatment. In this case it is likely that the cause of stripping on the screw is a combination of clinician error, such as the use of the wrong screw driver, and constant exposure of the screw head in the mouth. There was a lack of occlusal clearance for a restorative material to cover the screw access. The loose abutment was likely due to the position of the 3.6 requiring an angled abutment. The plan was to initially remove the prosthetic screws from 3.6 and 3.7, then remove the abutment screws. Due to the loose abutment on 3.6, the internal connection of the implant would be contaminated with bacteria and biofilm, it is essential to meticulously clean the connection prior to re-inserting the abutments.
Fig. 1

Fig. 2
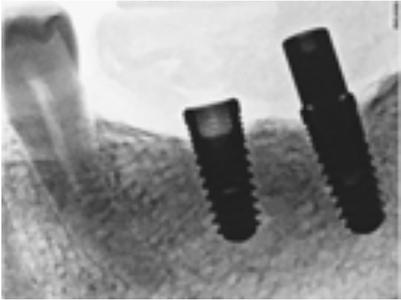
The treatment started with the prosthetic screw for 3.7 removed with a well-fitting implant driver. The 3.6 drive was stripped and not able to be engaged with a variety of drivers. A straight-line slot was carefully drilled into the head of the screw with a round high-speed bur under magnification. A flat head screw driver was used to engage and loosen the prosthetic screw. This converted the screw into a flat head screw, as seen in Figure 3. A periapical radiograph (Fig. 4) was taken of the implant to verify prosthetic screw removal was completed and note the extent of the loose abutment on 3.6. The abutment was removed and the inside of the implant was carefully cleaned using a combination of chlorohexidine 0.12%, microbrushes to physically scrub the inside of the implant and thorough irrigation and drying.
Fig. 3
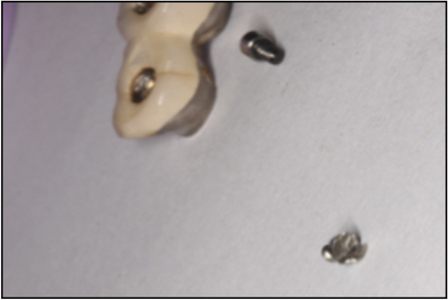
Fig. 4

Case #2
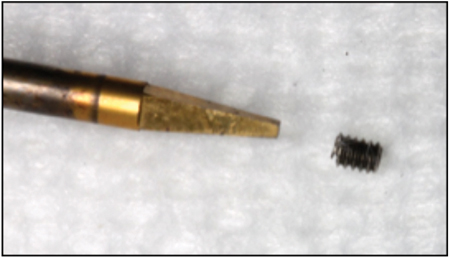
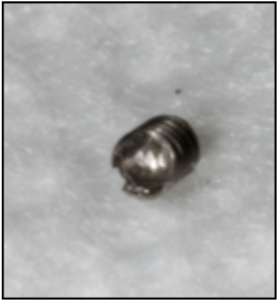
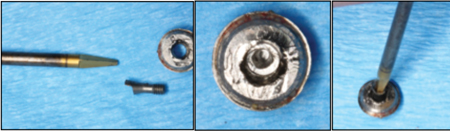
This 41-year-old female patient presented for removal of a fractured screw of a Astratech TX Aqua® platform implant in site 4.6 which occurred approximately 18 months after initial restoration. The patient had several incidences of her screw-retained crown loosening over the first 18 month of restoration. In Figure 5, a fractured prosthetic screw lodged into the internal implant chamber was visible on the initial radiographs. Three other dental specialists were seen who attempted to remove the fractured screw by using a variety of techniques unknown to the author. The implant was covered with soft tissue and was exposed with a diode laser at 1.0W (Picasso Diode Laser). Damage to the internal connection was observed prior to any retrieval attempt by the author clinically. The fractured abutment screw was observed to be torqued in and unable to loosen using conservative modalities such as: endodontic ice, lubrication, slow speed round bur in reverse, retrieval forks and an ultrasonic agitation. Endodontic Munce Burs® were utilized to drill a progressively increasing diameter pilot hole into the prosthetic screw and create a drive connection. Once the hole was approximately 2 mm deep as verified on the PA in Figure 6, a gold tapered Robertson square head driver was used to retrieve the screw (Fig. 7). After the removal of the screw, the implant was cleaned as previously described, and a healing abutment was placed. The patient returned to DDS with the crown and fractured parts to restore the implant.
Fig. 5

Fig. 6

Fig. 7
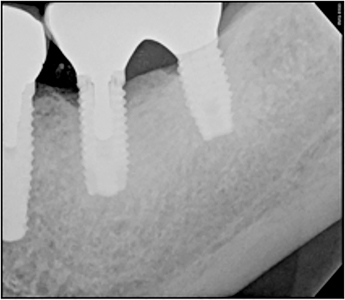
The patient returned approximately 1 year later with another abutment screw fracture (Fig. 8). It is thought that the cause of these fractures was bruxism which was not managed with a bruxism appliance. The patient presented with soft tissue overgrowth. A diode laser at 1.0W was used to trim the gingiva and to visualize the implant (Fig. 9). The screw was loose and easily removed with a retrieval fork in reverse. After the implant was cleaned, the internal connection of the implant was examined visually. To facilitate visualization of the internal connection the implant was filled with light body PVS impression material to check for any internal damage (Fig. 10). A small area of damage was observed in the counter-rotation connection area. An open tray impression coping was inserted and carefully inserted into the implant. As it was tightened down, the implant connection was smooth and passive fitting with no force. No rocking or rotation of the impression coping was observed, thus the implant was determined to be restorable. The likely cause of abutment screw fracture was placement of a regular platform implant into an area of high occlusal stress in a patient with a parafunctional bruxism habit.
Fig. 8

Fig. 9
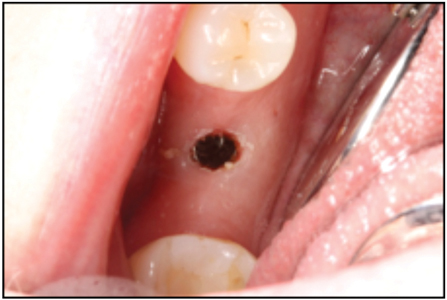
Fig. 10


Case #3
A 64-year-old male patient had a Straumann® Standard Plus Wide Neck implant in site 4.6 that was restored nine years prior to complication. The cast abutment fractured, and the prosthetic screw was not visible. The UCLA abutment had been drilled down by his dentist (Fig. 11). To create access in the middle occlusal, the author drilled down 5mm into the fixture to reach the prosthetic screw. The screw was engaged with a gold tapered Robertson, as in Case #2. The prosthetic screw was reversed out, along with the abutment (Fig. 12). The implant was cleaned as previously described, and had retained no damage.
Fig. 11


Fig. 12
Case #4
A 69-year-old male patient had a broken screw in a Straumann® NNC implant in site 1.4. He had two implants in the premolar area, with no teeth posterior to them. The occlusal forces were therefore very high, and are thought to have been the largest contributor to the fracture. Previous attempts had been made to remove the screw by other specialists using the manufacturers screw retrieval kit. This attempt failed and the head of the implant was damaged in the process (Fig. 13). The author carefully drilled through the lodged and damaged prosthetic screw (Fig. 14). This process was lengthy because the narrow size of the opening restricted access. The damaged screw would not loosen when a drive connection was created and therefore the screw was drilled out in pieces (Fig. 15). The internal threads of the implant were then re-tapped, using the Straumann taping and service kit. Once cleaned with rubbing alcohol and CHX, a two-piece healing abutment was seated. The head of the implant was damaged from the previous attempt with the manufacturers retrieval kit resulting in no counter rotation mechanism. The implant was compromised but viable, and restoration was recommended in the form of splinted crowns connecting 1.4-1.5 with minimal occlusion.
Fig. 13
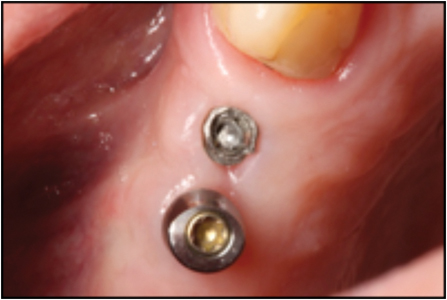
Fig. 14

Fig. 15


Case #5
A 65-year-old male patient presented with a broken screw in the 3.6 position. The screw was not loose; it appeared cross threaded. The technique used to remove this screw involved the use of munce burs. The fracture screw measured approximately 4 mm long. The screw was drilled in approximately 3 mm, and a #1 round bur was used in reverse to remove the screw. This process took approximately two hours due to patient limited opening, difficult access due to a large tongue, and constant cooling required to minimize heat production. The internal screw chamber did not appear damaged, as seen in the final radiographs (Fig. 16). The patient returned to DDS for prosthetic insertion.
Fig. 16


Discussion
This report proposes various approaches for the removal of fractured implant prosthetic and abutment screws, in which the function of the implant is maintained. Before removal of the fractured abutment screw, the surrounding bone level should be assessed using a radiograph to ensure the implant is osseointegrated enough for successful restoration. 7 Furthermore, the etiology for the abutment screw complication should be assessed and prevention mechanisms should be made to prevent damage from reoccurring.
Screw fracture may be the result of occlusal forces, either from functional loading or parafunctional behaviours such as bruxism. Bruxism produces increased buccal-lingual mandibular movement, with increased frequency and load. These additional occlusal forces increase the risk of fatigue fracture and marginal bone loss due to excessive bending overload forces on crestal bone. 14,15 The risk of screw fracture may also be exacerbated by undetected screw loosening due to non-axial pressure on the prosthesis. 5,6,16 Prolonged off angle forces on an implant can cause more metal fatigue and potential damage relative to strong axial forces 16, as seen in Case 1 with the 3.6 implant requiring an angled abutment. It has been reported that screw loosening is often an indication of impending fracture as screw loosening can create superficial damage or fatigue to the screw. 9,17 This is consistent with Case 2 as the screw fracture occurred twice after the patient experienced several episodes of her crown loosening, which likely resulted in a compromised prosthetic screw. It Is therefore recommended to replace the prosthetic screw if it has loosened, especially if it has been in function while loose. 9
If a bruxism habit is diagnosed, an appropriate device such as a Mount Sinai bruxism appliance (lower hard acrylic flat plane with bilaterally balanced posterior occlusion) should be produced for the patient. In addition, screw loosening is also an indication that the occlusal scheme may need to be re-evaluated and possibly adjusted. Occlusal adjustment of the implant crown may be required throughout the life of the prosthesis so that it is not in excessive occlusion or occlusal interference during lateral excursions as the occlusion settles and wears over time.

Click to enlarge
Studies report that certain abutment fixture connections are predisposed to fracture, such as the external hexagonal designs.4,18 Many studies show greater frequency of screw loosening in the external hexagon connection design relative to other implant configurations. 13,19 The external hexagonal connection was originally designed so that the implant could be engaged during placement; however, this design subjects the implant to greater external forces. 4 Furthermore, the mating surface of the slip-joint of the external hexagon has machined freedom resulting in micro-movements and vibrations during functional loading, thus resulting in a loss of pre-load predisposing the implant to screw-failure. 4,13,19 The internal hexagonal designs or screws with internal taper connections such as the Morse-taper system are less disposed to screw loosening due to the internal anti-rotation feature. 4,19 The implant system in Case 1 was hexagonal, and the implant was subject to high occlusal forces. Other reports suggest that risk of screw loosening and fracture is higher for premolar and molar implants. 5,14,15,19,20 Consistent with this data, the majority of cases in this report had complications in the posterior region.
Implants that utilize larger abutment/prosthetic screws in larger diameter implants are able to increase the surface area, better distribute occlusal forces, and withstand higher occlusal force. However, some implant systems use a universal prosthetic/abutment screw regardless of the implant size and intended location in the mouth. These implants, as well as smaller diameter implants, placed in areas of high occlusal stress may be more susceptible to prosthetic complications such as screw loosening or fracture.
It is also important to know that the suggested torque values are not universally the same amongst different implant systems and different implant companies. Below is a picture showing the different torque values for the different components available by Nobel Biocare.

Click to enlarge
The torque values and available design of screw drivers also vary greatly amongst the different implant companies.
Restorative dentists should confirm and know the exact manufacturers suggested torque values. The prosthetic screws for All on Four or Teeth in a day, are only at 15 Ncm. Some narrow diameter implants for abutment screws are only 15-20 Ncm. For example, Nobelactive 3.0 mm implants, the abutment screws are recommended to be torque at 15Ncm only.
Treatment Planning
Click to enlarge
Finally, the available generic third-party companies have opened up possibilities of where to obtain restorative components. However, generic screws may not be torque tested and manufactured with the same specification. It is possible that using generic third-party screws may lead to increased incidence of screw loosening or fractures. It is recommended to use authentic components whenever possible.
Tips
If drilling of the abutment screw is required, use the least amount of local anesthetic. This is to allow for the patient to detect any pain from heat and friction build up in the implant transferring to circumferential bone.
After the removal of the abutment and screw, thoroughly wash, irrigate, scrub and decontaminate the implant with CHX 0.12%, microbrushes, water, and a brand new HA.
If damage is suspected, check the internal connection with an impression coping to ensure a passive insertion and good fit.
Conclusion
The treatment for removal of a fractured implant screw is determined through a stepwise analysis involving the assessment of the gingiva, the degree of screw engagement, and the severity to which the screw is broken or stripped. These case reports suggest several techniques that can be utilized to preserve the implant and remove all broken fragments of the screw. The management of these mechanical complications can be addressed without the use of screw retrieval kits in a safe and timely manner. OH
Oral Health welcomes this original article.
References
- P Satwalekar, KS Chander, BA Reddy, N Sandeep, N Sandeep, T Satwalekar. A Simple and Cost Effective Method used for Removal of a Fractured Implant Abutment Screw: A Case Report. Journal of International Oral Health. 2013;5(5): 120–123.
- SL Oh, D Barnes. Managing a fractured implant: A clinical report. The Journal of Prosthetic Dentistry. 2016;115(4):397-401.
- I Nergiz, P Schmage, R Shahin. Removal of a fractured implant abutment screw: A clinical report. The Journal of Prosthetic Dentistry. 2004;91(6):513-517
- HC Quek, KB Tan, JI Nicholls. Load Fatigue Performance of Four Implant- Abutment Interface Designs: Effect of Torque Level and Implant System. International Journal of Oral & Maxillofacial Implants. 2008; 23(2):253-262.
- SE Eckert, SJ Meraw, E Cal, RK Ow. Analysis of incidence and associated factors with fractured implants: a retrospective study. International Journal of Oral & Maxillofacial Implants. 2000;15(5):662-667.
- N Tagger Green, EE Machtei, J Horwitz, M Peled. Fracture of dental implants: literature review and report of a case. 2002. Implant Dentistry. 2002;11(2):137-143.
- D Flanagan. Management of a fractured implant abutment screw. Journal of Oral Implantology. 2016;42(6): 508-511
- LG Bakaeen, S Winkle, PA Neff. The effect of implant diameter, restoration design, and occlusal table variations on screw loosening of posterior single-tooth implant restorations. Journal of Oral Implantology. 2001; 27(2):63-72.
- MS Schwarz. Mechanical complications of dental implants. Clinical Oral Implants Research. 2000; 11(Supplement1):156-158
- MJ Jaarda, ME Razzoog, DG Gratton DG. Comparison of “Look-Alike” Implant Prosthetic Retaining Screws. Journal of Prosthodontics. 1995;4(1):23-27.
- RL Burguete, RB Johns, T King, EA Patterson. Tightening characteristics for screwed joints in osseointegrated dental implants. Journal of Prosthetic Dentistry. 1994; 71(6):592-599.
- G Siamos, S Winkler, KG Boberick. Relationship between implant preload and screw loosening on implant-supported prostheses. Journal of Oral Implantology. 2002; 28(2):67-73.
- TAPN Carneiro, MS Prudente, RS e Pessoa, G Mendonça, FD das Neves. A conservative approach to retrieve a fractured abutment screw–Case report. Journal of Prosthodontic Research. 2016; 60(2):138-142
- B Rangert, PH Krogh, B Langer, N Van Roekel. Bending overload and implant fracture: a retrospective clinical analysis. International Journal of Oral & Maxillofacial Implants. 1995; 10(3): 326-334
- HJ Conrad, JK Schulte, MC Vallee. Fracture related to occlusal overload with single posterior implants: a clinical report. Journal of Prosthetic Dentistry. 2008; 99(4):251-6
- G Mendonça, S Mendonça, D Baccelli, AJ Fernandes-Neto, FD Neves. Management of Fractured Dental Implants: A Case Report. Implant Dentistry. 2009; 18(1) 10-16
- HC Quek, KB Tan, JI Nicholls. Load Fatigue Performance of a Single-Tooth Implant Abutment System: Effect of Diameter. Oral Maxillofacial Implants. 2006; 21(6):929-936.
- LS Machado, EA Bonfante, RB Anchieta, S Yamaguchi, PG Coelho. Implant-abutment connection designs for anterior crowns: reliability and failure modes. Implant Dentistry. 2013; 22(5):540-545.
- RL Simon. Single implant-supported molar and premolar crowns: a ten-year retrospective clinical report. Journal of Prosthetic Dentistry. 2003; 90(6):517-521.
- Y Sato, N Shindoi, R Hosokawa, K Tsuga, Y Akagawa. A biomechanical effect of wide implant placement and offset placement of three implants in the posterior partially edentulous region. Journal of Oral Rehabilitation. 2000; 27(1):15-21
About the Authors
 Avery Donkin is a student at Queen’s University, entering the 4th year of her undergraduate BSCH degree in biology with a focus on life sciences and zoology. She is pursuing dentistry, and has worked and assisted Dr. Jaffer Kermalli, Periodontist, in his practice and on a dental mission in Zanzibar, Tanzania. Contact info: 647-993-7938; avery.donkin@gmail.com
 Dr. Jaffer Kermalli is a board-certified periodontics who teaches part-time at the Faculty of Dentistry, University of Toronto. He maintains a private practice in Richmond Hill and Timmins, Ontario. His practice focuses on periodontics & implant surgery as well as implant complications. Contact Info: kermalli@gtaperio.com
 Dr. Beatrice Leung is a certified prosthodontist and has been in private practice in the midtown Toronto and the York region for over 13 years. During this time, she has taught Prosthodontics to both the graduate and undergraduate students at the University of Toronto. Currently, she is a part time Assistant Professor at the university, responsible for the undergraduate didactic and clinical prosthodontic teaching. Contact Info: Beatrice.leung@dentistry.utoronto.ca
Follow the Oral Health Group on Facebook, Instagram, Twitter and LinkedIn for the latest updates on news, clinical articles, practice management and more!


