
Interproximal incipient caries, white spot lesions, fluorosis, hypo-mineralization. What would you do if it was your child, your friend, yourself? Would you cut into the tooth to place an intra-coronal restoration? Would you look for alternate treatment options? We all know that intra-coronal restorations come with removal of plenty of healthy tooth structure to access the lesion. Additionally, they come with risk of failure and subsequent re-treatment, taking even more tooth structure and more risk of failure. What would you do? Do you drill into the tooth or do you use re-mineralization modalities like fluoride varnish, calcium phosphate, silver fluoride, cross your fingers and hold your breath that the lesion doesn’t progress? One option is to use resin infiltration which is a minimally invasive and more definitive approach.
As clinicians we strive to be both as conservative as possible and as effective as possible in our treatment approaches. As dentistry evolves, new materials and technologies become available allowing us this reality. We can diagnose lesions at earlier stages of development thanks to improving imaging technology. We can also treat more conservatively, removing less tooth structure than ever before, thanks to ever-improving materials and techniques. In the case of resin infiltration therapy, we are now able to provide definitive treatment without removing any tooth structure at all. Resin infiltration therapy is a method halting the progression of both incipient lesions and white spot lesions. It can be used effectively in appropriate situations of either proximal or smooth surface locations. “ICON” is the name of the resin infiltration system, manufactured by DMG America. The method of resin infiltration is simple, consisting of only three steps: etch dry and infiltrate. Icon resin infiltration therapy includes the use of an etchant Icon-Etch (DMG America), drying agent Icon-Dry (DMG America) and infiltration of a highly fluid, unfilled, light-curable resin Icon-Infiltrant (DMG America). Each step and material holds a specific function. The etchant, Icon-Etch (DMG America), prepares the surface of the tooth creating porosities. The drying agent, Icon-Dry (DMG America), dries the porosities that exist within the body of the carious lesion and provides a preview of the final result. The infiltrant, Icon-Infiltrant (DMG America), is then carried into the body of the lesion by capillary action. Once light cured, the lesion progression is blocked, and its development is arrested at an early stage.1 This is a method of definitive tooth restoration that can be used in both primary and permanent teeth. Resin infiltration of either proximal or smooth surface lesions results in repair of the existing lesion and halting further progression by stabilizing the surrounding tooth structure.2,3,4 Beyond halting the lesion and preventing further progression, resin infiltration has been shown to be efficacious in preventing further demineralization.5 Randomized clinical trials in proximal lesions of permanent teeth show significant halting of the progression of lesions after 3 years.6 A recent systematic review and meta-analysis conclude that resin infiltration is effective in preventing caries progression on primary and permanent teeth, and that resin infiltration “has a significant advantage” over non-invasive measures, such as fluoride varnish and remineralization therapies. Additionally, the review states that resin infiltration should be considered as a feasible option when treating initial carious lesions.7 Even more evidence shows that resin infiltration is more efficacious for controlling carious lesion progression than fluoride varnish and it is found to be acceptable by most children.8,9
The advantages of resin infiltration are obvious. Drilling and anesthesia are not necessary. The procedure itself is painless, and treatment requires only a single visit. Due to the efficacy of the method of resin infiltration, tooth structure is saved, local anesthesia is avoided, patient experience is better and long-term costs for restoration of the lesion are significantly decreased.10,11,12
Success with any dental procedure depends upon three critical factors. First and foremost is the selection of the appropriate patient, second is correct diagnosis and third is the knowledge and mastering of the material and technique required. Resin infiltration therapy is a procedure that requires approximately 15-30 minutes to complete, from start to finish. The etchant is comprised of 15% hydrochloric acid and thus contact with soft tissue is contra-indicated and soft tissue must be protected. The resin infiltrant is a hydrophobic material which requires an absolutely dry field. Given these two requirements patient selection is important to ensure a favorable outcome. The patient must be calm and compliant enough to tolerate either rubber dam or an isolation device for the time required to infiltrate the lesion. Correct diagnosis of the lesion is critical to the effectiveness of the treatment. Because of the ability of the Icon-Etch and Icon-Infiltrant to penetrate, Icon can be used in lesion depths of enamel 1 (E1), enamel 2 (E2), and dentin 1 (D1). Restorative procedures may be required for dentin 2 (D2) and dentin 3 (D3) lesions, as well as cavitated enamel. Fig. 1 illustrates lesions appropriate for Icon use. Careful attention to technique is necessary to achieve ideal results. Key to success of the technique is strict adherence to manufacturer’s instructions. The amount of scientific literature behind each step of the technique is enormous. Composition, timing, concentration, frequency, and repetition of each of the steps is cited in several studies and the most effective practices recommended and outlined here are a result of these investigations.13-17
Fig. 1

Methods for interproximal use and smooth surface differ only slightly due to the location of the lesion and accessing it. Treatment of proximal surfaces will be addressed here first. Critical to success is to isolate the area to be treated and to separate the interproximal area. An effective method to separate is with the use of an orthodontic separator. This can be placed up to one week prior or as little as 15 minutes prior to treatment. The goal is to allow for adequate separation of the teeth, approximately 50-80 micrometers prior to placement of the green separating wedge (included in the Icon kit). After isolation, the green separating wedge is placed interproximally and the orthodontic separator is removed. At this point visualization of the interproximal lesion is possible. (Figs. 2 & 3) The wedge is placed at a straight angle, so as not to cause any harm to the gingival tissues. Gentle consistent pressure should be used until the first resistance is felt. Leave the wedge in place for several seconds before slowly advancing further thereby achieving the maximum separation possible. Your patient will feel this pressure initially, but a few seconds later pressure anesthesia will eliminate the sensation. The placement of topical anesthetic will help keep your patient comfortable. Following isolation and separation of the area, resin Infiltration involves only three simple steps: etch, dry and infiltrate.
Fig. 2

Fig. 3

Etchant:
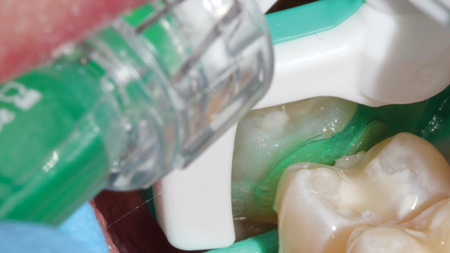
The Icon-Etch (DMG America) is 15% hydrochloric acid and is dispensed from a screw style syringe. The syringes have applicator tips which are single use and disposable. Attach the applicator tip, called a foil, to the syringe of Icon-Etch (DMG America). The foil is two sided and colored green on one side and white on the other. The green side of the foil is the active side, with perforations to allow for dispensing the Icon-Etch (DMG America). The syringe is placed interproximally and the etchant is dispensed by twisting the plunger. (Fig. 4) Care must be taken to avoid contact of the Icon-Etch (DMG America) with soft tissue. The Icon-Etch (DMG America) is left in contact with the lesion for 2 full minutes. Agitation of the Icon-Etch (DMG America) is beneficial while it is in contact with the proximal surface for maximum etching to occur. After 2 full minutes, rinse for 30 full seconds and air dry. The purpose of this step is to erode the surface layer of the lesion to allow for penetration of the Icon-Infiltrant (DMG America).18,19,20
Fig. 4
Drying Agent:
Icon-Dry (DMG America) a 99% ethanol solution is applied, and left in place for a full 30 seconds. The area is then dried with oil free air. This completely desiccates the lesion and tubules which allows for capillary action to uptake the infiltrant.
Infiltration:
The Icon-Infiltrant (DMG America) is a highly fluid unfilled resin with a high penetration coefficient that will be carried into the lesion’s porosities by capillary action and light cured, occluding the microporosities, thereby preventing further demineralization.21,22 It is very light sensitive material and thus, it is important to remove any direct overhead light sources to avoid premature curing of the Icon-Infiltrant. Attach an applicator tip to the Icon-Infiltrant (DMG America) and apply by twisting the syringe. Add Icon-Infiltrant (DMG America) periodically and infiltrate for 3 minutes. This ensures an adequate supply of resin to the lesion. Remove any excess material and light cure 40 seconds. Repeat the infiltration process with a new applicator tip. Leave undisturbed for one minute, remove excess again and light cure an additional 40 seconds.
Finish:
Final finish is accomplished by removing any excess infiltrant material with floss and hand instruments.
Further to the ability to treat interproximal lesions, Icon has the remarkable ability to mask out many smooth surface white spots, post-orthodontic white spot lesions,23,24 brown spots, hypo mineralization associated with molar incisor hypo-mineralization and lesions caused by fluorosis. The discolored appearance is masked due to reduction of light scattering.25 The refraction index of the Icon-Infiltrant is similar to enamel and so the lesion is virtually “erased”, giving an excellent esthetic result.26 The remarkable benefit for smooth surface lesions of this feature of refractive index is that once treated, it will effectively make the lesion disappear. Although this is an irrelevant point for our interproximal lesions, it is very relevant for our smooth surface lesions. Resin infiltration minimizes or eliminates the appearance of the white spot, brown spot or fluorosis lesion when placed on smooth surfaces. This is a truly revolutionary way to arrest smooth surface lesions and provide an esthetic result without any anesthesia and without any removal of tooth structure.
The method is very similar to interproximal use with the exception, of course, of the separation. Smooth surface treatment of a case of hypo-mineralization with Icon resin infiltration is illustrated in Figs. 5-12. Initial situation pre-operative of smooth surface incisor hypo-mineralization is shown in Fig. 5. Proper isolation is imperative to protect soft tissue and maintain a dry working field. Fig. 6 The tooth or teeth to be treated must be cleaned with a pumice or non-fluoridated prophylaxis paste, or it may be lightly abraded with a diamond bur. Fig. 7 The surface of the lesion is then treated with Icon-Etch (DMG America). This is applied with the provided syringe to an area extending approximately 2 mm around the edges of the lesion. Fig. 8 The hydrochloric acid is left in place for the prescribed time, washed and dried. It is advisable to agitate the acid during this time to prevent buffering and allow for a better result. An ethanol drying agent Icon-Dry (DMG America), supplied in a syringe in the Icon kit, is applied as directed. Fig. 9 At this point, remove direct overhead light source to avoid premature light curing of the Icon-Infiltrant (DMG America). Attach a vestibular tip to the Icon-Infiltrant and apply by twisting the syringe. Leave undisturbed for 3 minutes, and then preview the result prior to light curing. If further masking is required, continue to feed the Icon-Infiltrant to the lesion. Once satisfied with the result, light cure and repeat the infiltration process with a new vestibular tip for an additional 60 seconds, then light cure again. Fig. 10 Immediate post-operative situation is shown in Fig. 11 and 2 week follow up in Fig. 12. Icon resin infiltration is a truly revolutionary minimally invasive solution for this child with hypo-mineralization lesions. The results are nothing short of incredible.
Fig. 5
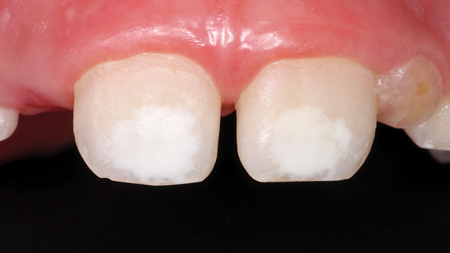
Fig. 6
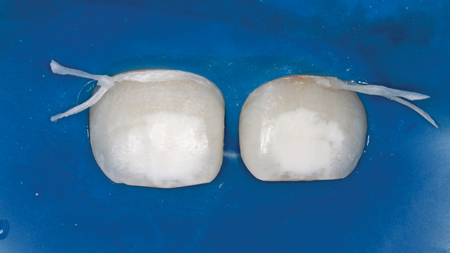
Fig. 7
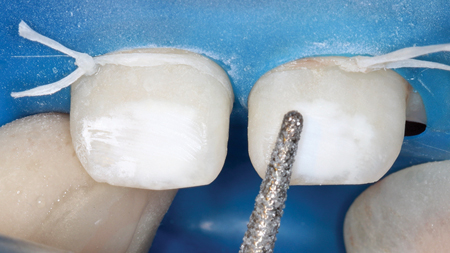
Fig. 8

Fig. 9

Fig. 10

Fig. 11

Fig. 12

Resin infiltration is a treatment that is minimally invasive, effective, and definitive. Patients can be cared for without the use of local anesthetic, without removing health tooth structure and expect definitive long-lasting results within minutes of application. Interproximal lesions of appropriate depth and without visible cavitation can be successfully treated minimally invasively and painlessly. Smooth surface lesions can be masked and erased. The Icon-Infiltrant creates a resistant and impermeable barrier. It is a treatment that I would want for my children, my friends and myself.
Oral Health welcomes this original article.
References
- Arslan S, Zorba YO, Atalay MA, et al. Effect of resin infiltration on enamel surface properties and Streptococcus mutans adhesion to artificial enamel lesions. Dent Mater J 2015;34(1):25-30.
- Paris S, Meyer-Lueckel H, Kielbassa AM. Resin infiltration of natural caries lesions. J Dent Res 2007, 86(7):662-6.
- Paris S, Meyer-Lueckel H. Resin Infiltration of Caries Lesions: an Efficacy Randomized Trial. J Dent Res 2010, 89 (8):823–826.
- Martignon S, Tellez M, Ekstrand K, Lara JS, Gomez J, Cortes A. Progression of Active Initial-proximal Lesions After Infiltration, Sealing or Flossing- instructions. J Dent Res 89 (Spec Iss A): 2519 (2010).
- Paris S, Meyer-Lueckel H. Caries inhibition by infiltrants in situ. Caries Res 43: 228, (Abst. No.136), (2009).
- Martignon, S., K. R. Ekstrand, J. Gomez, J. S. Lara, and A. Cortes. “Infiltrating/Sealing Proximal Caries Lesions A 3-year Randomized Clinical Trial.” Journal of dental research 91, no. 3 (2012): 288-292.
- Faghihian R, Tarrahi M, Zakizade M. Efficacy of the Resin Infiltration Technique in Preventing Initial Caries Progression: A Systematic Review and Meta-Analysis. Pediatric Dentistry
V41 / No 2 Mar / Apr 19. - Dorri M, Dunne SM, Walsh T, Schwendicke F. Micro-invasive interventions for managing proximal dental decay in primary and permanent teeth. Cochrane Database Syst Rev. 2015 Nov 5;(11).
- Meldrum A, Thomson WM. Resin Infiltration of Caries in Primary Molars in a Community Setting: 24-Month Randomized Controlled Trial Findings. JDR Clin Trans Res. 2017 Jul;2(3):287-294.
- Mendes Soviero V, Soares de Oliveira B, Aparecida de Lima Ferreira ME, Garcia dos Santos M. Aceitabillidade do tratamento micro-invasivo para lesões proximais não cavitadas em crianças. FC 76, ID 6518, FDI, Salvador de Bahia, Brazil (2010).
- Schwendicke F, Meyer-Lueckel H, Stolpe M, Dörfer CE, Paris S (2014) Costs and Effectiveness of Treatment Alternatives for Proximal Caries Lesions. PLoS ONE 9(1): e86992. doi:10.1371/journal.pone.0086992
- Alkilzy M, Splieth C. Clinical applicability and safety of resin infiltration of proximal caries. Caries Res 44: 171–248, Abs. 49, (2010).
- Paris, S, Soviero V, Seddig S, Meyers Lueckel H. Penetration depths of an infiltrant into proximal caries lesions in primary molars after different application times in vitro. International Journal of Pediatric Dentistry September 2012, 22(5), pp 349-355.
- Paris S, Meyer-Lueckel H. Influence of application frequency of an infiltrant on enamel lesions. J Dent Res 2008, (Spec Iss B):1585.
- Paris S, Meyer-Lueckel H, Cölfen H, Kielbassa AM. Penetration coefficients of commercially available and experimental composites intended to infiltrate enamel carious lesions. Dent Mater 2007, 23(6):742-8.
- Meyer-Lueckel H, Paris S, Kielbassa AM. Surface layer erosion of natural caries lesions with phosphoric and hydrochloric acid gels in preparation for resin infiltration. Caries Res 2007, 41(3):223-30.
- Paris S, Dörfer CE, Meyer-Lueckel H. Surface conditioning of natural enamel carious lesions in deciduous teeth in preparation for resin infiltration. J Dent 2010; 38: 65 – 71.
- Meyer-Lueckel H, Paris S, Kielbassa AM. Surface layer erosion of natural caries lesions with phosphoric and hydrochloric acid gels in preparation for resin infiltration. Caries Res 2007, 41(3):223-30.
- Paris S, Meyer-Lueckel H, Kielbassa AM. Resin infiltration of natural caries lesions. J Dent Res 2007, 86(7):662-6.
- Meyer-Lueckel H, Paris S, Kielbassa AM. Surface layer erosion of natural caries lesions with phosphoric and hydrochloric acid gels in preparation for resin infiltration. Caries Res 2007, 41(3):223-30
- Paris S, Meyer-Lueckel H. Inhibition of caries progression by Resin infiltration in situ. Caries Res 2010;44:47-54.
- Paris S, Meyer-Lueckel H. Caries inhibition by infiltrants in situ. Caries Res 43: 228, (Abst. No.136), (2009).
- Feng CH, Chu XY. Efficacy of one year treatment of ICON infiltration resin on post-orthodontic white spots. Beijing Da Xue Xue Bao 2013;45(1):40-3.
- Feng C, Liu R, Liu R, Zhao Q, Chu X. Effect of infiltration resin on the color masking of labial enamel white spot lesions. Hua Xi Kou Qiang Yi Xue Za Zhi 2013; 31(6):597-9.
- Paris S, Keltsch J, Dörfer CE, Meyer-Lückel H. Visual assimilation of artificial enamel caries lesions by infiltration in vitro. Caries Res 44: 171–248, Abs. 41, (2010).
- Paris S, Meyer-Lueckel H. Masking of labial enamel white spot lesions by resin infiltration – A Clinical report. Quintessence Int 2009;40:713-8.
About the Author
 Dr. Cohn is a general dentist, devoted solely to the practice of dentistry for children. She graduated from the University of Manitoba in 1991 and then went on to complete a post-graduate internship in Paediatric Dentistry. Since then, Dr. Cohn has devoted herself to the care and treatment of children only. She maintains a private practice at Kids Sleep Dentistry Winnipeg and Kids Dental in Winnipeg, Canada. Dr. Cohn is a partner, and has surgical privileges at Western Surgery Centre, a private surgical clinic. In addition to private practice, she is a part time clinical instructor, in Paediatric Dentistry at her alma mater, Gerald Niznick College of Dentistry at the University of Manitoba.


