
The classic “Endodontic Triad” is founded on the three pillar principles of cleaning, shaping, and packing. More specifically, the historical triad was described as debridement, sterilization, and obturation. However, the best mental and technical process for actually achieving cleaning, shaping, and packing is best understood from the perspective of the proper 3 “F” technical sequence. The 3 F’s are: finding, following, and finishing canals focus on the biologic and mechanical objectives required in treating every endodontic canal. Once this simple thought process is recognized, the 3 F guidelines become the watchwords for what to do when in endodontic treatment. The 3 F’s also coach dentists on how to focus on the outcome they want, how to measure the milestones along the way, and what to do differently if they are not getting the desired result. In other words, dentists know where they want to go in endodontic mechanics, how to get there, and what, why, and how to do things differently if they are not getting there.
Finding
For the restorative dentist performing endodontics, finding canals are one of the biggest technical problems that must be overcome in order to treat the patient’s endodontically diseased tooth. By understanding dentinal color maps, the typical location of orifices, and virtual rehearsing with the ToothAtlas (toothatlas.com), finding endodontic canals, while not always easy can indeed make their location easier and even enjoyable.
I have listed 12 practical techniques to improve a dentist’s ability for successfully finding endodontic canals:
1. Microscope and 3-D CBCT—As clinicians, if we can see it, we can treat it.1 The operating microscope allows dentists to see at an unprecedented level of accuracy (Fig. 1A). In daily dentistry and certainly endodontics, the endodontic microscope brings us closer to reality. In order to remain competitive and be at the top of their game, the dentist of the future will need to see with more precision. The microscope does just that; not just for the dentist but also the patient and the dental assistant. It is not a question of if the microscope will be part of every dental practitioner’s future, but when. To be ahead of the curve of excellence, dentists must be able to see and do dentistry as well as educate their patients, create perceived value, and reveal real value. If a picture is worth a thousand words, a live video feed of the patient’s very own dental procedure is worth 10,000 words. Predicable dental mastery is in the details and the microscope provides the simultaneous magnification and illumination to achieve a “what you see is what you get” experience for the dental team and the patient.
Figure 1A

Zeiss and Global Surgical microscopes with magnification and simultaneous illumination bring the dentist closer to reality. When dentists can see it, they can do it.
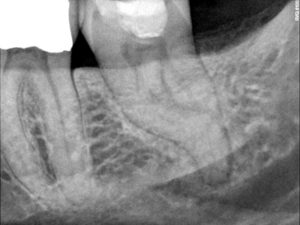
Digital imagery, especially in endodontics, much like the microscope, brings the clinician closer to the reality of diagnosis, treatment options, and treatment mechanics. The simple act of making images dozens of times larger on a monitor allows the dentist to identify root canal system anatomy and obstacles. CBCT digital imaging provides a 3-D blue print of the same 2-D root canal system anatomy and can often give the information needed for the dentist to make the endodontic diagnosis and lead toward the proper treatment plan and sequence where a 2-D image may be insufficient or even misleading (Fig. 1B).
Figure 1B

CBCT 3-D instruments such as the CS 9300 (Carestream Dental) bring the dentist closer to reality even further. 3-D imaging has the ability to literally see inside teeth
2. Access Cavity—Successful shaping and cleaning begin with the ideal access cavity.2 The balance between the size and design of an access versus unimpeded and unfettered access cavities is a renewed conversation in the endodontic literature. Like many controversies, the pendulum swings back and forth often due to emerging structural and biologic determinants coupled with new technologies. These changes may disrupt traditional mechanics while still producing the needed biologic requirements for either healing or preventing lesions of endodontic origin. As structural technologies improve, such as new breakthroughs in bonding, the need for meniscal access designs is actually less and less important. In fact, the standard and proper endodontic access cavity has less importance than the restorative preparation in so far as structural integrity. The so-called notion of “minimally invasive endodontics” should take into consideration what Nature herself considers minimally invasive. Modern endodontic access cavities and appropriately shaped canals for facilitating shaping, cleaning, and predictable 3-D obturation do, in fact, perfectly mimic the natural root canal system both in access cavity (simply de-roofing the chamber) and radicular shaping. The only tooth structure that is removed in ideal endodontic accesses is the roof of the chamber and the dentinal triangles; neither of which “weaken” the tooth. Ideal radicular preparations also mimic Nature’s shapes by reproducing 7% to 10% tapers that travel from the minimal apical constriction to Nature’s coronal radicular width of between one fifth and one third the diameter of the coronal portion of the canal. No transformation of paradigm shift is needed here. No new articles about minimally invasive endodontics should be wasted on attempts to make endodontic preparations smaller than the ones that have genetically evolved for more than 900 human generations. Nature knew and still knows what she is doing. The term “maximally appropriate endodontics” is actually the desired “appropriate” term and goal. Until one of the parts of the Endodontic Triad (cleaning, shaping, or obturation) experiences a radical change in technology such as sterilization without shaping, the current concepts of “maximally appropriate” cleaning, shaping, and obturation is the fundamental philosophy and methodology of today’s best practices.
3. Microexplorer – The classic DG 16 endodontic explorer is too large in diameter to identify and penetrate the entrance to endodontic canals that are undergoing calcific metamorphosis, or calcific degeneration, or just plain shrinkage with time. The purpose of a narrower endodontic explorer is to pierce within the orifice of narrowing canal without simultaneously blocking it with collagen or “dentin mud” (Figs. 1C-1E).
Figure 1C

The JW 17 Microexplorer (CliniMed) enables the dentist to pierce the endodontic orifice without blocking it with collagen or dentin mud which larger explorers tend to do.
Figure 1D

Microexplorers (lower image) are narrower than the classic DG 16 explorer (upper image).
Figure 1E

Illustration shows the difference between sliding through orifice dentin mud or collagen versus collecting the mud or collagen and blocking the canal orifice.
4. Chairside Reference – Prudent clinicians laminate this chart from the author’s chapter in Michael Cohen’s 2008 Quintessence text: Interdisciplinary Treatment Planning: Principles, Design, Implementation so that the reference is readily available during endodontic canal finding (Fig. 2A).
Figure 2A

Cohen text reference of average number of canals characteristic for every tooth.
5. ToothAtlas – The best practice endodontic clinicians preview ToothAtlas images prior to treating any particular tooth number. Becoming accustomed to the both trends and variables of any particular tooth produces knowledge and confidence. It also alerts the dentist about any specific tooth local knowledge and/or booby traps. Imagine that you plan to endodontically treat a patient’s maxillary lateral incisor. You say to yourself: “Maxillary lateral incisor…piece of cake! One canal and I can see it right in front of the patient’s mouth.” However, when you peruse the ToothAtlas, a maxillary lateral incisor common characteristic jumps out at you. Most canals end with an abrupt turn to the distal and often the palatal! This apical “hook” is often blocked, a shelf is formed, and the lateral incisor ends up with an under-filled root canal system. The answer of treating the entire root canal system starts with awareness and there is no better awareness than the ToothAtlas (Fig. 2B).
Figure 2B

ToothAtlas is a useful virtual roadmap rehearsal before actually treating a specific endodontic tooth.
6. New Burs – New burs are a must, not a luxury, for efficient access preparations.
7. Mueller Burs and Ultrasonics – Like the ultrasonic tip, the Mueller bur allows the clinician to see and do simultaneously, which results in control (Fig. 2C). By having a long shaft, the head of the handpiece does not block the view of the bur, and therefore the bur can be precisely positioned for accuracy. In addition, the bur cleanly cuts the dentin and reveals the canal entrance rather than smearing the dentin, concealing the canal orifice, as is the case with ultrasonics. The main value of ultrasonics in this endodontist’s experience is in endodontic disassembly such as removing posts and broken instruments. Ultrasonics are excellent for removing dentinal triangles and refining the walls, as well as removing denticles and calcifications from the chamber and coronal orifice entrances.
Figure 2C

Mueller burs have the advantage of penetrating and then identifying the canal orifice entrance by leaving a “white dot” that is filled with hydroxyapatite and identifies the entrance to thecanal itself.
8. Calcify Crown-Down – Pulps die and calcify crown-down.3 In other words, root canal system anatomy becomes wider when penetrating deeper (Figs. 2D & 2E). Rather than thinking that: “I can’t find the canal,” think: “the canal is not yet present at the current preparation depth. Go deeper.” Nature never does its own root canal. It only looks like it sometimes. Before the dentist is uncomfortably deep, however, it is important to bring in an endodontist before accidental root perforation in order to keep in the patient’s best interest and well-being.
Figure 2D

Illustration of typical maxillary anterior root canal system.
Figure 2E

Canals calcify crown-down in response to aging but more specifically due to carious and restorative trauma.
9. Dentin Road Maps and Dentinal Triangles – Stay away from white dentin areas because a perforation is soon to follow!
A bite-wing radiograph is essential before the endodontic access of posterior teeth to determine the occlusal-gingival width of the chamber. Sometimes a crown may block this measurement. In access of these teeth, if the dentist seems deep enough to have prepped through the chamber roof in a full crown tooth but has not, pause to take a right angle radiograph to avoid inadvertent perforation through the chamber floor versus the chamber roof (Fig. 2F-2K).
Figure 2F

Pretreatment image of mandibular left first molar revealing apparent calcified pulp chamber.
Figure 2G

When locating the narrow roof of a calcified pulp chamber, a treatment film is valuable to prevent perforation of the chamber floor versus the roof. If the image is not perfectly positioned at a right angle to the rubber dam clip, the access depth cannot be seen.
Figure 2H

Image not yet perfect so improve the angle further.
Figure 2I

Finally, the clinician can see that the current access depth is far short of the chamber floor and can safely penetrate a couple of millimeters deeper until the dentin roadmap allows discovery of the canal orifices.
Figure 2J

Modified bite-wing of mandibular right first molar. Note calcified chamber.
Figure 2K

Arrows outline dentin roadmap for location of MB canal orifice. Mueller bur penetration in brown color map (surrounded by arrows), is where the MB orifice is waiting to be found!
Figure 2L

Q-Mix (Dentsply Sirona Endodontics), agitation with the EndoActivator (Dentsply Sirona Endodontics), makes identification of small seemingly blocked orifices possible.
In addition, each posterior tooth should have three well-placed horizontal images before the access cavity: mesial, perpendicular, and distal. Some endodontists also want a CBCT image, especially in retreatment situations in order to better unravel the diagnosis and improve predictability.4
10. Orifice Location and Root Shape – If the is a canal in the center of the chamber of a mandibular molar, there is only one distal canal. However, if there is a canal in the DL or DB of the mandibular molar, 100% of the time, there will be another orifice in the other corner of the access cavity. If you cannot find it, you simply cannot find it yet. It is there, waiting to be discovered. Remember, canals calcify crown-down. You need to follow the dentin color maps with the Mueller bur and go deeper.
11. Q-Mix Trick for Narrow Orifice Location – If you follow a narrow or calcified canal orifice with the Mueller bur but cannot yet slide a small file into the canal, irrigate with Q-Mix (Dentsply Sirona Endodontics), which has a surfactant in it with the EndoActivator (Dentsply Sirona Endodontics) for 10 minutes (Fig. 2L). This technique removes the mineralized dentin (collagen plus hydroxyapatite), which is densely crushed and packed by the Mueller bur into the previous narrow porous space of the calcified canal. The now dentin “plug” which appears as a white dot will usually be patent and allow a narrow manual file such as the No. 6 to slip and slide down the canal.
12. Restraint – The previous 11 specific tips and hints focus on products and technique in canal finding. The twelfth tip and hint concentrates on principle. Finding canals takes restraint as well as a thoughtful strategy using patience and intention. The expected canal is almost always present and rather than “not being able to find the canal,” instead think that the canal is “simply not present at my access location.” Step back, take a deep breath, review and reorient yourself, look at CEJ root anatomy for canal location clues and take a CBCT 3-D image if you are completely lost. The key here is to slow down and step back. Sometimes we cannot see the forest for the trees. It is true in endodontic canal Finding as well. The canal is still there and waiting to be discovered!
Following
First, remove all access dentinal triangles (Figs. 3A-3C). Manual “instrumentation” or glidepath validation and creation are the lost art of endodontics. Following canals from their orifice to their terminus are also the missing link of mechanical endodontics and represents in many ways the most difficult part of endodontics if certain rules and principles are not followed. The dentist must be vigilant to the certain manual mechanical performances and understand the skill of restraint. Our survival of the fittest has largely been just that: the strongest of our species has survived. While that trait may have been useful to fight off predators, lack of food and water, and challenging elements, fight or flight does not work in endodontics. In fact, it makes things worse because when the dentist pushes, blocks, ledges, and transportations result. Glidepaths are lost and so is the 3-D endodontic seal. When following canals with small manual files, restraint and yield are the best watchwords allowing the file to literally “slide” down the existing walls of the canal. If the file does not easily navigate the canal, there are four reasons for this: (1) The canal is blocked with dentin mud, collagen, or previous endodontic obturation material; (2) the angle of incidence and the angle of access are different – that is, the selected curve on the file does not easily mimic the curve of the canal and cannot easily follow; (3) the tip of the hand instrument is too wide for the canal; or (4) the shaft of the file is too wide for the canal, ie, restrictive coronal dentin is preventing the instrument to travel deeper into the root canal system. The dentist often thinks, “It is tight at the end of the canal” while, if fact it is tight at the coronal portion of the canal.
Figure 3A

ProTaper Gold SX auxiliary Ni-Ti file (Dentsply Sirona Endodontics) allows for gentle and predictable removal of dentin triangles for unrestricted entrance into the root canal system.
Figure 3B

First brushing and then following is an excellent technique for removing coronal interferences such as dentin triangles and coronal restrictive dentin due to crown-down calcification.
Figure 3C

Brushing and Following with ProTaper Gold Shapers or any Ni-Ti file pre-enlarges canal coronal section for easy finishing without removing unnecessary dentin. (Figures 3a to 3c original images are courtesy of Advanced Endodontics, Santa Barbara, Calif.)
I have listed three practical techniques to improve dentist’s ability to follow canals from their orifice entrance to the radiographic terminus:
1. Curving Manual Files – Perhaps the number one trick in successful canal following besides restraint, is to pre-curve the endodontic file in one or two planes before every entry into a canal with the intention of following to the radiographic terminus (Fig. 3D).
Figure 3D

Precurve every manual file before every entrance into the canal while preparing the glidepath. A curved file is a smart file and can randomly follow Nature’s canal configuration.
2. Manual Glidepath Distinction of 4 Manual Motions – The four manual glidepath motions are as follows: follow, smooth, envelope, and balance.
Follow has to do with gliding down the canal until the radiographic terminus. Following requires being gentle and patient. You cannot go further until this essential step is complete, so take your time here, stay mistake-free, and enjoy being successful.
Smooth has to do with vertical in and out strokes with increasing amplitude until the file can easily travel more than several millimeters of canal length. Remember, you are only wearing away or smoothing enough of the canal wall to guide Ni-Ti shaping.
Envelope has to do with removing restrictive dentin with the hand file that does not easily progress to the radiographic terminus. One common and often forgotten reason that a file does not easily progress down a canal is restrictive dentin against the coronal part of the file shaft. Envelope motion is performed by following a pre-curved file short of maximum resistance, and then simultaneously turning clockwise and removing the file in order to carve away the restrictive dentin and then follow motion until either repeating the envelope short of maximum resistance or following to the radiographic terminus. The envelope is the only form of dentistry that occurs as the dentist is withdrawing from or leaving the tooth!
Balance is used when a smooth No. 10 hand file glidepath is established but the clinician desires an enlarged glidepath prior to rotary. A No. 15 file can be used in this case safely and predictably by turning the file clockwise at the point of resistance, then counter clockwise with slight apical pressure and proceeding to radiographic terminus as long as the file easily progresses. If not, remove the file in a clockwise direction, clean file flutes, and repeat to the radiographic terminus followed by smoothing motion and then Ni-Ti rotary.5-7
3. Mechanical Glidepath – Many clinicians feel safer with an enlarged glidepath that is wider than the glidepath produced with a No. 10 loose file.8 Progressing to a size No. 15 runs the risk of blocking or ledging, since the No. 15 file is 50% wider at the tip than a No. 10 file. Some schools even teach the use of a No. 20 file at length or slightly short before rotary shaping. This, too, predisposes the dentist to blocking, ledging, or transporting since the No. 20 file is actually 33.3 wider at the tip than a No. 15 file! This is smooth glidepath sabotage in the making. A safer, more predictable, and more efficient glidepath enlargement can be accomplished using a mechanical glidepath file such as ProGlider (Dentsply Sirona Endodontics), which, in essence is a baby ProTaper (Dentsply Sirona Endodontics) meaning progressively increasing tapers. A singe mechanical glidepath file makes all rotary and especially reciprocation easier and safer (Fig. 3E).
Figure 3E

ProGlider (Dentsply Sirona Endodontics) enables safe mechanical glidepath enlargement for all rotary and reciprocation endodontic Shaping.
Finishing
Finishing is essential to endodontic predictability. The successful endodontic clinician must finish as strong as when they start. The same time, energy, and concentration are needed during all 3 F’s. Finishing is divided into: shaping, cleaning, conefit, and obturation.9
1. Shaping
Shapers and finishers and two distinct Ni-Ti file designs and are novel to the ProTaper concept of incrementally preparing shapes in delicate dentin versus “drilling out” shapes with fixed tapered Ni-Ti files. Endodontic clinicians have control when they progressively shape canals by first removing restrictive dentin with shapers (in other words, rough out the canal) and then finish the shape using finishers to connect the dots between the minimal apical constriction and the appropriate one fifth to one third the root with at its coronal termination.
Shapers are used in a brush/follow motion and finishers are used in a follow/brush motion. First, brush to the side of the canal and then let the shaper follow deeper and then repeat to length. In other words, paint your way to the apex. Finishers are used with the same watchwords but in reverse order: follow/brush. So gently follow down the canal and then brush out. Then repeat to length.
A particularly useful technique with special heat treated, highly flexible Ni-Ti rotary instruments is the pre-curving of the file before canal entry (Figs. 3F-3H). This curving enables the dentist to sneak into the access over the access cavity cavosurface versus approaching straight down the canal. Therefore, the patient does not need to open as far, and canal entry is more graceful and easy. In addition, the pre-curving creates an immediate Ni-Ti file envelope of motion which encourages the file to shape and clean into the intricacies of the root canal system as well as creating a shape slightly larger than the geometry of the file itself, which improves efficiency.
Figure 3F

ProTaper Gold S1 placed into electric handpiece.
Figure 3G

ProTaper Gold S1 curved gently against finger.
Figure 3H

Curve partially remains and allows better access over access cavosurface as handpiece can approach more parallel to the curve of Spee versus perpendicular to it, requiring the patient to sometimes open to an impossible position for them.
When is shaping completed? When the apical flutes are visibly loaded with dentin, the exact shape is finished and the dentist can count on the corresponding gutta-percha cone to fit. The canal is then ready for vertical compaction of warm gutta-percha of carrier- based obturation.
When do you conefit? When the apical blades are loaded with dentin, the canal is ready for a predictable conefit.
2. Cleaning
Full-strength sodium hypochlorite is the ideal irrigant during following and glidepath preparation, as this solution digests detached collagen and removes dentin mud. If collagen is suspected apically, a viscous chelator such as ProLube (Dentsply Sirona Endodontics) is useful in emulsifying the collagen. Ethylenediaminetetraacetic acid (EDTA) is useful during rotary as the indiscriminant chelator slightly softens glidepath walls for easier shaping and simultaneously removes smear layer. EDTA, or yet better Q-Mix, which has the benefit of a penetrating surfactant, should be agitated with the EndoActivator to remove any remaining smear layer before drying and obturation.10
3. Conefit
Conefit is the lost art of endodontics. When I teach dentists endodontic technique, conefit is one of the least understood aspects of treatment. Conefit is a skill in and of itself. To assume the matching cone will fit the matching file is inaccurate. While cone sizing is improving (NanoFlow Gutta-Percha [Dentsply Sirona Endodontics]), root canal anatomy is never perfectly round in all canals (Fig. 3I). Therefore, how to fit a custom master cone is essential in order to produce the least gutta-percha/dentin distance by distorting the apical gutta-percha and, therefore, least relying on sealer that still remains the weakest link in endodontic obturation. Although reported improved sealers are being introduced into the endodontic literature, very few reports have been published on their suitability for warm gutta-percha compaction.
Figure 3I

Matching ProTaper Gold Finishing files and special machine made gutta-percha (Dentsply Sirona Endodontics).
4. Packing
The author’s thinking is that the clinician’s obturation technique preference becomes less significant as our ability to clean and sterilize root canal systems increases. Nonetheless, a standard measurement of the quality of endodontic treatment remains the efficacy and thoroughness of obturation based on final radiographic images. It is paramount to remember the rationale of endodontic success is simply and profoundly still true: “If the root canal system is rendered inert through shaping, cleaning, and sealing the portals of exit, lesions of endodontic origin will be cured where they exist and prevented where they do not exist.” The final radiograph represents the metric of the clinician’s endodontic performance.
Obturation technique is a personal preference and may vary from single cone with sealer, lateral condensation, and vertical compaction of warm gutta- percha to carrier-based obturation. This author prefers the predictability and choices offered in the vertical compaction techniques (Figs. 3J-3K).
Figure 3J
Pretreatment image of mandibular left second molar.
Figure 3K

Finished result using all the principles and technique described in this article as well as ProTaper Gold Shaping and Cleaning technology. (Courtesy of Dr. Jason West.)
Closing Comments
Many dentists start endodontic procedures without a clear goal in mind. This article summarizes a thought process and guide for dentists to follow. The exact steps needed to perform predictable endodontics have been reviewed and explained. With a plan, the dentist can truly be in control.
The 3 F’s: Find, Follow, and Finish are presented as a roadmap to get where we need to go in endodontic success, mark the milestones along the way, and know what to do differently if you are not getting there. This is what gives the clinician the freedom of knowing and the feeling of mastery. It is a place where the dentist experiences as newfound level of competence, consistency, and confidence.
Endodontic problems for overcoming. Freedom for proving. OH
Oral Health welcomes this original article.
References
- West JD. The role of the microscope in 21st century endodontics: visions of a new frontier. Dent Today. 2000;19:62-69.
- West J, Chivian N, Arens DE, et al. Endodontics. In: Goldstein RE, Chu SJ, Lee EA, et al, eds. Esthetics in Dentistry. 3rd ed. 2016: Shelton, CT; People’s Medical Publishing House USA: chapter 24. In press.
- West JD. Ten myths about endodontics: “fact versus pulp fiction.” Dent Today. 2014;33:118-125.
- West JD. The role of endodontics in interdisciplinary dentistry: Are you making the right decisions? Dent Today. 2014;33:80-85.
- West JD. The endodontic Glidepath: “Secret to rotary safety.” Dent Today. 2010;29:86-93.
- West JD. Manual versus mechanical endodontic Glidepath. Dent Today. 2011;30:136-140.
- West JD. Glidepath implementation: “Return to the beginning.” Dent Today. 2011;30:90-97.
- Ruddle CJ, Machtou P, West JD. Endodontic canal preparation: innovations in glide path management and shaping canals. Dent Today. 2014;33:118-123.
- West JD. Finishing: the essence of exceptional endodontics. Dent Today. 2001;20:36-41.
- Ruddle CJ. Hydrodynamic disinfection: tsunami endodontics. Dent Today. 2007;26:110-117.

Dr. West is founder and director of the Center for Endodontics in Tacoma, Wash. He graduatedfrom the University of Washington Dental School and received his MS degree and endodontic certificate at Boston University, where he has been awarded the Alumni of the Year Award. He is an educator and clinician, and his focus is interdisciplinary endodontics. He has authored several textbook chapters and is an editorial board member for the Journal of Esthetic and Restorativem Dentistry, Practical Procedures in Aesthetic Dentistry, and the Journal of Microscope Enhanced Dentistry. He can be reached toll-free at (800) 900-7668, via email at johnwest@centerforendodontics.com, or visit the website centerforendodontics.com.
RELATED ARTICLE: Dynamic Navigation For Orthograde And Retrograde Endodontics


