
The dental implant is a prosthetic device delivered through a surgical process. It allows clinicians to replace one or multiple missing teeth without damaging the remaining dentition.
Many attempts have been made in the literature to define the success, failure, and the factors that will influence the outcome. As clinicians, our focus should be on providing our patients with prosthetics that mimic nature, and will allow them to smile, talk, and chew. We need to create a situation where hopefully they are able to maintain the implant for the rest of their lives.
The best way to simplify any process is to start with the basic principles. In dentistry, we do this by stepping back and looking at the big picture. We start by analyzing the macro esthetics to create dento-facial harmony and let that guide our treatment process. We can then focus on the little things, such as the microaesthetics of embrasures, surface texture, line angles and halo effects among many others.
Proper macro aesthetic planning is our main job in aesthetic dentistry. This is especially important in dental implant prosthetics during the early stages of the restorative process. Each individual tooth has a specific position within the face and the smile. The use of facial references is the compass which leads us in the right direction, in combination with basic dental morphology concepts like size and proportion. (Fig. 1)
Fig. 1A

Fig. 1B

In the restorative stage of the dental implant process, we are fortunate to be able to visualize the outcome before placing our final restoration. We can use transitional restorations as prototypes that can be modified as needed, at a very low cost. The temporary restoration is an opportunity to visualize the final product without irreversible consequences. We can make the temporaries longer, shorter, adjust embrasures, and make changes to the soft tissue profile to create ideal contours. Most importantly, we can also evaluate the patient’s perception of the outcome. This reduces the stress for the clinician, patient, and lab technician, as we are removing as many variables as possible. Oftentimes, a temporary restoration may simply confirm whether an implant can be restored or not.
Clinical Case:
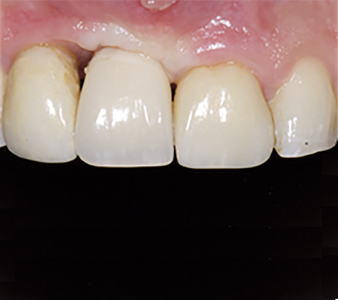
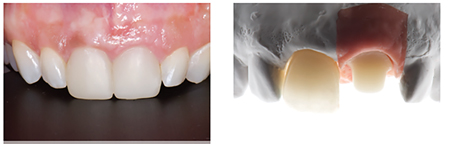
After the initial evaluation of the macro esthetics and visualization of our end goal, we can proceed with the clinical work. Upon removal of the old restorations, healthy tooth structure was found on 1.1 and an apparent cast gold abutment on 2.1. The next step is creating a transitional restoration with our new goals in mind. The biggest modifications we are looking to make here are in the cervical embrasure between 1.1 and 2.1 to create room for the papilla and the cervical contours to create a more natural emergence from the soft tissues. (Fig. 2)
Fig. 2A

Fig. 2B

Fig. 2C

We know from reliable studies that the distance of the contact point of the teeth to the bone height will affect the amount of tissue we can expect to fill in. Ideally, we want anatomically correct contours and no bone defects. However, if there is no bone to support the tissue, the case can become a lot more challenging. In those cases expectations need to be managed or additional treatment alternatives must be explored. (Fig. 3)
Fig. 3
In this case, a bisacryl material was used (PerfecTemp by DenMat) with a VPS template to fabricate a chairside temporary. Direct chairside temporaries are convenient because they are quick and can be modified easily with composite if necessary. Another very good alternative would be the use of jet a chairside acrylic resin (for example jet acrylic) or if there is a need for something more sophisticated a milled indirect temporary could be fabricated. (Fig. 4)
Fig. 4A

Fig. 4B
The restorative options for dental implants are very broad and unfortunately there is no perfect universal solution for every case. As much as we enjoy “recipes” for clinical scenarios to optimize results, we are not there yet in terms of implant restorative aesthetics. Temporary abutments can either be plastic or metal, however there is no huge benefit of one over the other on the final outcome. It seems to be a consensus that ideally implant temporary restorations should be screw retained. For this case, the existing gold abutment was maintained only as a temporary abutment for convenience.
Oftentimes the question at this stage is: “Should the contours of the transitional restoration’s emergence be convex, concave or flat?”. Also, what changes are needed at the critical and subcritical contours? Truly, the answer begins with the incisal edge position that will be based on facial references. The zenith of the restoration has to be positioned based on the desired size and proportion. These two variables are non-negotiable. The final critical and subcritical contour will depend on tissue volume and the position of the dental implants as it relates to the cervical aspect of the tooth. The focus should be getting the restoration to appear natural and that it is simple in the right spot. The remaining variables are just a matter of connecting the dots between the cervical aspect and the implant platform in a way that the soft tissue remains in an ideal position.
Implant abutments can be classified by material or by manufacturing process. With recent advances in implant dentistry materials, there are not many situations where cast abutments are the preferred choice. Cast abutments are prone to distortion during the manufacturing process which are significant at the connection level. The fit of the connection plays a significant role over long term bone and tissue stability. Alternatively, we can find machined prosthetic components that provide a superior fit, with the option of being prefabricated or custom made. Another possibility is a combination of both custom and prefabricated, for example we can use a prefabricated titanium base with a custom zirconia emergence profile. (Fig. 5)
Fig. 5A

Fig. 5B
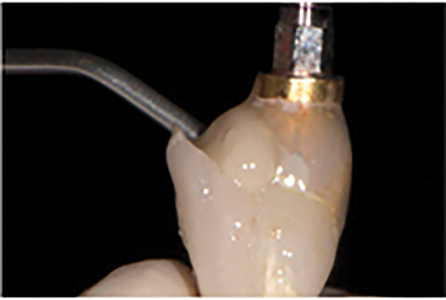
Fig. 5C

Once the transitional restorations create a pleasant smile, especially in terms of tooth position and gingival architecture, the clinician’s responsibility is to communicate these to the dental technician. Photographs, digital and or analogue impressions are commonly used. Also, it is the doctor’s responsibility to recommend the final prosthetic design taking into consideration mechanical, biological and aesthetic factors. The doctor will suggest abutment material and design, if the goal is screw retained or cement retained and also the target shade. Sending this information with an open mind and welcoming feedback from the dental technician is important as well.
Now with all the basic steps followed and lined up properly, we can focus on the micro aesthetics and pay attention to the aesthetic details to get the best possible outcome. Checking the size and position of embrasures (facial, lingual, incisal and cervical), line angles, surface texture, stains and color effects are important parameters for the best results. If we provided accurate references, a
talented dental technician will be able to focus on the micro esthetics to provide an outstanding result. The technician can be confident that all the other variables have been managed well, so they can focus on the artistic aspect of the treatment.
Fig. 6A

Fig. 6B

Fig. 7

To complete the treatment and place the restorations is the final step where the clinician’s attention to detail and knowledge is critical. In this case the both final restorations were cement retained and it was decided to bond the restorations with resin cement to get the best possible aesthetic result since it was deemed as a high risk aesthetic case due to a high smile line. Cord and rubber dam with customized clamps were used to control excess cement and prevent future complications.
In terms of cement selection, the top recommendation is using temporary cement for cement retained implant restorations, due to its effect on anaerobic bacteria. The limitation is the amount of retention provided and the aesthetics due to the color of the cement. The second choice of cement would be zinc phosphate (ZP) cement since it also seems to prevent growth of anaerobic bacteria colonies and provide more retention. However the color of ZP cement does not allow it to be used with translucent restorations in the aesthetic zone. Hence the reason resin cement was used in this case, trying to minimize the risks as much as possible.
Fig. 8A

in stump shades of tooth and final implant abutment.
Fig. 8B

Fig. 8C

Fig. 9A
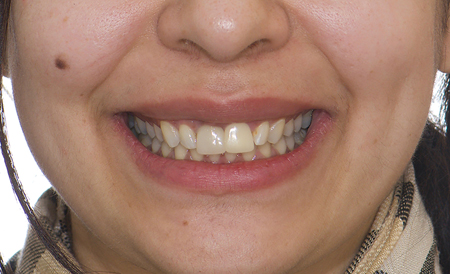
Fig. 9B
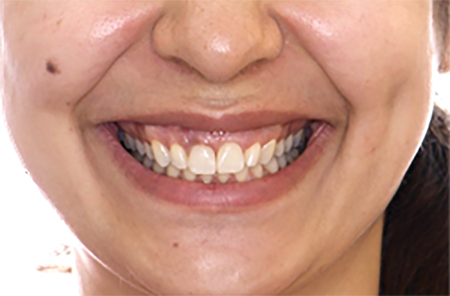
In conclusion, in order to achieve an excellent result that the patient and clinician are excited about, we need to understand the importance of stepping back and seeing the mouth as a whole. Ultimately we are not treating teeth or implants, we treat a person and the teeth need to be in harmony with the face. In the initial photo it was not possible to obtain a full, natural smile from the patient due to her lack of confidence in her smile. During the clinical evaluation, the high smile was noticed and the implications that it will have on the treatment. It is very important to understand each members’ role in a team. The doctor’s role is to place the smile and face in harmony, while creating a healthy stable foundation, so that a great technician can provide beautiful ceramic work. Together, we can provide the patient with an outcome that mimics nature. It’s important to always respect and credit the dental technician for their amazing work, and this case would not have been a success without Masayuki Saito.
Oral Health welcomes this original article.
References
- Chu SJ, Kan JY, Lee EA, Lin GH, Jahangiri L, Nevins M, Wang HL. Restorative Emergence Profile for Single-Tooth Implants in Healthy Periodontal Patients: Clinical Guidelines and Decision-Making Strategies. Int J Periodontics Restorative Dent. 2019 Jan/Feb;40(1):19-29. doi: 10.11607/prd.3697. PMID: 31815969.
- Fernández M, Delgado L, Molmeneu M, García D, Rodríguez D. Analysis of the misfit of dental implant-supported prostheses made with three manufacturing processes. J Prosthet Dent. 2014 Feb;111(2):116-23. doi: 10.1016/j.prosdent.2013.09.006. Epub 2013 Oct 28. PMID: 24176182.
- González-Martín O, Lee E, Weisgold A, Veltri M, Su H. Contour Management of Implant Restorations for Optimal Emergence Profiles: Guidelines for Immediate and Delayed Provisional Restorations. Int J Periodontics Restorative Dent. 2020 Jan/Feb;40(1):61-70. doi: 10.11607/prd.4422. PMID: 31815974.
- Raval NC, Wadhwani CP, Jain S, Darveau RP. The Interaction of Implant Luting Cements and Oral Bacteria Linked to Peri-Implant Disease: An In Vitro Analysis of Planktonic and Biofilm Growth – A Preliminary Study. Clin Implant Dent Relat Res. 2015 Dec;17(6):1029-35. doi: 10.1111/cid.12235. Epub 2014 Jun 6. PMID: 24909337.
About the Author
 Dr. Jose Viquez is a full time private practice prosthodontist. He graduated from Louisiana State University in 2014 and completed a dental implant and advanced aesthetics fellowship in 2015 at that same institution. He practices at the Southwest Specialty Group in Winnipeg, Manitoba. Dr. Viquez also dedicates one morning per week to teach 4th year dental students and runs the current literature review course for the graduate prosthodontics program at the University of Manitoba. Dr. Viquez can be reached by email at jd.viquezr@gmail.com or through Instagram @viquezprosthodontics.
RELATED ARTICLE: Aesthetic Restoration Of Maxillary Lateral Incisors With Direct Composite


