
Anterior Tooth Anatomy and Matrix Options
Freehand sculpting of anterior tooth anatomy using direct composite is challenging for even the most artistically talented clinician. The more surface area that is lost, along with anatomic landmarks, the more difficult it is to recreate the subtleties of anterior tooth form. Rebuilding the anterior interproximal surface presents its own inherent challenges as well. The emergence profiles, which are concave below the gingival crest, then convex in the gingival embrasure as the interproximal profile extends incisally toward the contact area, are extremely difficult to reproduce using traditional direct composite placement techniques. Most matrices are simply flat mylar strips and are incapable of reproducing such complex anatomic contours. Also, the limited access to the interproximal area with composite finishing burs, abrasive discs, and contouring strips makes it extremely difficult to create natural free flowing anatomic emergence profiles.
Restoring anterior proximal surfaces using direct composite can be a deceptively difficult procedure to perform because of some of the limitations described above. The emergence angles must be exaggerated to fill in an enlarged negative space in the gingival embrasure area between the adjacent teeth, creating physiologic contours while at the same time, closing the space and creating an anatomically precise and aesthetic restoration that blends into the natural tooth surface. It is much easier for the dental technician to control these contours when fabricating indirect ceramic restorations. Conversely, diastema closures with direct restorative materials are not as easy to perform as one might expect.
A Unique Matrix for Recreating Anterior Proximal Surfaces and Emergence Profiles
Traditional flat mylar strips or preformed celluloid crown forms have been the only matrix choices for anterior direct composite restorations for since composite resin has been in use. The limitations of these matrices are obvious. Mylar strips are flat and cannot properly reconstitute concave and convex physiologic profiles to the restorative material. The result is flat surfaces and “black triangles” between anterior teeth. Celluloid crown forms are not customizable enough to be used in all situations because of the extreme amount of variability in tooth size and morphology. In 2007, a truly anatomic and customizable anterior matrix was developed that can be effectively used to reproduce proximal physiologic contours and create beautifully aesthetic diastema closures when using direct composite. This System (Bioclear: Bioclear Dental) is a 50-micron mylar material, that is placed in intimate contact with the tooth structure and held in place with the rubber dam. No interproximal wedge is used, as the compression would distort the shape of the matrix. The latex material tightly holds the matrix in contact to the tooth surface so that there will be a flawless transition from tooth to restorative material as the convex emergence profile of the composite leaves the tooth surface. Once the “hip” of the restoration (the convex area below the interproximal contact) is formed with the matrix and heated flowable composite on both sides of the diastema is light cured, an anatomic wedge can be placed in the gingival embrasure to gain slight separation of the teeth so that the contact areas of the adjacent restorations can be completed using a “paste type” composite material.
The Technology of a “Nano Enhanced” Composite Material
Advances in composite resin technology have been largely on the filler side – changes in particle size, particle shape, or filler type, to try and maximize the aesthetic potential of the material while maintaining the physical properties necessary to enable the material to withstand the stresses of masticatory forces in the oral environment. With a “nano enhanced” composite material, such as Evanesce (Clinician’s Choice), the manufacturer reports of an innovative process that optimizes the refractive index of its unique nano pigments and fillers allows the material to “disappear” into tooth structure thus satisfying the demand for optimal aesthetics in the anterior region. It offers three different opacities so that when layered, it can more closely mimic the natural opacities of enamel and dentin. Most many cases, the universal shade alone can provide excellent shade blending with natural tooth structure. This is a critical component for optimal aesthetics since seamless blending the color of composite material into natural tooth structure is a difficult transition to clinically achieve.
Maxillary Lateral Incisor Restoration: Case Report
The patient (Figs. 1-4) presented after orthodontic therapy with maxillary lateral incisors that were too small to adequately fill the space between the central incisors and canines and maintain proper proportion and emergence profiles. The operative plan will be to use a nano-enhanced composite for this case to create natural contours and aesthetics because of the materials ability to seamlessly blend or disappear into the natural portion of the tooth. The “negative space” surrounding the diminutive lateral incisors is an aesthetic concern for the patient whose age dictates a direct restorative solution would be the most conservative option as opposed to indirect ceramic alternatives. The first step after the application of local anesthesia is to perform a gingival sculpting procedure with the diode laser (Figs. 5-6). It is important to note that the interproximal tissues are very dense and cannot be sufficiently displaced by either a direct or indirect restorative material in order to create the proper emergence profiles for the interproximal surfaces of the teeth. By performing a gingivoplasty and “creating a papilla” as a result, it will be possible to restore these areas to the proper contours. Isolation with retractors and a rubber dam (Fig. 7) is performed and a prophy polisher is used to remove the biofilm from the teeth (Fig. 8). The teeth are etched with 37% phosphoric acid for 15 seconds (Fig. 9), rinsed thoroughly then air-dried A bonding resin is then applied to the tooth surface, scrubbed in, air-thinned, and light cured.
Fig. 1

Fig. 2

Fig. 3

Fig. 4
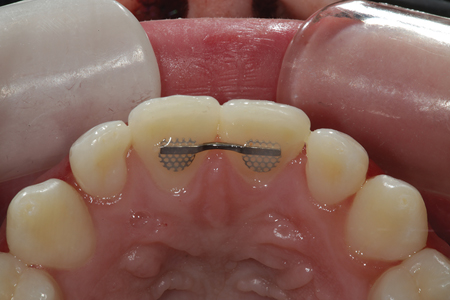
Fig. 5

Fig. 6

Fig. 7

Fig. 8

Fig. 9

It is difficult to create a convex emergence profile using a traditional mylar strip. An interproximal restoration using this matrix would have a flat emergence angle and a “black triangle” in the gingival embrasure, especially on a “misshapen lateral” incisor. Also, it is important to note that even if the clinician can create a convex contour to the composite using a freehand technique, finishing and polishing the area upon completion would be nearly impossible. Figure 10 shows a Bioclear matrix being held in place while flowable resin is injected between the matrix material and the tooth to create a physiologic interproximal tooth profile. Notice the convexity created by the exit of the matrix from the rubber dam, which holds the matrix tightly against the root surface without wedging. The heated flowable composite is expressed from the lingual proximal forward filling the matrix back to front. A plastic filling instrument (Goldstein Flexithin Mini 4: HuFriedy) is used to hold the labial portion of the matrix firmly against the facial surface of the tooth while light curing the increment (Fig. 11). Once cured, this forms the “hip” of the restoration, which is the portion of the composite that begins against the tooth subgingivally and extends to the inferior portion of the contact zone. Figure 12 shows the “hip” being placed on the contralateral maxillary lateral incisor closing the gingival embrasure area and correcting the proximal facial portion of the tooth on the distal aspect. Figure 13 shows both maxillary lateral incisors after addition of composite prior to finishing and polishing. Note the convex physiologic contours created by the Bioclear matrix and how they properly support the gingival tissues closing the negative space. These areas of the restoration are complete and should not be touched, if possible, with any finishing burs or discs. They will never be as perfect as they are immediately upon removal of the matrix material.
Fig. 10

Fig. 11

Fig. 12

Fig. 13

Contouring the facial “seam” of the restorations to blend with the natural tooth surface (Fig. 14), refine facial embrasures, proximal facial line angles (reflective line angles), and incisal edges is accomplished using a series of abrasive discs from course to extra fine (Super Snap Polishers: Shofu). Next, rubber polishers (A.S.A.P. all surface all access polishers: Clinician’s Choice) are used to further polish and enhance the luster of the restorations. A.S.A.P. polishers by virtue of their unique design can reach into embrasures and curved surfaces more efficiently than other shapes of polishers to enhance the luster of the composite (Figs. 15-16). If desired, a diamond polishing paste on a prophy cup can be used as a final polishing agent to even further enhance the finish of the restorations (Fig. 17).
Fig. 14

Fig. 15

Fig. 16

Fig. 17

Figure 18 shows tooth number 10 (22) after placement, finishing, and polishing. Interproximal surfaces can be contoured as needed using ContacEZ serrated diamond strips (Fig. 19). The strips in ContacEZ flex to maintain the convex contours of the proximal surface while making minor adjustments to that area when needed. The interproximal contact is check with dental floss after contouring and finishing is complete (Fig. 20). Figures 21-25 show various views of the completed restorations at two weeks post placement. It is important to note how well the contours of the restorations support the gingival tissues as well as the quality of the aesthetic result when using a nano-enhanced composite (Evanesce: Clinician’s Choice) material which gradually disappears and blends seamlessly with tooth structure creating “undetectable additions” to the restore these under contoured teeth.
Fig. 18

Fig. 19

Fig. 20

the restoration after completion.
Fig. 21

Fig. 22

Fig. 23

Fig. 24

Fig. 25

Oral Health welcomes this original article.
About The Author
 Dr. Robert A. Lowe received his Doctor of Dental Surgery degree from Loyola University School of Dentistry in 1982, where he graduated magna cum laude and second in his class. After graduating, he completed a one-year residency program at Edward Hines Veterans Administration Hospital. He received postgraduate training in different areas of dental care, including restorative and rehabilitative dentistry, cosmetic dentistry, endodontics, prosthodontics, periodontics, oral surgery, and sedation dentistry, completing a rotation in surgical anesthesia. Dr. Lowe has lectured at all of the major dental meetings in the United States, including the American Dental Association Annual Meeting, the American Academy of Cosmetic Dentistry, and the American Society of Dental Aesthetics.
RELATED ARTICLE: Direct Restorations In A Compromised Setting
Follow the Oral Health Group on Facebook, Instagram, Twitter and LinkedIn for the latest updates on news, clinical articles, practice management and more!


