
The field of implant dentistry has seen rapid innovation since Per-Ingvar Brånemark1 placed the first screw-retained dental implant in 1965. Yet, the approach to osteotomy creation has remained largely unchanged. Even with the advent of guided implant surgery and drilling innovations,2 patients are still expected to wait anywhere from three to six months for delivery of the final restoration after an implant is placed.
This article will discuss a new innovative and minimally invasive process in creating an implant osteotomy which may lead to increased predictability and decreased wait times for final implant restorations.
A New Approach to Osteotomy Creation
The implant stability “dip” that we see after three to four weeks following implant placement3 is theorized to be largely caused by the trauma, friction, heavy irrigation, and heat generated during conventional osteotomy creation. Clinicians have been taught that a decrease in initial stability around weeks 3-5 after implant placement is a normal part of the healing process.4 For these reasons, most clinicians wait anywhere from three to six months to load the implant with a definitive restoration.
A new implant system (N1TM Nobel Biocare) and its simple 3-step implant placement process of “shape, direct, place” may put into question the accepted notion that a large decrease in initial stability is a normal part of the healing process instead of a consequence of conventional osteotomy preparation. The “direct, shape and place” protocol of this innovative system is designed to reduce hard tissue trauma and protect the biology of the surgical site through utilizing only 2 minimally invasive steps to create the final osteotomy.5 As a streamlined workflow, this new system may also reduce chair time and reduce the number of appointments for patients.
Step 1 – Direct: Setting the depth and direction with OsseoDirector™
For this new implant system, the majority of cases only require two surgical steps to prepare the osteotomy. The OsseoDirector™ is the first and only bur that is used to prepare the initial osteotomy. It is run at conventional speeds of 1000-2000 RPM with irrigation and creates the pilot osteotomy of ~2mm in width.
The sharp tip of the OsseoDirector™ is designed to support bone engagement, while the fluted edges allow for efficient bone cutting in both apical and horizontal directions, when needed. (Fig. 1)
Fig. 1

Step 2- Shape: Shaping the final osteotomy with the OsseoShaper
Instead of relying on a sequence of widening drills, this implant system shapes the osteotomy with an innovative tool called the OsseoShaperTM. (Fig. 2) This instrument is packaged with every implant and acts as a coring tool that shapes the final width/length and dimensions of the osteotomy to receive the specific dental implant it is packaged with. It is specifically designed to follow the exact trajectory created in Step 1 by the OsseoDirectorTM.
Fig. 2
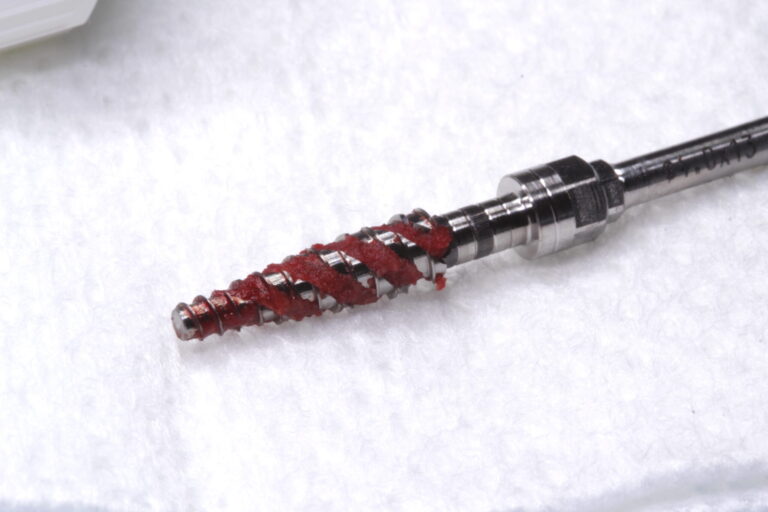
The OsseoShaperTM runs at a very low speed of 40-60 RPM with no irrigation. Similar to bone-tapping tools, the OsseoShaperTM runs forward until the desired osteotomy depth is achieved, then is reversed out, leaving behind a vital bone coagulum (including growth factors). The result is much less heat generation, which is believed to help decrease the so-called implant stability “dip” during the healing process.6-9
Furthermore, any bone that may have been traumatized by heat, friction, and irrigation through the use of the OsseoDirectorTM in Step 1 is now removed in a very atraumatic way leaving behind a vital bone coagulum that is available to bathe the hydrophilic surface of the implant and begin the contact osteogenesis process.6-9 (Fig. 3)
Fig. 3
The OsseoShaper™ instrument has shown to reduce trauma and create less heat and sound compared to conventional high-speed drilling techniques with irrigation.6-9
Step 3- Place: Implant placement with a Novel Trioval Conical Connection
The final step in this efficient 3-step implant surgery process is the placement of the specific implant for which the OsseoshaperTM has designed the customized osteotomy. The crest module of this new implant has a rounded triangular shape (Trioval) which also better resembles the shape of single rooted teeth. Furthermore, the actual conical connection of the implant is not engaged by the implant placement tool, which eliminates any chances of dimensional changes or stresses on the implant connection during implant placement. (Fig. 4)
Fig. 4

A preclinical study has shown that the trioval shape of this implant system helps to reduce cortical bone stress in comparison to traditional round implants and still provides initial stability.10 Excess cortical bone compression is believed to play a role in bone recession following implant placement.
The “One Abutment, One Time” Concept
The most fragile and important component of a dental implant restoration is the implant-abutment connection. This is where forces are concentrated, material changes may occur, and bacterial colonization may be problematic. Soft tissue adherence to components in this area have been demonstrated in the literature, and it has been postulated that repeated disruptions to implant-abutment connection may lead to continued and frequent tissue damage, leading to inflammatory responses that may result in subsequent bone remodeling. Recognizing that swapping of components into the implant-abutment connection is a routine part of implant restoration (eg. impression copings, abutment, crowns), it is understandable that tissue disruption readily occurs.11-12
The concept of placing an abutment into the implant-abutment connection on the day of placement or surgical uncovering seems sensible, but classically has limited the clinician restoratively to utilizing cemented restorations. As a result, this implant system has designed a novel restorative abutment platform to seal off the implant-abutment connection on the day of surgical placement or uncovering and yet permit restorative flexibility to provide a screw-retained final restoration that even provides angulated screw channel (ASC) solutions through a digital workflow. (N1 Base – Nobel Biocare) (Fig. 5) This concept was previously showcased in an Oral Health report in 2019 utilizing the On1TM treatment concept. (Nobel Biocare)
Case Reports: Cases Utilizing the 3-Step Efficient Process
The following case reports will showcase the utilization of all the concepts described above to treat a patient in a significantly shorter treatment time. (Case 1 Recently showcased in Dental Town)
Case 1 – Hopeless Maxillary Second Premolar
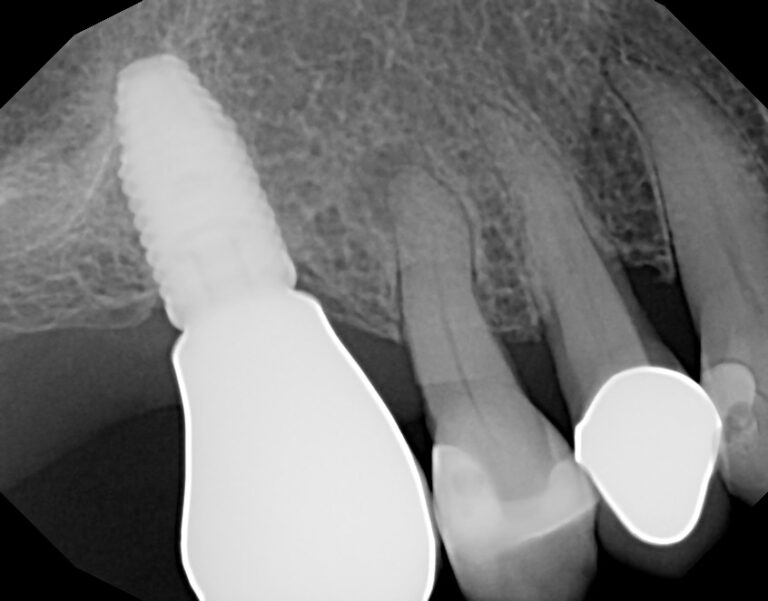
A 70-year-old patient presented with the chief complaint of pain in her upper right second premolar tooth.
Radiographic and clinical evaluation of the tooth revealed Grade 2 mobility and deep pocketing. The tooth was found to be cracked and possessed a periapical radiolucency. This tooth was determined to have a hopeless prognosis. (Figs. 6-8) The clinical solution was to extract the tooth and place an immediate implant in the socket. The patient had received other successful implant-supported restorations at our clinic. After learning of the new 3-step process available, she was excited about the prospect of having a shorter time to definitive crown placement compared to past restorations.
Fig. 6
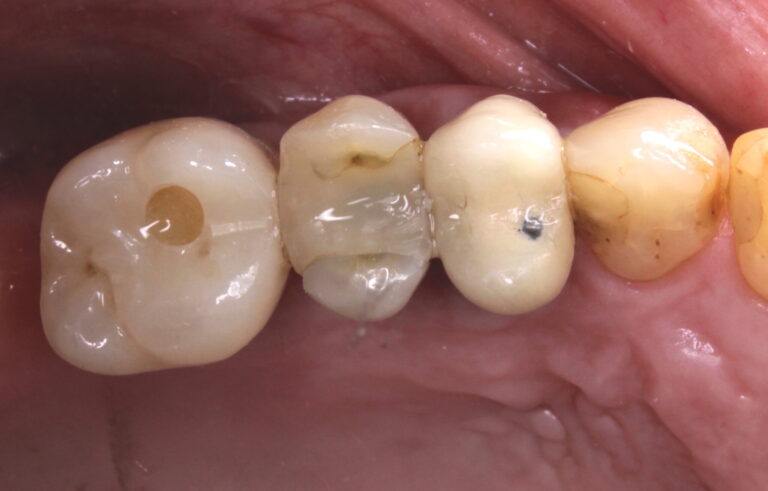
Fig. 7
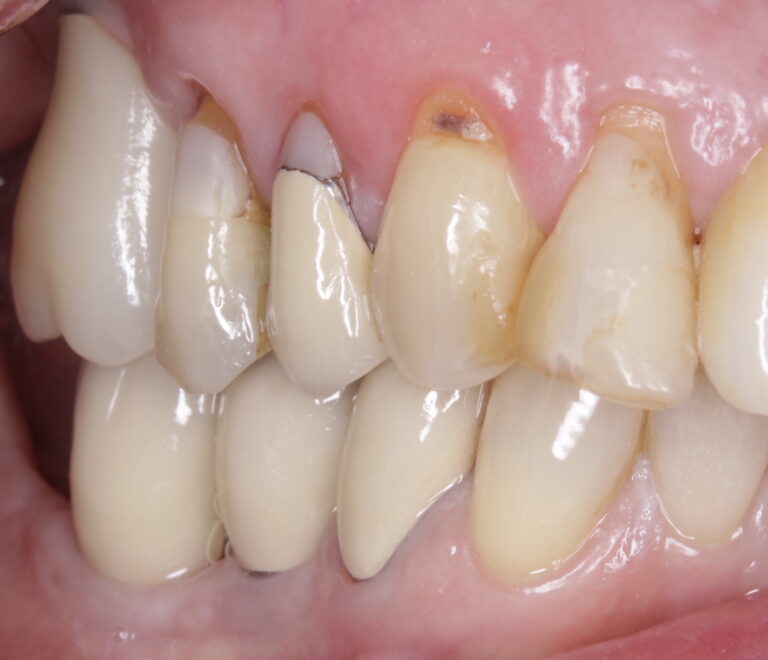
Fig. 8
The tooth was atraumatically extracted and the socket was thoroughly debrided and flushed. The socket classification was found to be a type 1 socket. (Figs. 9-10) The initial osteotomy was created using the OsseoDirectorTM under copious irrigation. A directional indicator was placed and a radiograph was taken to verify and evaluate the osteotomy trajectory. (Figs. 11-12) Next the implant was opened and the OsseoShaperTM was utilized to prepare the final osteotomy dimensions at very low speeds and no irrigation. The trajectory of the initial pilot osteotomy was precisely followed by the OsseoshaperTM. Osseous xenograft (Creos – Nobel Biocare) bathed in concentrated platelet rich plasma and L-PRF were then placed into the socket and compressed against the walls of the socket.
Fig. 9

Fig. 10
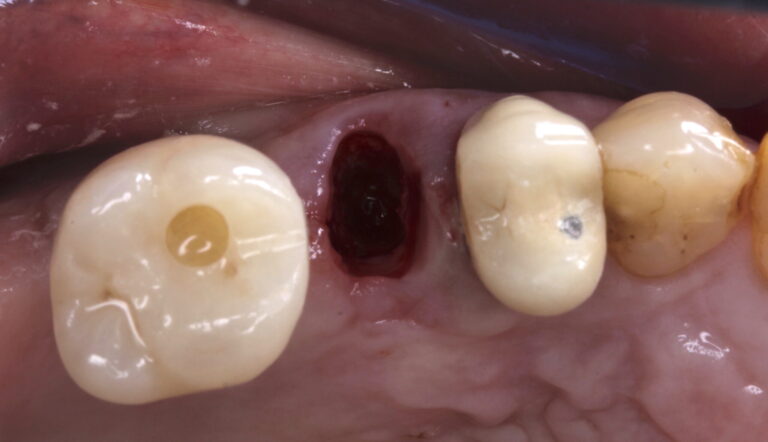
Fig. 11
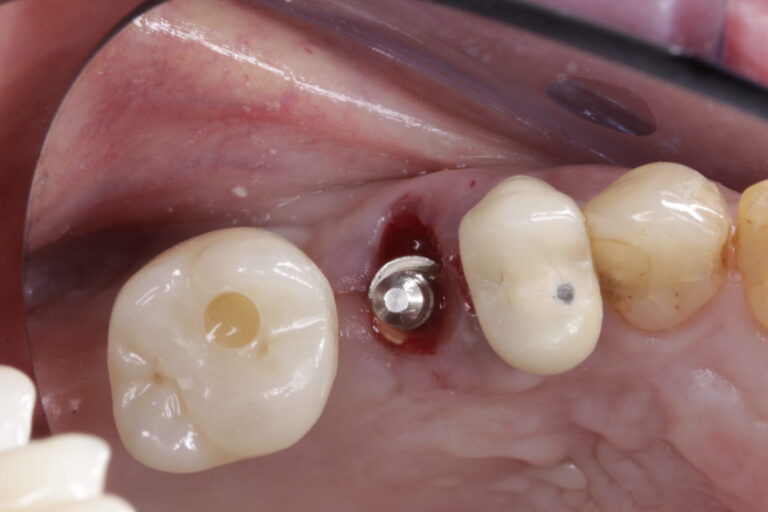
Fig. 12
The novel trioval conical connection implant was then placed 3 mm apical and 2–3 mm palatal from the proposed gingival zenith of the desired final restoration. Care was also taken to place the implant with the flat side of the trioval to the buccal aspect of the socket. (Fig. 13) An initial stability of >35 Ncm was attained from the implant placement, then bone milling was completed using a mill specific to this implant system. This step removes any bone or tissue above the implant connection that would interfere with the seating of the prosthetic components.
Fig. 13
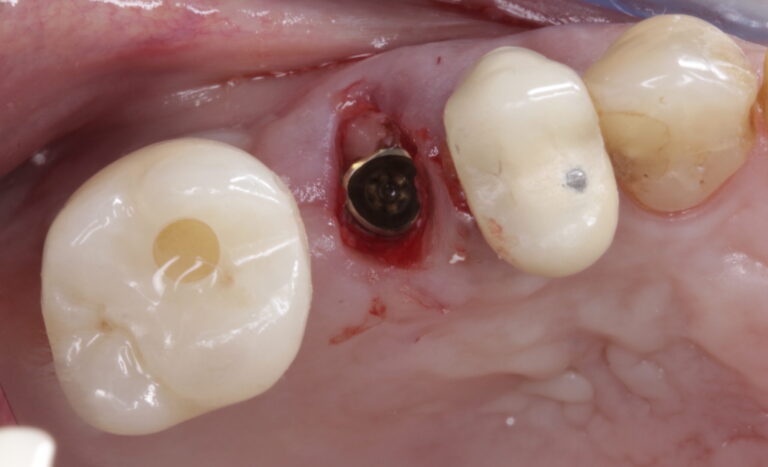
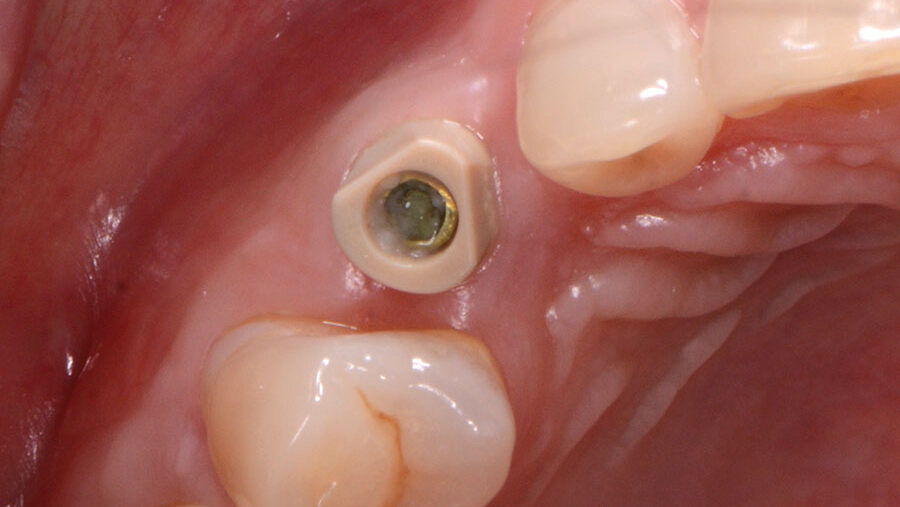
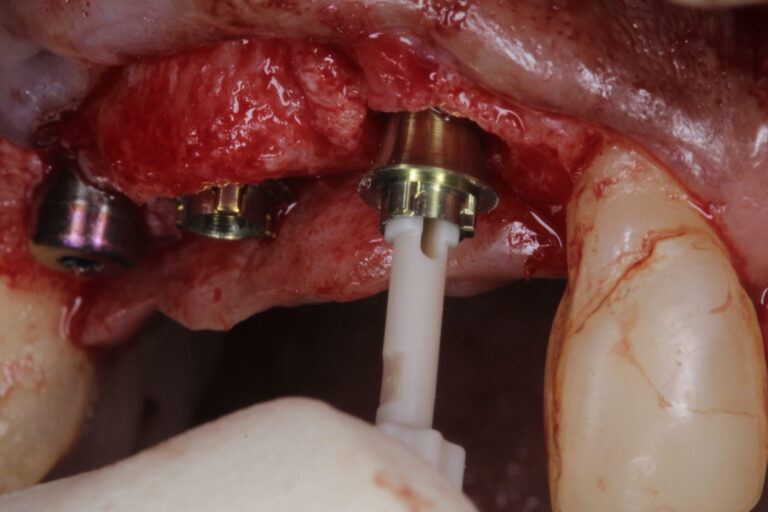
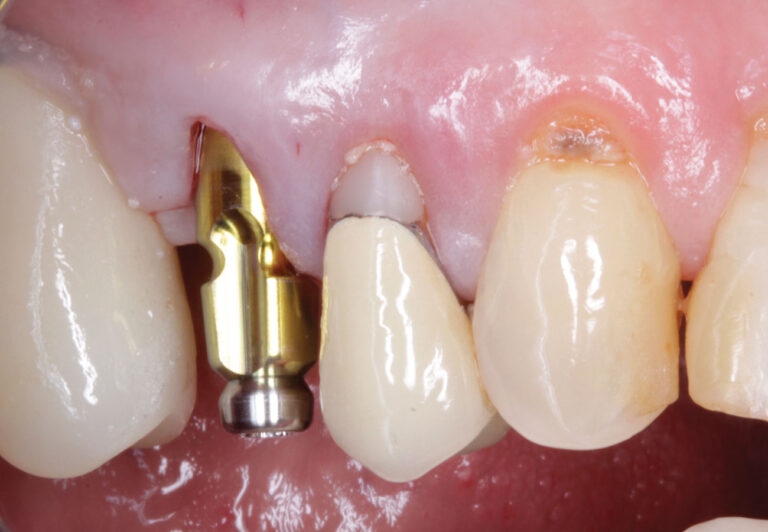
The novel “one-abutment, one-time” N1TM base was seated into the implant and torqued to specifications (20Ncm). (Fig. 14) A screw-retained provisional crown was then fabricated chairside using conventional restorative materials and a provisional abutment. (Figs. 15-17) A closed-tray impression of the base was then taken to create the future final restoration. (Fig. 18) Further osseous grafting was completed on the outside of the buccal plate and then the provisional crown was placed and torqued to specifications (20Ncm). The access hole for the provisional crown was filled with PVS impression material, and a final periapical radiograph was taken.
Fig. 14

Fig. 15
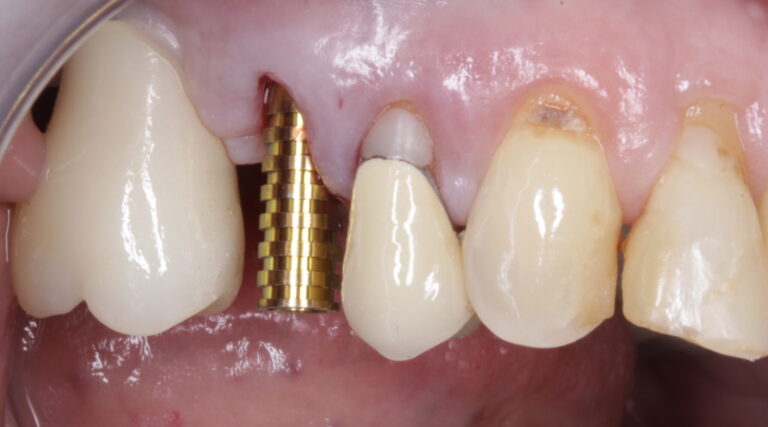
Fig. 16

Fig. 17

Fig. 18
During the postoperative appointment two weeks following implant placement, a single suture was removed. The surgical site showed exceptional soft-tissue healing and the patient noted virtually no discomfort over the past two weeks. (Fig. 19-20) The tissues were again inspected after the removal of the provisional crown. Great health and healing were evident.
Fig. 19

Fig. 20
The N1TM Base was again torqued to specifications (20 NCm) to evaluate stability of the implant, and no issues were found. The final screw-retained monolithic zirconia (ZirCad Prime, Ivoclar Vivadent) was seated onto the N1 Base and torqued to specifications (20 Ncm). Occlusion, proximal contacts, contours and aesthetics were all evaluated. After all these factors were approved by the patient, the access hole of the final crown was filled with Teflon tape and flowable composite and a final periapical radiograph was taken. (Figs. 21-23)
Fig. 21
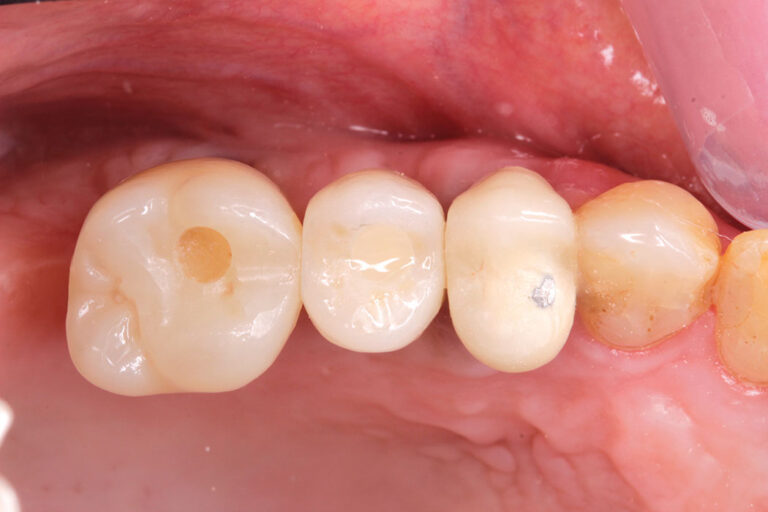
Fig. 22

Fig. 23

Over the next six months, the stability and healing of the implant site were monitored. The patient was then seen during the one-year follow-up appointment, at which point another periapical radiograph and photo were taken. Bone and tissue levels were ideal, and the patient was very happy with overall result. (Figs. 24-25)
Fig. 24
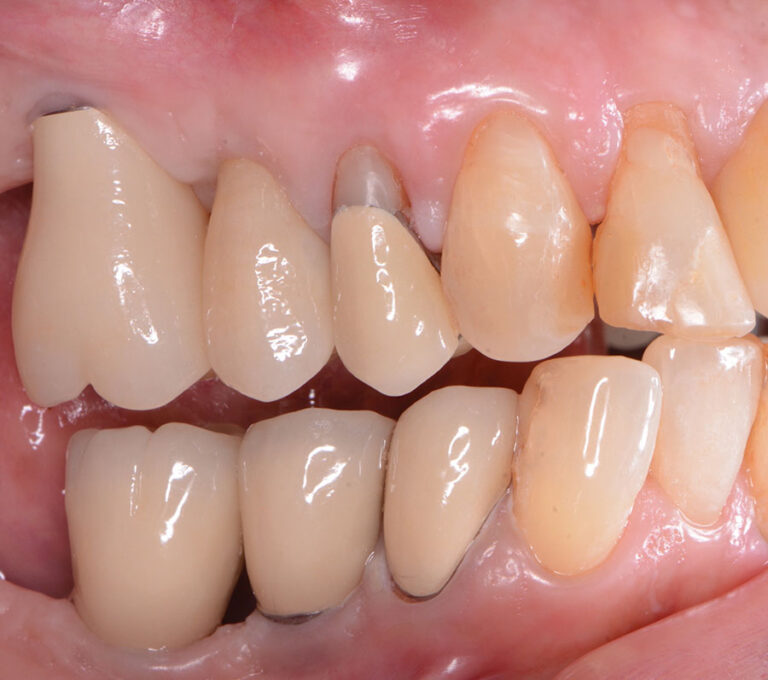
Fig. 25

Case 2 – Maxillary Canine
A 50-year-old patient presented with the chief complaint of a recently exfoliated primary tooth in the maxillary right canine position. (Figs. 26-27)
Fig. 26

Fig. 27

The solution agreed on was implant placement in the area to replace the tooth with simultaneous osseous & biologic grafting. The patient was excited to have this solution completed in a timely manner.
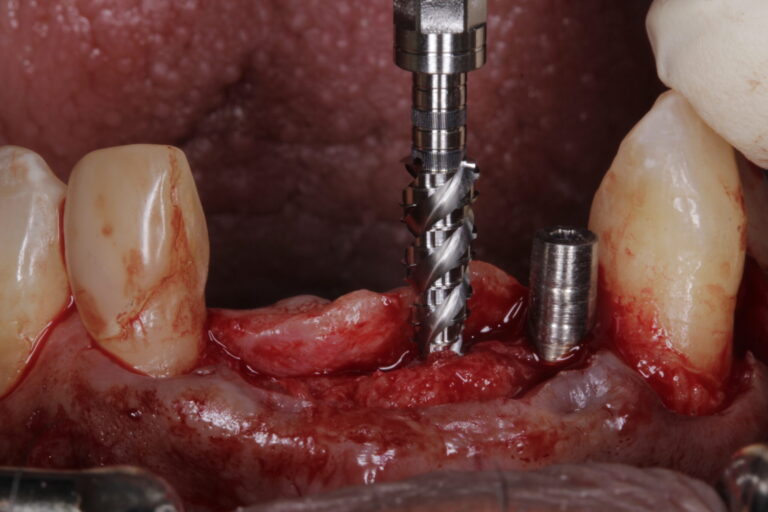
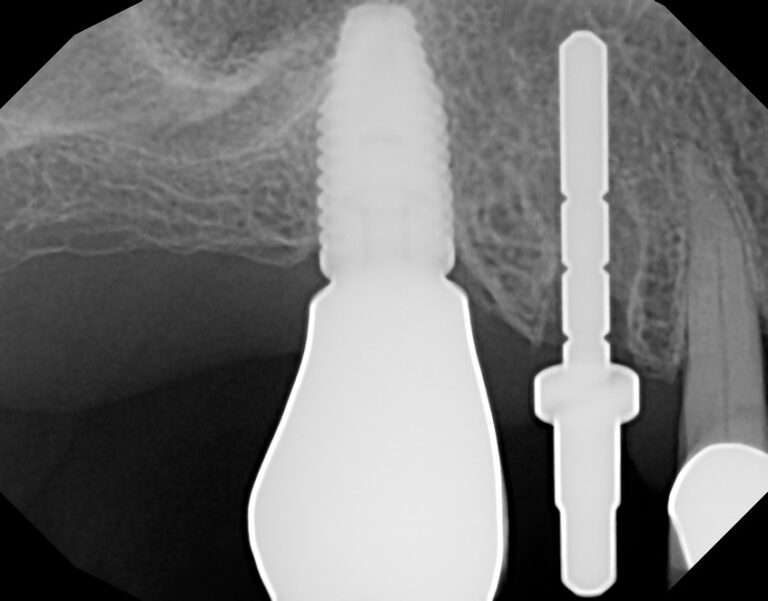
A conservative flap was reflected to better visualize the anatomy. The osteotomy was begun using the OsseoDirectorTM under irrigation. (Fig. 28) A radiograph was once again taken with the directional indicator in place. (Fig. 29) The implant was then opened and the OsseoShaperTM was utilized to prepare the final osteotomy dimensions. (Fig. 30) A piece of L-PRF was placed into the osteotomy prior to placing the implant.
Fig. 28
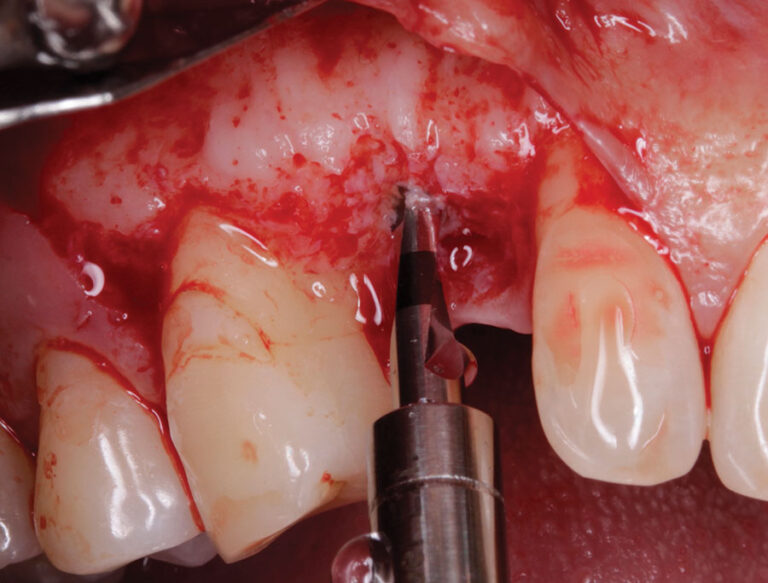
Fig. 29
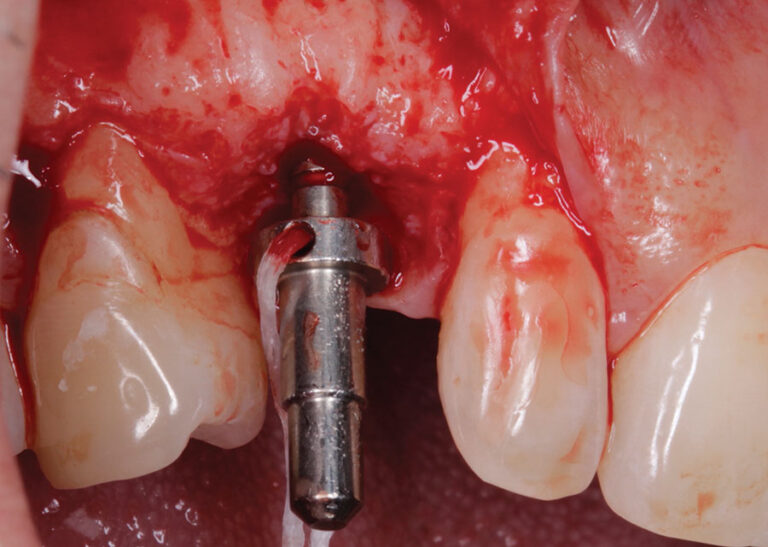
Fig. 30

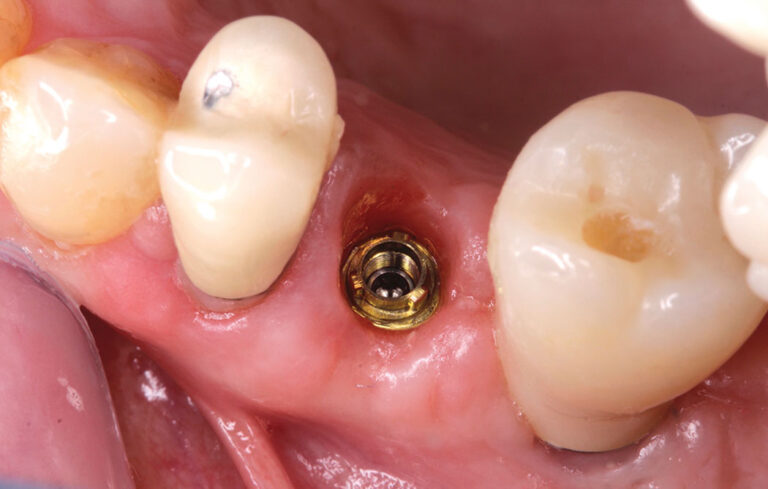
The trioval connection of the implant was again placed 3 mm apical and 2–3 mm palatal from the proposed gingival zenith of the desired final restoration with the flat side of the trioval connection being oriented to the buccal aspect of the ridge. (Figs. 31-32) Great initial stability (>35Ncm) was attained, and bone milling/profiling was completed. An N1TM base was seated into the implant and torqued to specifications (20Ncm). (Fig. 33) A specialized healing abutment that also acts as an IOS scan body was placed onto the base. (Fig. 34) Osseous & biologic grafting completed on the buccal aspects of the ridge, and the flap was then sutured closed. The case was evaluated at 2 weeks of healing and great tissue resolution was evident. After 6 weeks of healing, a digital impression of the IOS scan body healing abutment was completed as well as a shade selection. (Fig. 35) The final crown for the case was placed at the 9-week mark. (Figs. 36-37) Great healing and tissue thickness was evident. The patient was very happy with the form, function and esthetics of his new screw-retained final zirconia based restoration that utilized angulated screw channel technology. The patient was seen for a 6-month follow-up and all aspects of the implant supported crown was stable.
Fig. 31
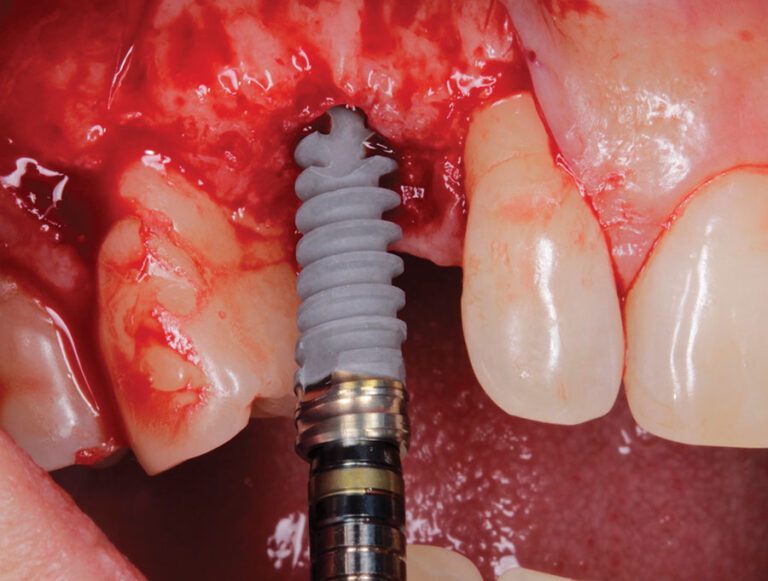
Fig. 32
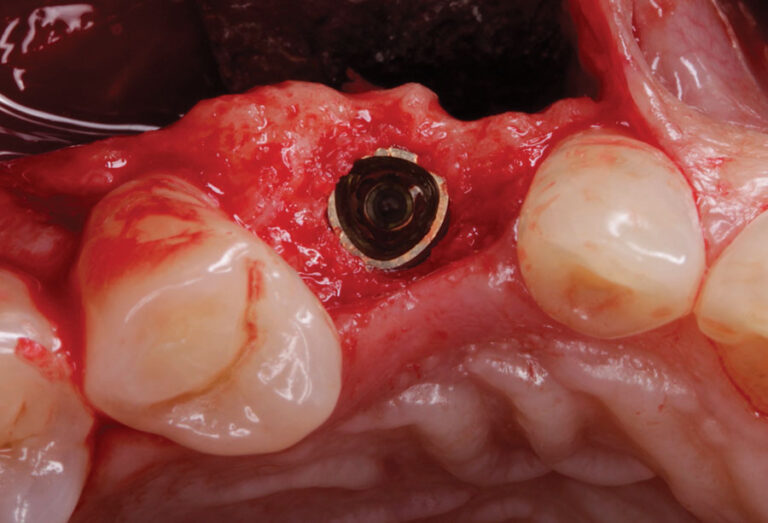
Fig. 33

Fig. 34
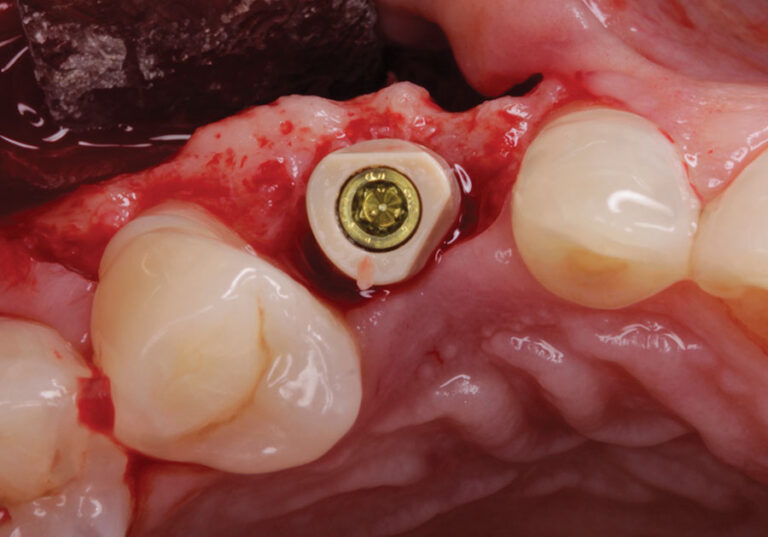
Fig. 35
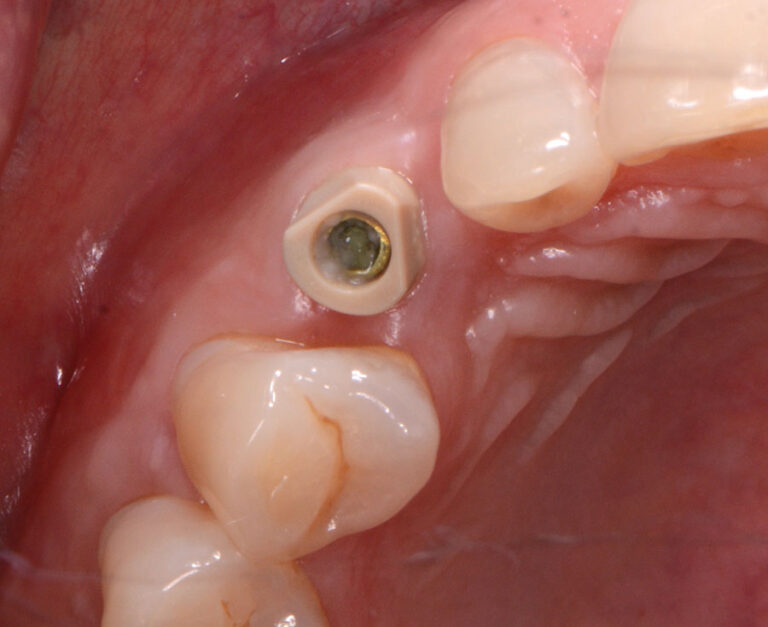
Fig. 36
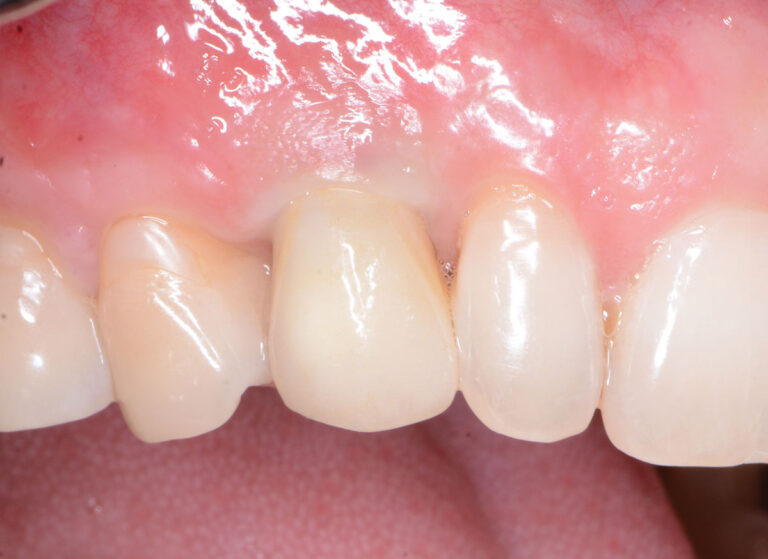
Fig. 37

Conclusion: Benefits of Decreased Loading Times and Less Time to Teeth
With the numerous cases I have completed utilizing this innovative 3-step process patients have benefitted from a significantly decreased time to their final teeth (2-8 weeks). They have also benefitted from a much more efficient and minimally invasive implant surgery. This has been a great benefit to our patients and their experiences. This minimally invasive, innovative osteotomy creation may lead to increased predictability and faster time to teeth. Furthermore, with the generation of less heat and trauma during the surgical process, we may see fewer failures and decreased variability in the overall results in implant dentistry. 
Oral Health welcomes this original article.
Disclaimer: Dr. Bobby Birdi is a scientific adviser and speaker for Nobel Biocare. The authors declare no financial conflict of interest.
References:
- Branemark P-I, Zarb GA, Albrektsson T. Introduction to Osseointegration. In: Branemark P- I, Zarb GA, Albrektsson T (eds). Tissue-Integrated Prostheses Osseointegration in Clinical Dentistry. Chicago: Quintessence, 1985
- Edmara T. P. Bergamo, Abbas Zahoui, Raúl Bravo Barrera, Salah Huwais, Paulo G. Coelho, Edward Dwayne Karateew, Estevam A. Bonfante. Osseodensification effect on implants primary and secondary stability: Multicenter controlled clinical trial. Clin Implant Dent Relat Res. 2021 Jun; 23(3): 317–328.
- Ho-Kyung Lim, Sung-Jae Lee, Yujin Jeong, Jong-Seok Lee, Jae-Jun Ryu, Ji-Suk Shim, In-Seok Song. Clinical Validation of Dental Implant Stability by Newly Designed Damping Capacity Assessment Device during the Healing Period. Medicina (Kaunas) 2022 Nov; 58(11): 1570.
- Albrektsson, T.; Johansson, C. Osteoinduction, Osteoconduction and Osseointegration. Eur. Spine J. 2001, 10 (Suppl 2), S96–S101.
- Chen CH, Coyac BR, Arioka M, et al. A Novel Osteotomy Preparation Technique to Preserve Implant Site Viability and Enhance Osteogenesis. J Clin Med. 2019;8(2):1-13.
- Coyac BR, Sun Q, Leahy B, Salvi G, Yuan X, Brunski JB, Helms JA. Optimizing autologous bone contribution to implant osseointegration. J Periodontol. 2020 Dec;91(12):1632-1644.
- Zemp J, Velikov S, Weißbrot S, et al. New Low-speed Site Preparation Protocol Significantly Reduces Noise. J Dent Res. 2020;99 (Spec Iss A):3053
- Limmeechokchai S, Kan JY, Rungcharassaeng K, Goodacre CJ, Lozada J, Oyoyo U. Heat and Sound Generation During Implant Osteotomy When Using Different Types of Drills in Artificial and Bovine Bone Blocks. J Oral Implantol. 2022 Jun 1;48(3):187-193.
- Bahat O, Yin X, Holst S, Zabalegui I, Berroeta E, Pérez J, Wöhrle P, Sörgel N, Brunski J, Helms JA. An Osteotomy Tool That Preserves Bone Viability: Evaluation in Preclinical and Clinical Settings. J Clin Med. 2022 Apr 30;11(9):2536.
- Velikov S, Camenzind M, Fabech J, et al. Stability of a New Trioval Implant in Bone Surrogate Model. J Dent Res. 2020;99 (Spec Iss A):3052.
- Degidi M1, Nardi D, Piattelli A. One abutment at one time: non-removal of an immediate abutment and its effect on bone healing around subcrestal tapered implants. Clin Oral Implants Res. 2011 Nov;22(11):1303-7.
- Perrotti V, Zhang D, Liang A, Wang J, Quaranta A. The Effect of One-Abutment at One-Time on Marginal Bone Loss Around Implants Placed in Healed Bone: A Systematic Review of Human Studies. Implant Dent. 2019 Aug 1.
About the Authors:

Dr. Bobby Birdi is a board-certified dual specialist in Periodontics & Prosthodontics. Bobby is presently the co-founder of the Digital Dentistry Institute and maintains a full-time private practice at the Imperio Dental Health Specialists and the BC Perio Dental Health & Implant Centres in Vancouver.

Catherine Chay is a certified dental assistant with over 15 years of experience in dental implantology. She is involved in both teaching and mentoring her fellow assistants and is currently the clinical manager of the BC Perio Dental Health & Implant Centres in Vancouver.

Dr. Felipe Ouriques is a distinguished professional in the field of dentistry, specializing in implantology and periodontics. He earned his DMD and completed his MS in Implantology at the Federal University of Santa Catarina. He is currently in a periodontics residency program at the University of Alabama.

Angus Barrie started working with his father at a young age and has been a registered technician for more than 30 years. He has specialized in CAD/CAM and implant work since 2002.


