
Introduction
“Control what you can control” -Andre Agassi
The standard of practice of mainstream endodontics has traditionally focused on the instrumentation, disinfection and obturation, while paying less attention to the restoration that follows root canal treatment.1 Despite many new advancements over the past six decades – including newer instruments, disinfection technologies and obturating materials – endodontic outcomes have not improved significantly.2 This has led to an ongoing retrospection within the field of endodontics and an emerging focus towards expanding procedural steps that can be controlled by the endodontic clinician. Indeed, the importance of immediate placement of the permanent restoration following root canal treatment to improve patient-centred outcomes has been highlighted recently.3 Patient-centered outcomes relate to variables that matter to patients.4 In the context of endodontics, a central component of patient-centred outcomes is the long-term asymptomatic and functional retention of endodontically treated teeth (ETT).5 Extractions of ETT, in order of prevalence, are mostly associated with restorative failures, recurrent caries, compromised periodontal support, and vertical root fractures with causes of true endodontic origin often at the bottom of the list.6-15 This realization is forcing clinicians to critically appraise what comprises the standard of practice in contemporary endodontics. It has become apparent that the immediate restoration of endodontically treated teeth is the primary factor that can improve patient-centered outcomes. Important factors related to the immediate restorative management of ETT include the selection of appropriate core build-ups, deep margin management and matrix adaptation, cementation of posts, placement of long-term direct restorations, communication with the restorative dentist regarding the indirect restoration and dentin conservation. Some of the principles of dentin conservation with regards to access design – such as incisal, restorative/caries-leveraged, stepped and “truss” accesses – and conservative instrumentation of the root canal system were described in our previous articles.29-30 Armamentarium and techniques for the above remaining restoratively-focused factors are discussed in more details in this article.
Restorative materials
As clinicians, we all see a variety of dental treatments in our patients. Astute clinicians are highly skilled at collecting individual patient-level data about their dental histories and relating it to the dynamics of any prescribed dental work, patient habits, integrity of restorative materials over a period of time and if patient needs have been met. This mindset allows for providing solutions for what is needed instead of what should be prescribed.
Currently, amalgam and composite resins are the two available materials for the clinician as permanent direct restorations; with the use of amalgam declining over the years and even being completely removed from many dental practices globally. Historically, amalgam was the workhorse restorative material in dentistry for over 200 years. Its ease of use, marginal adaptation, moisture forgiveness and evidence for longevity has set a gold standard for direct restoratives. Historically, cavity preparations for amalgam were designed within the G.V. Black paradigm of “extension for prevention”,16 and were aimed to provide an adequate depth of amalgam for resistance form while undercuts and dovetails/slots/grooves were placed for material retention at the expense of removing sound tooth structure. Over time, repeated restorative procedures resulted in cavity preparations becoming progressively larger and cusps failing from fracture under repeated occlusal load. It is important to distinguish the incorrect inference that amalgams cause crown fractures versus amalgams being associated with crown fractures due to progressive loss of remaining tooth structure.
Composite resins were first introduced in the 1960’s, primarily to overcome tooth-related fractures associated with amalgams while providing an excellent esthetic result. Composites have undergone frequent evolutionary changes over the last 60 years to improve upon bonding properties as well as material strength. In one aspect, the promise of composite was to eliminate tooth-related fractures. However, it has also been plagued by marginal discrepancies due to polymerization shrinkage, complications with layering technique, and moisture contamination during placement; thus leading to a higher incidence of secondary caries.17 Initially, composite cavity preparations were also taught to mimic that of amalgam preparations, where additional removal of tooth structure is counterintuitive if bonding is utilized. Presently, more conservative preparations with rounded internal line angles are recommended, as is utilizing and beveling any enamel at the cavosurface margins in order to further enhance bonding.
The choice to place an amalgam or composite restoration should be based on individual tooth requirements rather than applying a one-size-fits-all methodology. It is important to note that both amalgam, and to a lesser degree composite resin, have raised concerns over material safety. Amalgam has been repeatedly subjected to questions and concerns of potential mercury toxicity, where arguments have leaned towards a direct causal relationship for kidney and neurodegenerative diseases,18 but the epidemiological evidence is still lacking and calls for further long-term assessments. It is interesting to note that dental amalgam is also one of the ‘three modern faces of mercury” with the other two being methyl mercury in fish and ethyl mercury (thimerosal) as a preservative in vaccines .19 Composite resins have also raised health concerns for the presence of Bis-phenol A and its derivatives of Bis-GMA and Bis-DMA where scientific debates have leaned towards associated reproductive and immunological disorders where BPA leaches out of composite restorations in small quantities over time.20,21 Similar to the reasoning to that of amalgam, the purported causal relationships are lacking, and research calls for better designed studies to show if there are any adverse health outcomes, hence there is currently insufficient evidence to label both materials as unsafe for use in dentistry.
Core Build-ups
Resins
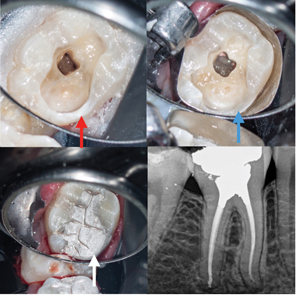
The first step involved in the placement of deep core build-ups is the cleaning of the pulp chamber. This can be achieved using ethanol and then 17% Ethylenediaminetetraacetic acid (EDTA) and scrubbing with a micro-brush followed by a water rinse. For composite resin core build-ups, following etching procedures, a dual-cure bonding agent such as Futurabond U (Voco, Cuxhaven, Germany) or Clearfil Photobond (Kuraray Dental, Tokyo, Japan) is applied. Care should be taken to thoroughly apply the bonding agent for at least 20 seconds on all walls of the access cavity. Gentle air drying followed by the removal of any pooling of bond using paper points before curing will minimize both the acceleration of curing of the dual cure composite and the presence of a radiolucent line on the post-operative radiograph. A dual-cure composite resin material, such as Luxacore Z Dual (DMG America LLC, New Jersey, USA), Rebilda DC (Voco, Cuxhaven, Germany) or Clearfil DC Core Plus (Kuraray Dental, Tokyo, Japan), is then used to build up the core. In order to increase ease of placement and mitigate the presence of voids, AccuDose NeedleTubes (Centrix Inc, Connecticut, USA) are recommended. The material is loaded into the tube (20 gauge for larger cavities and 24 gauge for smaller spaces), the tube is placed into a composite gun and the tip of the tube is positioned at the bottom of the access cavity, ensuring to touch the floor of the chamber and the gutta percha at the orifices. (Fig. 1) The material is expressed at a constant rate, making sure to slowly retract the tip of the tube, while keeping it immersed in the expressed material at all times. Once the cavity is filled, the material is allowed to chemically cure for one to two minutes; this is a critical step to mitigate against separation of the core material from the dentin bonding agent. This approach also works predictably for “truss” (Fig. 1) and contracted access cavities (Fig. 2) as well as post spaces. Light curing and finishing using the appropriate burs can then be completed. Long-term exposure of dual-cure composite resin material to the oral environment is not recommended. Therefore, as we will discuss later, light cured composite resin material should be used in cases where an indirect restoration will be delayed or not placed at all, and in Deep Margin Elevation (DME) cases.
Fig. 1
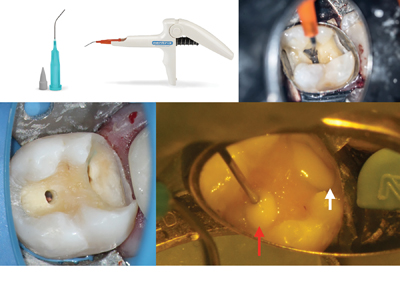
Fig. 2
C. A dual cure composite resin is used as a core build-up and the conservative access cavity is restored using a light-cured composite resin. D. Post-operative radiograph showing void free restoration.
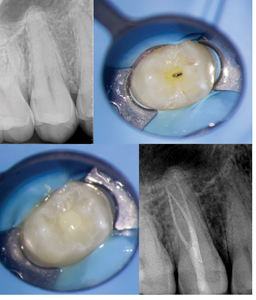
Amalgam
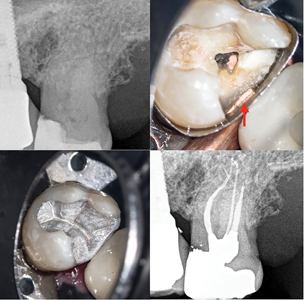
For amalgam cores, small carriers and pluggers are recommended in order to place the material into small spaces (e.g. canal orifices or contracted access cavity). When considering which type of amalgam to use (e.g. spherical or admix), spherical amalgam is recommended as less condensing force is required, making its placement easier. Once condensed and the initial set has been achieved, the restoration can be contoured and carved to finish. Spherical amalgam is easier to carve and polishes better than admix amalgam (Fig. 3) It is recommended to create adequate occlusal contacts with primary occlusal anatomy, especially when an indirect restoration is not planned or will be delayed. (Fig. 4) Following removal of caries and existing restorations, generally, if more than 2/3 of the intercuspal width is missing, it is recommended to reduce the cusps by 1.5mm to 2mm, and then overlay with restorative material. (Fig. 5) This will reduce the risk of a cuspal fracture.
Fig. 3
D. clinical follow-up.
Fig. 4
B. Primary occlusal anatomy is carved. C. Minimal occlusal contacts are on the restoration for the short term. D.&E. and F. Patient returns for a 2-week bite check: Occlusion is adjusted to provide ideal centric occlusal contacts on functional cusps and minimal or no contact on nonfunctional cusps in excursive movements.
Fig. 5
(red arrow). B. The disto-lingual wall is reduced by 1.5mm to 2mm (blue arrow) and
C. covered with restorative material (white arrow). D. Post-operative radiograph.
Aesthetic Crown Access Repairs
For cases where an access through a porcelain crown needs to be repaired, hydrofluoric acid such as Porcelain Etch (Ultradent, Utah, USA) in conjunction with a coarse diamond bur is carefully used to etch the porcelain surface at the cavo-surface margin. Care must be taken not to contact soft tissue with hydrofluoric acid. This is followed by the application of silane (Ultradent, Utah, USA) to the porcelain prior to the bonding agent and composite resin material of choice. An opaque composite resin such as Ceramage (Shofu, Japan) followed by a light-cured composite resin such as Filtek Supreme (3M, Minnesota, USA) is recommended. Bonding to zirconia can be more challenging. Thus for zirconia crown, roughening of the surface using a diamond bur and/or air abrasion is important. This is followed by the application of a zirconia primer such as Clearfil Primer Plus (Kuraray Dental, Tokyo, Japan) prior to applying the bonding agent. (Fig. 6)
Fig. 6

C. The access cavity is repaired using a light-cure bonding agent and bonded composite resin.
D. Post-operative radiograph.
Deep margin management and matrix adaptation
In the pursuit of favourable patient-centered outcomes, it becomes even more critical to manage the restorative aspects optimally in cases with deep interproximal caries. The progression from the management of simple occlusal restorations to a deep, challenging margin management requires a thorough understanding of techniques and armamentarium. The first step involves the mandatory use of magnification and field illumination together with unobstructed rubber dam isolation. Clamping a distal tooth and the use of a split dam is recommended. Alternatively, following caries removal, a new rubber dam with each tooth isolated individually can be used. However, poorly contoured restorations or severely worn teeth can make isolation of individual teeth challenging and can often result in a torn rubber dam. Once caries and defective restorations are removed, the next step is to gain full access to the cervical cavo-surface finish line. This requires the removal of any soft and hard tissue obstructions. A gingivectomy can be performed using System B (Kerr Dental, California, USA) cauterization: a #12 large tip or #6 medium tip is used at 400oF to gently brush the gingiva. (Fig. 7) The tip is frequently cleaned using a gauze to remove any adhering tissue. Alternatively, a fine chamfer 016 bur on high speed or a cauterizing laser can be used to remove obstructing gingival tissues. The presence of any bone obstructing access to the margin also needs to be removed. Minimally invasive osteotomies can be performed using diamond burs on high speed without air. The key is to remove any hard and soft tissue that will obstruct the gingival placement and adaptation of a matrix. Bleeding control is critical, especially if a bonded restoration will be placed. This is usually achieved with cauterization or alternatively, with the use of a hemostatic agent such as ViscoStat Clear (Ultradent, Utah, USA). Local anesthesia with 1:50,000 epinephrine injected proximal to the cautery site can also help control the bleeding.
Fig. 7

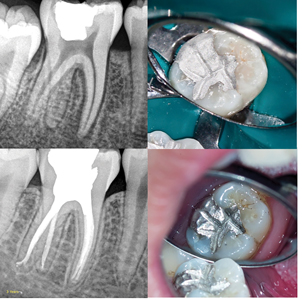
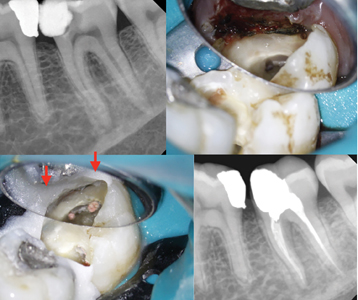
Once a controlled access to the deep margin is achieved, the next step involves the selection and placement of a matrix. If amalgam is used, the matrix will require adequate stability in order to resist condensation forces without movement. This can be obtained with a Tofflemire matrix band and a tightly fitting interproximal wedge. Alternatively, for either amalgam or composite, sectional matrices such as Tor VM (Moscow, Russia) (Fig. 8) or Greater Curve (Cincinnati, USA) matrix (Fig. 9) can be used with a wedge. Amalgam interproximal contacts rely on appropriate separation of adjacent teeth. Therefore, the largest wedge that allows for adequate separation is required. If dentin walls are missing at the line angles, materials such as PTFE (Teflon) tape or a light-cured resin barrier such as Opaldam (Ultradent, Utah, USA) can be used to provide additional stability to the matrix. In some cases, a well-adapted copper band provides the most ideal method to obtain a stable matrix for condensation of amalgam. (Fig. 10) Root concavities may lead to poor adaptation of the matrix. This can be rectified using PTFE tape (Fig. 9) or heated gutta percha. (Fig. 11)
Fig. 8

block the access to the pulp chamber and to help closing the distal root concavity under the Tofflemire band. D. A pre-endodontic build-up is placed. E. Cleaning and shaping is safely completed. F. Placement of inter-appointment calcium hydroxide. G. Root canal treatment is completed and Tor VM matrices (Moscow, Russia) are adapted using wedges and secured with Opaldam (Ultradent, Utah, USA) (red arrows).
H. A composite resin build-up is placed. I. Post-operative radiograph.
Fig. 9

D. Post-operative bitewing. E. & F. 1 year follow-up
Fig. 10

B., C. & D. Crown is removed and access completed. E. A copper band is selected, adapted and supported by Opaldam (Ultradent, Utah, USA)
to allow for the condensation of amalgam. F. Post-operative radiograph. G. and H. 1 year follow-up.
Fig. 11
In cases where the adaptation of a matrix cannot be achieved due to the complexity of the case, the use of a copper ring or a custom matrix approach is required: a light-cured resin barrier such as Opaldam (Ultradent, Utah, USA) or Kool-Dam (Pulpdent, Massachusetts, USA) is flowed in the interproximal areas and cured. A diamond bur is then used to expose the finish line of the cavity preparation and create a negative space into which the future core will be placed. (Fig. 12) This approach will not restore an interproximal contact and can be used to manage deep margins in cases where an indirect restoration is planned in the near future.
Fig. 12
D. Post-operative radiograph
If sub-optimal moisture control is present, amalgam should be considered as the material of choice. In cases where composite resin is placed, the above techniques can be used to adapt a matrix. Alternatively, the Bioclear Method, which will be discussed in more details later in the article, can be applied.
Ideally, if amalgam or a dual cure composite resin material is used, the deep margin along with the access cavity should be restored as a unit following obturation of the canals. In order to achieve proper intra- and inter-appointment isolation, a pre-endodontic build-up may be required. A glass ionomer material such as Fuji II (GC Dental, Tokyo, Japan) can be used along with the above techniques for proper margin management. Care should be taken to block the access to the canals using Cavit (3M, Minnesota, USA) or PTFE tape while placing the pre-endodontic build-up material. (Fig. 8)
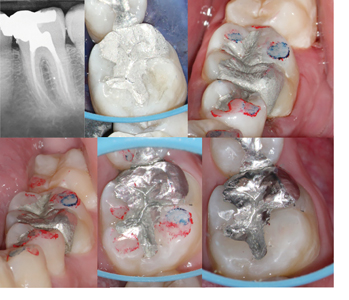
Deep margin elevation (DME)
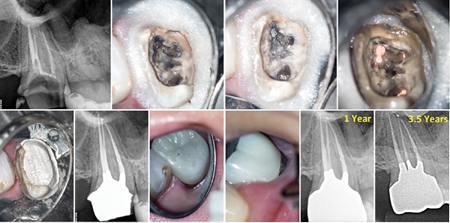
A different approach may be taken if a Deep Margin Elevation (DME) procedure is planned. DME involves the coronal elevation of a deep margin to a supragingival position either using amalgam (Fig. 13) or composite resin (Fig. 14).22 The supragingival position of the elevated margin allows for better isolation for direct restorations, optimal impressions of crown preparations and easier removal of excess cement after crown cementation. As opposed to traditional crown lengthening procedures, DME is less aggressive and appears to be well tolerated by the periodontium both clinically and histologically.23 Once a matrix is properly adapted and optimal isolation is achieved, the pre-endodontic build-up is completed using a light-cured bonded composite resin. After the completion of endodontic treatment, a separate bonded core build-up is placed and adapted to the existing permanent pre-endodontic build-up. As mentioned, amalgam can also be used for DME (Fig. 15) and can seal the tooth long-term due to the tight restoration-tooth interface. The longevity of amalgam is due in part to the ability to burnish and polish amalgam resulting in a well-sealed restoration. Additionally, silver ions are known to have bactericidal and bacteriostatic properties so any bacteria that eventually leaks under the amalgam does not necessarily progress to caries. Indirect restoration with an elevated margins located on amalgam or composite resin materials provides a predictable option for the compromised endodontically treated tooth.
Fig. 13

A. Upper first molar with deep distal caries and pulp necrosis.
B. & C. After completion of root canal treatment, a sectional matrix is stabilized with Opaldam (Ultradent, Utah, USA). D. Post-operative radiograph. E. Post-operative clinical image. F. 2.5 year follow-up showing placement of crown margin on restorative material on the distal aspect (red arrow).
Fig. 14
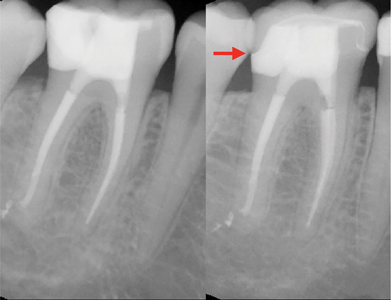
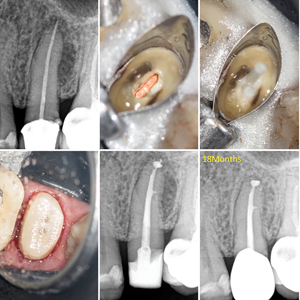
Fig. 15
B. & C. Retreatment is completed and D. a combined Tofflemire band and custom
resin matrix is used to to place the amalgam core. E. The distal crown finishing
line is prepared on restorative material. F. Post-operative radiograph.
G. & H. Crown with distal margin placed on the restorative material. Soft tissue health is maintained at the 1 year follow-up. I. 1 year and J. 3.5 years radiographic follow-up.
Cementation of posts
A commonly held belief is that the purpose of a post is to retain a core. If a post is truly needed to retain a core, then there are likely significant structural issues with the tooth (e.g. minimal or lack of adequate ferrule) and a short-term (<5 yr) structural failure should be expected, depending upon the dentition and occlusal scheme. The primary reason the authors place posts is to mitigate the loss of structural integrity incurred, in part, by endodontic treatment. A passively-placed fiber or metal post offers greater rigidity than composite or gutta percha. With significant loss of coronal tooth structure, placement of more than one post is ideal. (Fig. 16) The authors routinely place posts in premolars and anteriors, especially when the teeth are already crowned, since they are more susceptible to cervical snap-off failures. There is increasing evidence that cementing conservatively placed posts in endodontically treated premolars and anteriors may translate to improved tooth survival.24,25 In cases where a lack of ferrule for the future indirect restoration is anticipated, including in compromised molars, a rigid stainless steel post such as ParaPost (Coltene Whaldent, Ohio, USA) is recommended. (Fig. 17) Alternatively, in anterior and premolar teeth with adequate ferrule, one or multiple fiber posts may be cemented. No or minimal post space preparation is recommended, allowing for maximal radicular dentin conservation. The post space should be cleaned using ethanol and a small microbrush prior to application of phosphoric acid etch. If the bonding system does not include any matrix metalloproteinase (MMP) inhibitor, the application of 2% Chlorhexidine solution to the access cavity is recommended (26). After etching, a dual-cure bonding agent such as Futurabond U (Voco, Cuxhaven, Germany) or Clearfil Photobond (Kuraray Dental, Tokyo, Japan) is applied. Gentle air drying followed by the removal of any pooling of bonding agent using paper points before curing will minimize the acceleration of curing of the dual cure composite. A dual cure composite resin material, such as Luxacore Z Dual (DMG America LLC, New Jersey, USA), Rebilda DC (Voco, Cuxhaven, Germany) or Clearfil DC Core Plus (Kuraray Dental, Tokyo, Japan) is injected using the 24 gauge AccuDose NeedleTubes (Centrix Inc, Connecticut, USA) into the post space and the entire access cavity. The post(s) is then slowly inserted, displacing excess resin, which is then allowed to chemically cure for one to two minutes before it is light-cured. It is recommended to condition the fiber posts with 24% hydrogen peroxide for 10 minutes prior to cementation.
Fig. 16
deep margins isolated using a Tofflemire band supported by a resin matrix.
C. Two fiber posts are cemented and D. rough crown preparation completed.
E. Post-operative radiograph and F. 18 months follow-up.
Fig. 17

A. Pre-operative radiograph of an upper second premolar with lack of ferrule on the distal aspect. B., C. & D. Following root canal retreatment, the tooth is restored using a metal post and composite resin core build-up.
Long-term direct restorations
Due to a variety of reasons, the patient may not be able to receive the recommended indirect restoration following endodontic treatment or a crown may not be indicated at all. In cases where a long-term direct restoration will be placed, in addition to achieving adequate margin closure, care should be taken to establish optimal contours, interproximal contacts and occlusal scheme. For amalgam restorations, specific attention should be given to proper burnishing of the matrix to obtain smooth and tight interproximal contour. Attention to details should also be given during carving so that adequate shape, contour and occlusal contact is achieved. As opposed to pronounced occlusal and cuspal anatomy (which only the clinician can appreciate), patient related outcomes, such as a comfortable, interference-free function in lateral excursive movements should remain the focus.
For long-term composite resin restorations, in the authors’ opinion, the Bioclear Method (Tacoma, USA) allows for the most predictability in achieving optimal contours and contacts. G.V. Black published his cavity preparations in 1890.16 This was a fundamental moment in dentistry as it codified dental procedures; it gave dentists a predictable and repeatable technique for restoring teeth. But this methodology was based upon woodworking concepts and designed for amalgam, the only material available at the time, which required undercuts, grooves and dovetails for retention.
Today we have composite as an additional restorative material. Composite has some distinct advantages over amalgam (as well as some disadvantages) and has become the restorative material of choice worldwide. The fundamental problem is that amalgam and composite are completely disparate materials. Therefore, the cavity preparation should be customized based on the chosen restorative material. The GV Black cavity preparation was not designed with structural engineering in mind; and so sharp internal line angles and narrow preparations keep the tooth in tension which promotes crack initiation and propagation.
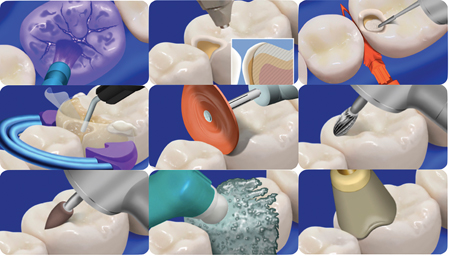
Dr. David Clark developed the Bioclear Method as a result of his study of cracked teeth.27 As one of the pioneers in microscope-enhanced dentistry, he realized that as dentists, we are contributing to an epidemic of cracked and diseased teeth. The Bioclear Method starts with a new cavity preparation that incorporates material science and structural engineering principles. (Fig. 18) The Clark Class II preparation uses the strengths (and even a major weakness) of composite to hold the tooth in compression and thereby mitigates crack initiation and propagation.
Fig. 18

The Bioclear Method involves the injection over-molding of heated composite resin in conjunction with tooth form matrices and wedges. The steps involved in the Bioclear Method (Fig. 19) include: (1) Biofilm removal (disclosing solution and air polishing), (2) Tooth preparation which involves placement of long and rounded radius bevels free of any sharp stress risers, (3) Matrix placement with a clear sectional matrix with pre-wedging and the use of a separation ring that allows for the flow of composite around to the prepared facial and lingual tooth surfaces, (4) Injection molding using heated flowable and paste composites, and (5) Finishing and polishing the restoration using finishing discs and polishing paste and cups in order to leave a smooth plaque-resistant surface. The polymerization of the over flowed composite resin shrink wraps the tooth and helps in the prevention of cracks and structural damage. Longevity is further achieved by the removal of any stress risers on the occlusal surface. The occlusal surface should have minimal anatomy and interferences during excursive movements. The Bioclear Method allows for achieving
optimal tooth form contours and interproximal contacts. (Figs. 20, 21, 22)
Fig. 19
B. Biofilm removal using air polishing. C. Pre-wedging and cavity preparation refinement. D. Use of a clear, tooth form sectional matrix, tooth form wedge and separation ring. Injection overloading using heated composite resin. Finishing and polishing using E. finishing discs,
F. carbide bur, G. finishing point, H. polishing paste and I. polishing cup.
Fig. 20
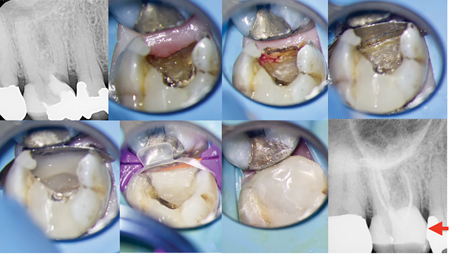
Fig. 21
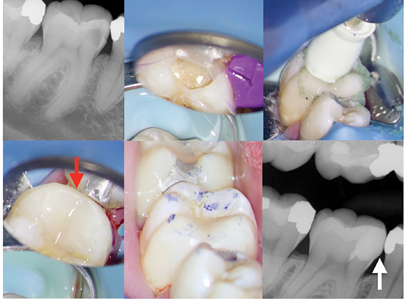
Fig. 22

E. occluso-gingivally (black arrows). F. Post-operative radiograph showing adequate interproximal contact (yellow arrow).
Recommendations for indirect restorations
Attention to minimize excessive occlusal forces placed on endodontically treated teeth should be given. In the era of milled restorations, particular care is needed to ensure excessive lateral forces are not exerted on ETT due to pronounced cuspal anatomy. (Fig. 23) Prescribing crowns with minimal occlusal anatomy and inclination angles of the cusps will greatly minimize the load during excursive movements.28 In particular, checking occlusion on zirconia crowns can be challenging due to the glaze and the high hardness values. Excursive interferences are often not observed until the glaze is removed. Occlusal contact in maximum intercuspation should be light and positioned on functional cusp(s) only. There should be no interferences in excursive movements, however when this is not possible, group function is an appropriate compromise. Consideration to using cuspal coverage with gold or porcelain fused to metal material should be given, as these materials better adapt to minor inter-occlusal disharmony. Furthermore, particular attention should be given to proper gingival contour and marginal integrity as open crown margins or over-contours are often leading to long term inflammation. (Fig. 24) Attempts at following textbook recommendations that all endodontically treated posterior teeth should be restored with indirect restorations, have the potential to make the situation worse and create problems of their own, especially when the treated tooth may not require cuspal coverage in the first place due to conservative treatment and adequate immediate restorative management. (Fig. 25) Finally, if the patient has a known parafunctional habit, recommendations for the fabrication of an occlusal splint should be communicated.
Fig. 23

Fig. 24
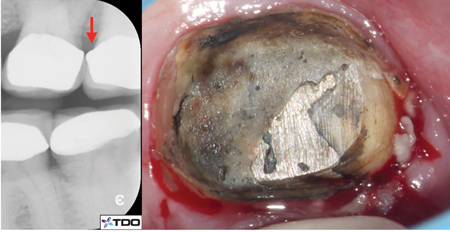
B. Severe gingival inflammation is seen after removal of the defective crown.
Fig. 25

A. Upper first molar with irreversible pulpitis.
B. & C. Post-operative radiographs demonstrating conservative mesialized caries leveraged access cavity and immediate placement of a direct permanent restoration.
D. At follow-up, the tooth has been restored with an indirect restoration which has an open margin (red arrow).
Conclusion
This paper concludes our three-part series29,30 on dentin conservation, armamentarium and restorative procedures following root canal therapy. As clinicians, it is prudent to understand that a non-restorable tooth is of no value to our patients. Evolving clinicians should continuously test their own knowledge and the way they process their treatments, in order to offer longevity. The adjective ‘long-term’ is also debatable amongst educational circles, as such a question is only meaningful to the patients themselves. For the endodontist, longevity of treatment becomes an event of interest only when it is eventually observed, if at all. We should also keep in mind the limitations of the inferences we draw from the endodontic literature regarding longevity of treatment. This is especially true when relating the procedural steps of root canal treatment to the endodontic outcomes or other particular outcome(s) of interest. One must remain skeptical and develop an inquisitive nature to practice and repeat, and continuously self-reflect on the processes and clinical decision makings for every patient, on an individual basis. Such internal reflections should be followed by looking into personal biases and their effects on the inability to self-improve or worse, to deny that a contrary could exist. As Dr. Herbert Weisberg said,” It is OK to be wrong, as long as you are in the mode of continually testing and revising your theories in the light of evidence”.31 It should also be reminded that restoratively driven conservative endodontics goes hand-in-hand with the placement of the final restoration and does not promote a virtue of cutting the smallest access cavity as possible, working through defective restorations, caries, or non-restorable teeth. Rather, it is an intimate marriage between selective dentin removal and biologically driven procedures coupled with the immediate placement of a quality permanent restoration into a functionally prepared cavity preparation. As minimally invasive technologies continue to develop and filter into dentistry, future applications using augmented reality, artificial intelligence and machine learning will eliminate tolerances for procedural error and precision and accuracy will become near perfect. This will ultimately lead to more efficient and ergonomic treatments. As clinicians we should embrace these emerging changes that are becoming part of our clinical routines for the future.
Oral Health welcomes this original article.
References
- American Association of Endodontists. The Standard of Practice in Contemporary Endodontics. Group. 2008;
- Bartols A, Bormann C, Werner L, Schienle M, Walther W, Dörfer CE. A retrospective assessment of different endodontic treatment protocols. PeerJ. 2020;
- AAE. Endodontics: Colleagues for Excellence. Colleagues for Excellence A New Look at the Endo-Restorative Interface. Am Assoc Endodontists. 2020;
- Bardes CL. Defining “Patient-Centered Medicine.” N Engl J Med. 2012;
- Azarpazhooh A, Dao T, Ungar WJ, Da Costa J, Figueiredo R, Krahn M, et al. Patients’ values related to treatment options for teeth with apical periodontitis. J Endod. 2016;
- Ng YL, Mann V, Gulabivala K. A prospective study of the factors affecting outcomes of non-surgical root canal treatment: Part 2: Tooth survival. Int Endod J. 2011;
- Landys Borén D, Jonasson P, Kvist T. Long-term survival of endodontically treated teeth at a public dental specialist clinic. J Endod. 2015;41(2):176–81.
- Stavropoulou AF, Koidis PT. A systematic review of single crowns on endodontically treated teeth. Journal of Dentistry. 2007.
- Lynch CD, Burke FM, Ní Ríordáin R, Hannigan A. The influence of coronal restoration type on the survival of endodontically treated teeth. Eur J Prosthodont Restor Dent. 2004;
- Petersson K, Fransson H, Wolf E, Håkansson J. Twenty-year follow-up of root filled teeth in a Swedish population receiving high-cost dental care. Int Endod J. 2016;
- Vire D. Failure of endodontically treated teeth: classification and evaluation. J Endod. 1991;
- Sjögren U, Hägglund B, Sundqvist G, Wing K. Factors affecting the long-term results of endodontic treatment. J Endod. 1990;
- Fonzar F, Fonzar A, Buttolo P, Worthington H V, Esposito M. The prognosis of root canal therapy: a 10-year retrospective cohort study on 411 patients with 1175 endodontically treated teeth. Eur J Oral Implantol. 2009;
- Lee AHC, Cheung GSP, Wong MCM. Long-term outcome of primary non-surgical root canal treatment. Clin Oral Investig. 2012;
- Olcay K, Ataoglu H, Belli S. Evaluation of Related Factors in the Failure of Endodontically Treated Teeth: A Cross-sectional Study. J Endod. 2018;
- Singh H. Remembering Sir G.V. Black. Indian J Dent. 2015;
- Soares CJ, Faria-E-Silva AL, Rodrigues M de P, Fernandes Vilela AB, Pfeifer CS, Tantbirojn D, et al. Polymerization shrinkage stress of composite resins and resin cements – What do we need to know? Brazilian Oral Research. 2017.
- Mikhailichenko N, Yagami K, Chiou JY, Huang JY, Wang YH, Wei JCC, et al. Exposure to dental filling materials and the risk of dementia: A population-based nested case control study in Taiwan. Int J Environ Res Public Health. 2019;
- Clarkson TW. The three modern faces of mercury. Environ Health Perspect. 2002;
- Maserejian NN, Shrader P, Brown OA, Trachtenberg FL, Soncini J, Hauser R, et al. Dental sealants and composite restorations and longitudinal changes in immune function markers in children. Int J Paediatr Dent. 2014;
- Azarpazhooh A, Main PA. Is there a risk of harm or toxicity in the placement of pit and fissure sealant materials? A systematic review. Journal of the Canadian Dental Association. 2008.
- Magne P, Spreafico R. Deep Margin Elevation: A Paradigm Shift. Am J Esthet Dent. 2012;
- Sarfati A, Tirlet G. Deep margin elevation versus crown lengthening: biologic width revisited. Int J Esthet Dent. 2018;
- Ferrari M, Vichi A, Fadda GM, Cagidiaco MC, Tay FR, Breschi L, et al. A Randomized Controlled Trial of Endodontically Treated and Restored Premolars. J Dent Res. 2012;
- Ferrari M, Cagidiaco MC, Grandini S, De Sanctis M, Goracci C. Post placement affects survival of endodontically treated premolars. J Dent Res. 2007;
- Tjäderhane L, Nascimento FD, Breschi L, Mazzoni A, Tersariol ILS, Geraldeli S, et al. Strategies to prevent hydrolytic degradation of the hybrid layer – A review. Dental Materials. 2013.
- Clark D. Composite VS Procelain’s: What you need to know. Dent Today. 2017;April.
- Khademi J, Blue M, Robison N. Endodontic disease and periodontal problems: The role of occlusion. Dent Today. 2019;
- Nadeau B, Jung D, Vora V, Trends towards conservative endodontic treatment. Oral Health. 2019; May
- Nadeau B, Jung D, Vora V, Armamentarium for dentin conservation during endodontic treatment. Oral Health. 2020; May
- Weisberg HI. Willful Ignorance: The Mismeasure of Uncertainty. Willful Ignorance: The Mismeasure of Uncertainty. 2014.
About the Authors
 Bobby Nadeau: Dr. Nadeau graduated with a DDS degree from Dalhousie University and a Master of Science in Endodontics from the University of Toronto. He is in full time private practice in Kingston, ON. Dr. Nadeau may be contacted at bobby.nadeau@mail.utoronto.ca.
 Dale Jung: Dr. Dale Jung graduated with a DDS degree from UCLA School of Dentistry and attained a certificate in endodontics from New York University College of Dentistry. Dr. Jung is in full time private practice in Huntington Beach and Victorville, CA. He may be contacted at jungendo@gmail.com.
 Viraj Vora: Dr. Viraj Vora graduated from the University of Western Ontario with a DDS and a Master of Science with a Certificate of Specialty in Endodontics from the University of Michigan. Dr. Vora is in full time private practice in Vaughan, ON, limited to microscopic conservative endodontics and restorative dentistry. He may be contacted at viraj@endodonticcentre.ca.
RELATED ARTICLE: Armamentarium for Dentin Conservation During Endodontic Treatment


