
Introduction
For terminal dentition patients, the concept of a removable provisional prosthesis can cause a great deal of anxiety and even cause deferral of treatment. Traditional healing phases in implant dentistry can be several months, and up to a year depending on the various procedures that are required — such as soft tissue grafting, hard tissue grafting and osseointegration.
This article discusses a novel and predictable protocol for a clinician to deliver a full-arch immediate fixed prosthesis that is both functionally and esthetically appealing to both practitioners and patients.
CASE PRESENTATION
A 63-year-old female patient presented to the office with a maxillary terminal dentition. Terminal dentition refers to a situation in which the long-term prognosis of the dentition was guarded to poor as she had multiple teeth with recurrent decay, bone loss and mobility. Her medical history was reviewed and revealed no significant findings or contraindications to treatment.
After the necessary records were taken, a consultation was held with the patient to discuss various treatment options including staging conventional treatment in phases or moving to a full implant-retained prosthesis for the maxillary arch.
In this instance, she elected to have her teeth extracted, prophylactically. This was a preventive measure to save the existing bone to ensure there would be sufficient bone to anchor the required implants so she could be restored to function. If the patient had decided to wait to extract her teeth, she would run the risk of her periodontal disease progressing and further compromising bone levels for future implant placement.
IMPLANT TREATMENT OPTIONS
Traditional Healing and Staged Approach to an Implant-Supported Prosthesis
During the consultation, the patient was presented with the traditional option of a staged approach to an implant-supported prosthesis. This included removal of the existing maxillary teeth, osteoplasty of the alveolar ridge, and socket grafting as required. Then, she would be given a provisional immediate complete upper denture to wear for four to six months. After this initial healing phase, the patient would be re-evaluated and the implants would be placed dependent on healing. After implant placement, she would wait an additional four to six months for osseointegration before the implants would be loaded and the final fixed prosthesis could be fabricated. We estimated the total treatment time for the patient to be 12 months or longer.
The patient was advised that she would be making a change from her natural dentition to a provisional complete upper acrylic denture for the first eight to 12 months and that this may be challenging, especially given the anatomical changes that occur during the healing phase. She also understood that there might be an increased risk of complications as the denture places pressure on the bone grafted sites, the alveolus and the dental implants.
All-On-4 Denture Conversion
The patient was also presented with the All-On-4 treatment option. This procedure involves immediate extractions, free-handing bone reduction, free-handing implant placement and free-handing the conversion of an immediate denture over the implants. This protocol, while effective, is less predictable and can be cumbersome and time-consuming for both the patient and practitioner.
Digitally Guided Surgery, Digitally Guided Prosthetics
The patient was also presented with a third option, using a digital approach in treatment planning, guided bone reduction, guided implant placement and guided prosthetic pickup of the implant abutments. This prosthetic treatment plan is, in short, digitally supported and digitally planned. Ultimately, this protocol assists the clinician in delivering a predictable result for the patient and removes any guesswork resulting from free-handing different aspects of treatment.
The patient opted for this latter treatment option which included delivery of a provisional prefabricated, bar-supported, monolithic polymethyl methacrylate acrylic (PMMA) prosthesis.
DIGITALLY GUIDED SURGERY AND PROSTHETIC METHOD
This method involves digitizing the patient’s dentition and idealizing the vertical dimension of occlusion (VDO), occlusal plane and functional esthetics based on the records provided to the laboratory, nSequence® (Reno, Nevada). The benefit of this digital solution for the patient is that the patient and clinician are able to make variations to the treatment plan and visualize the final outcome before the patient has surgery.
Stage 1 – Patient Records
As per the standard protocol, complete records of the patients were obtained, including models, a series of extraoral and intraoral photographs (Figs. 1–5). The patient’s vertical dimension was analyzed and recorded, as well as her overall facial profile, smile and esthetics. From this information, it was determined that the incisal edges of the maxillary incisors would be lengthened and the posterior teeth would be adjusted to optimize the occlusal plane and correct her slight anterior open bite in the final restoration.
The bite registration was taken at the desired vertical dimension of occlusion. This is an important requirement for the digital planning phase in order to fabricate the provisional and dictates the placement of the implants and abutments for the final restoration.
A CBCT scan of the patient was taken at the ideal vertical dimension of occlusion using the bite registration. The field of view must capture the entire jaw being treated as well as the opposing arch. All records were then sent to the laboratory for processing and digitization along with a laboratory prescription describing the desired treatment and implants to be used.
FIGURE 1.

FIGURE 2.

FIGURE 3.

FIGURE 4.

FIGURE 5.

Stage 2 – Digital Planning
Upon receipt of the records, the laboratory merged the clinical data with the CBCT and prepared a digital wax-up. A virtual meeting was held to review the facially-driven treatment plan. Verification and confirmation of the digital wax-ups (in isolation and in occlusion) as well as the planning and approval of the tooth positions and angled abutments was discussed (Figs. 6–8).
The digital representation illustrated the amount of bone reduction necessary to optimize the prosthetic junction and to achieve an esthetic smile line (Fig. 9). The benefit of knowing the amount of bone reduction required prior to treatment enabled us to evaluate the viability of this treatment for the patient. This information was used in conjunction with the photographs which showed the patient’s lip in repose and in a high smile to observe the lip translation or movement.
Most importantly, this step confirmed, prior to surgery, that implant anchorage was adequate using the existing bone and that there would be a favourable prosthetic outcome.
FIGURE 6.

FIGURE 7.

FIGURE 8.

FIGURE 9.

Stage 3 – Ordering of Case
Components
The laboratory’s software contains implant components of all the mainstream dental companies. From the practitioner’s perspective, this is time and cost-effective since stock rather than customized abutments can be utilized, especially in the provisional phase. This allowed us to design the prosthesis knowing some abutments would be angled to fit the design and emergence of the restoration and where possible, they would be confined within the prosthesis.
Once the treatment plan was finalized, the laboratory compiled and emailed a specific list of components required for this case (implant analogs, multi-unit abutments and temporary titanium cylinders) as well as the implant sizes required for the patient’s treatment. The necessary components were then ordered by the office and delivered directly to the laboratory.
Stage 4 – Delivery of Case
Once the ordered components were received, the laboratory prepared, assembled and delivered the case including the bone reduction, implant placement and prosthetic guides to the clinician’s office.
The turnaround time was approximately 1 month from the time the initial patient records were taken to delivery of the case.
Stage 5 – Patient’s Surgical and Prosthetic Appointment
I – “Check Bite”
On the day of surgery, the most important first step is to perform the “check bite”. This hard acrylic bite fabricated by the laboratory is based on the patient’s complete records and merged data
(Fig. 10). The purpose of the “check bite” is to ensure the accuracy of the merged data and provide the practitioner with confidence and verification of the same. This confirmation is crucial as every step of the guided surgical and prosthetic phase is based on this bite. If there are any discrepancies, there may be ensuing surgical and prosthetic adjustments or implications. In extreme situations, records may need to be retaken. In this case, the “check bite” was accurate and treatment proceeded. (This step can also be performed one week prior to surgery to ensure accurate fit and necessary changes can be made prior to the surgery date.)
FIGURE 10.

II – “Bone Foundation” Guide
The patient’s upper teeth were extracted and a full thickness flap was raised to expose the alveolus (both buccal and lingual aspects) (Fig. 11). The “bone foundation” guide was placed to fit over the alveolus with three struts containing indentations that engaged the incisal edges of the lower dentition (Fig. 12). The bone foundation guide, once placed, is not removed until the insertion of the provisional prosthesis. As the patient bites into these struts, they help to stabilize and position the bone foundation guide. Once the guide was seated without any visible gaps, guided fixation pins were placed with depth control to secure the guide via engagement of the buccal and palatal bone (Figs. 13, 14).
FIGURE 11.
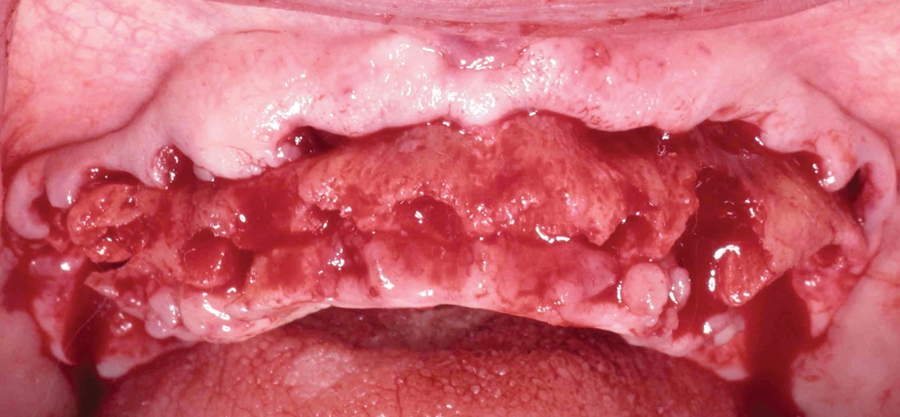
FIGURE 12.

FIGURE 13.
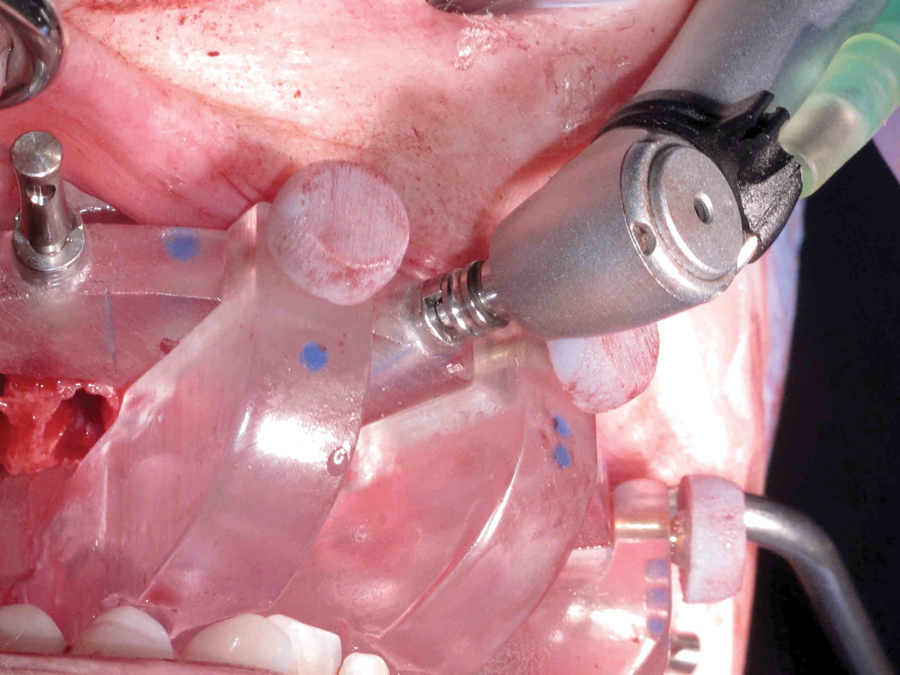
FIGURE 14.
The positioning struts were then removed, and now the foundation guide served as the bone reduction guide. Alveolar bone was removed using Rongeur’s forceps (Fig. 15) and larger bone fragments were preserved to use later in the surgical procedure. The alveolus was then smoothed using a bur (Fig. 16) until it was flush with the foundation guide (Fig. 17).
FIGURE 15.
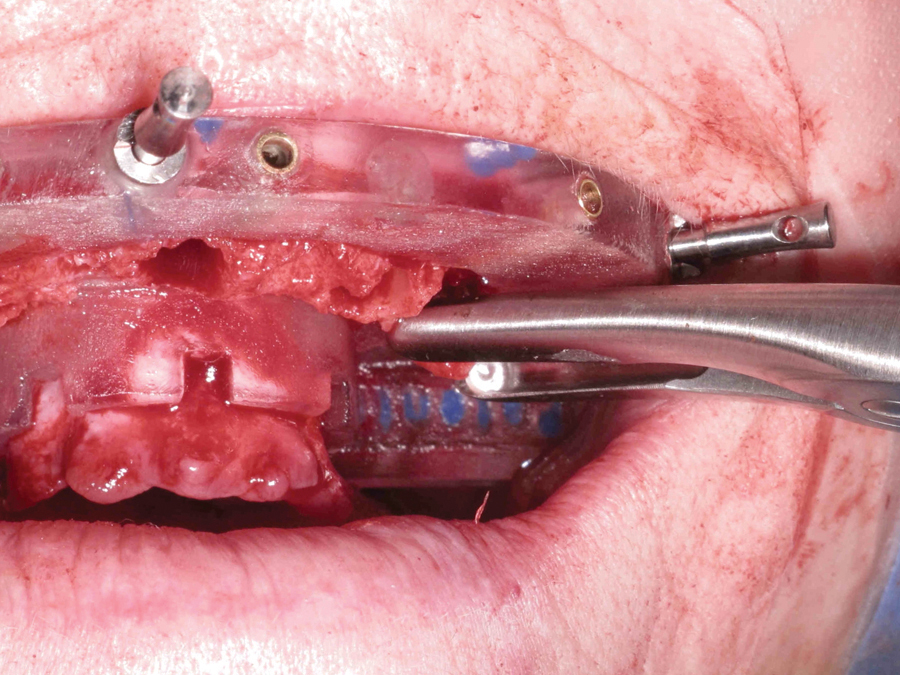
FIGURE 16.
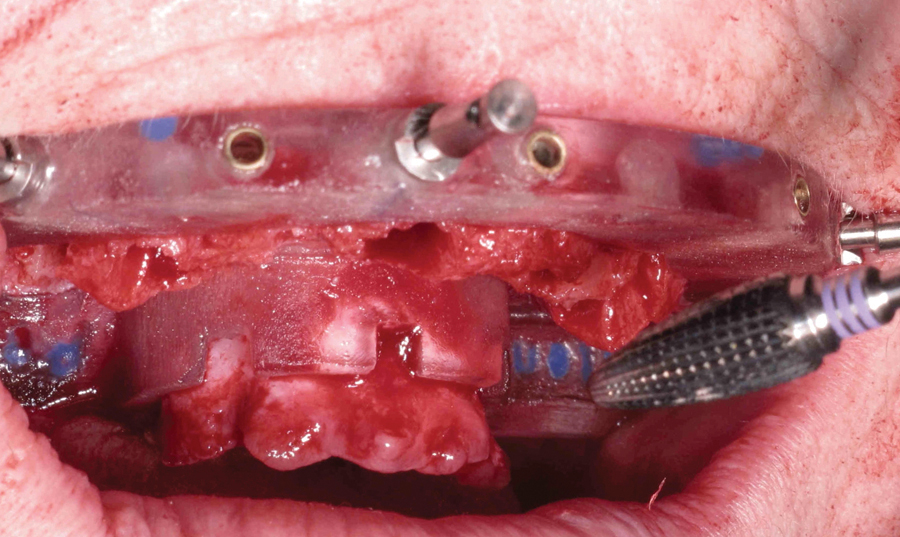
FIGURE 17.

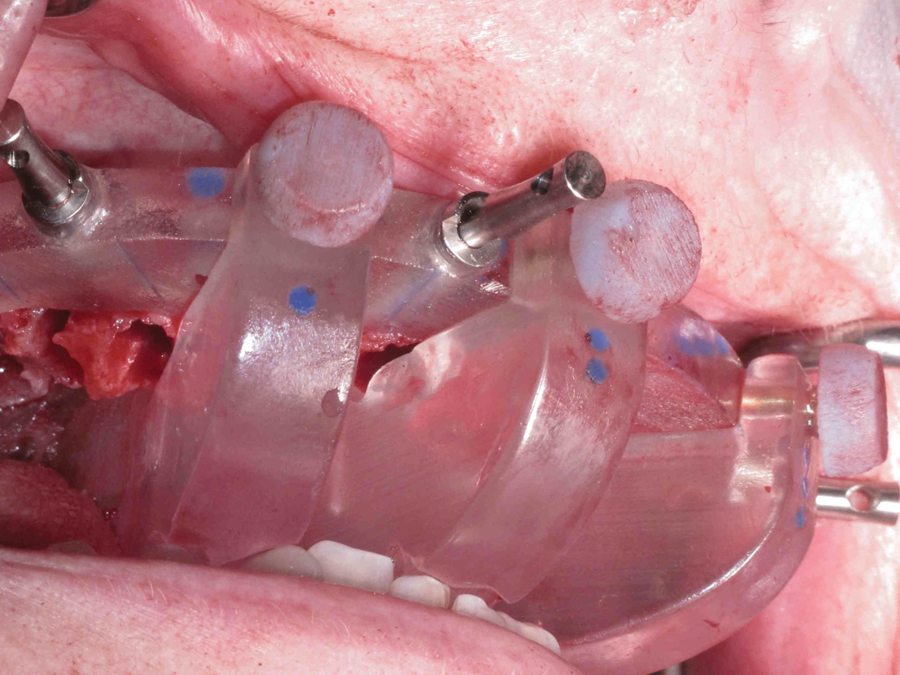
III – Implant Placement
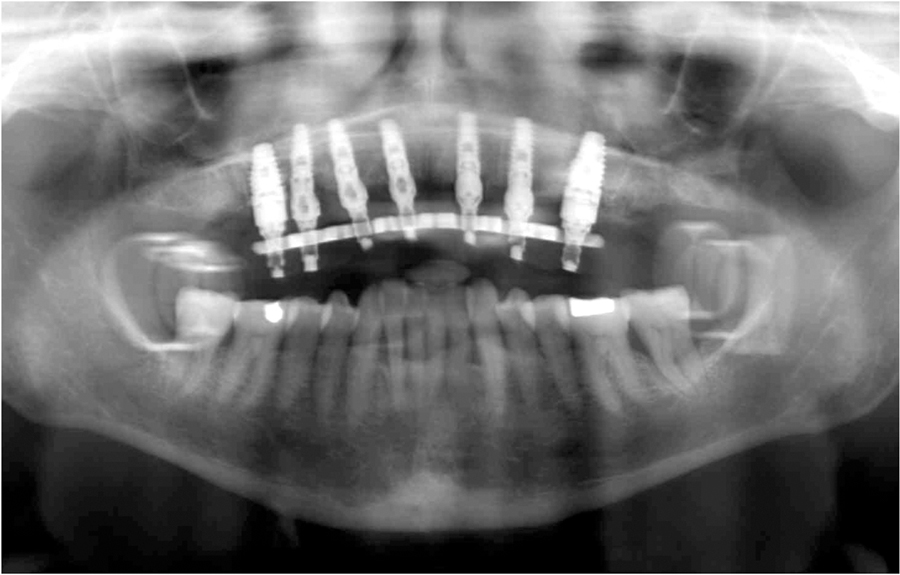
Next, the implant placement guide was placed (Fig. 18) and indexed to fit into the bone foundation guide, a protocol patented by the laboratory (Fig. 19). Sleeves of different diameters from the Biohorizons® Guided Surgical Kit, fit within the holes to guide the sequential osteotomy process in preparing the implant sites (Figs. 20, 21). Once the desired size osteotomies were achieved, Biohorizons® Tapered Internal Implants were placed through the guide into the sites (Fig. 22). After all the implants were placed, the implant placement guide was removed from the foundation guide (Fig. 23).
FIGURE 18.

FIGURE 19.

FIGURE 20.

FIGURE 21.
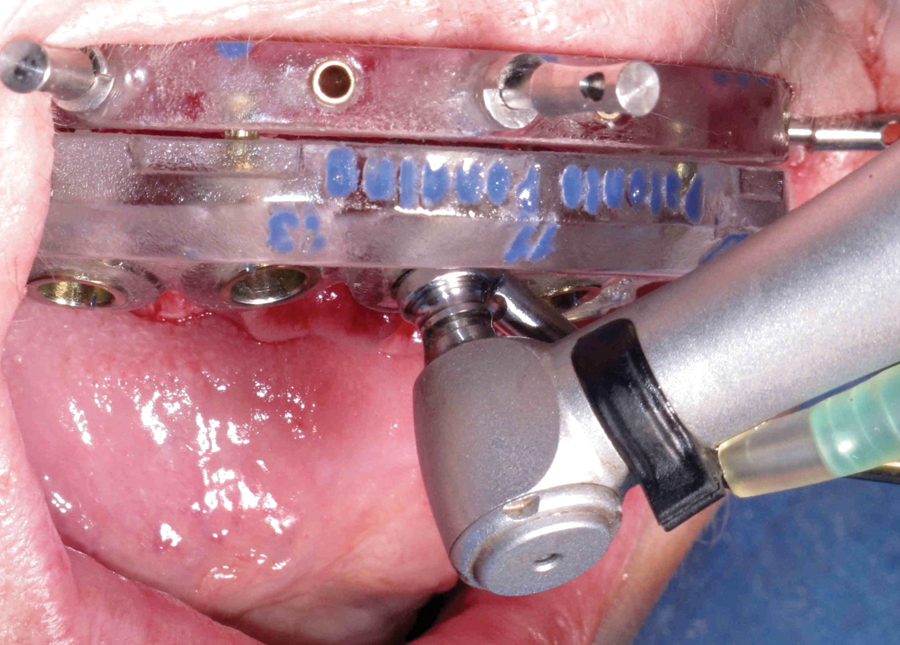
FIGURE 22.

FIGURE 23.

IV – Multi-unit Abutment
Placement
Following implant placement, an abutment placement guide was placed and indexed also to fit into the foundation guide. Because angled multi-unit abutments can be placed in 1 of 6 different positions, a specific guide was created to assist in their placement to ensure correct positioning of the abutment. The multi-unit abutments were placed and torqued to 30Ncm (according to Biohorizons® specifications) (Fig. 24). Then, the abutment placement guide was removed.
FIGURE 24.

V – Temporary Titanium Cylinder Placement
Temporary titanium cylinders were then hand-tightened to the multi-unit abutments (Figs. 25, 26). The cylinders were pre-notched to engage the acrylic pick-up material and have been pre-trimmed by the laboratory to the correct height to fit within the prosthesis. Block out tubes were also provided by the laboratory and were placed into the temporary titanium cylinders to protect the prosthesis screws.
FIGURE 25.

FIGURE 26.

VII – Silicone Gasket and Fit of the Provisional
A flexible silicone gasket (guide) was placed over the temporary titanium cylinders and has a precise tight fit around the apical portion of the cylinders (Fig. 27). The purpose of this gasket is three-fold: to block any undercuts, to guide the provisional apically and laterally, as well as to account for the thickness of the underlying soft tissue. The rounded surface of the convex prosthesis fits into the concave surface of the silicone providing a lateral and vertical stop for the prosthesis (Fig. 28). The laboratory has prepared the provisional prosthesis with holes corresponding to the precise positions of the temporary titanium cylinders (Fig. 29). Next, a silicone bite registration index was placed against the incisal edge of the provisional and indexed to the mandibular incisors. As the patient closes into the bite registration, this also helps to stabilize the prosthesis vertically at the ideal vertical dimension of occlusion (Fig. 30).
FIGURE 27.

FIGURE 28.

FIGURE 29.

FIGURE 30.

VIII – Pick-up of the Provisional
Once the prosthesis was stabilized, a dual-cured polymer (Triad® DuaLine®, Dentsply) was injected into the small buccal channels and light cured to surround and “pick-up” the cylinders (Fig. 31). Once the dual-cured polymer was cured from the buccal aspect, the patient was instructed to open and the bite registration was gently removed. The prosthesis was carefully inspected from the occlusal aspect and any voids between the prosthesis and the cylinders were filled in with the dual-cured polymer and again light cured from the occlusal aspect.
The block out tubes were then removed and the prosthesis was unscrewed and removed from the mouth (Fig. 32).
FIGURE 31.
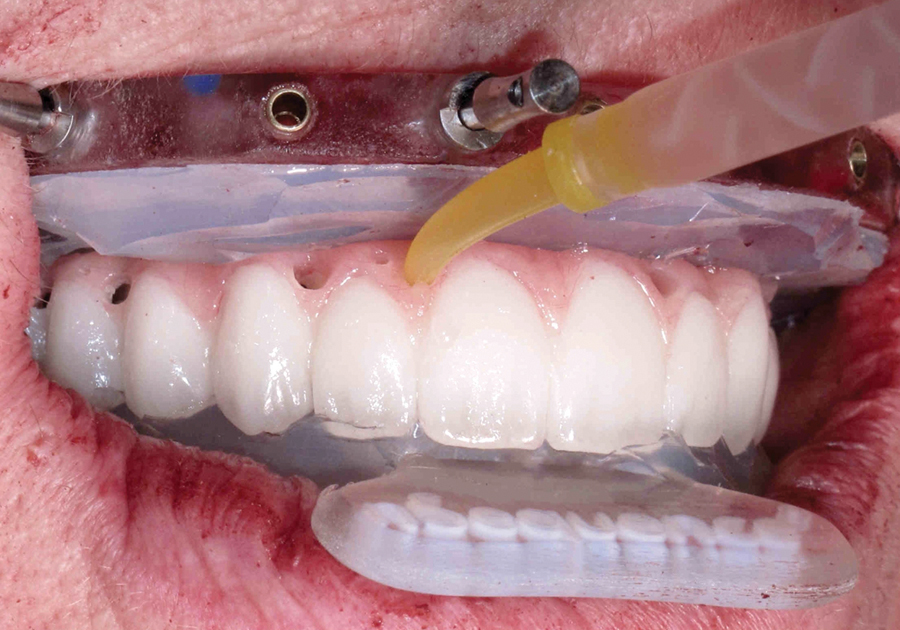
FIGURE 32.

IX – Removal of Guide and Closure
Once the provisional was removed, the silicone maxillary gasket was also removed. The fixation pins and foundation guide were subsequently removed. The edges of the alveolus were then rounded and the remaining sockets were filled with the autogenous bone harvested from the bone reduction. The excess soft tissue was trimmed and individual interrupted sutures were placed between the implants.
X – Finishing and Insertion of the Provisional Prosthesis
Once the provisional was removed, additional acrylic was added to fill any remaining voids around the titanium cylinders. The additional acrylic also served to reinforce the dual-cured polymer. The provisional was then further cured with heat and pressure before its final polish.
The finished provisional prosthesis was then placed onto the multi-unit abutments. The prosthesis was torqued into place according to manufacturer’s specifications. A small piece of Polytetrafluoroethylene (PTFE) tape and temporary filling material was placed in each access hole.
Finally, the patient’s occlusion was verified to have bilateral, posterior, simultaneous contacts (Figs. 33–37).
FIGURE 33.

FIGURE 34.

FIGURE 35.

FIGURE 36.

FIGURE 37.
DISCUSSION:
This article illustrates an innovative technique patented by nSequence® (Reno, NV) that integrates various digital technologies to maximize implant stability with available bone, while maintaining prosthetic predictability and achieving a highly desirable esthetic result. This guided surgical and guided prosthetic procedure provides the patient with confidence and comfort during the provisional stage.
While the All-On-4 remains a popular treatment option for many patients, it is less predictable. Because the clinician must free-hand the placement of the implants in the alveolar bone without knowing the quality and quantity of the bone and then, must free-hand the placement and insertion of the denture without having a verifiable vertical dimension of occlusion, this could lead to an increased margin of error during the procedure.
Additionally, this technique is also time-consuming for both the dentist and the patient. With a lengthy surgical treatment time, there is an increased risk of infection and morbidity for the patient. The prosthetic treatment phase may be lengthy due to the free-hand denture conversion. The denture conversion process involves troughing out a horseshoe shape through the occlusal/lingual surfaces of the denture teeth and picking up the titanium cylinders. This leads to a weaker provisional which is susceptible to fracture. The occlusion may be less predictable and may require the clinician to re-create the contours for the occlusal contacts. Furthermore, it is a long day for the patient while they wait for the denture conversion, adjustments and final finishing.
Conversely, the guided surgery and guided prosthesis procedure used in this case proved to be very predictable and extremely time-efficient from both the dentist and patient perspective. The virtual treatment planning time was invaluable as it allowed visualization of the anatomy, quality and quantity of bone available and the angulations of the implants and abutments as it relates to the final prosthetic result. Moreover, the initial bite registration taken at the ideal final vertical dimension of occlusion assisted in the creation of precise indexed guides for each phase of treatment which significantly enhanced the predictability of the provisional prosthesis placement. The use of a prefabricated, bar-supported, monolithic polymethyl methacrylate acrylic prosthesis in conjunction with the digital technology provided a stronger long-term provisional that is more esthetic and better able to accurately reproduce the vertical dimension of occlusion, tooth positions, and occlusal contacts.
CONCLUSION:
In order to provide the best possible treatment for our patients, as clinicians, we should strive to search for the best and most predictable outcomes for our patients. To this end, utilizing digital technology to improve patient outcomes and predictability should be considered part of our necessary armamentarium.OH
Oral Health welcomes this original article.
Dr. Natalie Wong graduated from the University of Toronto with her Doctor of Dental Surgery in 1996 and received her Certificate in Prosthodontics from the University of Michigan, Ann Arbor in 2007. She is the only dentist that has attained a combination of the U.S. Board Certification in Implant Dentistry, U.S. Board Certification in Prosthodontics, and Canadian Board Certification in Prosthodontics. She is a Diplomate of the International Congress of Oral Implantologists (ICOI), and holds Fellowships with the Academy of General Dentistry (AGD), American Academy of Implant Dentistry (AAID), and the Misch International Implant Institute Canada for which she is also a Faculty Member. Dr. Wong currently serves as a clinical instructor in the Implant Prosthodontic Unit in the Graduate Prosthodontic Department at the University of Toronto. Dr. Wong lectures nationally and internationally on implant dentistry while maintaining a private implant surgical and prosthodontic practice in Toronto.


