

Clear aligners have come a long way in the orthodontic market with many patients now preferring this aesthetic treatment modality. Thanks to tremendous consumer demand.1 Aesthetic alignment attracts both young and adult patients who otherwise would not accept traditional metal braces. Clear aligners are a great option for those who want straight teeth and a beautiful smile without showing any metal wires in the process.2 Clear aligners can be used as a standalone procedure or a stage in complex full mouth rehabilitations.
Clear aligner history
Clear aligner treatments have evolved in the past 25 years. But how did it start? Kesling in 1949 described the concept of using a series of thermoplastic positions to move the teeth.3 Invisalign (Align technology, Inc. San Jose, CA, USA) has branded the clear aligner treatment. It was influenced by decades of old concepts in orthodontics. The core concept is using a series of clear aligners to move teeth in a series of 0.25-1 mm increments and to wear each tray from 7 to 14 days according to different protocols and tray materials.4 Initially clear aligners were fabricated using stone casts (Figs. 37, 38). Today, scanners and printers have been implemented into the protocol. It is claimed that this technology gives more control on tooth movement.
Clear aligners can be applied in different clinical patterns. It can be used in interceptive orthodontics to maintain a space or guide an eruption.5 It is used in aesthetic orthodontics to align crowded teeth. It is also used in implant therapy to find space for implants.6 The average treatment time is 3 to 9 months in 2-3 mm crowding cases. Today, Clear aligners can treat mild to moderate cases in complexity with the aid of hybrid therapies where additional auxiliaries such as elastics, mini screws and attachments are added.7
Clear aligner advantages
There are several advantages using Clear aligners in orthodontics.8 Some of them are:
- Oral hygiene can be maintained easily throughout the treatment
- Aesthetic and comfortable transparent trays are ideal for those who prefer to avoid the unflattering look of traditional metal braces
- Clear aligners are very comfortable. Common soft tissue irritations and lacerations caused by metal wires and brackets are avoided.
- Convenience in daily use as it doesn’t interrupt normal life style. Clears are mostly invisible allowing patients to socialize and smile confidently.
- Speed of treatment is evident as many cases can be finished in 3 to 9 months.
- Healthier teeth tissue avoiding common enamel decalcification spots from bonding cements used in fixed bracket systems.
Case Selection
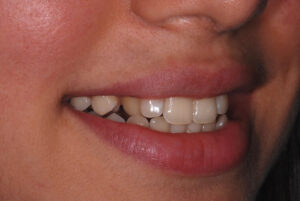
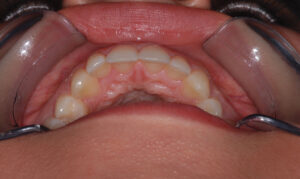
Dentists and first time users are advised to start with simple cases. It is possible to treat complex cases using clear aligners combined with supplementary devices such as expanders, distalizers, anchorage and elastics. It is not recommended to use these modalities without considerable experience.9 One of the best ways to determine if the patient is a good candidate for clear aligners is by determining if they will be compliant or not. If we suspect they will not be compliant, meaning if the patient will not agree to wear aligners for at least 20-hours a day, they are not likely a good candidate for clear aligner treatment and it’s more likely that we will not get the desired results. Any potential case should be assessed before starting the treatment. There are 8 digital photographs that will help us in case assessment: front full face, profile view, close up front smile view, close up right side smile view, close up left side smile view, lower arch occlusal view, upper arch occlusal view, front chin up view and arch apart/retracted cheeks view.
Fig. 1

Fig. 2
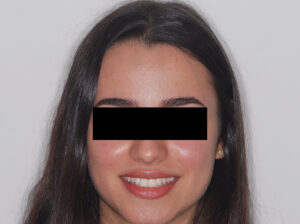
Fig. 3

Fig. 4
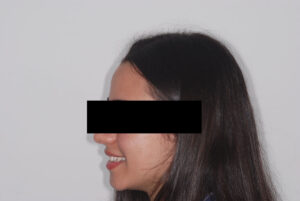
Fig. 5
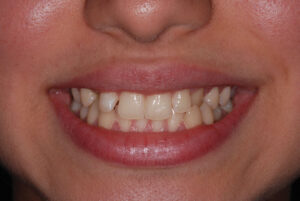
Fig. 6

Fig. 7

Fig. 8

Fig. 9
Case report: Patient History and examination
A 19-year-old university student presented to our clinic with chief complaint of teeth misalignment. Medical history was collected with no significant findings. The patient and her guardian mother did not report any family history of class III malocclusion.
During intra oral examination, we found the following:
- Minimal amount of plaque with adequate oral hygiene
- Retained temporary lower right molar no.5 with MO cavity (missing permanent #20)
- Mild lower arch crowding (1mm)
- The maxillary right and left canines in cross bite
- Upper right lateral rotated and protruded
- Dental midline shifted to the left 0.5mm
Fig. 10
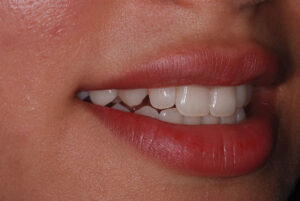
Fig. 11

Fig. 12

Fig. 13
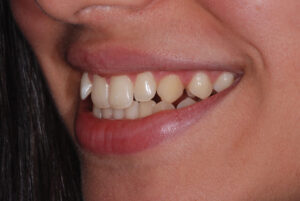
Fig. 14
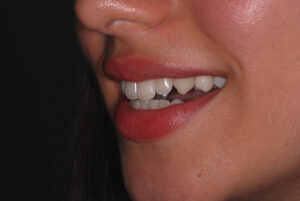
Fig. 15

Fig. 16

Fig. 17
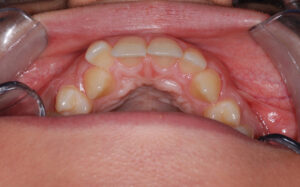
Fig. 18
Diagnosis
An anterior crossbite is a malocclusion that presents with a reverse overjet of one or more of the anterior teeth. There are several factors to consider before we determine the main cause of anterior crossbite.10,11 The main skeletal and dental anterior crossbite indicators are:
The number of teeth involved: in a dental anterior crossbites, there is a single tooth involved. However, when there is a segment of a teeth in a crossbite, this generally indicates that the crossbite is more likely a result of skeletal etiological origin.
Position of teeth: In skeletal crossbite, teeth are often positioned normally in the jaw. In the dental crossbite, teeth are deviated from their normal axial inclination.
Occlusion/closure pathway: Any premature anterior teeth contact may result in anterior crossbite of dental origin. For example, a pseudo class III relationship may develop due to premature incisor teeth contact causing lower teeth displacement.
Crowding/Lack of arch space: tooth size/arch discrepancy may cause anterior crossbite of dental origin. Study models can be of great tool to measure the crowding/space needed discrepancy.
Based on the upper mentioned factors, this patient presented anterior cross bite of dental origin.
Fig. 19
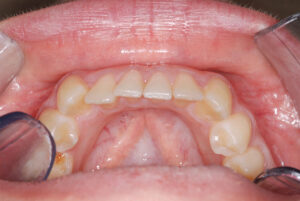
Fig. 20

Fig. 21
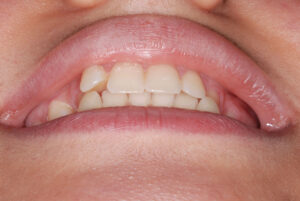
Fig. 22

Fig. 23
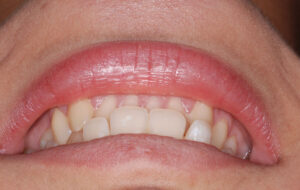
Fig. 24

Fig. 25

Fig. 26

Fig. 27

Arch analysis and case assessment
The patient has a Class I malocclusion with canines being in cross bite in the upper arch along with mild crowding in the lower arch. To measure the amount of teeth crowding, we used the Hencher’s technique: Simply we poured the models, measured the width of the teeth involved and the curve then subtract them from each other. The number we get is the space required to align the teeth or IPR needed to be performed. A digital caliper can be used to calculate the measurements (Fig. 40). The curve can be determined based on a landmark. The landmark is the best-positioned tooth or point on a tooth in the arch to where all the other teeth must move. The landmark selection is based upon the functional and aesthetic criteria. The teeth sum in upper arch was 42.1mm and the curve sum is 43.3mm. That means we have 1.2mm extra space. This makes sense since we are driving teeth outwards which means we are gaining space. The lower teeth sum was 33.2mm while the curve was 32.2mm. This means we need 1 mm of space to align the lower teeth into the curve.12
Fig. 28

Fig. 29

Fig. 30

Fig. 31

Fig. 32
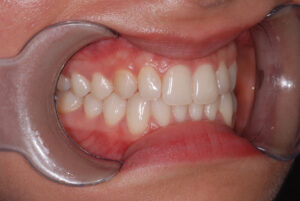
Fig. 33

Fig. 34

Fig. 35

Fig. 36

Fig. 37
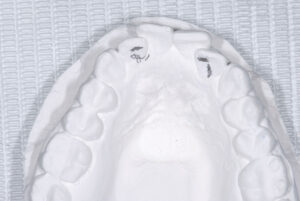
Fig. 38
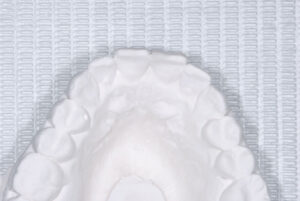
Fig. 39

Fig. 40

Treatment plan discussion
Anterior cross bites are a major aesthetic and functional anomaly, which must be corrected for proper occlusion and aesthetics. It is an abnormal axial inclination of one or more maxillary anterior teeth. It is the lingual positioning of the maxillary anterior teeth in relation to the anterior mandibular teeth.13 During the treatment plan discussion, we suggested two treatment options. For each we discussed advantages, disadvantages and a risk analysis. The 1st option was to align the upper and lower arches with clear aligners and finish with whitening on the last week of the treatment. Then we would extract the primary tooth in the lower arch and place an implant in the edentulous area. The second option was to maintain the deciduous tooth, restore the cavity and use the tooth as a space maintainer. Then we continue treatment with clear aligners and whitening. With this option we would observe and maintain the primary tooth until it is time to remove it and place an implant in the future if required. The patient elected to move forward with the second option.
Treatment
After taking the necessary digital photographs and completing a comprehensive oral examination, we took diagnostic upper and lower impressions and we duplicated them to fabricate the working models.
A high quality impression is required for a successful case evaluation.
We only use silicone-based materials such as PVS, VPS or Polyether. To avoid some issues found with impression taking procedures such as double impression, which occurs when material is not fully set, we use the one-step technique. This also helps to grab the last molar in the upper arch.
For this case, impressions were taken at two week intervals to fabricate four clear trays, two for the upper arch and two for lower arch. The patient will wear each tray for 7 days on each arch and then switch to the second tray on the following week. The first set of trays is fabricated with two different plastic sheets of 0.5mm and 1mm thickness. The patient will start with 0.5mm on the first week and then use the 1mm clear tray on the second. All the subsequent clear trays are made of 1mm sheet thickness. The reason we fabricate the first trays with 0.5mm thickness is to reduce any initial discomfort generated. Once teeth become loose, the successive 1 mm plastic sheets will not cause the discomfort mentioned. Clear sheets are thermoformed on the set-up models made for tooth movement using a vacuum former machine. This case required 12 clear trays for each arch to correct the misalignment. A total of 7 months for the upper and 9 months for lower arch were enough to accomplish the desired result correcting the upper crossbite and lower misalignment. On the last two weeks of treatment, we initiated the whitening protocol using 9.5% hydrogen peroxide Pola Day whitening product for the duration of 14 days. This approach preserves time, as the patient will achieve whitening of the teeth at the same time he completes the alignment. Furthermore, we use the last clear aligner as a retainer if the initial treatment plan agreement with the patient was to use removable retainer.14
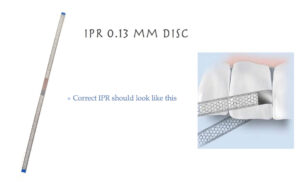
All the clear aligners are fabricated in house. This is a very cost/time effective technique. The aligner trays are fabricated having a high trim line. This improves the retention. It is important to mention that we did not use any engagers AKA attachments. Many studies have concluded that the presence and number of attachments is not significantly more effective than having no attachment.15 Interproximal reduction or IPR is performed on lower teeth to facilitate teeth movement. We barely needed IPR on the upper arch. So what is IPR, or PPR in clear aligner therapy?
IPR
IPR is the interproximal reduction procedure. This is the way we create space in cases where we can’t expand or if we don’t want to distalize or extract teeth. Interproximal reduction studies have shown that there is no risk of caries after performing IPR procedure if it is applied properly.16,17 The Interproximal enamel is much thicker than the labial enamel. IPR should be focused on those more aligned teeth. This strategy is performed to prevent the damage that can happen by stripping overlapped teeth. We still contour overlapped teeth but we use thinner size finishing strips at first followed by PPR. IPR is performed strategically and progressively as needed to allow the teeth to align at each subsequent appointment. IPR is performed incrementally over several appointments to release enough space to allow the teeth to move. IPR strips should always be used in a sequence form from smaller size to bigger size. We use diamond perforated stainless steel strips with non-serrated middle part (Fig. 41). In our opinion, these strips are better than discs. Discs cut unnecessary extra enamel. The strips provide flexibility to contour the tooth minimal invasively preserving the anatomical tooth structure (Fig. 42).18 In contrast PPR is performed ideally using discs. So what is PPR?
Fig. 41

Fig. 42
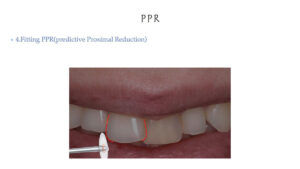
PPR
Predictive Proximal Reduction is done in cases where the interproximal surfaces are triangular in shape or extra bulbous. This procedure is performed mostly on centrals using a finishing disc to reshape the tooth. This will prevent the appearance of black triangles after alignment and will avoid cutting teeth when they are extremely overlapping (Fig. 43).
Fig. 43
Patient Instructions
Patient compliance is critical for successful results. Hence, how we guide and provide instructions verbally is crucial to the success of the case and the compliance of the patient. Instructions provided are presented as follows:
- Congratulate the patient for receiving his customized clear Aligners
- Wish the patient success with his journey to a beautiful natural smile to boost motivation.
- Inform the patient that he/she may feel minor tenderness on some teeth for a few days but this is temporary & normal due to the gentle force on misaligned teeth.
- Teach/demonstrate how to insert and remove the clear aligner in the mouth
- Give instructions to change the tray every 1 or 2 weeks
- Ask the patient to come back in 2 weeks for a review
- Let your patient know that they should take the clear aligner out whenever eating. Encourage them to use a straw when drinking colored beverages.
- Remind them to brush and floss their teeth every time they take the aligner in and out
- Explain to the patient that the minimum wearing time is between 18-20 hours per day
- Teach your patient how to clean the aligner
- Remind your patient to keep the trays safe in a box when they take it off
Discussion
Anterior crossbites are a major aesthetic and functional anomaly, which has to be corrected for proper occlusion. Anterior crossbites can be dental, skeletal or functional.
Clear aligners fabrication can be performed digitally (virtual teeth set-up) or manually (moving teeth on gypsum models) Physical model production doesn’t require a third party source. For this case, we created sequential models every two weeks. Another way is to pour multiple models at once. One model will be used as study casts while the others are working models used to manually move the crooked teeth. Going forward, those working models will be used as master models. From these master models, new impressions are made and models are prepared to serve as working casts to fabricate new clear aligners. There is no need for the patient to come every two weeks for new impressions. This technique is ideal for patients who travel or live far away from the dental office. All the models should be preserved until the end of the treatment. If a tray cannot be inserted with moderate pressure, it means that the tooth has been moved in excess. In this case, another model can be created by pushing back the tooth slightly in the master cast, then a working cast is prepared and another clear aligner is fabricated. Thus even if the tooth is moved in excess, and the tray is not fitting, it is possible to correct it at any stage. The clear aligners are readily available to change the treatment sequence throughout its course. Another benefit of serial aligners is that it enables the patient to receive necessary dental treatments during orthodontic therapy. The alignment treatment can also be restarted easily even when the patient has not yet worn the aligners for a period of time. Our patient was very pleased with the aesthetic end result. From an aesthetic point of view, one may argue that tooth #13 crown is short and ideally would need a gingivectomy or crown lengthening procedure. However the main goal is to achieve the patient’s expectations, stay minimally invasive and have a natural aesthetic end result.
Retention
When we finished the active stage of treatment, we reached the retention stage. This means we will have to have the arch form of aligned teeth retained by either a clear retainer worn for varying periods of time or a permanent bonded retainer which is fixed to the back of the teeth.19,20 This can be made using a technique where a multistrand stainless steel wire is pre- bent by a technician on the finished model. To assist in proper seating, the lab sets up a multistranded 0.15-0.18 stainless steel wires on a jig. (Fig. 44)
Fig. 44

The retention protocol depends on patient’s compliance. If the patient declines the fixed retainer option during the treatment plan discussion, we recommend wearing Essex retainers of 1 mm thickness for 6 months all the time then another 6 months at night only. Afterwards, the patient can reduce wearing the retainer to twice per week at night only with observation. If teeth movement is noticed, then a fixed wire is recommended to avoid relapse. At the last appointment of alignment, the patient can use the last 1 mm thickness aligner as a retainer. It is formed over the final plaster cast, without any dental movement. This appliance keeps the teeth in the final position and periodontal ligament traction in the zones in which the bony apposition is needed. The stability is achieved when the alveolar bone remodeling is finished.
Conclusion
Today there is a higher demand for more aesthetic Clear Aligner therapy. Clear aligner treatment solves numerous aesthetic concerns. Most adults prefer removable appliances to fixed metal braces. Clear Aligners offer the advantages of superior aesthetics and comfort compared to other fixed appliances. This treatment modality is flexible in the way you go about timing and delivery. We use alignment in our clinic as one stage in the progressive smile makeover concept. This minimally invasive concept provides a road map to dentists to put proper diagnosis based on digital smile analysis and facilities in choosing the most appropriate treatment route to improve aesthetics without compromising the teeth structure.
Oral Health welcomes this original article.
References
- KimTW, Park J. An Aesthetic Orthodontic Treatment Option. Fabrication and application. Dentistry Today 2008; 27:132-135.
- Bowman SJ. Clear collection instruments for clear aligner treatments. Orthodontic practice US. 2015;(3): 74-78.
- Lou T, Mair A. An Historical Overview of Clear Aligner Therapy the Evolution of Clear Aligners. Oral Health Group. 2020.
- Bichu YM, Alwafi A, Liu X, Andrews J, Ludwig B, Bichu AY, Zou B. Advances in orthodontic clear aligner materials. Bioactive Materials. 2023 Apr 1;22:384-403.
- CASTROFLORIO T, RAVERA S, GARINO F. 11 Interceptive Orthodontics with Aligners. Principles and Biomechanics of Aligner Treatment-E-Book. 2021 Sep 21:121.
- AldoG.MassimoR.Pre-Restorative Treatment with the Invisalign System. J.Clin.Orthod.2006 Nov; 40(11); 679-682
- Putrino, A.; Barbato, E.;Galluccio, G. Clear Aligners: Between Evolution and Efficiency—A Scoping Review. Int. J. Environ. Res. Public Health 2021, 18, 2870.
- Vijayaalakshmi LG, Sumathifelicita A. Clear aligners in orthodontics. International journal of management, IT & engineering. 2017 Jul;7(7).
- BoschkenD.Treating a complex class III case with segmented clear aligners, elastics, high frequency vibration and virtual visits. Orthotown magazine. July/August, 2022.
- Park J, Kim TW, Esthetic Orthodontic Correction of a Canine Crossbite.Orhto Journal.210; 21(1): 23-29
- Preston C.et al. Early Diagnosis and Treatment of Anterior Crossbite.Dental learning.com.2012; 1(6): 3-11
- AbrahamKK et al. Correction of anterior Crossbite using modified transparent aligners: An esthetic approach. Contemp. Clin Dent.2016 Jul-Sep; 7(3): 394-397.
- StaggersJA. Clear correct treatment of an anterior crossbite. Orthotown 2014;April
- Anbuselvan GJ, Tamilzharasi S, Karthi M. Essix Appliance Revisited. National journal of integrated research in medicine. 2012 Jan 1;3(1).
- Momtaz, Pouya, “The Effect of Attachment Placement and Location on Rotational Control of Conical Teeth Using Clear Aligner Therapy” (2016). UNLV Theses, Dissertations, Professional Papers, and Capstones. 2712.
- Hancher P. Orthodontics for estheticdentistry Part 1. J Cosmetic Dent 2005;Winter (20): 4.
- El-Mangoury N, Moussa M, Mostafa Y,Girgis A. In vivo remineralization after air-rotor stripping. J Clin Orthod 1991;25: 75−78.
- Radlanski R, Jager A, Zimmer B.Morphology of interdentally stripped enamel one year after treatment. J ClinOrtho 1991; 23: 748−750
- Littlewood SJ, Millett DT, Doubleday B, Bearn DR, Worthington HV. Retention procedures for stabilising tooth position after treatment with orthodontic braces. Cochrane Database of Systematic Reviews. 2016(1).
- Nanda RS, Nanda SK. Considerations of dentofacial growth in long-term retention and stability: is active retention needed?. American journal of orthodontics and dentofacial orthopedics: official publication of the American Association of Orthodontists, its constituent societies, and the American Board of Orthodontics. 1992 Apr;101(4):297-302.
About the Author:

Dr. Rami Chayah, Esthetic dentist, founder of the Progressive Smile Makeover Concept (PSMC) after 17 years of practicing and focusing on minimal invasive esthetic dentistry. International Speaker and published author. Currently provides courses about (PSMC) focusing on Digital Smile Analysis, Anterior esthetics, Clear Aligner and digital dental photography.


