
Aesthetic dentists today have the unique opportunity to dramatically improve the quality of our patients’ lives. By restoring form and function to the stomatognathic system, we are able to improve a patient’s masticatory function, their appearance, and ultimately their self esteem.
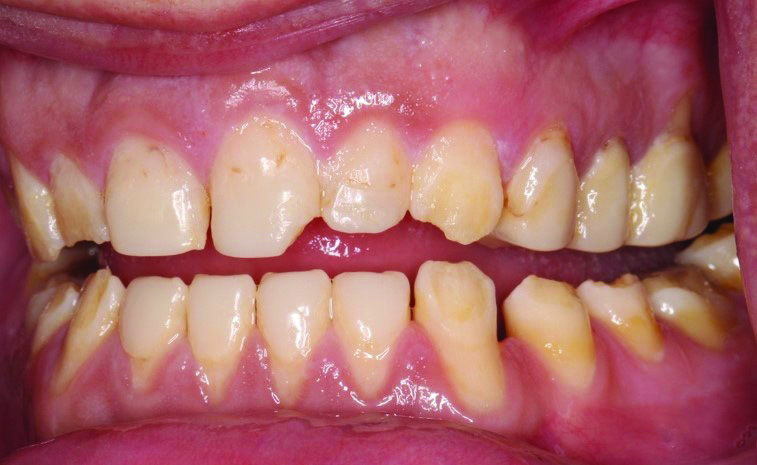
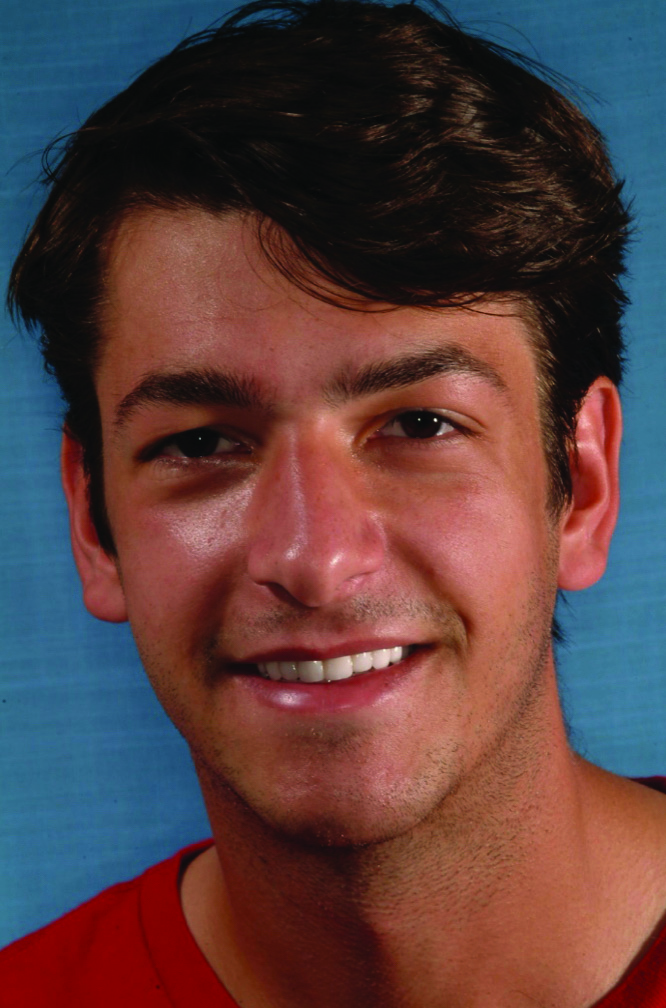
Various environmental and genetic factors can affect the airway, skeletal development, enamel formation, occlusion, orofacial myofunction, and impact the overall appearance of the face. This young gentleman presented with goals of wanting to improve the appearance of his smile and to be able to chew foods more efficiently. His genetically inherited Amelogenesis Imperfecta (AI) affected his enamel formation and development and although AI primarily affects enamel formation, a common sequela, as seen in his case, is a more constricted maxillary arch and skeletal open bite with anterior space resulting in occlusal instability (Figs. 1 to 5).1,2,3,4
Fig. 1
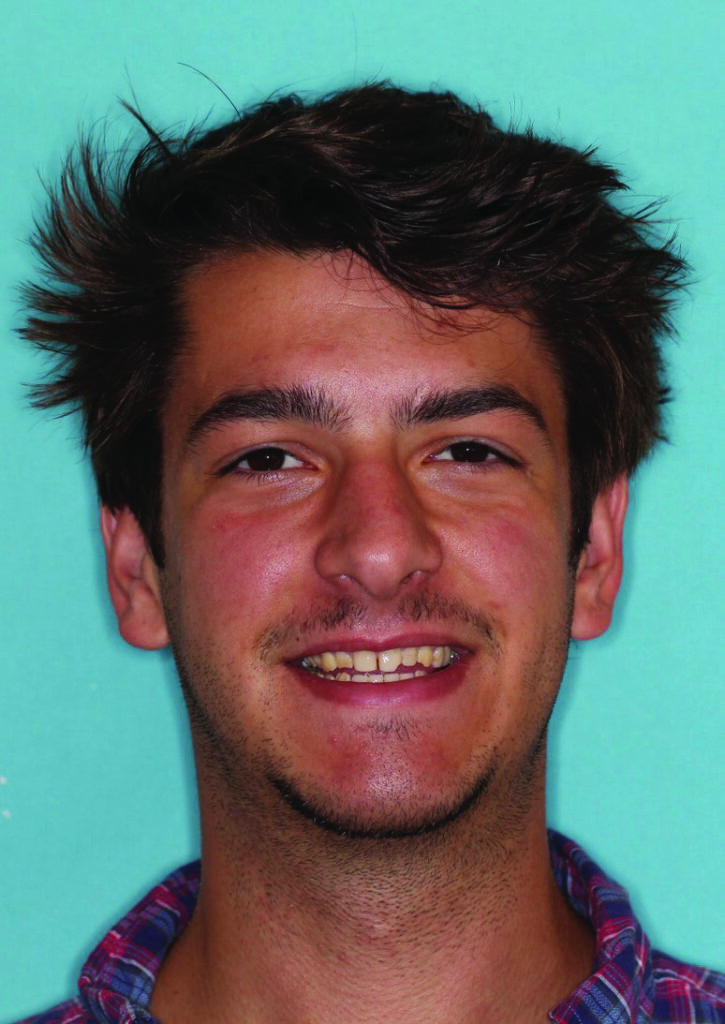
Fig. 2

CASE REPORT: DIAGNOSIS AND TREATMENT PLAN
When evaluating a case the identification of restorative goals require a thorough evaluation of the airway, the TMJs, occlusion, periodontal condition, myofunctional habits, and dental and facial aesthetics. The only tooth-against-tooth occlusal contacts present were between teeth Nos. 2, 3, and 31 (Figs. 3-5). This unique occlusal pattern where the tongue served as the majority of the occlusal contacts was an example of how form influences function. An open bite, a posterior bilateral crossbite, arch size disharmony, generalized microdontia, and diastemata all contributed to an adapted masticatory pattern. An aesthetic goal of closing the open bite while at the same time improving function required an understanding of how to accomplish harmony between the outward tongue pressure and inward pressure of the buccinator- orbicularis oris muscle bands. Creating a stable neutral zone, as defined by Dawson, requires positioning teeth in the horizontal dimension where the boundaries for the position of the teeth are within the neutral zone of opposing forces on the teeth between the inward forces of the perioral musculature and the outward tongue pressure forces.5 Disharmony of the occlusal pattern as well as tongue position required myofunctional therapy to retrain proper resting tongue position as well as tongue position for swallowing and speech.
Fig. 3
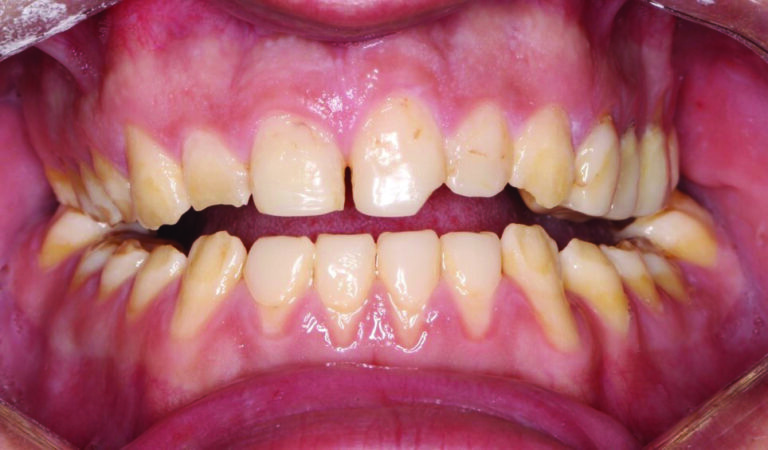
Fig. 4
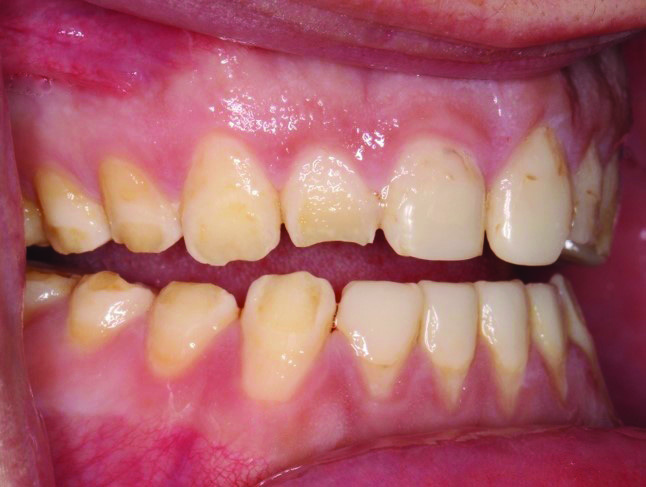
Fig. 5
During the diagnosis phase a complete TMJ exam was completed to assess joint health. A stable Piper Stage I diagnosis was confirmed for both joint structure and function.6 Long term functional and aesthetic success of this unique case required a conservative preparation design focused on occlusal stability. 22 full coverage IPS e.max Press crowns (Ivoclar Vivadent) (teeth Nos. 2 to 15, 18 to 21, and 28 to 31) and 6 IPS e.max Press veneers (Ivoclar Vivadent) (teeth Nos. 22 to 27) were treatment planned. Ivoclar Vivadent’s low translucency bleach shade 2 ingot (LTBL2) was selected due to the mimicry of the low translucency of this ingot to that of natural dentin, making these ingots optimal for creating life like brightness and chroma in the posterior and with the cut-back technique, ideal aesthetic appearance in the anterior.7
CLINICAL PROTOCOL
When determining where to begin with proceeding with a functional and aesthetic reconstruction, a proper occlusal plane must first be defined. A properly established plane of occlusion allows for ideal form and function with optimal tooth dimensions and embrasure form.8,9 The mandibular arch was treated first to obtain the desired proper Curves of Spee and Wilson and incisal edge position.
In order to establish occlusal harmony without altering the vertical dimension of occlusion, a centric relation bite registration was taken using Genie Bite (Sultan Healthcare) which recorded the anterior VDO (Fig. 6). When treating the open bite, the preoperative inter arch relationship and clearance is especially essential in treatment planning. This anterior centric relation bite registration served as reference to the original VDO to allow for a conservative 1.5mm occlusal and axial reduction of the right posterior molars. A translucent thermoplastic matrix of the diagnostic wax up was utilized as a reduction guide during the preparation process. Once the right posterior quadrant was prepared, a right posterior bite registration was obtained with the original anterior bite registration in place. Great care was taken to preserve as much natural tooth structure as possible with preparation design given the patient’s young age as well as the underdeveloped dentition. The left posterior quadrant was subsequently prepared with a left bite registration taken with the anterior and right posterior bite registrations in place. The inter arch vertical discrepancy improvement can be seen in Figure 7.
Fig. 6

Fig. 7

After preparation of the posterior teeth, a 0.5mm depth cut diamond #900-7136 (Henry Schein Inc.) was used to precisely ensure a minimal facial reduction for veneer preparations of teeth Nos. 22 to 27. The translucent thermoplastic matrix of the diagnostic wax up again served as a reduction guide. The axial wall depth of the initial reduction was identified with a permanent marker and the round ended diamond #112-5161 (Henry Schein Inc.) was used to accurately remove the enamel to a conservative 0.5mm total facial reduction (Fig. 8). Next, interproximal clearance was completed with a less than 0.75 mm incisal edge reduction.
Fig. 8
Anterior teeth with cleared contacts is an ideal preparation design for this case because we gain several advantages: our technician is provided with control over placing and correcting misaligned midlines, porcelain color modification can be made in this area to better resemble natural enamel, the lingual margin is placed in a free cleansing area improving gingival health and risk for recurrent decay, and it increases retention form.
After all external line angles were rounded and polished using a diamond #8878K-31 (Brasseler USA), the anterior bite registration was taken using Genie Bite (Sultan Healthcare) with both posterior bite registrations in place (Fig. 9). A face bow transfer was taken with the SAM Axioquick facebow (Great Lakes Orthodontics), and Genie rapid set light body VPS and Genie putty VPS (Sultan Healthcare) captured the final impression.
Fig. 9

A clear thermoplastic matrix fabricated from the wax up served as a reduction guide during preparation and also was used for provisionalization utilizing Luxatemp (DMG America) (Fig. 10). One drop of OptiBond FL (Kerr Corp.) adhesive was placed in the intaglio surface of each tooth’s provisional before fully seating and then light curing. This technique allows for cement- free preps when the provisionals are removed because the adhesive bonds to the provisional material not the prepared tooth structure. Ochre characterization from Kerr Corp.’s Kolor + Plus kit was added to the gingival 1/3 of the provisionals (Fig. 11). Final mandibular restoration shade and characterization was selected and confirmed with patient and lab technician interaction.
Fig. 10
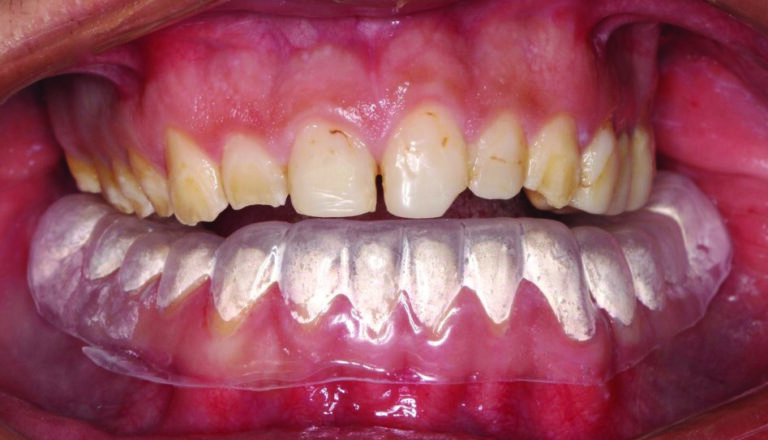
Fig. 11

A total acid etch technique was used to bond the final restorations in place. The preparations were etched with Etch-Rite 38% phosphoric acid gel (Pulpdent) for 20 seconds, washed thoroughly and dried, followed by placing several coats of Dentin Desensitizer (Pulpdent). Next, several coats of OptiBond FL (Kerr Corp.) primer followed by one coat of adhesive was placed. These coats were slightly air dispersed then light cured for 20 seconds. The restorations were cleaned with Ivoclean (Ivoclar Vivadent) for 20 seconds, rinsed, air dried, then one drop of Silane Primer (Kerr Corp.) was applied and air dispersed. Final cementation was with Calibra Esthetic Resin Cement (Dentsply Caulk).
Proper finishing of restorations is essential for success. To begin the finishing process three burs were used. A red-striped 30 grit diamond (Brasseler USA) was first used around all margins, followed by a yellow-striped 15 grit diamond (Brasseler USA), and then a white-striped 30 bladed finishing bur (Brasseler USA). Shofu polishing points were then utilized beginning with the no stripe point, then the yellow-striped, and lastly the white-striped polishing point (Shofu Dental Corp.) The interproximal finishing began first by using a Ceri-Saw (DenMat) to ensure excess cement in the interproximal areas was cleared out, then a red-striped Gateway Flexi diamond strip (Brasseler USA) was used to smooth each interproximal surface. The last and most significant interproximal polishing step was achieved with a series of Epitec Strips (GC America). After the blue, green, gray, and then tan strips were used, flossing between the teeth was extremely smooth, the polishing sequence was complete, and an environment for ideal gingival health at the margins was accomplished.
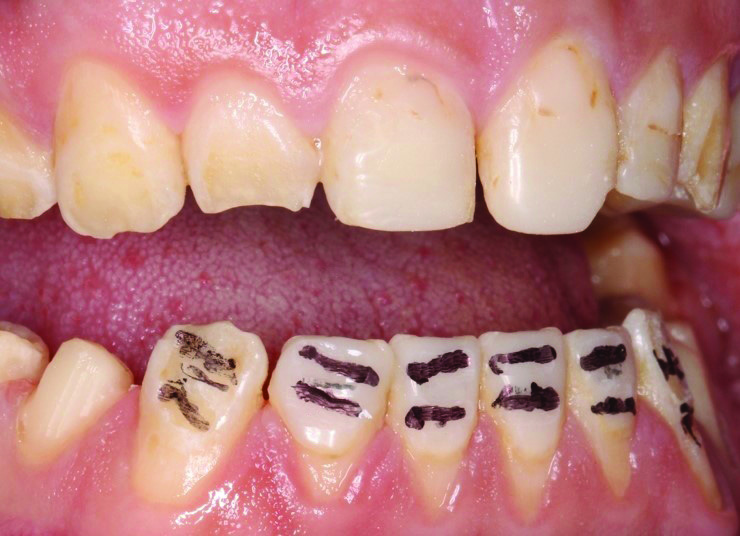
The Schuyler/DeLar bite registration technique, Mizzy Master Wax (DeLar) and bite registration wax (Great Lakes Orthodontics), was used to take an accurate CR bite registration, with the final mandibular restorations in place. Minimal occlusal adjustments to the maxillary arch were completed prior to taking the CR bite registration. Instead of starting the preparation sequence of the maxillary arch similar to the mandibular arch, the anterior maxillary teeth Nos. 6 to 11 were prepared first using a 0.5mm depth cut diamond #900-7136 (Henry Schein Inc.) to achieve minimal facial reduction. A round ended diamond #112-5161 (Henry Schein Inc.) was then used to remove enamel to the precise 0.5mm depth cuts. A minimal 0.75mm incisal reduction was achieved for all ceramic IPS e.max Press lithium disilicate crowns (Ivoclar Vivadent). The identical technique of obtaining three separate bite registrations with Genie Bite (Sultan Healthcare) that was performed with the mandibular arch was followed for the prepared maxillary arch to assess occlusal clearance. Genie rapid set light body VPS and Genie putty VPS (Sultan Health Care) was used for the final impression and temporization was completed with Luxatemp (DMG America) using the translucent thermoplastic matrix.
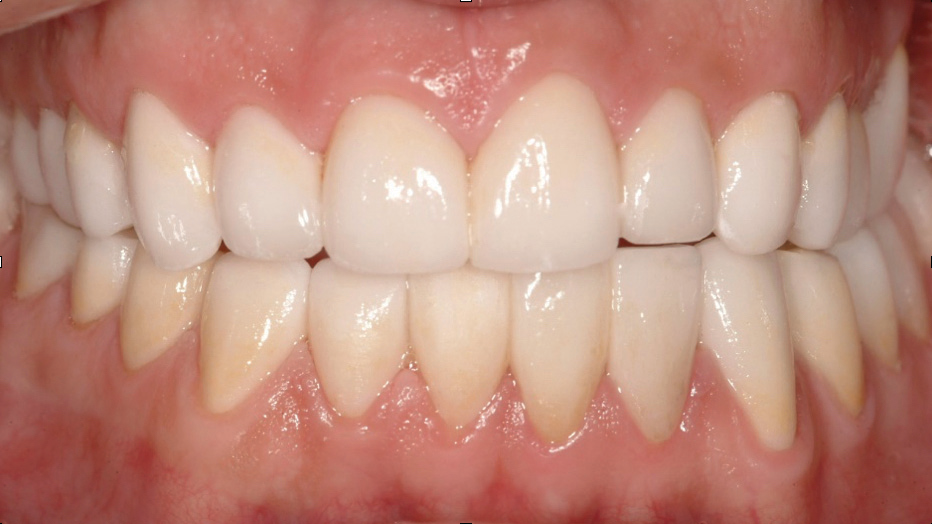
Due to the significant open bite the inter arch occlusal discrepancy was split between both arches. To create as natural and aesthetically pleasing smile as possible the mandibular final restorations were given more hue to create a toned down appearance (Figs. 12-14). This lab characterization technique helped to visually conceal the length of the mandibular restorations, thereby accentuating the maxillary restorations, and in effect, creating a fuller more youthful smile. The finishing sequence of the maxillary restoration was identical to the sequence followed with the mandibular arch. To ensure occlusal stability, equilibration was completed with stable stops in centric relation, canine guidance in harmony with border movements of the envelope of function, disclussion of posterior teeth in protrusion and on the nonworking side, and non interference on all posterior teeth on the working-side with canine guidance (Figs. 12-16).5
Fig. 12
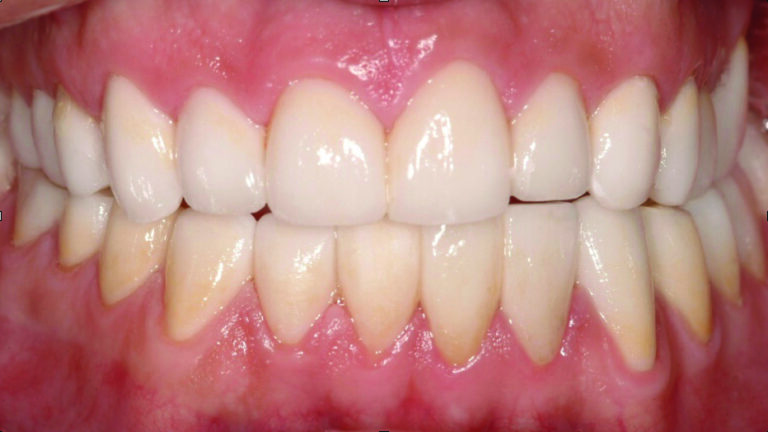
Fig. 13

Fig. 14
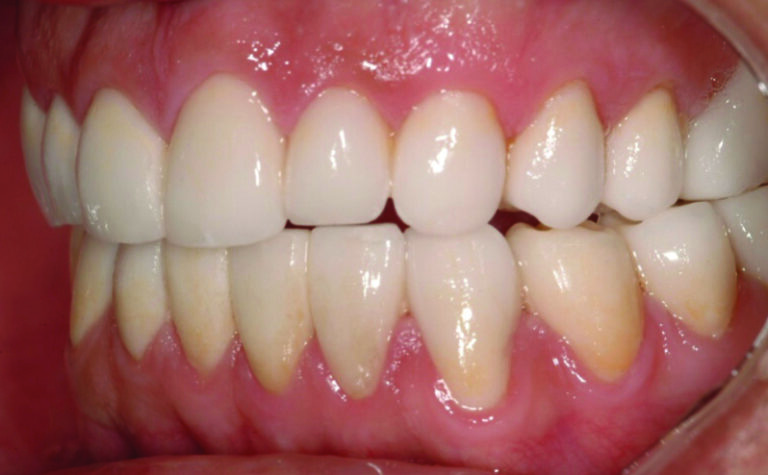
Fig. 15

Fig. 16
CLOSING COMMENTS
Improving aesthetics in cases where there are numerous functional problems can be rewarding for both the patient and aesthetic dentist. A thorough evaluation and identifying all aesthetic and functional challenges as well as their etiology is necessary in order for long term case success. In this gentleman’s case genetic enamel malformation, arch size discrepancy, tongue position, and myofunctional disorder caused the numerous functional and aesthetic problems of occlusal plane irregularity, absence of a balanced occlusion, compromised tooth appearance and form and embrasure asymmetry. Myofunctional therapy is an important component to consider in helping ensure long term success in treating open bite cases where the tongue position has either caused the open bite or has been an accommodated functional habit due to inter arch irregularity or maxillary arch constriction.
It is important to note that while treatment goals aim to completely eliminate deficits, often complete deficit elimination may compromise the functional stability of the case and provide minimal case enhancement.9 A more balanced gingival zenith architecture of the maxillary arch could have been accomplished by crown lengthening teeth Nos. 7 and 8, however due to the patient’s low lip line, there was no significant benefit to the patient by performing this additional procedure. This gentleman’s new attractive smile restored function and aesthetics and ultimately quality of life (Figs. 15 & 16). 
Oral Health welcomes this original article.
Disclosure: Tyler Wynne, DDS has no financial interest in any of the companies mentioned in this article and received no compensation for writing this article.
Acknowledgement: Laboratory fabrication by John Wilson of Wilson Dental Art, Raleigh, NC.
About the Author:

Dr. Tyler Wynne received his doctor of dental surgery degree (2014) from the University of North Carolina School of Dentistry where he is also an adjunct member of the faculty. He practices general dentistry in Clemmons, North Carolina, is an editorial board member of REALITY Ratings and Reviews and is a scholar of the Dawson Academy. Dr. Wynne is a fellow of the International Academy for Dental-Facial Esthetics, the Academy of General Dentistry, and is a member of the American Society for Dental Aesthetics.


